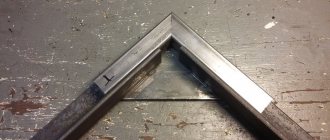
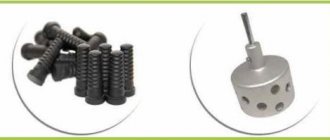
DIY quick-release clamp
Sometimes when working with wood, clamps are required, with which you can fix or hold a part to a work table or place within just a few seconds.
In order to make a quick clamp, you will need wooden boards or plywood 16-18 mm thick. Initially, the tracing paper of the parts is transferred to wood and cut out using a jigsaw. In the driven parts, you will need to make cuts to fit the mating part.
At the marked points of the axes you need to make holes with a diameter of 20 mm.
Hinge axles are cut out of a round blank, ground and pressed into the holes. The result is a clamp design that is somewhat reminiscent of scissors. The drive uses a standard lead screw with a diameter of 6 mm.
Clamp for holding and securing small parts
In a similar way, you can make a clamp for fixing particularly small parts. You will first need to mark and cut out two halves of a device similar to tweezers or a medical clamp from OSB or plywood.
The crescent-shaped blanks are connected to each other using a wooden axis, so a hole of the appropriate diameter must be made in each of the parts of the clamp. For the clamp body, you can use ash or spruce; the axis must be made of a harder material - oak or beech.
Clamp made from rebar and wood
Using a reinforcing rod 50-60 cm long and 8 mm in diameter, you can make a very strong and at the same time lightweight frame for universal use.
The structure is based on a wooden support block made from hardwood. Block dimensions 150x50x30mm. Dimensions may vary depending on the thickness and bending radius of the reinforcing bar. A hook from a piece of reinforcement can be bent with a heavy hammer on a steel pipe. The bend must be done so that the bent reinforcement is flat.
Next, a 7.5 mm through hole is drilled in the block, and the finished reinforcing hook is hammered in; a hole must be made along the line for the lead screw and the clamp must be assembled.
F-shape
To make the work easier, you will need to prepare a few simple clamps. You need to prepare in advance small pieces of any profile, a nut with a screw and mounting bolts. Angle clamps for welding are manufactured in 2 stages.
Base
You will need three pieces of profile pipe. You can use any profile that is at hand, but it is better to take one with different shelf sizes. For example, a 25/60 pipe can serve as an excellent base blank.
Parts are cut to lengths of 300, 200, 100 mm. Distribute the smaller piece in the middle of the long one and grab them. The result was a base 180 mm wide.
From the larger edge, the corners are marked and cut at 450. A section of the profile about 150 mm long is welded in the middle of the long part of the base. A nut with a clamping screw will be attached to this part.
Cut a corner or profile along the length of the bevel on the base and grab the pieces to the end of the base. These parts of the structure serve as guides for the workpiece and as stops for fixation.
Boil all the joints and clean them well with a grinder and a cleaning stone . The base of the corner clamp for welding is ready, you can proceed to the final part of the assembly.
Clamp
All that remains is to make the clamp. To do this, at the end of a straight piece extending from the base, a nut with a screw is welded at a sufficient distance. To prevent damage to the thread during welding, the screw must be well lubricated with grease or other thick lubricant.
Now they cut off two parts 100 mm each, cut the ends at 450, join and weld the part. This will be the pressing bar. It can be made from a corner or profile. You can bend it in a semicircle. In any case, it is important that it reliably fixes parts of the structure.
At a short distance from the inner corner of the clamp, a steel plate 4-5 mm thick is welded. Then a hole is burned to allow the end of the screw to pass through.
Clean the joints with a grinder. The end of the screw is inserted into the hole in the plate, and a retainer is welded to its edge. A handle for rotation is welded to the other end.
Terms of use
There are several different rules regarding the use of the device. Among the features we note the following:
Care must be taken to ensure that the surface is completely adjacent to the working part of the tool. When clamping, pay attention to the force applied. Too high an indicator causes damage to the surface layer. Do not forget that the corner clamp itself must also be securely fastened when machining the workpiece.
Otherwise, the processing becomes significantly more complicated.
The simplicity of the mechanism means that it is quite easy to use. You don't need to have any special skills.
Angle Clamps for Metal Workpieces
The use of a clamping device is also possible if it is necessary to ensure reliable fixation of metal elements. Also, for fastening metal parts, corner clamps are used, made using metal. This is due to the fact that metal workpieces must be fastened more securely, since serious stress occurs during processing.
It is worth considering that a metal corner clamp is made in the same way as a wooden one.
In this case, sheet metal is used as a base, the thickness of which is 8-10 mm. To significantly increase the fastening, individual elements are welded.
Varieties
The purpose of this publication is not to build something like an encyclopedia of mounting clamps - there are many types of them, and there are even more patents for new, “super-super” ones. Our task is to show which clamps are most needed in a home workshop, and how best to make a clamp without wasting a lot of material and time.
The most common types of clamps in handicraft production are shown in Fig:
- G-shaped (G-cramp; G-clamp) is the most reliable, reliable and cheapest of the general-purpose clamps. Disadvantages: it takes a long time to tighten and can turn the parts being glued if the stop hinge is of poor quality or not maintained. The latter is quite important: an adhesive layer that has not set is a good lubricant, but it is undesirable to separate and recompress the surfaces being glued together, as the strength of the dried joint decreases sharply. In addition, a regular G-clamp does not hold round parts well, so a special pipe clamp is used to secure pipes or a round profile for welding or butt soldering (see next figure). Assembled from ordinary structural steel s=(2.5-4) mm, such a welded clamp provides reliable fixation of pipes up to d(120-150)x(1.5-4) mm.
- F-shaped (F-cramp). Quick-clamping, operates on the principle of jamming the sliding stop in the dead center position. Pressure until it is firmly secured is most often provided by a screw clamp, as in a G-shaped clamp. An even “softer” and faster clamping, but less reliable, is provided by a trigger-eccentric clamping mechanism, see below. The most versatile and widespread of the clamps. The main disadvantage is that due to vibrations and shocks during operation, it can self-unclip and release. Or, on the contrary, it jams tightly, and when wedged with a hammer blow (see below), either the clamp or the part “shoots out”. It is not suitable for adaptation to butt welding of pipes: the jaws are driven by indirect heating and the pipe joint moves apart.
- C-shaped (C-clamp, fixing tongs). A fairly narrowly specialized tool. The main purpose is to compress the parts to be glued. Simple C-clamps are made with a spring clamp. The trigger-lever clamp allows you to precisely set the clamping force.
- Angle clamps for welding linear parts (pipes, profiles) at a given angle. There is no completely established special Anglo-American term. The most commonly used are welding clamp and dead-lock clamp.
- Joiner's bench - a carpentry clamp for joining panels from boards, slats and beams, assembling units from shaped parts (for example, railings with balusters). On the trail. rice. a rail clamp is shown; There are also rack and pipe ones, see below. Please note that pipe clamps are sold under the name “pipe clamp”, and clamps for end-to-end welding/soldering of round timber should be searched for under the query “welded clamp”.
- E-shaped (E-clamp). A highly specialized tool for edging carpentry with glue. If you need to carefully glue an edge on existing valuable furniture/interior design, it is difficult to do without an E-clamp.
- O-shaped or tape, or crimp grip (loop stay, loop brace). Band clamps are most often used by virtuoso carpenters and furniture makers-restorers. If you can fetch up to $1000 or more for a well-restored antique Viennese chair, then for a slightly skewed or wobbly chair they will fetch, at best, 15-20 of the same ones. Making a frame for a large painting or photograph without a tape clamp is also not so easy.
- Lever-plunger (precision clamp). When the trigger is pressed, the plunger (pusher) with the clamping stop moves smoothly forward. The trigger is released - the plunger is fixed by a spring-loaded slide, which becomes in the dead center position. Pressing again releases the slide and further advances the plunger. A good lever-plunger clamp can securely clamp a chicken egg without damaging its shell. In a home workshop, such precision clamping is unlikely to be needed, but suddenly a good precision clamp can be obtained from a mounting gun for tubes with silicone, etc. viscous compounds. A fixed jaw can be easily installed into the opening (window) for the neck of the tube, and a movable one is mounted on the rod instead of the standard pusher. If necessary, both can be removed and the tool can be used for its intended purpose.
Devices for secondary protection during argon arc welding
Factory-produced welding clamps are quite expensive, so it makes sense to make a corner clamp with your own hands. Such a task cannot be called difficult, since for assembly you can use metal elements that have been stored in a garage or shed for years, which would be a pity to throw away. Due to the simplicity of the design, the use of complex tools is not required to make an angle clamp.
Regardless of the design, the main purpose of the devices is to rigidly clamp workpieces for their subsequent welding or surfacing. Corner clamps made of plywood allow you to connect both metal parts and wood blanks.
To make your own clamp you will need the following materials:
- a pair of hardwood blocks 25 mm thick;
- a sheet of plywood with a thickness of at least 12 mm;
- fastening elements: studs, self-tapping screws;
- hacksaw or jigsaw;
- drill.
A square with sides measuring 250 or 300 mm is cut out of a plywood sheet, to which bars are attached at right angles.
The angle should be set as accurately as possible, since the correct fastening of the workpieces relative to each other will depend on it in the future.
First, the bars should be glued, wait until the glue sets, and countersink with a drill. Self-tapping screws or other fasteners are screwed into the resulting holes. From the center of the pads it is necessary to draw perpendicular lines along which the screw studs will move.
At a distance of 20 mm from the corners, thrust bars are fixed, leaving a small gap between them. Its size should slightly exceed the maximum width of the workpieces to be fixed. It is more convenient to screw in the studs immediately, before attaching the thrust pads.
It is also necessary to prepare movable bars that connect to the pin. When screwed in, its part will move towards the corner block.
When making a corner clamp from a massive material, such as chipboard, a thicker material should be selected for the bars.
First of all, you need to make a drawing or sketch of the corner clamp and decide on the main dimensions.
To make the base you will need sheet material 8–10 mm thick. For fastening, you can use a corner of the appropriate size. It is convenient to connect the elements using electric welding.
- For a screw clamping mechanism, two nuts are welded together. The bracket with a threaded hole in the central part is made with a height of 30–40 mm. For fastening, it is recommended to use a bolted connection, which can be easily replaced if the thread breaks.
- The mutual placement of the pressing jaws requires special attention. It is necessary to ideally set the right angle, since when performing welding work it will be impossible to achieve acceptable quality. First, one corner is welded to the clamp, and another is placed on it. The resulting structure is tightly compressed and welded to the bracket.
- Guides are attached to the side planes of the clamp to ensure movement of the base. A groove measuring 8–10 mm is cut along the bisector line of the clamping device.
- A bolt is screwed into the upper base of the clamp. Its thread should not reach the head, which will ensure free movement of the bases relative to each other.
Do you use a clamp at home or at work? Did you make it yourself or buy it ready-made at a hardware store? What difficulties and features of welding did you encounter when using the device? Please share your experience in the comments.
To obtain a high-quality seam, product parts must be correctly positioned in space relative to each other. To perform this action, special devices of various types are used for assembly and welding.
The first ones are used for installing and securing parts of a structure using tacks, welding pliers, welding clamps, and other simple mechanical devices.
Welding fixtures are used to connect pre-assembled products fixed in a certain position. These also include mass clamping. The third option allows you to combine the two operations listed above.
It is worth noting that the assembly mechanisms must allow free movement of parts of the structure. They will heat up during operation and their size may change.
If the parts are placed close to each other without the possibility of movement, then deformations may occur due to thermal effects.
READ MORE: Landscape design of a plot of 6 acres 79 photos layout of a country courtyard designs of beautiful garden plots
When working with large parts with low rigidity, tools should provide the ability to connect only the edges of the parts, and not the entire structure.
When planning welding work, it is necessary to provide in advance the possibility of access to the joints. If parts are located at right angles, corner clamps should be used. If possible, you can spot weld parts of the structure.
Then it is enough to throw the ground terminals of the welding machine over the product and you can start working. Sometimes you can use a lot of the details themselves. Under their own weight, they can be quite reliably positioned in the required configuration.
However, this option is not always applicable, so it is always better to have welding pliers on hand.
Magnetic clamps are classified as installation and fastening mechanisms. This means that they allow you to correctly position the parts and secure them. This operation is carried out using strong magnetic elements.
What advantages does this welding device provide? Let's figure it out.
The main advantages include:
- the ability to quickly connect parts;
- installation of parts at different angles using a magnetic angle for welding;
- significant reduction in time for preparatory work;
- small dimensions;
- the presence of a magnetic field activator in some models;
- possibility of quick and easy cleaning of magnets.
The main disadvantage of such devices is the limitation of their use depending on the material. Non-magnetic metals, wood, etc. do not allow the use of magnets.
On the other hand, magnetic welding fixtures allow you to fasten parts at any angle to each other, and they are more versatile than, for example, clamps.
In addition, on the Internet you can find a large number of reviews devoted to the manufacture of homemade devices for welding work. For example, you can make your own magnetic square for welding with your own hands or a magnetic mass for welding.
If you find everything you need and study the drawing in detail, you can make a good tool at home. A do-it-yourself metal clamp is a unit that is reliable. In this regard, it will be significantly inferior to a wooden unit. For manufacturing, you will need not only material, but also welding equipment, as well as some tools used in plumbing.
Many craftsmen prefer to make a clamp from a channel, reinforcement, from a corner or from a hairpin. All these metal elements are perfect for this.
Made of metal
It is best to use a metal pipe. The result is a tubular structure. You can make a different type of tool.
Additionally, you will need three metal rings. Their internal diameter must coincide with the external diameter of the pipe. It is allowed to use a metal rod instead of a pipe in the design. A welding machine is used to create the tool.
The work algorithm is as follows.
- The support platforms are welded to two rings. They are made from a metal corner. It's better if it's steel.
- A nut is placed on the remaining ring, and it is welded to the end of a rod or pipe, depending on what is being used.
- A handle is installed on the head of the pancake bolt being used, and the bolt is screwed into the ring.
- A hole is made in the free end where the fixing pins will be installed.
If you have reinforcement on hand, you can use it to assemble the clamp. The process looks like this:
- at the first stage, the reinforcement will need to be cut;
- then the sliding part is made, a nut is installed, which is attached to the lever;
- at the third stage, prepare the screw and stand that will rotate;
- you will need to cut a thread in the rod, then make a shoulder;
- at the last stage they make a handle and a panel for the jaw.
Made of wood
You can also make your own clamp from wood. This tool is most convenient for working with wooden workpieces. This can be plywood, fiberboard or chipboard sheets, timber or boards, but they must be of small thickness. When making wooden tools using this technology, you should adhere to the following sequence.
- First, a template is created on cardboard for future wooden blanks.
- Templates are transferred to wood in accordance with the selected scale.
- It is better not to use boards made from pine. The wood must be hard, then the unit will last a long time.
- Each part of the future clamp is cut out using a jigsaw.
- To ensure a clear shape, the edges are corrected with a file.
- The surface must be sanded.
- A hole for the bolt is first marked in the jaws, and then drilled. For an axial bolt, its length must be at least 1.5 times the diameter of the bolt.
- In the part that will play the role of a handle, a hole for the nut is also drilled.
- The nut is installed with glue. It can be epoxy or cyanoacrylic.
- Now you can assemble the tool. The axial bolt is fixed with adhesive. The rear hinge is installed with screws.
- The upper jaw is installed, then a washer is placed and the handle is placed.
A quick-release clamp can also be made from wood. The only drawback of this technology is that it takes more time, but it saves time when the work is completed. The process looks like this.
- First, the layout of the future parts is transferred to lumber, then the elements of the future clamp are cut out of the boards.
- A jigsaw is used to make slots for the axle plate. They are necessary in the movable sponge.
- The next step is to use a chisel. A groove is made for the cam lever.
- Holes are drilled to install the pins.
- The outer and inner surfaces must be treated first with a file to remove rough protrusions, and then with sandpaper.
- The axial plate is cut out of metal. It will also need to be properly sanded, and then drill holes where the pins need to be installed.
- At the last stage, the tool is assembled.
From the jack
DIY process
There are several options for making these devices yourself.
Corner for furniture assembly
Those who had to assemble furniture themselves often quarreled during assembly due to the inconvenience of connecting large parts to each other. It is especially difficult to do this if there is no assistant. Such an assistant can be a simple furniture vice, or rather, several simple clamping devices and a durable rectangular table or carpentry workbench, the manufacture of which can be learned from this article.
Grooves are installed on the table to secure parts of the assembled furniture, and carpentry clamps serve as clamps. There are many different options for how to make such devices.
Carpenter's clamp
The simplest screw clamp is made according to the principle of a caliper. To do this you will need several blocks of durable wood and a small sheet of plywood. To fix such a device in a certain position, a screw device with a locking bar is used on the rail of this simple tool.
Self-clamping clamps are often used to press the workpiece to the table. Their operating principle is very simple. On a workbench, such a device is fixed using a screw pin, and the clamping is done with a special lever with a rounded end at the clamping end.
Such tools are very convenient to use for processing a large number of parts of the same shape. For example, when milling or grinding, as well as when drilling and sawing.
https://youtube.com/watch?v=ayx-NSjjB8M
For welding work
Today, a welding machine in the garage is no longer a rarity, and sometimes even a necessity. For welding work, clamping parts at a certain angle is sometimes necessary, like air. Purchased tools often fail due to the dishonesty of their manufacturers, so it is better to make an angle clamp for welding yourself.
Having found a tedious drawing or made it yourself, we prepare the necessary material and tools. After this, we proceed to production according to a simple scheme:
Making the base. We weld steel plates and a corner of the same thickness according to the drawings of the selected option. The main task is to carefully measure the 90-degree angle to secure the parts to be welded. The angle may be different if you are making a tool for a specific purpose. Manufacturing of a clamping device. To do this, you can use large diameter nuts. We secure them with a bolt so that they can be changed if the threads break. You can find screw devices from broken vices or workbenches
Again, it is important to ensure that the clamping jaws are at a right angle or the angle for which our device is designed. Product assembly and fastening. When the base and clamp are ready, they are connected depending on the design of the product: by welding or using bolts and nuts
Here you can consider the option of attaching the device to a fixed surface. To do this, you can drill several holes in the base for such fastening.
Making any option requires a lot of effort and effort. All this will pay off handsomely when the next welding or connection of two slats at right angles goes quickly and smoothly. After all, you will have a reliable assistant who is always nearby and ready to properly serve the one who made it with his own hands.
Useful tips and tricks for making
Before starting work, you need to prepare and clear the space. It is advisable to carry out all operations on a workbench; if there is none, on any clean and flat surface. To control the position of the parts, you can use a construction square.
On metal clamps, it is imperative to remove protruding areas of welding seams. They can be ground with a grinder using a metal grinding disc. For the manufacture of these devices, it is recommended to use stainless steel. If you used a regular one, you will have to paint it.
The composition covers all metal elements, with the exception of moving parts - nuts and lead screw.
It is advisable to provide a special place in the garage or workshop for storing clamps. A tool box or shelf is suitable for this.
How to make it yourself
Ready-made tools are sometimes not suitable for certain jobs, so craftsmen make them with their own hands. First you need to prepare pieces of chipboard or plywood with a smooth surface.
You can make the device in the shape of a triangle or rectangle so that there is one right angle:
- on both sides of the corner, stepping back three or five centimeters from the top, it is necessary to attach the bars using self-tapping screws;
- I place the prepared pieces on a flat surface and press them tightly using ordinary clamps;
- To free access to the joint, it is better to cut off the protruding top of the corner.
The next step is to make the clamp clamp. You need to prepare the following parts: three nuts, a long pin or bolt, a handle, a bracket:
- for the base, a triangular shape will be optimal;
- the pin protrudes beyond the edges of the base in a state of full compression, without detail;
- draw a bisector from the corner;
- the nut and bolt are secured with a bracket at a distance of ten, twenty millimeters from the intersection of the bisector with the hypotenuse;
- a metal bracket is made by bending it to the shape of a nut;
- holes are drilled at the edges of the hypotenuse;
- the bolt is guided by the head at the top of the right angle;
- a handle is attached to the opposite side of the bolt.
When working with sheets for furniture, you need to prepare:
- plywood with a thickness of 8 to 12 mm, chipboard is possible;
- drill;
- jigsaw and hacksaw;
- rectangular or square wooden block.
We cut out several triangles with right angles, the legs of which are equal in length and should be 25-40 cm. Depending on the size of the device of simple clamps, holes are made in the corners of the triangle. The distance should be 10-15 cm from the legs to the holes. Make two holes on the hypotenuse and screw the sheets. The device is ready.
It is better to make more than one tool in order to assemble the entire structure. Making them is not difficult; financially it is more profitable than buying ready-made ones, since this is not a universal tool. It is not suitable for all furniture assembly jobs. A do-it-yourself device can be made for any job.
A hacksaw for metal before modification and clamps obtained from it after modification
Assembly diagram
Plywood device
One-time fixation, which does not require high rigidity, is successfully performed using sheets of plywood.
For work you will need pieces of plywood 1.5x10x10 cm, which are cut with a jigsaw. Squares are marked by dividing the blanks diagonally into two parts. Holes are marked at a distance of 20 cm from the edge with a distance between them of at least 8 cm, otherwise the clamps will begin to interfere with each other. Holes Ø40 mm are drilled in the marked places. Three corners are filed to remove excess glue under the clamps.
Design and types of carpentry clamps
Now, let's talk about the design and types of clamps, depending on which your purchase may depend. The structure of this tool is elementary - as a rule, it consists of 2 parts. This is the main frame, and the moving part is the element with the clamp. Moving this clamp allows the carpenter to change the distance between the two jaws of the clamp and set the value he needs. Also, in the moving part of the clamp there is a clamping device. It can be a screw or a lever that is used to fix the very moving part. In addition, using this part you can adjust the compression ratio.
Now, about the varieties of the part we are considering
Before you buy clamps for carpentry, you need to pay attention to the type and design of this tool. So, depending on the design, there are “G” and “F”-shaped clamps, automatic clamps and clamps
The difference between "G" and "F" lies in the design itself. Thus, a “G”-shaped clamp has the shape of the English letter “G”, in which one part - the base of the tool - forms the shape of the letter “C”, along which a movable mechanism is installed, forming a “G”-shape. These clamps for carpentry are very convenient when working with wood, when fixing metal surfaces and other parts. The peculiarity of such a clamp is due to the fact that with its help you can fix the part more firmly than using other types of carpentry clamps. Moreover, it can also be used in locksmith work.
Attention!
When buying carpentry clamps, be careful, because the fixed part is usually made of cast iron, which sometimes may not be of the best quality, may be fragile, and so on.
“F”-shaped clamps have a slightly different shape and design. It is based on the “sliding” principle. Thus, this clamp has a stationary part with an elongated plate along which the clamping mechanism moves. This type of clamp is very convenient because it has a larger clamping step, as well as a larger clamping mouth.
The remaining types of clamps are very similar in design and identical in their purpose. They have an automatic locking drive, or a special clamping mechanism that allows you to fix the moving part with one hand.
To buy a carpenter's clamp, in general, you do not need a lot of knowledge or buying secrets. It is enough just to carefully inspect the tool, make sure that their pressing surfaces are in close contact with each other, and also that these surfaces have a smooth and even structure. Rotary screws, threads and handles must be of high quality and free from any defects - chips or cracks.
In order to avoid dents that may remain on the workpieces after work, it is necessary to use special plastic or rubber gaskets
Therefore, when purchasing, make sure that they are included in the kit. The main thing is that the gaskets are made of a material that is softer than the part being clamped
And, of course, when purchasing, pay attention to the working stroke of the clamps, which can range from 20 to 250 mm. It is selected depending on how and where you will use the additional tool.
Clamps are an indispensable tool for every carpenter. It is difficult to imagine a master who is able to do his work without these devices. There are quite a few types of clamps and clamps, and manufacturers never cease to look for new solutions to make their tools even more convenient, functional and adapted to specific carpentry tasks.
In our material, we will talk in detail about the main types of wood clamps: we will tell you what different models of clamps consist of and how they work, consider the advantages and disadvantages of each of them, and give useful tips on how to choose a clamp for specific carpentry tasks.
Design nuances
Clamps are produced not only for right angles, but also multi-profile, allowing welding at angles from 30 to 90 degrees. The corner welding clamp has characteristic differences:
- The clamp jaws are thicker when compared with other analogues, so the welding seam does not warp the entire structure due to temperature differences.
- Pressure screws are made of copper or brass, since splashes of molten metal do not settle on the threads and cannot damage the mechanism.
- A convenient position to securely connect the parts - the optimal option allows you to weld the product clamped in the clamp on three sides.
- To rigidly fasten any parts to the product, nuts with pre-screwed screws are welded, which allows you to fix structures of different dimensions.
Making a clamp with your own hands
You can create with your own hands:
- the required strength of the device;
- equipment for fixing metal parts;
- clamps of all sizes and varieties.
If the work ahead is simple, then the tool can be made from simple and cheap materials.
Corner clamp made of plywood
To make a tool you need:
- Prepare pieces of plywood 1.5 cm thick and 10x10 cm in size.
- Divide the squares into two parts diagonally.
- Mark holes at a distance of 2 cm from the edge and drill with a diameter of 40 mm.
- Cut the side along the holes so that excess glue under the fasteners can be conveniently removed.
The plywood tool is ready. You can’t count on its long-term use, but it is made from the simplest materials at hand.
Making and assembling a wooden corner clamp with your own hands
you should choose the right material
From the selected material you will need to prepare:
- two plates 15 cm wide, 20 cm long and 2 cm thick;
- two bars 2 cm wide and 25 cm long;
- metal bolts;
- self-tapping screws with a diameter of 5 mm (2 x 20 cm long and 2 x 12 cm).
After everything is prepared, you can begin assembling the device with your own hands:
- Place two long slats on the table. In this case, one should be laid edge down, and the second – up.
- Drill holes in the slats for connection using a drill. They must match for both parts.
- Attach one plate to the lower bar and fasten the second parallel to it. For this purpose, a self-tapping screw passing through the elements is used, which will regulate the degree of clamping of the part between them.
- Drill holes at the ends of the slats and attach solders or plates to them. The angle between the elements should be 90 degrees.
The manufacture and installation of the corner wooden clamp is completed, now you can check its operation.
DIY corner metal clamp
has good fixation rigidity
Using a metal clamp you can:
- fix structural elements at different angles;
- perform preliminary installation of products;
- align structural parts relative to each other.
In addition, metal corner clamps are widely used during welding work. Such instruments are divided into two types:
- Two-coordinate.
- Three-coordinate.
Using the device, you can fix two elements of a metal structure, and then secure them by welding. Even the simplest type of such equipment will make welding work more comfortable, ensure high quality seams, facilitate various manipulations with structural parts and significantly save time.
Making a corner clamp from metal with your own hands is quite simple. To do this you will need to prepare:
- steel sheet 10 mm thick;
- nuts – 3 pcs;
- steel sheet with external thread to fit the nuts;
- large diameter washers.
Manufacturing technology:
- Cut two blanks from the sheet, 50 cm long and 4 cm wide.
- Weld an auxiliary part to the main part of the part in the shape of the letter “L”.
- Weld the support element flat onto the short edge.
- Weld three nuts together, placing them with their edge towards the moving part. In this case, the screwed rod must run parallel to the base of the device.
- Weld all parts along the outer edge, inserting a strip of tool between them.
- When attaching the movable bar to the structure, weld along the inner edge.
- Weld large washers to the edge of the metal rod.
Work on the manufacture of corner metal clamps has been completed. When carrying out carpentry, plumbing or welding work, it can be used to securely fix the structure. Such a tool can replace one assistant and speed up the work time. And its moving elements will allow you to connect the parts at the required inclination and angle.
Having studied the types and options for creating corner clamps, making and assembling the tool with your own hands will not be difficult. In this case, the type of structure should be selected depending on the required fixation strength. Such a device will be useful both in the home and in professional activities.
Types of clamps
There are several types of clamps that can provide reliable fixation of workpieces. All of them are divided into three main categories:
- Simple ones are designed to fix the product relative to the working part of the workbench.
- Angular ones are characterized by a design that allows you to fix two parts relative to each other in the required position.
- Volumetric ones are characterized by a more complex design that allows the fixation of three workpieces relative to each other in the required position.
The first type is characterized by a C-shape, which has a special bracket with a threaded clamp. The workpiece can be very different - plastic, wood, metal and many other materials. The second type is extremely common, as it is required to perform large, similar jobs.
Factory devices are very expensive, but are characterized by higher performance characteristics. The corner version is made on the basis of a simple design. The main characteristics, as well as strength, largely depend on the type of material used.
general characteristics
A clamp comes in handy when you need to secure parts to give time for glue to dry or to perform welding. When assembling furniture, the device will help you assemble elements without displacement and drill holes for fasteners in the right place. The homemade tool weighs a little, but it handles the fixation perfectly. It is easier to move from place to place than a regular construction vice. The corner clamp for welding is made of metal.
There are two stops on the clamp of the homemade device. There must be a block clamp with good mobility, so it can be used for workpieces of different sizes. For high rigidity of fixation, a screw and a lever mechanism must be present. For the carpentry option, the use of a runner and a strip is allowed. But with any design, the stop parts must be movable.
Benefits of the tool
Due to the high cost of factory-made products, it is profitable to make a clamp yourself, but savings are not the only advantage of the tool. Clamp calibration tailored to specific jobs will help secure parts better. If the clamp is made for a one-time job, cheap materials are used in production.
Preparatory stage of work
Anyone who has ever done something with their own hands understands perfectly well that you can’t do without good drawings. This is where the Internet comes to the rescue. We type in the search engine “drawings of an angle clamp for do-it-yourself welding.” If you are a carpenter and are looking for data for your profession, then the request is: “drawings of carpentry clamps with your own hands.” Having received many options, we select the one we need and print it on the printer.
Now you need to prepare the tools and materials for making the device. At this stage, it is important to ensure that you do not forget anything. After all, sometimes one forgotten small screw can force you to go to the store again, and this can cost more than one lost hour of precious time. When everything is ready, we proceed directly to work on a homemade clamp.
DIY corner clamps
The use of specialized clamps today remains the only possible way to assemble any rectangular or square structures made of wood and metal with a perfectly aligned right angle.
For example, a system of ready-made triangles that cover the planes of the joining sides and firmly hold them in the desired position until the fasteners are installed or welding is completed.
Universal clamp for any angle
A right angle, as a rule, does not pose a particular problem when working with clamps; it is much more difficult to make an angle of any size. To solve such problems, you need to make an adaptation to the clamp, as in the photo.
The additional device is based on a regular pine block with a right angle sector cut out in the center. The second piece is a regular right-angled triangle, which can be made from spruce or pine slats.
A through hole with a diameter of 5-6 mm is drilled at the top of the sector corner. It is the hole that allows the triangle to swing and change the angle of inclination of the clamp by 3-7o.
Angle steel clamp for assembly
It is much easier to connect two parts at right angles if you secure them in a corner clamp. In the simplest case, the device consists of two guides made from a cut profile pipe or a steel angle.
The guides must be set using a square at an angle of 90° and connected with additional sheet metal overlays.
To ensure that the workpieces do not fall out of the device during operation, two G-shaped clamps are additionally installed on each of the guides.
Plywood clamps
When assembling furniture, chipboard sheets are often used, which are considered a very common material. They can be fixed relative to each other at right angles. To carry out such work, you need a tool that can be assembled independently. A plywood clamp is created using the following materials:
- The base is made using plywood or chipboard, the thickness is about 8-12 mm.
- The emphasis is created by using rectangular or square timber from various types of wood.
- You will also need a hacksaw for the job.
- A drill with various bits is also required.
After finding all the required materials and tools, you can begin directly assembling the mechanism. The sequence of actions is as follows:
- From plywood, two triangles with legs are created, the length of which is 30-40 cm. In this case, it is important to maintain an angle of 90 degrees between the sides of the triangle, since otherwise the resulting product will be characterized by low accuracy.
- A hole is drilled in each corner of the created blanks. Their size is selected in accordance with what clamps will be used.
Having created the product in question, you can begin to use your homemade design. Due to the use of a metal fixing element, high reliability of fastening is ensured, since even a slight displacement of the workpiece can lead to serious defects.
Operating principle
The principle of operation of the clamp is very simple. It is necessary to separate the jaws so that they are separated from each other at a distance of 3 cm greater than the width of the shield that will be installed. Next you need to fix them on the pipe. To do this, tighten the nuts that are located at the edges. The blanks must be placed on the tubes and sealed with glue. Then they need to be pulled together by rotating the “lamb”.
If you know how to use a grinder and a welding machine, you can make the same clamp for gluing wood from metal.
To maintain the plane of the plot with tubes, it is recommended to arrange the clamps in a checkerboard pattern. The main advantage of such a tool is its ease of manufacture and operation.