A cultivator is a type of gardening equipment that replaces manual labor when cultivating the land: it loosens the soil and forms beds. With its help, you can very quickly weed and apply fertilizers. This device is a mechanized hoe with an electric drive.
Such a unit is not suitable for large areas and development of virgin soil. But in small areas, especially where planted trees and shrubs interfere with the use of larger equipment, a homemade electric cultivator is simply irreplaceable.
We make our own homemade electric motor unit
Owners of personal plots can greatly benefit from an electric walk-behind tractor that you can make yourself.
This device greatly facilitates light agricultural work involving loosening the soil. Such equipment is especially useful during the season of planting and harvesting vegetables.
According to some indicators, electric walk-behind tractors are inferior to their gasoline counterparts. However, such homemade devices have a number of advantages. In practice, walk-behind tractors equipped with an electric motor have less weight, are less noisy in operation, do not produce toxic emissions and are cheaper to use.
For people who are unfamiliar with this type of technology, mastering an electric walk-behind tractor will be much easier than understanding the complexity of the design of traditional gasoline units.
Classification and principle of operation
The design and operating principle of the unit are not very complicated.
That is why many summer residents decide to make an electric cultivator with their own hands.
Drawings of the device prove that it is quite possible. The main design elements are:
The frame houses the electric motor and gearbox. The working parts - opener and cutters - are installed on the output shaft of the last element. The steering wheel with handle is attached to the frame using a mating element. The frame also has a wheelbase. The depth of the dig can be adjusted using a bolted opener or a handle. The average productivity of industrial units is about 3 acres per hour.
A similar indicator can be achieved with a homemade device.
Nowadays you can find a large number of cultivator models on sale, differing in technical characteristics. Most often, these units are classified according to the following parameters:
- Weight - lightweight models weigh no more than 10 kg.
- Power - the range is quite large and ranges from 1 to 12 hp. With.
- Number of attachments - when choosing, a summer resident should decide on the possible range of work, since the required number of attachments depends on this factor.
How to make an electric walk-behind tractor with your own hands
Electric walk-behind tractors can be used both in greenhouses and on land plots that have a limited area. This limitation is caused by the need to access the power grid.
Some models have rechargeable batteries, which will allow you to use such devices on rough terrain. When operating an electric walk-behind tractor, it is necessary to prevent overheating of the engine by periodically allowing it to cool. To extend the working life, such devices are also not recommended for use on heavy, unplowed soils.
As an example, we can consider the electric walk-behind tractor “Electrokrot”, which was made with our own hands on the basis of a gasoline module. The model equipped with an electric motor has significant advantages over its gasoline counterparts. Namely:
— ease of use;
— ease of maintenance;
— economical operation, given the lack of costs for purchasing fuel;
— no harmful emissions;
— availability of spare parts;
- low cost, considering DIY assembly.
As an additional advantage, we can highlight the automatic shutdown of the electric motor in case of overheating. This function can significantly extend the operating life of electrical equipment. Thanks to the handle adjustable to the operator’s height, the ergonomics of the walk-behind tractor increases.
Types of cultivators
This equipment is available in different models:
- disk
- paws
- rotary
- milling
Almost all cultivators work on the same principle: the mechanical part is started, which sets the device in motion, loosening the soil.
Diagram of a manual cultivator (click on the photo to enlarge)
Its classification depends on the purpose of the equipment: differences in size, engine power, operation, scope of work. Considering these criteria, they are:
- light
- moderate severity
- heavy.
For relatively small areas with soft soil, light equipment is suitable, usually flower beds and greenhouses. Medium-weight equipment is designed for clay soil. Heavy equipment is universal, it is suitable for any type of soil.
Cultivators differ in the way they function:
- hand cultivators;
- with electric drive;
- on gasoline.
We will focus on manual cultivators, which you can make yourself to save money.
A number of advantages of manual designs:
- They are economical and do not require refueling.
- Several devices are replaced: a shovel, a hoe, a rake.
- They take up little space.
- Help distribute the load across all muscles.
Our next article tells us what is better to use in the country: a walk-behind tractor or a cultivator.
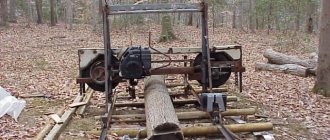
Homemade electric walk-behind tractor
To make an electric walk-behind tractor with your own hands, you will need some materials that are available to owners of personal plots. The manufacturing process of such a device can be divided into several technical operations:
1.
The supporting frame is one of the main elements of the equipment. To make it you will need a channel and a corner. The width of the frame must correspond to the dimensions of the engine and gearbox. You can use pieces of pipe of the required size as handles. The pipes should be welded to both sides of the metal frame. After this, you need to screw a bronze insert to the pipes with screws, which will serve as an axis.
2.
For the sliding effect, you can use ball bearings that are selected with the appropriate diameter. To fix the handles to the pipe, you need to weld special brackets. In order to secure the cultivator and the plow holder, you need to weld the bracket in the middle part of the pipe. Using screws, you need to install a platform on the frame body in special slots in the side ribs. To mount the electric motor, special holes should be made in the platform.
3.
By means of a belt, the pulley on the bronze axis is connected to the same element on the electric motor. Using a chain, the movement is transmitted to a sprocket located slightly lower. For these purposes, you can use a regular bicycle chain.
4.
The movement of the walk-behind tractor will be carried out due to the working device, which directly cultivates the soil. Curved knives need to be secured to a square plate, and they will be held in place thanks to a key located on the lower axis. When the shaft rotates, the soil will be loosened and the entire module will move. Reduction is created through the relationship of pulleys and sprockets.
5.
The movement is controlled by a switch that must be placed on the handle of the holder. You can connect the motor to the network using a wire wound on a reel.
In general, making a homemade electric walk-behind tractor does not require special technical qualifications. When manufacturing it, basic ergonomics and safety rules for the owner of such agricultural equipment should be observed.
Electric cultivator LopLosh
This model is an alternative to bulky devices. The name consists of two parts - a shovel and a horse. It features a special design with horizontal cutters. Suitable for processing any soil without spending a lot of time and resources.
Making LopLosh with your own hands is not at all difficult. To do this, you need a strong frame, a support stand, insulated control handles to prevent electric shocks, an electric motor, and a gearbox to transmit rotation to the knife shafts.
Left and right knives with cutting parts in the direction of rotation are installed on the shafts. On the gearbox there are side walls with nuts. You can install one or more knives, as well as a hiller, depending on the work being performed.
The peculiarity of this device is that the handles are positioned in the direction of movement. You can move at maximum speed without putting much stress on the engine and without overheating.
DIY electric walk-behind tractor
Materials and tools used by the author:
List of materials:
— drive axle from an auto-rickshaw (or similar); — BLDC motor 60V/1000W; — rechargeable battery (60V); — wheels for walk-behind tractor; — speed controller for the motor; — electronic throttle grip or switch; - bicycle handlebars; — square and round pipes; - Sheet steel; — steel plates, corner; - bolts, nuts, washers, etc.
Homemade manufacturing process:
Step one. Assembling the frame
First of all, the author assembled a rectangular frame from rectangular pipes. The frame is made in such a way that it turns out to be a kind of box, a housing in which the motor, speed controller, and also the battery will be located.
Next, the author installed the finished frame on an axle with wheels, welding the necessary brackets. That's all, half of the walk-behind tractor is already assembled!
Step two. Steering wheel
We weld a piece of round pipe to the frame, and weld a handlebar from a bicycle or motorcycle to the end of the pipe. That's all, if the angles are chosen correctly, the steering wheel will be quite comfortable. Of course, if there are several users of the homemade product, it would be nice to provide height adjustment.
After installing the steering wheel, the author took his friend (brother, comrade, colleague, classmate, underline as appropriate) for a ride in the homemade product.
The coupling device is made of thick steel plates; it should be possible to adjust the height. It wouldn’t hurt to have a setting that will allow you to adjust the angle of attack of the harrows.
Step four. Sheathing
We are sheathing the box; here you will need thin sheet steel; galvanized steel is perfect, which you can get at any hardware store. In the front part, the author decided to install a grille, air will enter through it, this is necessary to cool the engine and controller.
Step five. Painting, assembly and testing
The homemade product is almost ready, we weld the necessary fasteners and you can assemble the walk-behind tractor. Everything looks quite original, you can try it out. The walk-behind tractor starts off quite quickly, and the machine easily drags the harrows.
Of course, if you make a good reduction gearbox, the motor power may be enough for more serious tasks. It would also be good to consider the possibility of locking the drive axle.
Typical device
Figure 1. Walk-behind tractor frame. The design of the walk-behind tractor from various manufacturers has practically no fundamental differences. Most consist of a power unit, a system for transmitting rotating torque to a wheel pair, brackets for installing working tools, and control elements. Main differences:
- engine power and design;
- type of drive;
- wheel pair device;
- differences in suspension design.
The power and type of engine will depend on the available power unit. This could be the engine of a scooter, scooter, motorcycle, or gasoline saw. With sufficient experience and the ability to connect to the network, an electric unit can be manufactured.
This model is much easier to operate and does not require fuel or oil. The electric walk-behind tractor must be equipped with a cable of the required length to process the main area of the site. A power of 1 kW equals 1.36 liters. s., therefore, to ensure the functionality of the homemade product, you should use an engine with a power of at least 1.8-2 kW.
The drive type can have several options. A prerequisite for transmitting torque to the wheels is the presence of a clutch device that makes it possible to stop the unit with the engine running.
Figure 2. Motor dimensions and mounting points.
Most power units have a fairly high engine speed. The speed of the block should be low. To do this, a gearbox with a reduction ratio must be installed between the shaft and the wheelset. The gearbox circuit must ensure the transmission of the required force and maintain the optimal speed for operation.
The wheelset can be made independently from metal. You can use wheels from a car, scooter, or other mechanism, equipping them with chains with brackets for better traction with the ground.
The walk-behind tractor must contain a suspension for attaching various working tools. Dimensions and design will depend on available fixtures. An option with rigid fastening of one tool is possible, but such use is irrational. The best option is to design a multifunctional block circuit.
Making a homemade electric walk-behind tractor, video tutorial, photos.
Such an assistant is very useful on the farm, and if you make an electric walk-behind tractor with your own hands, then it is doubly pleasant to work with it; it helps to carry out light work on cultivating and loosening the soil on a personal plot. Compared to gasoline models, they are not as versatile and powerful, but they have their own advantages.
They weigh less, make less noise, are more economical to use, environmentally friendly and much cheaper than gasoline models. For a person who is completely unfamiliar with technology, the operation and maintenance of electric motor units will not raise any questions.
Manufacturing recommendations
Before starting work, you must carefully study the drawings of the electric cultivator (it is impossible to assemble it yourself without them) and select the necessary materials.
To reduce manufacturing costs, you can use an electric motor from any household appliance, such as a washing machine. You shouldn’t buy wheels, because they can be taken from a broken-down country car. It should be said that today the LopLosh cultivator has become quite popular. The peculiarity of its design is the vertical arrangement of the cutters. However, some summer residents prefer to create simpler units. It doesn’t matter whether the cultivator is made from an angle grinder or from a washing machine. The sequence of actions and design will not undergo significant changes.
How to make an electric walk-behind tractor with your own hands
Electric motor units are used in enclosed spaces or areas with limited area. Possibility of access to the electrical network is the only condition for their use. If the model is battery-powered, then the lack of an electrical outlet will not be a problem. When using an electric walk-behind tractor, try not to overheat the engine, let it cool down.
It is also not recommended to use it on unplowed and heavy soils, due to which you will achieve an extended service life. Electric walk-behind tractors are equipped with additional functions that greatly facilitate the operator’s work.
For example, the service life will be extended by the automatic shutdown function when the engine overheats. The adjustable handle allows it to be adjusted to suit the operator.
Let's look at the design of the electric motoblock "Electrokrot", made with our own hands from its gasoline predecessor. First, let's look at the advantages of the resulting electric walk-behind tractor - simpler and easier to repair and operate, no need for gasoline. This model is also assembled by hand, using common parts and materials that are easy to find.
Homemade electric walk-behind tractor
To make an electric walk-behind tractor with your own hands, we start working with the frame using two pieces of channel No. 10 and a 32x32 corner.
We prepare two pieces of pipe by installing a bronze insert with a hole. The axle will pass through these holes. We weld the pipes on both sides of the frame. Next, an insert is secured through the walls of the pipe with screws. It can also serve as a sliding bearing.
Although ball bearings matched to the diameter of the pipe are better suited for this. To attach the handles to the top tube, brackets are welded. And the bracket for attaching the cultivator or plow holder is welded in the middle of the pipe.
Using screws on the frame, a platform is installed in the slots of the side ribs. The electric motor will be mounted on the holes that are available at the site.
The electric motor pulley is connected by a belt drive to a pulley on an axis, which is installed in the frame tube. An asterisk is superimposed on the other side of the axis. Using a chain transmission, it supplies movement to the sprocket, which is located below. A motorcycle or bicycle chain is used for chain transmission.
The movement of a homemade electric walk-behind tractor occurs thanks to a device for cultivating the soil. The curved knives are mounted on a square plate and are held in place by a key on the bottom axis. When they rotate, they loosen the earth and move forward due to bending.
Chain drive and belt drive make it possible to reduce the engine speed. Using the ratio of sprockets and pulleys, 200 or 1000 rpm can be achieved.
To control the movement, handles are attached to the bracket, on one of which there is a switch button. To connect the engine to the electrical network, a coil with a wound wire is placed on the axis between the handles. To form and cultivate a bed, you need to attach a holder to the frame on which soil-cultivating tools will be installed.
The only drawback of a homemade electric walk-behind tractor is that it is connected to a wire and, accordingly, to a power source. After all, he will not be able to move more than 50 meters from the network. Although this is quite enough for cultivating a personal plot.
Simple cultivator "Tornado"
One of the simplest and cheapest cultivators to manufacture is the Tornado. It received this name due to the shape of the working part of the spiral-shaped sharp pins twisted in a spiral.
This design is designed to remove weeds along with the roots . To do this, four twisted pins are welded to the crosspiece at its ends perpendicular to the plane, and a pipe holder is welded to the middle at a right angle to the plane.
The length of the pipe is selected based on the ease of use of the tool and directly depends on the height of the person. A lever with equal arms relative to the center line of the pipe is attached to the end of the pipe to rotate the tool. The result should be something similar to a corkscrew, but much larger in size.
To make the working part of the cultivator - the teeth, you need to take a steel rod with a diameter of 10 mm and bend it half a turn on a bending machine with a distance equal to half the length.
Therefore, the rods must be selected up to 35 cm. After this, they must be bent in a certain way so that their maximum coincidence is achieved. The uniformity of the tool’s penetration into the ground and the quality of loosening depend on how accurately they are bent. Then they are welded to a cross made of a metal plate with a thickness of 4 mm and flat dimensions sufficient to secure the holding pipe.
The diameter of the pipe must be at least 20 cm to ensure the reliability of the structure. A handle-lever made of a pipe of the same diameter is attached to the upper part. aluminum pipes in order to significantly reduce the weight of the structure. The length of the lever must correspond to the width of the shoulders of the person who will carry out the processing with this tool. After this, you should sharpen the ends of the pins.
Typically, such a cultivator is made in the form of a hand tool , but it can be modified to create a more universal device that runs on electricity. To do this, the lever is made removable, and the pipe is telescopic with several height-mounted bolts. Then an adapter for the cartridge holder of an electric drill is made from a rod and pipe.
The main task is to maintain alignment relative to the axis so that there is no beating during operation, as well as the strength of fastening of all parts. After this, you need to choose a powerful drill with speed control and reverse, as well as a chuck for conventional drills. As a result, the cultivator will work like a regular drill attachment in the presence of electricity or manually when working in the field.
Do-it-yourself electric motor block. Benefits and Features
Every farmer or gardener who has a personal plot is faced with spring and autumn field work. It is in the spring that the active preparation of the land for planting begins, and in the fall - the cleaning of the land and preparation for wintering. In this case, an electric walk-behind tractor will be indispensable. A car for a summer residence, which is adapted for various agricultural work. Without high-quality soil cultivation, a good harvest is impossible.
Gearbox and wheelset
Figure 6. Cultivator subframe. The device must necessarily contain a reduction gearbox. The most widely used design is the chain system, which is reliable and simple. The main purpose is to reduce the speed of movement of the unit and increase the power of torque on the wheels. Figure 6. Cultivator subframe. The device must necessarily contain a reduction gearbox. The most widely used design is the chain system, which is reliable and simple. The main purpose is to reduce the speed of movement of the unit and increase the power of torque on the wheels.
The gearbox drawing is shown in Fig. 4. The device consists of 2 stages. The first is designed to transmit speed from the engine output shaft to the intermediate shaft. It uses 2 sprockets with 57 and 17 teeth. The smaller sprocket is installed on the output shaft of the power unit, the larger one on the input shaft of the gearbox.
The next stage transfers from the intermediate shaft to the wheelset. To manufacture this stage, reinforced sprockets with 11 and 25 teeth, respectively, were used. The second stage is located in a closed crankcase, which protects the parts from soil and dust.
The shaft outlets are sealed with oil seals. The crankcase is filled with oil to a level approximately up to the middle of the driven sprocket. When the unit operates, the chain, bearings, and second-stage sprockets are automatically lubricated.
For reinforcement, a spacer is welded between the crankcase and the main frame. To adjust the chain tension, the upper bearings are installed in eccentric housings. All bearing housings are attached to the crankcase walls with M8 bolts.
You can assemble a walk-behind tractor with ready-made wheels from some mechanism or make it yourself. This design uses wheels with additional attachments from the SMZ motorized stroller. The design of the nozzles is shown in Fig. 5. From the prepared parts you need to assemble two halves, connected on one side by a hinge. The second ends are connected with a lock when installed on the bus.
If you have the device, it’s quite easy to turn the unit into a motor cultivator. To install knives, you need to make a T-shaped bracket from a square or rectangular pipe. Appearance and dimensions are shown in Fig. 6.
Advantages of an electric walk-behind tractor over a gasoline one
An electric walk-behind tractor is much more profitable than its gasoline counterpart for several reasons :
- compactness and ease of handling;
- low cost of equipment;
- ecologically pure;
- Ideal for women and the elderly.
Modern electric walk-behind tractors are designed for cultivating small plots of land. They work excellently in narrow beds when it is necessary to loosen the soil between trees, shrubs and various crops. They work well around houses and fences. A manual machine easily replaces manual labor, providing the opportunity to enjoy working on a personal plot.
Popular models
Before ordering a manual cultivator for your garden, read and compare the characteristics of common models. Also take into account their pros and cons. Popular hand cultivators:
| Price in rubles | Characteristics | pros | Minuses |
| 1889 | Type – star-shaped; length – 37.7 cm, weight – 0.865 kg, working width – 14 cm, material – steel, handle/handle attachment – combisystem. | Convenient, effective, lightweight, easy to use. | No handle/handle included, more expensive than alternative options. |
| Price in rubles | Characteristics | pros | Minuses |
| 1299 | Type – root remover, weight – 2000 g, dimensions (in package) – 68x20x20 cm, loosens soil to a depth of 20 cm. | You can loosen the soil of almost any density, remove small and large weeds, and can adjust the length of the boom. | Difficult to work on hard, trampled ground (requires a lot of effort), difficulties may arise during assembly. |
| Price in rubles | Characteristics | pros | Minuses |
| 2479 | Includes 2 telescopic handles with adjustable length, handle height - 100-150 cm, tooth length - 28 cm, material - high-carbon spring steel, folded dimensions - 58x100x10 cm, weight (packaged) - 6960 g. | Crushes the soil to a depth of 25-28 cm, does not turn the soil over, high processing speed. | Not suitable for digging up virgin soil, larger and more expensive than analogues. |
| Price in rubles | Characteristics | pros | Minuses |
| 774 | Type - disk, purpose - cultivation, loosening, main mechanism - star-shaped disks, material - steel, tool width - 14 cm, packaged dimensions - 13.5x34x15.5 cm, packaged weight - 690 g. | Reasonably priced, relatively lightweight, easy to use, copes well with cutting through soil. | The handle will have to be purchased separately; the knives are held in the fork by plastic plugs. |
| Price in rubles | Characteristics | pros | Minuses |
| 929 | Type - rotary with handle and weeding knife, length - 147 cm, purpose - digging and leveling the soil for sowing, coating of the metal part - powder enamel, handle - wooden, packaged dimensions - 169x21x12 cm, packaged weight - 1860 g. | Reasonable cost, availability of cuttings, loosens sandy soil well, cuts weeds. | The small width of the working part and the length of the handle may not be optimal for all family members. |
How to make an electric walk-behind tractor with your own hands?
You can easily make a reliable electric walk-behind tractor for plowing the land yourself. This is not an expensive pleasure and does not require special financial investments. Electric walk-behind tractors are quite easy to assemble, and all the necessary parts can be purchased freely. DIY construction consists of several steps :
- At the first stage, the frame is made. To do this you will need a channel and a corner. It is important to consider that the size of the frame and motor are the same. For the role of handles, it is best to weld two pipes along the edges of the frame, after which the handles are secured with a metal insert, which serves as an axis;
- For excellent fixation, attach the bracket in the middle of the pipe. A small platform for installing the electric motor is mounted on the frame;
- the wheel that transmits movement to the belt is connected to a similar wheel on the electric motor. The chain then transmits the movement below to the installed sprocket. A bicycle chain will do the job perfectly;
- An electric walk-behind tractor for plowing the land requires the presence of attachments on the machine. There are a huge number of variations; curved metal knives that can go deep into the ground and loosen it with ease may work well;
- To make the work easier, it is recommended to install a special reel on which the excess wire will be wound. Control is best done using a switch. Do-it-yourself electric walk-behind tractor is ready.
Device with a motor from an electric saw
In this electric cultivator, the function of the power unit is performed by an electric chain saw of the Parma brand. It is attached using clamps to the cultivator frame. If necessary, the saw can be quickly dismantled and used for its intended purpose.
The frame is welded from steel pipes Ø24 mm. Working cutters are made from a Ø30 mm pipe, and steel teeth are welded to them - 6 pieces at an angle of 30 degrees to each other. The rotation of the cutters is transmitted by a two-stage chain transmission. In the first stage, the drive sprocket is used from the saw, and the driven one is installed from the bicycle. The second stage consists of a motor sprocket and chain.
The cutter shaft is made of a round metal profile and is mounted in the frame fork using rolling bearings. The cutters and sprockets are secured with dowels. This device requires protective covers to be installed on the drive chains.
Features of the electric walk-behind tractor. Owner reviews
A manual electric walk-behind tractor has a number of its own features. We can definitely say that this unit is intended for a specific soil. According to the owners' reviews, you can see that the machine plows exceptionally loose and light soil perfectly. In addition, the walk-behind tractor can be equipped with a fairly large set of mounted implements, which can greatly facilitate work on the ground.
An electric walk-behind tractor for a summer cottage can not only plow the soil, but also help in fertilizing it. It can perfectly enrich the soil with oxygen and improve its structure, which will “reward” it with a bountiful harvest.
Design and principle of operation of an electric cultivator
An electric cultivator is a device consisting of an electric motor and a gearbox, which are placed on a frame. The working bodies (cutters and opener) are attached to the output shaft of the gearbox. The steering wheel with handle is connected to the frame through an interface element. A transport wheel is mounted on the frame. In some models, you can move the steering wheel and lock it in a given position.
Operating principle of an electric cultivator
Through a worm gearbox , the electric motor transmits rotational torque to the working parts (cutters).
Thanks to the sharp blades of the cutters, high-quality soil cultivation is possible. The plowing depth can be adjusted with a coulter clamped with bolts or by moving the handle of the device up and down. The width of tillage can reach half a meter, and the maximum plowing depth is 25 cm.
The average productivity of electric cultivators is approximately 3 acres per hour, but the value of this characteristic is largely influenced by the nature of the soil (sandstones are easier to cultivate than loam). The rotation speed of the knives is 50 rpm. Power consumption of devices is up to 2 kW.
Using a steering wheel connected through an interface element to the frame, a person controls the electric cultivator. Thanks to the wheel, the unit can be transported. Some models provide the ability to adjust the position of the steering wheel (in accordance with the physical characteristics of the user or due to the peculiarities of the technological process, when a person must be on the side of the device and not walk on plowed soil).
Making a homemade electric motor block
Such an assistant is very useful on the farm, and if you make an electric walk-behind tractor with your own hands, then it is doubly pleasant to work with it; it helps to carry out light work on cultivating and loosening the soil on a personal plot. Compared to gasoline models, they are not as versatile and powerful, but they have their own advantages.
They weigh less, make less noise, are more economical to use, environmentally friendly and much cheaper than gasoline models. For a person who is completely unfamiliar with technology, the operation and maintenance of electric motor units will not raise any questions.
What determines the choice of unit for soil cultivation?
The choice of cultivator is influenced by the set of crops that grow on the site, the structure of the cultivated soil, and the productivity and energy intensity of the equipment. For example, if the plot is divided into small zones (flower garden, vegetable garden, berry garden, lawn, garden), then the most suitable option would be to purchase a light-class cultivator. If the plot is of impressive size, then middle-class equipment is suitable.
The cultivator, in terms of its operational characteristics, must correspond to the purposes for which it will be used. Professional equipment in a small area will only cause harm.
How to make an electric walk-behind tractor with your own hands
Electric motor units are used in enclosed spaces or areas with limited area. Possibility of access to the electrical network is the only condition for their use. If the model is battery-powered, then the lack of an electrical outlet will not be a problem. When using an electric walk-behind tractor, try not to overheat the engine, let it cool down.
It is also not recommended to use it on unplowed and heavy soils, due to which you will achieve an extended service life. Electric walk-behind tractors are equipped with additional functions that greatly facilitate the operator’s work.
For example, the service life will be extended by the automatic shutdown function when the engine overheats. The adjustable handle allows it to be adjusted to suit the operator.
Let's look at the design of the electric motoblock "Electrokrot", made with our own hands from its gasoline predecessor. First, let's look at the advantages of the resulting electric walk-behind tractor - simpler and easier to repair and operate, no need for gasoline. This model is also assembled by hand, using common parts and materials that are easy to find.
Homemade electric walk-behind tractor
To make an electric walk-behind tractor with your own hands, we start working with the frame using two pieces of channel No. 10 and a 32x32 corner. We prepare two pieces of pipe by installing a bronze insert with a hole. The axle will pass through these holes. We weld the pipes on both sides of the frame. Next, an insert is secured through the walls of the pipe with screws. It can also serve as a sliding bearing.
Although ball bearings matched to the diameter of the pipe are better suited for this. To attach the handles to the top tube, brackets are welded. And the bracket for attaching the cultivator or plow holder is welded in the middle of the pipe. Using screws on the frame, a platform is installed in the slots of the side ribs. The electric motor will be mounted on the holes that are available at the site.
The electric motor pulley is connected by a belt drive to a pulley on an axis, which is installed in the frame tube. An asterisk is superimposed on the other side of the axis. Using a chain transmission, it supplies movement to the sprocket, which is located below. A motorcycle or bicycle chain is used for chain transmission.
The movement of a homemade electric walk-behind tractor occurs thanks to a device for cultivating the soil. The curved knives are mounted on a square plate and are held in place by a key on the bottom axis. When they rotate, they loosen the earth and move forward due to bending. Chain drive and belt drive make it possible to reduce the engine speed. Using the ratio of sprockets and pulleys, 200 or 1000 rpm can be achieved.
To control the movement, handles are attached to the bracket, on one of which there is a switch button. To connect the engine to the electrical network, a coil with a wound wire is placed on the axis between the handles. To form and cultivate a bed, you need to attach a holder to the frame on which soil-cultivating tools will be installed.
The only drawback of a homemade electric walk-behind tractor is that it is connected to a wire and, accordingly, to a power source. After all, he will not be able to move more than 50 meters from the network. Although this is quite enough for cultivating a personal plot.
Toothed manual plower
If it is necessary to loosen the soil to a shallow depth, hand plows with toothed elements are used. The tool consists of several disks made of steel and fixed on one axis, on the surface of which L-shaped pins are welded or screwed.
Discs
must have significant weight so that the pins can stick into the ground without additional effort. A U-shaped frame of suitable height is used as a holder for disks so that the rotating elements do not touch it.
In the middle of the frame, on the opposite side from the disks, in a perpendicular direction, a handle is screwed onto bolts. Both wood and metal can be used as a material for the handle, the main thing is to ensure the required level of structural strength.
Its production is similar to that described for the Tornado cultivator.
Steel wheels
usually made in quantities of 5 from solid metal, which reduces physical stress and ensures efficient operation. The diameter of the discs is made equal to at least 150 mm to ensure better loosening, and the thickness is sufficient for attaching the pins.
First, they are turned on a milling machine, and then the required number of holes are drilled in diameter and an M8 or M10 thread is cut inside for pins in an amount of 4. They are distributed evenly over the disk with the same distance from each other.
Axis
must withstand the full load of all elements without deflection or deformation, so its diameter must be from 20 mm. At the ends of the axle, threads are cut for the nut. The length of the axle should take into account the width of the disks, as well as provide the necessary space for installing bearings at the points of attachment to the frame.
After this, the finished discs are put on the axle, and then inserted into the frame and securely screwed on the sides with nuts. The handle is attached to the frame by welding or bolts.
For the purpose of automating the tine cultivator
perform the following actions:
- the axle is made longer by the width of the coupling;
- from the outside of the frame it is firmly fixed;
- An electric motor with a coupling is attached to the bottom of the cultivator holder;
- install a belt that transmits torque from the engine to the axle.
At the same time, by using different diameters of couplings, it is possible to regulate the transmitted force, as well as the speed of movement of the unit.
Electric walk-behind tractor / electric walk-behind tractor
In farming today, it is almost impossible to do without the help of technology. Of course, until quite recently people cultivated the land manually. But we live in an age of technological progress, therefore, we have the opportunity to simplify our lives and maintain our health thanks to a variety of equipment.
Thus, walk-behind tractors are universal agricultural equipment that is capable of performing any work on cultivating land, caring for animals, and cleaning a personal plot. On sale you can find electric, gasoline or diesel units. Gasoline equipment is the most versatile and in demand due to its wide capabilities and affordable price. Diesel units are designed for fairly large areas - up to 5 hectares of land, they are more durable, heavier and at the same time cost an order of magnitude higher.
Electric motor units are classified as light equipment. They have limited capabilities, but at the same time they are much cheaper than their counterparts. In this article we will talk about the characteristics and advantages of electric walk-behind tractors, and how to correctly and independently make your own unit practically from scrap materials.
Plow body
The basis of the plow body is a triangular wedge ABCO. Its parameters are used during the design of a specific structure, which give it technological and operational properties.
Angle a, which is located in the longitudinal-vertical plane, is responsible for crumbling and bending of the soil layer. The wrapping of the earth layer occurs due to the angle in, located in the transverse-vertical plane.
To move the layer to the side, the angle y, lying in the horizontal plane, corresponds. Thanks to these parameters, bending and crumbling of the earth layer occurs.
All these parameters are interconnected by a trigonometric relationship:
Based on this, only two angles are randomly changed. To determine the third, the values of the first two are used. Quite an important conclusion for any designer. If you change one or another parameter, the triangular wedge acquires a plow-mouldboard surface of a certain type: helical (angle b), cylindrical (angle a), cylindrical (angle y), standard.
Knowing all the necessary parameters, making a plow for an electric cultivator will not be a problem.
Homemade electric cultivator: photo, description, as well as a video showing the device in operation.
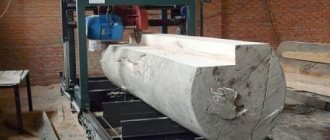
Craftsman Stanislav Iosifovich made a homemade electric cultivator with his own hands to cultivate his garden. The basis of the design of a homemade cultivator is a three-phase electric motor and a gearbox that rotates the cultivator cutters. Wheels from VAZ are also installed. The weight of the device is 300 kg, and the working width is 116 cm.
We were cultivating a plot at the dacha; with a regular shovel it would have taken 2.5 hours, but this cultivator plowed the plot in 25 minutes.
From the electric motor to the gearbox there is a belt drive, from the gearbox there is a chain drive for the rotation of the shaft with cutters.
How to choose an electric walk-behind tractor?
Such equipment will be extremely useful for small areas and even for enclosed spaces, such as greenhouses. It is very light, easy to operate, and does not require special maintenance. The only thing is that the cultivation area is limited due to the wire, but if your unit has a battery, this problem will disappear.
For a dacha, sometimes it is not necessary to buy heavy equipment, and even medium-sized ones. A lightweight unit is enough that can very quickly, within a few days, plow a small area of land. In addition, they are less noisy, even a woman can handle them, which cannot be said about gasoline and diesel units.
Of course, you shouldn’t count on the machine’s high productivity. It is suitable for plowing light and crumbly soils. In this case, the depth of processing will not be large.
It is best to buy such a car specifically for a dacha, where the size of the plot will not exceed 10 acres. But these machines perform best in greenhouses.
Advantages of electric models:
- The work is less noisy, which is extremely important for people with hearing problems;
- Little weight. It will be convenient for you to transport and move this unit. In addition, even a woman or an elderly person can work behind it;
- There is no harm to the environment, as there are no harmful emissions;
- There are battery models that will not be tied to the length of the wire;
- Economical. Electricity is much cheaper than diesel fuel, and even more so gasoline.
There are also disadvantages. If your power suddenly goes out, you won't be able to work. Also, the equipment will not process the heavy soils of a large plot of land, and certainly not cope with virgin soil. There is no possibility to attach attachments. There are no speeds, which may cause some difficulties in control, but you will get used to it quickly enough and will be able to work the entire area without missing pieces of land.
Cultivator: concept, scope of application
An electric cultivator is a device equipped with an electric drive and designed for cultivating land. Thus, it can be a full-fledged analogue of manual labor and will cope perfectly with the task of loosening the soil, applying fertilizers, creating beds and weeding them. In simple words, an electric cultivator is a mechanized chopper.
Attention! The device in question is not at all intended for cultivating large agricultural areas. But it is perfect for caring for a small flower garden, vegetable plot, etc.
The main task of the cultivator is to give the soil the necessary structure (it removes a layer of earth no more than 30 cm deep), thus preparing it for fertilizing, watering and other manipulations with the area planted with crops.
Among the main advantages of an electric cultivator are the following:
- Ecological cleanliness. Since the cultivator runs on electricity, it is completely safe for the environment and humans. That is why it can be safely used even in closed areas (in greenhouses, for example).
- Light weight of the device. Thanks to its lightness, even people who do not have significant physical abilities (for example, old people) can handle the device.
- Compactness. The cultivator can be easily moved around the site and, if necessary, can be easily transported by car.
- Easy to operate and maintain. To work with a cultivator and maintain its working condition, it is not necessary to have special skills.
- Low manufacturing costs. It is quite possible to make a cultivator from parts that everyone has on hand, so it is accessible to a wide range of gardeners and gardeners.
How to make an electric walk-behind tractor with your own hands?
As an example, consider the “Electrokrot” unit, which was made manually from a gasoline predecessor. The main advantages of the equipment made are ease of use, you don’t have to spend money on gasoline, and also the fact that you can make it practically from scrap materials.
The entire work process consists of the following stages:
- Making the frame. You will need a channel and a corner. The frame size must match the size of the gearbox and motor. Then pieces of pipe of suitable size are welded into the frame, which will ultimately play the role of handles. After this, a bronze insert is screwed to the pipes, which serves as an axis;
- Ball bearings are used to create the sliding effect. To attach the cultivator and plow holder, you need to weld a bracket approximately in the middle of the pipe. A special platform is installed on the frame body, onto which the electric motor is then mounted;
- A pulley on a bronze axle is connected to the same element on the engine using a belt. You can use a regular bicycle chain to transfer motion to the sprocket;
- The walk-behind tractor will move due to the tool, which will plow the land. The knives need to be bent and attached to a square plate;
- You can control it using a switch that is attached directly to the handle of the holder. It is also necessary to install a coil on which the wire will be wound in order to connect the unit to the electrical network.
In general, making a homemade electric motor unit is quite simple. It is only important to have the necessary tools, as well as materials that serve to create the basis for the unit. Even a person who does not have professional skills in this field can cope with such work.
Model based on a meat grinder engine
Much of what you need for work can be found on your farm or easily purchased. To manufacture structural elements you need:
- A serviceable engine from a meat grinder;
- Wheels with axles;
- Autospring;
- Corners;
- Scrap;
- Screw;
- 2 pipes.
There are also a lot of tools at hand:
- Sledgehammer;
- Pliers;
- A set of keys;
- Hammer;
- A welding machine, but if you don’t have one, you don’t need to buy it at all, but you can rent it.
2 corners are screwed to the gearbox made of metal, and then 2 pipes are welded to them, which will serve as handles, so they must first be bent to a shape that is convenient to use. For strength, you can weld a metal spacer between the pipes.
Next, axles for wheels are welded to the corners, which must be selected in medium sizes. Because small ones will get stuck in the ground, and large ones are inconvenient to control.
An ordinary crowbar is used as a shaft. The workpiece from it is installed in the sleeve, which remains after removing the meat grinder attachment. She removes it with a sledgehammer. Grousers are made from autosprings, which must be slightly screwed out during installation to make it easier to control the cultivator. They are then welded to the shaft at an angle of 120 degrees.
For ease of operation, a switch is attached to the handle, which is connected according to the “triangle” circuit; a capacitor electric start is used.
If you move the cultivator quickly, large clods of earth will remain, and if you move it slowly, the soil will be crushed. If desired, a homemade plow can also be made for it. Then it will be possible not only to loosen, but also to plow the soil. Such a homemade cultivator can last for quite a long time.
Manufacturing of disc rotary cultivator
A disc-based tool is capable of harrowing the soil, breaking up lumps, and leveling the surface. Making it is much more difficult than all of the above options; it requires special skills.
Assembly diagram of a rotary disk cultivator
For assembly you will need:
- disks;
- axis;
- staples;
- sleeve;
- stock;
- pipe, handle.
- Convex disks are welded to bushings mounted on the axle.
- You need to secure the axle in the brackets using a cotter pin.
- The pipe with handles and crossbar passes through a large bracket.
- A rod protruding above the crossbar is screwed into the rod, welded to the small bracket.
Essentially, the design of a hike for a “baby”. But it is much stronger and more functional.