What kind of trolleys are made for transporting goods?
A cart and a wheelbarrow are practically the same device for transporting goods manually. At the same time, a tool with one wheel is usually called a wheelbarrow, although there are also two. They make garden wheelbarrows with both three and four wheels with their own hands. This is one of the tool parameters, we list others:
- material of construction;
- load capacity;
- specialization in the cargo being transported (for a boat, for a motor, for welding, for a dog, etc.);
- design features (in the form of a platform, rolling, apilift trolley, self-propelled, dump truck, for a bicycle, etc.).
Let's evaluate the photos of homemade devices. We will try to find something as a basis for your design.
The most affordable option is to make a wheelbarrow from boards, since it does not require welding. A fairly simple design, the reliability of which is sufficient for building a country house. In this case, the wheel is in front, so exactly half of the load will fall on the person’s arms and lower back. Any garden wheelbarrow with one wheel has one more drawback that can be decisive - low stability.
However, there are also advantages:
- high maneuverability;
- the ability to move along narrow paths;
- possibility of unloading on the side;
- low cost, since the wheel is the most expensive unit.
This wheelbarrow was made by hand specifically for transporting firewood. The design is simple and easy to replicate. A large diameter bicycle wheel is ideal for forest conditions. However, half of the load again goes to the person.
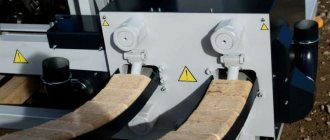
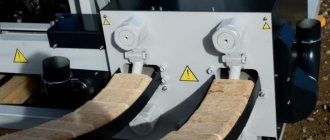
The trolley for transporting tiles and bricks is well thought out: the center of gravity falls on the axle of the wheels, and the load does not need to be lifted high. The cargo subframe is suspended on rotating elements and lowered to the ground when necessary. Two wheels and an adjustable stop provide good stability both when moving and when loading.
The apilift trolley is well suited for transporting beehives. A special mechanism with pulleys and a cable helps to pick up the load from the ground and move it upward, ensuring that its center of gravity is located above the wheel axle.
It is convenient to use a barrel as a trough for a garden wheelbarrow. All that remains is to buy a couple of wheels, some pipes and work on welding.
Using wheels from an old motorcycle or bicycle is a smart solution. Undeniable advantages:
- you don't need to buy them;
- large diameter ensures high maneuverability on any surface;
- load capacity is optimal in domestic conditions.
This design is designed for transporting hay. Two forks from bicycles, a pair of wheels and a headboard from a bed are quite realistic components in rural conditions.
As you can see, bicycle wheels are even suitable for transporting bricks. A bicycle cart made from boards is not durable and is suitable for temporary use.
A tool wheelbarrow can transport even guns or shovels. The design of the trolley is approximately the same.
Using a wheelbarrow, you can deliver water to a remote garden, tree, or household utensils. These are factory designs, but a special water bag is also suitable for a homemade wheelbarrow.
Remember how Tom Sawyer convinced Huckleberry Finn to paint the fence? Follow the example and make a car with a motor for your son. In gratitude, he will transport the contents of the entire quarry next door for you.
Want something cooler? No problem! An old barrel and a car wheel are quite accessible attributes. As you can see, cart design matters.
We decide on the dimensions and prepare homemade drawings
A cart for a walk-behind tractor is a serious matter, so you should start with the drawings. It is clear that each homemaker chooses his own solutions, but the dimensions of existing products will clearly help.
These drawings can be used to build a medium-sized trailer with a rigid suspension. In this case, a body made of boards is assumed.
This drawing will help you make the trailer frame shown above. Typically, a profile pipe with a cross section of 25x25 mm or 20x40 mm is used for these purposes.
This diagram illustrates the parameters of a trailer with a lift. A telescopic stop can be easily made from two pipes of different diameters inserted into each other. There is a protrusion on the frame that secures the front part of the body from lateral movements while driving. The support under the drawbar ensures horizontal fixation of the trailer.
This drawing will help you make a simple structure with a flat loading platform. A lightweight trailer can be made from a profile pipe with a cross-section of 20x20 mm or a corner 45x45 mm.
It is convenient to use a trailer suspension from the Ant scooter or make one yourself. Two independent levers on silent blocks plus shock absorbers with springs will ensure a highly smooth ride.
Another drawing of a trailer with soft suspension. In this case, it is assumed that a torsion bar suspension from a motorized stroller or “Zaporozhets” will be used. Let me note that, regardless of what design you choose, you need to prepare at least a simple sketch of the frame with dimensions. This will help avoid mistakes, material damage and wasted time.
Preparing to make a wheelbarrow
Before starting to manufacture a garden cart, they create drawings with their own hands based on a well-thought-out model. The main purpose of the device is first determined, what exactly is planned to be transported and over what distances. Depending on the purpose, the optimal dimensions of the body and wheels, as well as materials, are chosen.
DIY garden wheelbarrow
Having drawn an exact diagram of the planned structure, you need to determine how much materials will be needed. After conducting an inspection in your household, you can say with confidence which components are available and what needs to be purchased. In this case, you can immediately calculate financial costs, determining the profitability of your actions.
Which wheels to choose
If you have unnecessary children's bicycles, scooters, or strollers, the issue of finding wheels can be resolved very easily and quickly. Without any monetary costs, a homemade wheelbarrow for a summer residence will be provided with wheels. Depending on the design design, you can use a different number of wheels - from one to four.
If there is nothing suitable on the farm, then there is a need to purchase new wheels. They can be of different prices, but you don’t need to save too much on them by buying the cheapest ones. It should be taken into account that the wheels will bear quite a large load, so it is worth taking care of high-quality and durable parts.
Important! When buying new wheels for a cart, you should pay special attention to their size. Small wheels can significantly complicate the movement of the structure on uneven ground; considerable physical effort will be required to move the wheelbarrow. Therefore, it is worth giving preference to medium-sized inflatable wheels with a metal rim, which will make it possible to move heavy loads in the cart even on loose and uneven soil
Therefore, it is worth giving preference to medium-sized inflatable wheels with a metal rim, which will make it possible to move heavy loads in the cart even on loose and uneven soil.
Optimal body material
Depending on the purpose of a homemade garden wheelbarrow, the size of the body, shape and material for its manufacture are determined. Most often, metals are used for these purposes: aluminum or steel.
Aluminum is a more expensive material, but it has a number of advantages:
- significantly reduces the weight of the finished structure, which facilitates its operation;
- The body is absolutely not subject to corrosion and does not require constant painting.
Steel is stronger than aluminum. If you have a welding unit, you can perform any operations with it, giving it the desired shape. A trolley with a steel body is heavy, which may require additional effort from the worker. At the same time, the increased strength of the body allows you to move even very heavy loads without fear of damage.
If you have wood on your farm, you can make a cart body from wood. Old baby bathtubs or troughs can easily work. Even from unnecessary metal or plastic barrels, craftsmen make a body for a wheelbarrow. To do this, the container is cut in half vertically, and the cargo bowl is ready for mounting on the frame.
Note! The body made of a plastic barrel makes the structure quite light and mobile, however, moving very heavy bulky cargo can lead to its breakage and cracks.
What and how to make handles from
A DIY garden cart is usually made with one transverse or two longitudinal handles. The advantage of making household appliances yourself is that you can design the structure, taking into account individual characteristics of use and body type (height). Some gardeners note the particular convenience of a cart with one transverse handle, because it is comfortable to carry both in front of you and behind your back. You can move such a structure behind you, holding it with one hand, while walking along an uneven road, while it would be extremely inconvenient to carry a wheelbarrow with two handles in this way.
Handles are attached to the frame with the body, for the manufacture of which different materials can be used:
Most often, preference is given to metal because of its greater strength. If there are metal pipes of small diameter in the household, they can be used in the construction of both frames and handles.
Additional Information! Metal parts are best joined together by welding rather than mechanical fastening. For convenience, the part of the metal handles that you hold with your hands can be wrapped in rubberized film.
Manufacturing methods and materials
The wooden two-wheeled model is the easiest to implement. To produce it you will need a standard set of tools.
Small instructions for work:
- You will need a board 7x7 centimeters. It will serve as a frame. All parts of the frame must be connected to the board using screws. Additional parts are used for strengthening.
- Several slats need to be attached to the bottom of the structure.
- The handle will be made of metal. It will make the structure more resistant to loads. A handlebar from an old bicycle or an ordinary thick steel rod are perfect as a handle.
- The sides will be made of boards. Be sure to consider what kind of loads you plan to move - the more loads, the larger the boards needed for high sides. The frame and well-fixed wheels can give reliability to the product.
Read also: Calculation of beam deflection on two supports
Application and process description
Four-wheeled carts for moving large loads are always made of metal. Thanks to the presence of four wheels, such models are more spacious, durable and have a longer service life. Able to withstand weight up to one hundred kilograms. In order to make a similar design option with your own hands, stock up on a plumbing tool kit.
To make a cart with four wheels, you will need:
- Preliminary calculations for the platform on which the goods will be moved.
- Make a container where materials will be moved in the future. Depending on the container parameters, the frame size will be calculated.
- Using welding, it is necessary to install the structure with the frame. In order to secure the frame, you can take the remains of the pipes. Weld the handle to the frame.
- The wheels are welded almost last.
- It is best to use pneumatic tires as “shoes” for wheels. Thanks to them, you can increase the weight of transported cargo to eighty kilograms.
Do-it-yourself 2-wheeled garden wheelbarrow: manufacturing instructions
Now let's move on to the main part of our work - the body. As we agreed, we will make it to transport approximately 200 kg and somewhere in the same volume. Let’s take the height to be 40 centimeters (no more needed - it’s bad to turn over), length – 80 centimeters along the bottom edge of the body and 100 along the top. Width – 60-70 centimeters, to your taste. Actually, now let's move on to the assembly process.
STEP 1: we prepare scrap metal. Steel thickness – 2 mm. It's enough. Of course, if your plans are to win Mr. Olympia, then you can make the body from 3-4 mm steel. You should have such spare parts as shown in the figure, then you can make a garden wheelbarrow with your own hands, the drawings of which were provided above.
STEP 2: weld everything together. Actually, there’s nothing to explain here, just take any welding machine and weld this Rubik’s cube into a monolith.
STEP 3: we strengthen the structure with small corners. This point is relevant only if you used 1 mm thick steel to make a two-wheeled wheelbarrow with your own hands. The enhancements remove the “jellied” effect and the car becomes monolithic. With a steel thickness of 2 mm, you don’t have to worry about it - it will stand rooted to the spot.
STEP 4: install the “box” on our frame. We weld it in several places to the metal profile, to the corners and voila - our do-it-yourself car is ready! All that remains now is to give it a tolerable appearance.
STEP 5: paint. Do you have some old metal paint somewhere or dried residue from painting a gate or garage? We dilute and paint. Quality is not needed here - it will be erased anyway, this is just for the better appearance of our design, so that a photo of a garden wheelbarrow with your own hands can be uploaded to a social network to collect likes!
Now all that remains is to make one little thing - a folding leg, so that you can put the wheelbarrow in a horizontal position and conveniently load it. It will take no more than 30 minutes. We take a wheel from an old washing machine along with the mount, with a light movement of a hammer we remove the wheel from the mount (or unscrew it, depending on the design), and weld the mount to the bottom of the wheelbarrow. Next, you need to take a 20x20 mm metal profile, drill a 10 mm hole at the end, and insert an M10 bolt into the mount. Add a lock nut to prevent it from coming loose. You should end up with a car that looks like this:
The leg may require a stop (if you made poor calculations of the height and angle of the attachment). You can weld some piece of metal that will be in the place of the required stop, or take a pry bar and turn the leg mount in the desired direction. However, these are trifles and they are resolved in the process. Now you know how to make a car with your own hands without spending money and you can go to the garage for all the necessary components
Also note that at a scrap metal collection point you can get good deals for pennies
We invite you to watch a comparison of a purchased wheelbarrow and a garden wheelbarrow with your own hands in the video:
Wheelbarrows or carts used by gardeners and gardeners have a lightweight design and are not designed to transport loads that are too large or heavy. A do-it-yourself garden wheelbarrow can be made quite simply, even from unnecessary or improvised materials, which allows you to get a reliable and budget-friendly means of transportation.
Comfortable movement
Although such a structure is not intended for permanent residence, the need for comfort on the road and travel has not been canceled. Today there is a lot of technology that can make living in a mobile home easier.
Indoor light
To ensure the availability of constant light and electricity, you can use a battery or accumulator, a charger, electrical wires, or an electricity supply control panel.
Heating in the house
For these purposes, you can use several types of heaters. It is preferable to use a gas cylinder, as this will also provide the possibility of cooking.
If the gas supply installation technology is quite complex, then you need to seek help from a specialist. Constructing such a vehicle with your own hands is commendable, but the safety of its inhabitants must be taken into account above all.
Water supply, kitchen and bathroom
Any housing will not be comfortable if it does not have basic amenities, such as a bathroom, a well-equipped kitchen and the availability of water. At the planning stage, you need to carefully consider their location for maximum comfort. Do not forget about the automatic water supply system and tanks for it.
Furniture installation
When installing furniture, certain difficulties may arise, since it should be located as compactly as possible around the entire perimeter. They mainly use folding furniture that can be unfolded if necessary. This allows you to significantly save space. It can only be purchased to order, and it will not be cheap.
It is better to have at least 2-3 windows. Thanks to their large number, there will be no need to turn on the lights during the day.
Description of four wheel garden cart
An ordinary cart has a simple design.
Device and characteristics
The simplest wheelbarrow is designed as follows:
- A rectangular or square wooden (metal) base, it can be solid or in the form of a lattice.
- Four wheels are attached to the base.
- On one side there is a handle that the user must hold on to during transportation.
- A metal or wooden crossbar is fixed on the opposite side. It is needed to prevent the load from falling off the wheelbarrow.
4 wheel garden cart
Industrially produced carts are usually made of metal (stainless steel), while homemade ones are most often made of wood.
Advantages and disadvantages
A 4-wheel garden cart, or wheelbarrow, has many advantages. This is an indispensable “assistant” for those who do not have a car or motorcycle. If you can’t buy it in a store, you can assemble a wheelbarrow with your own hands, from scrap materials. When assembling, you can use ready-made diagrams and drawings.
Among the main advantages are:
- small sizes;
- mobility;
- inexpensive cost;
- maneuverability and ease of operation.
Disadvantages include frequent breakdowns and limited load capacity, as well as the fact that physical force must be used when using.
The garden cart is mobile and easy to use
Capacity and load capacity
Four-wheeled garden carts are often used to transport wood when villagers prepare firewood for the winter. Inexperienced users often try to load the wheelbarrow as much as possible, and make a big mistake.
The capacity and lifting capacity of a garden cart is limited. They depend on the dimensions of the vehicle and how well the car is made. Typically, data on capacity and load capacity are indicated in the operating instructions.
Important! On average, a garden cart is designed for a load of 70 - 130 liters, with a load capacity of 65 - 120 kg. If such a cart is overloaded, the wheel supports may not be able to withstand
In addition, it will not be easy to move it either.
If such a cart is overloaded, the wheel supports may not hold up. In addition, moving it will also not be easy.
Body made of... barrels
As an option, you can install a platform from a used 200-liter barrel on your wheelbarrow. But not from under bitumen, otherwise your cargo will turn into oil waste. Using a hand grinder, cut it lengthwise - according to height.
Strengthen the former barrel on the frame with the half-bottom closer to the “driver” of the car. Even damp bulk material can easily spill out of it, and the wheelbarrow does not need to be placed with the handles up; a slight tilt forward is sufficient.
Models and prices
The gardening equipment market offers models of one-wheeled wheelbarrows from different manufacturers. Belamos and Haemmerlin have proven themselves well.
Prices on average range from 1,300 rubles to 6,000 rubles or more, depending on the characteristics of the equipment and the country of production.
For clarity, the article examines several single-wheeled models, garden and construction, differing in the above characteristics. Prices may vary depending on the markup of a particular store.
One-wheeled garden wheelbarrow Belamos457Р
- Price from 1800 rub.
- Body material – steel
- Wheel – pneumatic, 380 with bearing
- Volume/Capacity – 85 liters 80 kg
- Production – Russia
Garden wheelbarrow RAMBO
- Price from 1300 rub.
- Body material – steel
- Wheel – pneumatic
- Volume/Capacity – 65 liters 80 kg
- Production - China
Garden one-wheeled wheelbarrow 85 l. production Russia
- Price from 1600 rub.
- Body material – galvanized steel
- Wheel – pneumatic, 360*80 with bearing
- Volume/Load Capacity – 85 liters 120 kg
- Production – Russia
Garden wheelbarrow FIT 77555
- Price from 3100 rub.
- Body material – galvanized steel
- Wheel – pneumatic 380
- Volume/Load Capacity – 65 liters 140 kg
- Manufacture – China (brand country – Canada)
One-wheeled wheelbarrow Haemmerlin CARGO 90 MG P
- Price from 6000 rub.
- Body material – galvanized steel
- Wheel – cast 390
- Volume/Capacity – 90 liters 200 kg
- Production – France
Advantages and disadvantages
It is difficult to overestimate the importance of a four-wheeled garden cart. These are units that allow you to perform various jobs: remove household waste, dry leaves and herbs, transport firewood, coal and other light and heavy materials. In general, this is a technique that significantly speeds up any work process on the site.
Four-wheeled cars are the most reliable and easy to drive, although there are rare reviews that these devices are somewhat clumsy. Meanwhile, the multi-purpose carts on four wheels are stable and will not tip over during operation.
Preparing to make a wheelbarrow
Before starting to manufacture a garden cart, they create drawings with their own hands based on a well-thought-out model. The main purpose of the device is first determined, what exactly is planned to be transported and over what distances. Depending on the purpose, the optimal dimensions of the body and wheels, as well as materials, are chosen.
DIY garden wheelbarrow
Having drawn an exact diagram of the planned structure, you need to determine how much materials will be needed. After conducting an inspection in your household, you can say with confidence which components are available and what needs to be purchased. In this case, you can immediately calculate financial costs, determining the profitability of your actions.
Which wheels to choose
If you have unnecessary children's bicycles, scooters, or strollers, the issue of finding wheels can be resolved very easily and quickly. Without any monetary costs, a homemade wheelbarrow for a summer residence will be provided with wheels. Depending on the design design, you can use a different number of wheels - from one to four.
If there is nothing suitable on the farm, then there is a need to purchase new wheels. They can be of different prices, but you don’t need to save too much on them by buying the cheapest ones. It should be taken into account that the wheels will bear quite a large load, so it is worth taking care of high-quality and durable parts.
Important! When buying new wheels for a cart, you should pay special attention to their size. Small wheels can significantly complicate the movement of the structure on uneven ground; considerable physical effort will be required to move the wheelbarrow. Therefore, it is worth giving preference to medium-sized inflatable wheels with a metal rim, which will make it possible to move heavy loads in the cart even on loose and uneven soil
Therefore, it is worth giving preference to medium-sized inflatable wheels with a metal rim, which will make it possible to move heavy loads in the cart even on loose and uneven soil.
"Is the game worth the candle"
Indeed, is it worth making a wheelbarrow with your own hands, in principle? In most cases, the answer is no, and we see them being purchased at the store. Of course, it doesn’t make sense to purchase everything you need and spend a lot of time repeating the factory version, since the factory product will be cheaper. However, there are a number of circumstances under which people take up work:
- a non-standard design is required for special cargo or delivery conditions;
- Suitable parts and materials are available;
- I have the desire and time to build a cart myself.
Maybe it will be more convenient for you to purchase a ready-made car and modify it at your discretion. In any case, I wish you good luck in fulfilling your plans. When the homemade product has served its purpose, it can be painted again, filled with flowers and placed in an “eternal parking lot.”
Wheelbarrow
The first wheelbarrows appeared several thousand years ago. It differs from other designs by having only one wheel. Making such a cart for transporting goods with your own hands is not at all difficult.
Necessary materials:
- Small bicycle wheel;
- Its corresponding axis;
- Metal pipe for the handle ⌀ 0.2 cm and a length of at least 2.5 m.
These parts are connected with screws, pieces of wood, nails and overlays. For the body, you can use a baby bath that has become unnecessary.
Instead, you can make a plywood box, fastening the parts with bars and screws, and then paint the entire structure.
Homemade carts and their versatility
A structure that will help gardeners move any type of cargo is called a trolley. Using a cart or wheelbarrow, you will spend less time and effort moving goods from point A to point B. Using a cart will allow you to spend less time and effort on transporting heavy loads.
Homemade carts are also considered universal - if the structure is equipped with additional removable holders and drawers, it can be used to move not only liquid cargo, but a variety of small items and other accessories, in addition to the usual large cargo.
Homemade models are intended for moving not only gardening or gardening tools; there are also boat carts that you can also build with your own hands.
DIY options
If at this stage you have not yet changed your mind about making a wheelbarrow yourself, then let's start studying this topic.
First, let's look at what frame and body designs can be.
One of the options for the frame is to weld it from a square rod with a cross section of 25 mm. You need to put two wheels on the axle. In turn, the axle is a pin mounted on nuts.
We also recommend reading
The body itself will consist of galvanized sheets. They need to be cut to the required sizes and screwed to the frame. As a result, we get a household item.
In this picture, we see that the master did not try too hard to make the wheelbarrow aesthetically beautiful. He needed to make a tool for transporting earth, so that it would take a minimum of time and money.
In the picture we see the fruit of the craftsman’s labor
- An unnecessary container was taken for mixing the solution, which later became the body
- A frame was made from metal plumbing pipes. They were bent into an arc and welded together.
- The axle for the wheel was also attached by welding. And the body was tightened with wire so that it would not fall out when turned over.
This is not the most ideal car option, but it will cope with its functions.
In this picture we most likely see the result of the work of a perfectionist. Since the creator of this cart did not have a tool for bending pipes, a combination grinder was used to score the cart handles. The support legs were installed ready-made. The body is completely welded from scratch from a 3 mm thick sheet of iron.
If you look closely, you can notice something:
The edges on the body are cut very evenly, it feels like it’s not even an angle grinder. Along the entire length of the body we see very high-quality welds. Pay attention to what color paint was chosen. This is an indicator that the wheelbarrow was not made to carry earth or bricks in it, but for very clean work... Here the owner did not try to make a wheelbarrow like at the factory: the bends are not of such high quality, the quality of the seams is also not very neat
Although all this will not affect the performance of its functions
Here the owner did not try to make a car like at the factory: the bends are not as high quality, the quality of the seams is also not very neat. Although all this will not affect the performance of its functions.
Master class on making a wheelbarrow (video)
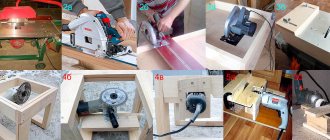
But what if you don’t have a welding machine at hand, or have never used one? In this case, there is a lot of information on the Internet on how to make a garden wheelbarrow with your own hands, with only boards, screws, an axle and devices to attach it to the cart itself.
During assembly, it is preferable to use self-tapping screws made of galvanized material. Before you start tightening the screws, make holes in the boards, but make them smaller than the screws. This is done so that the board does not split when assembled with self-tapping screws.
In this picture, we see another version of the car. A board bottom is not as practical as a galvanized sheet bottom. In this option, all that remains is to make the sides and put two wheels on the axle.
Another option for a garden wheelbarrow is to make it from a barrel. Moreover, the material of the barrel is unimportant. It can be plastic, metal, or even wood, although you will probably have to struggle with it. The barrel is cut into two parts vertically, which means that two wheelbarrows can be made from it. The procedure for performing a “barrel” cart:
- Mode purchased barrel into two parts.
- We assemble the frame, the options for which you read above.
- We make the sides or ribs on which the barrel will rest.
- We install the wheels.
As you can see, old things can sometimes come in handy, so think twice when you want to clean up your garage. Then you can wrap the holders with electrical tape to make it more comfortable for your hands. We can say that the car is ready. You can start making the “sister car”.
If you have an old bed, then we have another option for you. For this you will need: the bed itself and wheels. The wheels must be powerful. Wheels from an ancient Cossack are one of the options. The design of the trolley can be either on two wheels or on four. Assembly order:
- Removing the bed net
- We attach the wheels using welding or fasteners.
- We fasten the bottom and sides from a thick steel layer.
- We mount the handle - to your taste, but it is better to make it with the letter “p”, because it will be more ergonomic.
That's it, the creation is ready. It turns out to be a good homemade garden wheelbarrow for transporting goods. This is an indispensable tool for transporting hay, building materials, firewood and so on.
How to choose?
Before you buy a wheelbarrow, you need to decide what work on the land will be performed most often with its help. If you have to transport large loads, then the best option would be a 4-wheel garden wheelbarrow with a reinforced body . Such a unit has frontal stiffening ribs over the entire area of the sides and bottom of the equipment. Thanks to this design characteristic, the cart will easily transport massive and voluminous loads, and no deformation of the body will occur .
If you will mainly transport bulk or liquid cargo , for example, sand, organic fertilizers, then it is better to buy a cart that does not have corners and additional stiffeners, since part of the transported goods will certainly get stuck in the cart, causing a lot of inconvenience to the person.
These carts will need to be cleaned and washed frequently. You also need to look at the width of the body, which should not be excessively large. The wheelbarrow should easily pass through the gate opening and not impede movement around the site.
Handle holders in garden wheelbarrows must be positioned correctly. Before purchasing, it is better to test the unit in use and understand for yourself how easy it is to use. The handles should be far from each other and moderately long. This arrangement allows you to minimize the load on the person’s back and arms. Moreover, ideal mobility of the four-wheeled vehicle during its movement is ensured.
There are two options for placing handles - two parallel or one continuous longitudinal . You can only understand which model is better through trial use. In any case, the handles should be long, with grooved nozzles for more comfortable work, so that the gardener’s hands do not slip.
Wheel diameter is also important . If the wheels are large, driving a two-axle wheelbarrow is much easier. Depreciation also depends on the diameter. A convenient wheel diameter for garden wheelbarrows is considered to be from 35 to 45 cm.
Regarding the production material, we can confidently say that metal wheelbarrows are more durable, reliable and have a long service life. And plastic models are much lighter, ideal for simple work on the ground, collecting garbage and transporting crops. They are easier to care for, they do not rust over time, they are durable and cheaper than the first option. Wooden wheelbarrows are often presented in the format of decorative elements. They decorate landscapes and do not use wheelbarrows for their intended purpose.
The following video is about the Westman 250 4 wheel garden cart.
The garden wheelbarrow and cart are known to anyone who has a summer house or any plot of land, who wants to build a house or any other structure. Also, these tools are necessary if you are going to transfer a significant amount of soil, fertilizer, building materials or other cargo.
- Make it yourself or buy it
- Types of wheelbarrows
- How to approach the matter
- DIY options
- We also recommend reading
- Master class on making a wheelbarrow (video)
- Wheel options
- Fastening wheels (video)
- The simplest car
- conclusions
Show all content
If you have not yet bought a cart or wheelbarrow, but want to do so, then you need to understand everything in order to know the general concepts of what types of such tools there are. It is also important to know about all the advantages and disadvantages of them, and maybe consider the option of making a cart yourself. In this article we will try to give a detailed answer to the question - how to make a wheelbarrow with your own hands? Along the way, we will also try to give an answer to such a question as: what material should the wheelbarrow be made of and what kind of design could it be ?
Read also: What is a quantitative characteristic of metallicity
Homemade car
Do it yourself
To make a decorative cart, you need a high-quality drawing and functional tools. All parts of the future wooden cart must have the correct dimensional ratio.
Wheel assembly
Effective assembly of decorative cart wheels involves their manufacture according to the intended drawings.
Making a homemade wooden wheel is easy if you prepare a round craft from plywood and drill a hole in the center for the future cart axle. Or make 2 wooden semicircular elements and combine them.
The most beautiful variation is considered to be decorative wheels equipped with spokes. To make wooden parts, future dimensions of the wheel are marked on a plywood sheet. The middle of the craft is marked with a pencil and a nail is hammered into it.
Then they find a thin wooden strip, which is not inferior in length to the radius of the workpiece, and make 2 cuts in it. A nail is inserted into the central clearing, 5 mm in diameter, and a pencil is inserted into the second, 8 mm in diameter. Using a pencil attached to the rail, draw a circle so that the cart wheel has a natural diameter. The circle is divided into 8 segments.
To make the rim, you need to select wooden blocks that are placed around the circumference. They are connected end to end in the shape of a wheel. To create a smooth transition, you can saw down the blocks placed on the plywood sheet.
When making an axle for a cart, a thick block should be used, on which a circle is drawn and the axle craft is cut out. Now they select the material for the wheel spokes. Knitting needles are easy to make, but can be purchased at a hardware store. The length of the homemade spokes should match the diameter between the rim and the axle of the cart wheel.
The knitting needles are installed in prepared holes with a diameter equal to the diameter of the cuttings. The cuttings are tightly connected to the holes and placed at equal distances.
After manufacturing, the wheel is assembled:
- the handles for the knitting needles are placed with one edge into the drilled holes in the axle;
- the other edge of the spokes is inserted into the holes in the rim;
- the wheel rim segments are lubricated with glue, joined and tightened with a tight belt;
- A press is placed on the cart wheel to prevent the glue from coming apart.
After drying the wheel, complex elements are cleaned with emery.
Body
In the question of how to make a trolley as original as possible on your own, the creation of a decorative body plays an important role. Here you need to correctly build the blocks for arranging the cart frame and lay the boards for the body.
To make a decorative chaise frame, a complex drawing is required. After its creation, they are engaged in placing the bottom of the cart. It is formed from beautiful boards, which are secured with blocks with a diameter of 0.5 by 0.5 cm. The blocks are placed tightly to each other and connected with fasteners. To build a homemade decorative cart frame, glue can be used.
Afterwards, the decorative blank is placed on a flat area of the garden and covered with boards of beautiful colors. For the antique design of the future cart, a varnish coating can be used.
Putting on wheels
To put a decorative cart on wheels, you need to use cuttings from gardening tools. The cuttings sit perfectly on the axis if they are cut into several decorative parts.
To keep the wheels of the chaise in balance, you can use long wooden blocks that are nailed to the sides of the cart. The wheels are placed on the resulting chocks so that they are clearly on the sides of the haystack.
The more wheels a haystack truck has, the more firmly the chocks are installed. If the placed elements of the cart axle are loose, they are additionally secured with adhesive.
Goals
A small country dacha is probably the most common hobby in the post-Soviet space over the past half century. The area of cities is growing every year, and areas are naturally moving away from the center of populated areas. Distances are sometimes measured in tens of kilometers; The most comfortable way to overcome them is to drive your own car.
At the same time, not all summer residents are ready to turn a small plot into a place of permanent residence. The maximum that an average city family can decide to do is spend the night on their property once a week. Building a permanent house for the sake of this overnight stay is a dubious idea; sleeping in a car is very uncomfortable...
For summer residents who have basic skills in working with power tools, homemade summer cottage trailers are often the solution.
Miniature homemade mobile home.
We have to study one of these structures, getting acquainted with the materials used and design solutions.
Acknowledgment: The photographs used in this article were kindly posted by one of the regulars of the League of Caravaners forum. The author's work was reduced only to explaining some technical subtleties.
Selection of materials
In most cases, the base on which a compact trailer-dacha-motorhome is built is a single-axle trailer with a maximum load of no more than a ton. Taking into account the weight of household items and a couple of people, our choice is a caravan trailer weighing up to 750 kg.
The weight limitation leaves its mark on the choice of material.
- We will make the frame of the building from pine beams with a cross-section of 50 mm.
- The walls are made of 10 mm plywood (moisture-resistant or impregnated to reduce the hygroscopicity of the material and prevent it from rotting); the floor is made of 12 mm. It is also used to construct country tables and beds inside.
- External cladding is galvanized steel. The sheets are hemmed to the frame bar with self-tapping screws; the overlaps are additionally sealed with silicone sealant. The outer corners are reinforced with aluminum corners - again sealed with silicone.
After painting, galvanizing will look quite decent.
- What to choose as insulation laid between the inner and outer layers of plywood - we will leave it to the reader to decide. Here is a comparative thermal conductivity of popular insulation materials:
| Material | Thermal conductivity, W/m*S |
| Polyurethane foam | 0,025 |
| Foam rubber | 0,04 |
| Styrofoam | 0,037 |
| Glass wool | 0,05 |
| Extruded polystyrene foam | 0,028 |
A caveat: glass wool will inevitably cake over time. It is better to use rigid insulation.
Dimensions
A reasonable minimum size of trailer required for our purposes is 2300x1600 mm. Such dimensions will allow you to build a comfortable enough sleeping place for two people inside and leave some space for a table for a washbasin and/or a gas stove.
A two-axle trailer-dacha will provide much more comfort; however, the price of such a trailer will be double or triple. Its dimensions (up to 4.5 meters in length) allow you to build a full-fledged country house with a washbasin, kitchen and toilet.
A reasonable minimum height of a structure is generally 2 meters. The height can be adjusted depending on the size of the owners: it is clear that a very tall person will not want to constantly cling to the ceiling with the top of their head.
Construction
So let's get started. How to build a cottage from a trailer with your own hands?
Floor, bottom trim
- The sides are completely dismantled. All that remains of the trailer is a flat area. If the horizontal base is sufficiently rigid, floor joists and trim can be attached directly to it; It is better to weld a thin flexible sheet with a frame made of corrugated pipe with a cross-section of 50x25 mm.
- Then the lower frame made of timber, laid around the perimeter, is bolted to the base; the side bars are connected by lags in increments of 20 cm (for 12 mm plywood).
As an option, the entire structure can be assembled on a stand and only then pulled to the base of the trailer.
- The logs are attached to the frame with a galvanized angle; The block must be soaked twice with hot drying oil.
Tip: instead of drying oil heated in a water bath, you can use cold drying oil. In this case, after applying each layer, the block is heated with a construction hairdryer.
- Insulation is laid between the joists; then the floor is covered with plywood, which is attached with self-tapping screws.
Frame
The instructions for assembling the frame are no different from the construction of the lower frame: the block is connected with corners using self-tapping screws. Before or after assembly, the wood is impregnated with drying oil. Do not be afraid that the frame will not be rigid enough: the sheathing will give the structure strength.
Sheathing, insulation
The finished frame begins to be sheathed from the inside. The plywood is attached with self-tapping screws 32 millimeters long in increments of approximately 25 cm. Self-tapping screws are only galvanized: in damp weather, black steel will inevitably decorate the walls with untidy rusty streaks.
Three nuances:
- The holes for the screws are pre-drilled and countersunk so that the caps do not catch on clothing. An alternative is to use self-tapping screws with semi-countersunk heads.
The plywood is fastened with galvanized self-tapping screws with semi-countersunk heads.
- The inside of the plywood must be sanded before varnishing and after applying the first layer. Any moisture will raise the lint on the top layer of veneer, which will make the surface rough. The amount of work will be quite large, so it is better to use a grinder - even the simplest, vibrating one. If there is no electricity where you are building, there is always a way out: renting a diesel generator for a summer house costs from 1,000 rubles per day.
- The outer side and ends of plywood also need protective impregnation. And in this case, the cheapest and most practical option is two layers of hot drying oil. The insulation is fixed in the grooves formed by the frame and the inner lining, after which it is sheathed on the outside with plywood coated on both sides.
Expanded polystyrene is inserted spaced and foamed.
The door is assembled similarly to the walls and hung on galvanized hinges; a regular door lock or a pair of bolts is used as a lock - inside and outside.
The last stage is galvanized exterior finishing. It is fixed with self-tapping screws 25 mm long in 10 cm increments along all frame bars; then the corners are closed with a corner. Don't forget about the sealant: it will protect the corners and joints from water leakage.
The photo shows the trim ready for painting.
Window
If you want your tiny home to have skylights, no problem.
- The opening is provided at the stage of frame construction. It is surrounded by a bar with a cross-section of the same 50x50 mm.
- An alloy corner is used as an external glazing bead, screwed flush with the outer cladding with self-tapping screws. The seat under the corner is pre-coated with sealant.
- A piece of plexiglass cut to the size of the opening is placed on the sealant and fixed from the inside with a bead made from the same duralumin corner.
Internal layout
Our choice is a transformable bed-seat and folding table. The transformation mechanism will be made clear by pictures.
In this position of the bed and table, the house turns into a miniature dining room.
And now it has a sleeping place. For greater convenience, the table can be placed in a vertical position.
Useful little things
- An alternative to galvanized plywood is external cladding made of corrugated sheets. Country houses from modular containers are often built using a similar scheme.
- Do-it-yourself repair of a summer house trailer usually comes down to periodic painting of the galvanized surface. Old paint is removed with washes. In those few cases when the wheels, fenders or suspension of the trailer are damaged, spare parts for the trailer camper are purchased at the nearest auto store.
Brake lights and fenders are easy to find at an auto store.
- The simplest way to organize ventilation is to provide a pair of hatches in the door covered with a mosquito net (bottom and top).
Conclusion
We hope that our recommendations will help the reader in building their own mobile home. As usual, the video in this article will offer additional materials to his attention. Good luck!
Add to favorites Printable version
Making a one-wheel trolley
Work on the manufacture of such a cart must begin with determining the dimensions of the future structure. The parameters will be determined by the volume of the container that will form the basis. Based on this, you should select a wheel and frame. Additional elements include levers, handles, ribs and a base. You will need racks, stops, slats and transverse ribs.
After this, you can prepare the tools, namely:
- grinder;
- drill;
- metal saw;
- screwdriver;
- hammer;
- welding inverter.
Among the materials it is worth highlighting:
- handset;
- steel sheet;
- corner for support posts;
- nuts;
- thin-walled tube;
- cotter pins.
As for the steel sheet, its thickness should be 1 mm, while the area of the sheet will be 2 m2. A tube will be used as an axis; it can be replaced with fittings. Corners should be prepared for the support posts, but for the cargo posts and handles you will need a thin-walled tube, its diameter should be 20 mm.
Factory solutions
What are the differences between cart wheels? Why do their prices vary widely? There are quite a lot of differences between them.
Fastening
A wheel with a bracket is useful because when the wheelbarrow is tilted, it independently turns in the desired direction. This feature will make the 1-wheel garden cart more manageable. But a 2-wheeled garden cart will do just fine without this element: any rotation of the wheel will not cause its center of gravity to shift beyond the wheelbase.
When the wheelbarrow is tilted, the bracket itself turns in the desired direction.
Swivel wheels are useful if you have to roll the wheelbarrow on paths with a small turning radius. For movements in a straight line, products with a fixed position of the axis of rotation are sufficient.
However: a 4-wheeled garden cart with swivel wheels is much more convenient, since it can move in any direction, and not just along its longitudinal axis. Of course, this property is only useful on smooth, hard paths.
How to use a garden wheelbarrow?
Improper operation of this device leads to destruction of the body, deformation of the frame, and rapid wear of the wheels. In order for the garden cart to last as long as possible, it is recommended to use it in accordance with the rules:
Place heavy loads evenly on the body. Do not overload the device more than normal. Move the garden cart at a moderate speed. Working with a wheelbarrow after sunset is only allowed in good lighting. Placing a loaded cart on slopes increases the risk of tipping over, so it is recommended to place it on a level surface. When changing direction, whether on steep ascents or descents, you must hold the handles firmly and step carefully. In winter, slippery paths where cargo is planned to be transported by cart must be sprinkled with sand. After work, clean the wheelbarrow from dirt. Periodically check the condition of the components, tighten fasteners, and inflate tires.
What determines the cost of products
The average price of garden wheelbarrows and carts of different models varies significantly depending on a whole set of factors, including:
- load capacity;
- body volume;
- number and type of wheels;
- material used in production.
It is necessary to take into account the fact that the cost of garden wheelbarrows varies not only depending on the technical characteristics and equipment, but also on the reputation of the company producing the brand. Therefore, if you have the materials and tools necessary for manufacturing the structure, it is advisable to do such work yourself.
When choosing the design of a garden wheelbarrow, it is important to take into account the main characteristics of such a device and its purpose. For frequent transportation of large and heavy loads, preference should be given to the manufacture of stable and more maneuverable models, and for the infrequent movement of the lightest materials, a simple, lightweight version of a wheelbarrow can cope quite well.