What kind of trolleys are made for transporting goods?
A cart and a wheelbarrow are practically the same device for transporting goods manually. At the same time, a tool with one wheel is usually called a wheelbarrow, although there are also two. They make garden wheelbarrows with both three and four wheels with their own hands. This is one of the tool parameters, we list others:
- material of construction;
- load capacity;
- specialization in the cargo being transported (for a boat, for a motor, for welding, for a dog, etc.);
- design features (in the form of a platform, rolling, apilift trolley, self-propelled, dump truck, for a bicycle, etc.).
Let's evaluate the photos of homemade devices. We will try to find something as a basis for your design.
The most affordable option is to make a wheelbarrow from boards, since it does not require welding. A fairly simple design, the reliability of which is sufficient for building a country house. In this case, the wheel is in front, so exactly half of the load will fall on the person’s arms and lower back. Any garden wheelbarrow with one wheel has one more drawback that can be decisive - low stability.
However, there are also advantages:
- high maneuverability;
- the ability to move along narrow paths;
- possibility of unloading on the side;
- low cost, since the wheel is the most expensive unit.
This wheelbarrow was made by hand specifically for transporting firewood. The design is simple and easy to replicate. A large diameter bicycle wheel is ideal for forest conditions. However, half of the load again goes to the person.
The trolley for transporting tiles and bricks is well thought out: the center of gravity falls on the axle of the wheels, and the load does not need to be lifted high. The cargo subframe is suspended on rotating elements and lowered to the ground when necessary. Two wheels and an adjustable stop provide good stability both when moving and when loading.
The apilift trolley is well suited for transporting beehives. A special mechanism with pulleys and a cable helps to pick up the load from the ground and move it upward, ensuring that its center of gravity is located above the wheel axle.
It is convenient to use a barrel as a trough for a garden wheelbarrow. All that remains is to buy a couple of wheels, some pipes and work on welding.
Using wheels from an old motorcycle or bicycle is a smart solution. Undeniable advantages:
- you don't need to buy them;
- large diameter ensures high maneuverability on any surface;
- load capacity is optimal in domestic conditions.
This design is designed for transporting hay. Two forks from bicycles, a pair of wheels and a headboard from a bed are quite realistic components in rural conditions.
As you can see, bicycle wheels are even suitable for transporting bricks. A bicycle cart made from boards is not durable and is suitable for temporary use.
A tool wheelbarrow can transport even guns or shovels. The design of the trolley is approximately the same.
Using a wheelbarrow, you can deliver water to a remote garden, tree, or household utensils. These are factory designs, but a special water bag is also suitable for a homemade wheelbarrow.
Remember how Tom Sawyer convinced Huckleberry Finn to paint the fence? Follow the example and make a car with a motor for your son. In gratitude, he will transport the contents of the entire quarry next door for you.
Want something cooler? No problem! An old barrel and a car wheel are quite accessible attributes. As you can see, cart design matters.
conclusions
We believe that you found this article useful, and now you at least have a general idea of what homemade cars can be, and perhaps you have your own ideas. If you have not found a car that suits your needs, you have the option of buying a ready-made car.
Anyone who has dealt with work on a personal plot knows that you can’t do without a trolley when doing any work. Working in garden plots requires constant movement, moving some kind of load (it doesn’t matter whether it’s large loads or a simple bucket of fertilizers).
A garden cart can make your work easier. It can be purchased ready-made at a hardware store or constructed at home from scraps at hand.
Preparing to make a wheelbarrow
Before starting to manufacture a garden cart, they create drawings with their own hands based on a well-thought-out model. The main purpose of the device is first determined, what exactly is planned to be transported and over what distances. Depending on the purpose, the optimal dimensions of the body and wheels, as well as materials, are chosen.
DIY garden wheelbarrow
Having drawn an exact diagram of the planned structure, you need to determine how much materials will be needed. After conducting an inspection in your household, you can say with confidence which components are available and what needs to be purchased. In this case, you can immediately calculate financial costs, determining the profitability of your actions.
Which wheels to choose
If you have unnecessary children's bicycles, scooters, or strollers, the issue of finding wheels can be resolved very easily and quickly. Without any monetary costs, a homemade wheelbarrow for a summer residence will be provided with wheels. Depending on the design design, you can use a different number of wheels - from one to four.
If there is nothing suitable on the farm, then there is a need to purchase new wheels. They can be of different prices, but you don’t need to save too much on them by buying the cheapest ones. It should be taken into account that the wheels will bear quite a large load, so it is worth taking care of high-quality and durable parts.
Important! When buying new wheels for a cart, you should pay special attention to their size. Small wheels can significantly complicate the movement of the structure on uneven ground; considerable physical effort will be required to move the wheelbarrow. Therefore, it is worth giving preference to medium-sized inflatable wheels with a metal rim, which will make it possible to move heavy loads in the cart even on loose and uneven soil
Therefore, it is worth giving preference to medium-sized inflatable wheels with a metal rim, which will make it possible to move heavy loads in the cart even on loose and uneven soil.
Optimal body material
Depending on the purpose of a homemade garden wheelbarrow, the size of the body, shape and material for its manufacture are determined. Most often, metals are used for these purposes: aluminum or steel.
Aluminum is a more expensive material, but it has a number of advantages:
- significantly reduces the weight of the finished structure, which facilitates its operation;
- The body is absolutely not subject to corrosion and does not require constant painting.
Steel is stronger than aluminum. If you have a welding unit, you can perform any operations with it, giving it the desired shape. A trolley with a steel body is heavy, which may require additional effort from the worker. At the same time, the increased strength of the body allows you to move even very heavy loads without fear of damage.
If you have wood on your farm, you can make a cart body from wood. Old baby bathtubs or troughs can easily work. Even from unnecessary metal or plastic barrels, craftsmen make a body for a wheelbarrow. To do this, the container is cut in half vertically, and the cargo bowl is ready for mounting on the frame.
Note! The body made of a plastic barrel makes the structure quite light and mobile, however, moving very heavy bulky cargo can lead to its breakage and cracks.
What and how to make handles from
A DIY garden cart is usually made with one transverse or two longitudinal handles. The advantage of making household appliances yourself is that you can design the structure, taking into account individual characteristics of use and body type (height). Some gardeners note the particular convenience of a cart with one transverse handle, because it is comfortable to carry both in front of you and behind your back. You can move such a structure behind you, holding it with one hand, while walking along an uneven road, while it would be extremely inconvenient to carry a wheelbarrow with two handles in this way.
Handles are attached to the frame with the body, for the manufacture of which different materials can be used:
Most often, preference is given to metal because of its greater strength. If there are metal pipes of small diameter in the household, they can be used in the construction of both frames and handles.
Additional Information! Metal parts are best joined together by welding rather than mechanical fastening. For convenience, the part of the metal handles that you hold with your hands can be wrapped in rubberized film.
Material selection
When making it yourself, available materials are often used, and there is no question of choice. However, in case of purchasing the necessary components, the following options are available:
- Wood - allows you to get by with a minimum number of tools. The cutting is done with a hacksaw, the fastening is done with bolts and angles. However, the tree is not resistant to adverse weather conditions, and after a few seasons the joints will become loose, begin to rot and break.
Ferrous metal - a garden cart made with your own hands from this material will be durable and inexpensive. Although the work will require more tools, in particular, a welding machine and an angle grinder.
Stainless steel or galvanized steel is the most durable material that is not exposed to moisture. Such a cart will cost more than others and will require tools similar to the previous version, but it will last for many years and may even be inherited by children or grandchildren.
The choice of manufacturing material depends on financial capabilities, but it is highly not recommended to give preference to wood, due to its fragility.
Do-it-yourself 2-wheeled garden wheelbarrow: manufacturing instructions
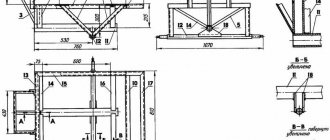
Now let's move on to the main part of our work - the body. As we agreed, we will make it to transport approximately 200 kg and somewhere in the same volume. Let’s take the height to be 40 centimeters (no more needed - it’s bad to turn over), length – 80 centimeters along the bottom edge of the body and 100 along the top. Width – 60-70 centimeters, to your taste. Actually, now let's move on to the assembly process.
STEP 1: we prepare scrap metal. Steel thickness – 2 mm. It's enough. Of course, if your plans are to win Mr. Olympia, then you can make the body from 3-4 mm steel. You should have such spare parts as shown in the figure, then you can make a garden wheelbarrow with your own hands, the drawings of which were provided above.
STEP 2: weld everything together. Actually, there’s nothing to explain here, just take any welding machine and weld this Rubik’s cube into a monolith.
STEP 3: we strengthen the structure with small corners. This point is relevant only if you used 1 mm thick steel to make a two-wheeled wheelbarrow with your own hands. The enhancements remove the “jellied” effect and the car becomes monolithic. With a steel thickness of 2 mm, you don’t have to worry about it - it will stand rooted to the spot.
STEP 4: install the “box” on our frame. We weld it in several places to the metal profile, to the corners and voila - our do-it-yourself car is ready! All that remains now is to give it a tolerable appearance.
STEP 5: paint. Do you have some old metal paint somewhere or dried residue from painting a gate or garage? We dilute and paint. Quality is not needed here - it will be erased anyway, this is just for the better appearance of our design, so that a photo of a garden wheelbarrow with your own hands can be uploaded to a social network to collect likes!
Now all that remains is to make one little thing - a folding leg, so that you can put the wheelbarrow in a horizontal position and conveniently load it. It will take no more than 30 minutes. We take a wheel from an old washing machine along with the mount, with a light movement of a hammer we remove the wheel from the mount (or unscrew it, depending on the design), and weld the mount to the bottom of the wheelbarrow. Next, you need to take a 20x20 mm metal profile, drill a 10 mm hole at the end, and insert an M10 bolt into the mount. Add a lock nut to prevent it from coming loose. You should end up with a car that looks like this:
The leg may require a stop (if you made poor calculations of the height and angle of the attachment). You can weld some piece of metal that will be in the place of the required stop, or take a pry bar and turn the leg mount in the desired direction. However, these are trifles and they are resolved in the process. Now you know how to make a car with your own hands without spending money and you can go to the garage for all the necessary components
Also note that at a scrap metal collection point you can get good deals for pennies
We invite you to watch a comparison of a purchased wheelbarrow and a garden wheelbarrow with your own hands in the video:
Wheelbarrows or carts used by gardeners and gardeners have a lightweight design and are not designed to transport loads that are too large or heavy. A do-it-yourself garden wheelbarrow can be made quite simply, even from unnecessary or improvised materials, which allows you to get a reliable and budget-friendly means of transportation.
Assembling a durable assistant
If you plan to use a wheelbarrow to transport various heavy loads, building materials, large items, it should be made with 4 wheels. This design is usually made of metal elements. To compile it, the contractor must have a welding machine and tools for a mechanic. The trolley frame is made up of pipes and pieces. They are welded together onto one platform.
The handle and wheels are welded to the frame. Experts recommend equipping it with tires, which increases the load capacity and simplifies the movement process. Each wheel is welded to the frame separately. The container is mounted on the platform. Various cargoes are loaded into it for transportation. For these purposes, use an old or new pallet. The device for loading and transporting materials is preferably fixed on the platform.
The operation is performed by welding or fastening. The first option is suitable for carts that are not planned to be disassembled soon. The bolted connection allows you to change the container if necessary for transportation.
Originally posted 2018-03-28 15:13:01.
Description of four wheel garden cart
An ordinary cart has a simple design.
Device and characteristics
The simplest wheelbarrow is designed as follows:
- A rectangular or square wooden (metal) base, it can be solid or in the form of a lattice.
- Four wheels are attached to the base.
- On one side there is a handle that the user must hold on to during transportation.
- A metal or wooden crossbar is fixed on the opposite side. It is needed to prevent the load from falling off the wheelbarrow.
4 wheel garden cart
Industrially produced carts are usually made of metal (stainless steel), while homemade ones are most often made of wood.
Advantages and disadvantages
A 4-wheel garden cart, or wheelbarrow, has many advantages. This is an indispensable “assistant” for those who do not have a car or motorcycle. If you can’t buy it in a store, you can assemble a wheelbarrow with your own hands, from scrap materials. When assembling, you can use ready-made diagrams and drawings.
Among the main advantages are:
- small sizes;
- mobility;
- inexpensive cost;
- maneuverability and ease of operation.
Disadvantages include frequent breakdowns and limited load capacity, as well as the fact that physical force must be used when using.
The garden cart is mobile and easy to use
Capacity and load capacity
Four-wheeled garden carts are often used to transport wood when villagers prepare firewood for the winter. Inexperienced users often try to load the wheelbarrow as much as possible, and make a big mistake.
The capacity and lifting capacity of a garden cart is limited. They depend on the dimensions of the vehicle and how well the car is made. Typically, data on capacity and load capacity are indicated in the operating instructions.
Important! On average, a garden cart is designed for a load of 70 - 130 liters, with a load capacity of 65 - 120 kg. If such a cart is overloaded, the wheel supports may not be able to withstand
In addition, it will not be easy to move it either.
If such a cart is overloaded, the wheel supports may not hold up. In addition, moving it will also not be easy.
Main design elements
In general terms, the design of various models of trolleys does not differ significantly and consists of the following main parts:
- Frame - a corner, square or round profile is used for it. The last two options can withstand more significant loads. You don’t have to weld the frame; in this case, the wheels and handle are attached directly to the body.
Body - in the factory version, this is a stamped element on which there are no welds. When you decide to make a cart with your own hands, you will need to cut pieces of sheet metal and weld them together. To improve the joining, a metal corner is applied to the ends.
Wheels – the most convenient to use are chambered varieties. They allow you to move the wheelbarrow around the site with maximum ease. Wheels from a bicycle, moped or even a motorcycle will do. You can also purchase ready-made copies created specifically for wheelbarrows.
Handle – the most common options are in the shape of the letter “P”, “T” or “H”. A good grip is provided by the handle with the letters “P” and “H”.
Models and prices
The gardening equipment market offers models of one-wheeled wheelbarrows from different manufacturers. Belamos and Haemmerlin have proven themselves well.
Prices on average range from 1,300 rubles to 6,000 rubles or more, depending on the characteristics of the equipment and the country of production.
For clarity, the article examines several single-wheeled models, garden and construction, differing in the above characteristics. Prices may vary depending on the markup of a particular store.
One-wheeled garden wheelbarrow Belamos457Р
- Price from 1800 rub.
- Body material – steel
- Wheel – pneumatic, 380 with bearing
- Volume/Capacity – 85 liters 80 kg
- Production – Russia
Garden wheelbarrow RAMBO
- Price from 1300 rub.
- Body material – steel
- Wheel – pneumatic
- Volume/Capacity – 65 liters 80 kg
- Production - China
Garden one-wheeled wheelbarrow 85 l. production Russia
- Price from 1600 rub.
- Body material – galvanized steel
- Wheel – pneumatic, 360*80 with bearing
- Volume/Load Capacity – 85 liters 120 kg
- Production – Russia
Garden wheelbarrow FIT 77555
- Price from 3100 rub.
- Body material – galvanized steel
- Wheel – pneumatic 380
- Volume/Load Capacity – 65 liters 140 kg
- Manufacture – China (brand country – Canada)
One-wheeled wheelbarrow Haemmerlin CARGO 90 MG P
- Price from 6000 rub.
- Body material – galvanized steel
- Wheel – cast 390
- Volume/Capacity – 90 liters 200 kg
- Production – France
Preparing to make a wheelbarrow
Before starting to manufacture a garden cart, they create drawings with their own hands based on a well-thought-out model. The main purpose of the device is first determined, what exactly is planned to be transported and over what distances. Depending on the purpose, the optimal dimensions of the body and wheels, as well as materials, are chosen.
DIY garden wheelbarrow
Having drawn an exact diagram of the planned structure, you need to determine how much materials will be needed. After conducting an inspection in your household, you can say with confidence which components are available and what needs to be purchased. In this case, you can immediately calculate financial costs, determining the profitability of your actions.
Which wheels to choose
If you have unnecessary children's bicycles, scooters, or strollers, the issue of finding wheels can be resolved very easily and quickly. Without any monetary costs, a homemade wheelbarrow for a summer residence will be provided with wheels. Depending on the design design, you can use a different number of wheels - from one to four.
If there is nothing suitable on the farm, then there is a need to purchase new wheels. They can be of different prices, but you don’t need to save too much on them by buying the cheapest ones. It should be taken into account that the wheels will bear quite a large load, so it is worth taking care of high-quality and durable parts.
Important! When buying new wheels for a cart, you should pay special attention to their size. Small wheels can significantly complicate the movement of the structure on uneven ground; considerable physical effort will be required to move the wheelbarrow. Therefore, it is worth giving preference to medium-sized inflatable wheels with a metal rim, which will make it possible to move heavy loads in the cart even on loose and uneven soil
Therefore, it is worth giving preference to medium-sized inflatable wheels with a metal rim, which will make it possible to move heavy loads in the cart even on loose and uneven soil.
General characteristics
Devices for transporting country goods can be made of different materials. The most common are metal and wood . The wheelbarrow can have different designs. folding model , which, if the owner wishes, can be assembled and stored in a small room, and there are devices that cannot be transformed .
The latter require large spaces for storage.
The area of economic work, as well as construction, is quite large. Therefore, depending on the purpose, a 4-wheeled garden cart can be manufactured with a minimum load capacity of 70 kg and a maximum load capacity of 250 kg. The size of the vehicle also depends on the maximum cargo weight parameter.
If the model will be used only for household needs, then a load capacity of up to 100 kg should be fully sufficient. Such wheelbarrows are small, maneuverable, simple and very easy to use. Options with a carrying capacity of more than 200 kilograms are used only for construction work: they are not so maneuverable, large and weighty. It is not recommended to purchase them for work in the garden.
Wheelbarrow
The first wheelbarrows appeared several thousand years ago. It differs from other designs by having only one wheel. Making such a cart for transporting goods with your own hands is not at all difficult.
Necessary materials:
- Small bicycle wheel;
- Its corresponding axis;
- Metal pipe for the handle ⌀ 0.2 cm and a length of at least 2.5 m.
These parts are connected with screws, pieces of wood, nails and overlays. For the body, you can use a baby bath that has become unnecessary.
Instead, you can make a plywood box, fastening the parts with bars and screws, and then paint the entire structure.
Advantages
- Easy to fold and unfold.
- Strength and wear resistance.
- There is a possibility of height adjustment.
- Wheel hubs do not break.
- Folding cargo platform that can withstand heavy weight.
- Ability to stand independently.
- Light weight.
- Possibility to store when folded.
- The design is not subject to corrosion.
In order to make your work easier and not carry heavy boxes in your hands, as well as save time on packing heavy items around the warehouse, you can purchase a folding cart , which will help save effort and time. The folding cart requires no fuel and no additional maintenance costs. The products have a low price and a long service life.
You may also be interested in this article about two-wheeled hand carts.
The development of the enterprise includes the option of expanding the area of warehouse premises and, at the same time, increasing the cargo itself. This is when a 3t forklift will come in handy.
DIY options
If at this stage you have not yet changed your mind about making a wheelbarrow yourself, then let's start studying this topic.
First, let's look at what frame and body designs can be.
One of the options for the frame is to weld it from a square rod with a cross section of 25 mm. You need to put two wheels on the axle. In turn, the axle is a pin mounted on nuts.
We also recommend reading
The body itself will consist of galvanized sheets. They need to be cut to the required sizes and screwed to the frame. As a result, we get a household item.
In this picture, we see that the master did not try too hard to make the wheelbarrow aesthetically beautiful. He needed to make a tool for transporting earth, so that it would take a minimum of time and money.
In the picture we see the fruit of the craftsman’s labor
- An unnecessary container was taken for mixing the solution, which later became the body
- A frame was made from metal plumbing pipes. They were bent into an arc and welded together.
- The axle for the wheel was also attached by welding. And the body was tightened with wire so that it would not fall out when turned over.
This is not the most ideal car option, but it will cope with its functions.
In this picture we most likely see the result of the work of a perfectionist. Since the creator of this cart did not have a tool for bending pipes, a combination grinder was used to score the cart handles. The support legs were installed ready-made. The body is completely welded from scratch from a 3 mm thick sheet of iron.
If you look closely, you can notice something:
The edges on the body are cut very evenly, it feels like it’s not even an angle grinder. Along the entire length of the body we see very high-quality welds. Pay attention to what color paint was chosen. This is an indicator that the wheelbarrow was not made to carry earth or bricks in it, but for very clean work... Here the owner did not try to make a wheelbarrow like at the factory: the bends are not of such high quality, the quality of the seams is also not very neat
Although all this will not affect the performance of its functions
Here the owner did not try to make a car like at the factory: the bends are not as high quality, the quality of the seams is also not very neat. Although all this will not affect the performance of its functions.
Master class on making a wheelbarrow (video)
But what if you don’t have a welding machine at hand, or have never used one? In this case, there is a lot of information on the Internet on how to make a garden wheelbarrow with your own hands, with only boards, screws, an axle and devices to attach it to the cart itself.
During assembly, it is preferable to use self-tapping screws made of galvanized material. Before you start tightening the screws, make holes in the boards, but make them smaller than the screws. This is done so that the board does not split when assembled with self-tapping screws.
In this picture, we see another version of the car. A board bottom is not as practical as a galvanized sheet bottom. In this option, all that remains is to make the sides and put two wheels on the axle.
Another option for a garden wheelbarrow is to make it from a barrel. Moreover, the material of the barrel is unimportant. It can be plastic, metal, or even wood, although you will probably have to struggle with it. The barrel is cut into two parts vertically, which means that two wheelbarrows can be made from it. The procedure for performing a “barrel” cart:
- Mode purchased barrel into two parts.
- We assemble the frame, the options for which you read above.
- We make the sides or ribs on which the barrel will rest.
- We install the wheels.
As you can see, old things can sometimes come in handy, so think twice when you want to clean up your garage. Then you can wrap the holders with electrical tape to make it more comfortable for your hands. We can say that the car is ready. You can start making the “sister car”.
If you have an old bed, then we have another option for you. For this you will need: the bed itself and wheels. The wheels must be powerful. Wheels from an ancient Cossack are one of the options. The design of the trolley can be either on two wheels or on four. Assembly order:
- Removing the bed net
- We attach the wheels using welding or fasteners.
- We fasten the bottom and sides from a thick steel layer.
- We mount the handle - to your taste, but it is better to make it with the letter “p”, because it will be more ergonomic.
That's it, the creation is ready. It turns out to be a good homemade garden wheelbarrow for transporting goods. This is an indispensable tool for transporting hay, building materials, firewood and so on.
Make it yourself or buy it
The very first question that should be asked in our situation is whether it is worth “reinventing the wheel”? Is it better to buy a ready-made tool?
First, go to the first online construction store that will give you a Google search and look at the prices. Of course, buying at retail is more expensive than making it yourself, but not so much as to completely discard this option.
After comparing prices and assessing your own efforts that will be spent on making your own cart, you can come to a certain conclusion - your own cart will come out inexpensively if you don’t need to buy material for manufacturing, and you have everything on your farm, and you are asking the only question how to assemble it from what is there. Otherwise, the work will be unprofitable.
In the same store, the price of wheels ranges from 400 to 5000 rubles.
However, if you are a crafter at heart and get satisfaction from this kind of manual activity, then why not give it a try.
Do it yourself
To make a decorative cart, you need a high-quality drawing and functional tools. All parts of the future wooden cart must have the correct dimensional ratio.
Wheel assembly
Effective assembly of decorative cart wheels involves their manufacture according to the intended drawings.
Making a homemade wooden wheel is easy if you prepare a round craft from plywood and drill a hole in the center for the future cart axle. Or make 2 wooden semicircular elements and combine them.
The most beautiful variation is considered to be decorative wheels equipped with spokes. To make wooden parts, future dimensions of the wheel are marked on a plywood sheet. The middle of the craft is marked with a pencil and a nail is hammered into it.
Then they find a thin wooden strip, which is not inferior in length to the radius of the workpiece, and make 2 cuts in it. A nail is inserted into the central clearing, 5 mm in diameter, and a pencil is inserted into the second, 8 mm in diameter. Using a pencil attached to the rail, draw a circle so that the cart wheel has a natural diameter. The circle is divided into 8 segments.
To make the rim, you need to select wooden blocks that are placed around the circumference. They are connected end to end in the shape of a wheel. To create a smooth transition, you can saw down the blocks placed on the plywood sheet.
When making an axle for a cart, a thick block should be used, on which a circle is drawn and the axle craft is cut out. Now they select the material for the wheel spokes. Knitting needles are easy to make, but can be purchased at a hardware store. The length of the homemade spokes should match the diameter between the rim and the axle of the cart wheel.
The knitting needles are installed in prepared holes with a diameter equal to the diameter of the cuttings. The cuttings are tightly connected to the holes and placed at equal distances.
After manufacturing, the wheel is assembled:
- the handles for the knitting needles are placed with one edge into the drilled holes in the axle;
- the other edge of the spokes is inserted into the holes in the rim;
- the wheel rim segments are lubricated with glue, joined and tightened with a tight belt;
- A press is placed on the cart wheel to prevent the glue from coming apart.
After drying the wheel, complex elements are cleaned with emery.
Body
In the question of how to make a trolley as original as possible on your own, the creation of a decorative body plays an important role. Here you need to correctly build the blocks for arranging the cart frame and lay the boards for the body.
To make a decorative chaise frame, a complex drawing is required. After its creation, they are engaged in placing the bottom of the cart. It is formed from beautiful boards, which are secured with blocks with a diameter of 0.5 by 0.5 cm. The blocks are placed tightly to each other and connected with fasteners. To build a homemade decorative cart frame, glue can be used.
Afterwards, the decorative blank is placed on a flat area of the garden and covered with boards of beautiful colors. For the antique design of the future cart, a varnish coating can be used.
Putting on wheels
To put a decorative cart on wheels, you need to use cuttings from gardening tools. The cuttings sit perfectly on the axis if they are cut into several decorative parts.
To keep the wheels of the chaise in balance, you can use long wooden blocks that are nailed to the sides of the cart. The wheels are placed on the resulting chocks so that they are clearly on the sides of the haystack.
The more wheels a haystack truck has, the more firmly the chocks are installed. If the placed elements of the cart axle are loose, they are additionally secured with adhesive.
Garden cart decor
Decorative cart with pumpkins and flowers
Decorating a homemade decorative cart is a creative process that depends on your imagination and ideas:
- Flower garden from the body. Fill it halfway with soil and plant beautiful plants.
- Firewood for country barbecues. Place massive carts near a stationary grill.
- Inside the body of a medium-sized cart, place small sculptures, plant pots, pots and metal cans of flowers. Decorate the outside of the body with hay bales and props.
- The cart is covered with soil as if it were overturned and earth is pouring out of it. Then the improvised flowerbed is planted with flowers - a floral “waterfall” is obtained.
Making a one-wheel trolley
Work on the manufacture of such a cart must begin with determining the dimensions of the future structure. The parameters will be determined by the volume of the container that will form the basis. Based on this, you should select a wheel and frame. Additional elements include levers, handles, ribs and a base. You will need racks, stops, slats and transverse ribs.
After this, you can prepare the tools, namely:
- grinder;
- drill;
- metal saw;
- screwdriver;
- hammer;
- welding inverter.
Among the materials it is worth highlighting:
- handset;
- steel sheet;
- corner for support posts;
- nuts;
- thin-walled tube;
- cotter pins.
As for the steel sheet, its thickness should be 1 mm, while the area of the sheet will be 2 m2. A tube will be used as an axis; it can be replaced with fittings. Corners should be prepared for the support posts, but for the cargo posts and handles you will need a thin-walled tube, its diameter should be 20 mm.
Application
Hand trolleys for warehouses can be different : for example, a vat trolley, which is a capacious container on wheels, is often used. The container sizes can be from 100 to 800 liters.
Most often, such carts are used to move bulk cargo or goods that can spill, such as milk in soft packaging. The cart has soft rubber wheels with a durable hub that can withstand loads exceeding those stated in the passport.
The metal body is usually galvanized and is not subject to corrosion. The chan cart can move on any surface . Its wheels are designed in such a way that moving a loaded cart is easy and you can push it in any direction.
How to use a garden wheelbarrow?
Improper operation of this device leads to destruction of the body, deformation of the frame, and rapid wear of the wheels. In order for the garden cart to last as long as possible, it is recommended to use it in accordance with the rules:
Place heavy loads evenly on the body. Do not overload the device more than normal. Move the garden cart at a moderate speed. Working with a wheelbarrow after sunset is only allowed in good lighting. Placing a loaded cart on slopes increases the risk of tipping over, so it is recommended to place it on a level surface. When changing direction, whether on steep ascents or descents, you must hold the handles firmly and step carefully. In winter, slippery paths where cargo is planned to be transported by cart must be sprinkled with sand. After work, clean the wheelbarrow from dirt. Periodically check the condition of the components, tighten fasteners, and inflate tires.
Question answer
The most durable is the welded base, which will be made from a profile. It’s quite simple to do – cut two pieces of pipe. They should be slightly longer than the width of the base. Don't forget about the clearance between the structure and the wheel. To prevent dirt from sticking and interfering with movement, make a gap of three centimeters.
Yes, sure. To do this, it is necessary to critically examine the condition of the cart itself. The interior may remain unchanged. You can place a variety of garden tools or boxes with cargo here. You can change the frame - make it more durable, install high sides. A couple of profile pipes can be welded along the frame. Install limiters at the top, L-shaped clamps along the bottom. As a result, we will get an improved cart for moving a variety of equipment.