Welding pipes is not an easy task, especially if you need to make sure that they do not leak during operation. But even if this is not necessary, certain difficulties often arise if it is necessary to weld one pipe into another at a certain angle.
It is quite difficult for an untrained welder to do this. To do this, you first need to mark the pipe, then cut it evenly with a grinder and weld it into another pipe. What tricks are there for this? How to quickly and correctly cut a pipe at an angle?
DIY rope square
- Georgy Menshikov January 15, 2018
- Useful tips
A homemade rope square is simple and accurate!
A square is always needed. It is difficult to imagine the modern world without the simplest measuring tool, a square. Wherever something needs to be placed or strengthened perpendicular to each other, a square is required. It is necessary, for example, to set the wall at right angles to the floor. A small square cannot do this. The longer the mating parts, the larger the square must be to ensure the required orientation accuracy.
Large angles are available, but they are expensive. Square size 1050x500 mm. sell for 9800 rubles! Probably some kind of shed costs less. But in small-scale construction, even such a square does not solve the problem. There you already need squares with a side of several meters. What to do?
Solving the problem is easy if you know the “magic” numbers 3,4 and 5!
Our square will be foldable and can fit in your pocket.
What are pipe and bend methods in Angular tutorial?
Stack Overflow
- Near
- Goods
- For teams
- Stack Overflow Public Questions and Answers
- Stack Overflow for Teams Where developers and technologists share proprietary knowledge with colleagues
- Job openings Programming and related technical career opportunities
- Talent Hire tech talent and build your employer brand
- Advertising Reach developers and technologists from around the world
- About company
Loading…
- Login register
current community
.
So, the manufacturing process:
- We drive two nails into a long board at a distance L = 5 meters from each other. This distance must be done accurately. It is better to mark with a metal tape measure.
- We put two rings on the nails, for example from keys, and tighten the rings tightly with strong twine or rope. The rope or twine must be securely fastened to the rings.
- We drive two nails into the board at a distance of L = 4 meters and repeat the operation according to point 2.
- We repeat the same thing for L=3. All. The square is ready.
Let's check the perpendicularity of the vertical beam to the horizontal platform. Using nails, we fix one of the cables, for example a three-meter one, on a vertical beam at points 1 and 2. We put rings of five and four-meter cables on the same nails, bring the free ends together and tension the structure. If point 3 coincides with the horizontal platform, everything is in order. Angle 90 degrees.
Of course, you can make a square not from three separate cables, but from one, made in a triangle. Then you only need three rings, correctly positioned on the rope.
A similar option for checking the frame is shown in the photo. Here’s another option for checking the same frame, if you don’t have a square, but have a metal meter.
Measure two legs of 60 and 80 centimeters from the corner of the frame, attach a ruler to the marks. If the legs are measured accurately and the ruler meter matches the marks, then the frame is made correctly. The angle is right.
And finally, we will correctly install the fence on the plot.
Stretch one of the legs of our square along the fence and secure it with pegs. Stretch our square and drive in the third peg. You've got a right angle. You can put up a fence.
All these tricks with a rope square are based on the school formula: “the square of the hypotenuse is equal to the sum of the squares of the legs.”
The integers three four and five that satisfy this condition are easy to remember. These numbers can be changed multiple times.
You can, for example, make segments 1.5 2 2.5 meters long, or 0.6 0.8 1 meter and even 0.3 0.4 0.5 meters. You just need to take into account that the smaller the size of the segments, the more accurately you need to determine their length.
The calculation shows that under the most unfavorable circumstances, when the error in the length of all cables is 1 cm, then for a square with lengths of 100 80 and 60 centimeters, the angle will not be 90 degrees, but 93 degrees. For lengths of 3 4 and 5 meters only 90.059 degrees.
The rope triangle, despite its primitive simplicity, gives very good accuracy results.
Author of the article “Do-it-yourself rope square” Georgy Menshikov
Indications for use
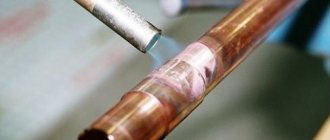
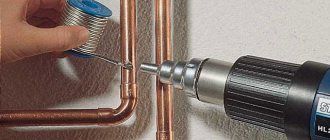
Gas pipe welding
Electric arc, argon arc or gas welding without beveled edges begins with adjusting the ends. The maximum gap between the pipes, in this case, is 1.5 millimeters, and the minimum is 0.5 millimeters. Moreover, this technique is used only on pipes with a wall thickness of 1 to 6 millimeters. The process itself begins with tacking the corner joint with spot welds, followed by straightening the position of the pipes and circumferentially welding the joint from the outside.
Angular mating with a one-sided end involves the formation of a chamfer at an angle of 50 degrees. A double-sided section involves the formation of two chamfers at an angle of 30 degrees. The gap between the edges in the first case is 1-2 millimeters, and in the second case 2-5 millimeters. That is, you can practically not worry about the accuracy of the ends. The wall thickness of pipes joined in this way ranges from 2 to 20 millimeters.
Angular mating with beveled edges and section involves joining pipes with a wall thickness of 6 to 60 millimeters. In this case, the width of the section ranges from 18 to 48 millimeters. Of course, such dimensions require a special technique for filling the weld pool.
Round corner welding process
A rounded corner is formed by special bending of one pipe, and not by welding two like a standard straight one. To do this, you need to draw a transverse line on it using a square.
Then, on the side of the future internal corner from this line, a point is marked at a distance of the width of the pipe. In this case, it is 5 cm, so the mark is placed with an indentation of 5 cm. Now you need to move the compass apart by 5 cm, and connect the point and the edge of the line, drawing a quarter circle.
Next, you need to mark a second one behind this point, at a distance from the line equal to the distance of the drawn circle. You can simply take a grinder disc with the same rounding, attach it to the drawn arc, and put marks along its edges. Then it is installed at one point at the beginning of the line, and rolled along the pipe. The mark we need is placed at the point where the second point touches it.
This distance can also be calculated mathematically using the circumference formula “P=2πr”. Where r is the radius of the circle, which in our case is always equal to the width of the pipe. The distance that needs to be retreated from the line will be equal to a quarter of the circle calculated by the formula.
At the last mark on the pipe, another transverse line is drawn under the square. Now you need to shade part of the pipe, as in the picture. Do the same on the other side of the pipe. You will also need to shade the short rectangle on the side wall.
The marked shaded part of the pipe is cut off.
The edges of the cut need to be sanded.
After this, the pipe is bent.
It will resist, so you can knock it out with a hammer and hold it for tack welding.
Next, the joint is welded with a continuous seam.
Types of corner joints
The main regulatory document that regulates the welding of pipes at an angle - GOST 16037-80 - states that in addition to five methods of welding tees (crosses), there are also eight ways of joining sectors in a bend (elements in a track).
Moreover, angular coupling, which involves joining highways, both at a right angle and at an acute or obtuse angle, is realized using the following types of joints:
Docking the highway at an acute angle
- Corner connection of pipes of the same diameter, without beveled edges, with a one-sided weld. Designation according to GOST – U16. In this case, the edges of the pipes are ground down and adjusted to each other with virtually no gap, and the projection of the mating line resembles a triangle.
- Corner connection of a pipe and a fitting (branch or welding), without section, with a one-sided weld, Designation according to GOST - U17, U18. The projection of the welding joint is similar to a semicircle. The edges fit together with minimal clearance.
- Corner connection with beveled edges, one-sided seam, designated code U19. The conjugation line is similar to a sector of a circle. The edges of the lower pipe are practically not processed. The section (chamfer) is removed only from the top pipe.
- A corner connection with a beveled edge on a cylindrical miter, made with a one-sided seam (code U20). The projection of the mating line is similar to the arc sector, and the edges of the lower pipe are practically not processed.
- Angular connection to a section, on a one-sided gasket, with a ring-shaped liner placed inside the pipe. The seam is sealed from the outside and marked on the assembly drawings as U21.
Methods for determining a reversal
Previously, a common solution was how to create a 90-degree angle, for example, there was a regular construction corner on the foundation. The main thing is that it has been tested and corresponds to 90 degrees. Today, professionals use laser levels to simplify the process and speed up installation work. The third option is to use a regular measuring tape.
Regular construction tape
Pythagorean theorem
Anyone who attended school is familiar with this proven theorem. It applies only to triangles in which one of the angles is necessarily right. The sides adjacent to it are legs a and b, the connecting segment is the hypotenuse (c). The formula looks like this: a²+b²=c².
The convenience of using this method of finding a right angle during construction is that markings can be applied in any room of any size. The presence of foreign objects is even acceptable here. The main thing is that there is access to the corner and walls, so that the connecting hypotenuse can be freely extended. Additionally, you only need a calculator to quickly make the necessary calculations.
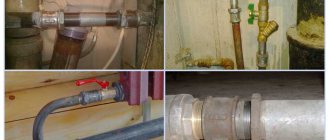
Types of connections
All existing pipe connections are divided into two main groups:
- detachable;
- one-piece.
The use of detachable connections allows, if necessary, to disassemble the joint section. Thanks to this property, it is possible to repair and replace the joint without compromising the integrity of the pipes. Detachable joints include threaded connectors (fittings) and flanges.
In the case of permanent joints, it is possible to disassemble the pipeline, however, this will lead to damage to the pipe material. The most popular option for permanently connecting pipelines is welding. In addition, there are a number of other methods: gluing, pressing, installing a socket using cement mortar.
All of the above methods are quite popular and are used to connect pipelines transporting various media: water pipelines, heating communications, gas networks, sewer systems, as well as industrial and technical lines.
The main thing
In the interior, it is often necessary to place right angles under furniture or plumbing equipment.
Using a tape measure, you can check a 90-degree turn in three ways: the sides are equal to 3/4/5 parts, if the connecting segment between meter walls is 141.4 cm, applying the Pythagorean theorem.
Also, a tape measure is enough to form three angles of 30, 45 and 60 degrees.
Additionally, you may only need a calculator and a pencil for marking.
Main stages of work
At the next stage, using a sheet of paper, you will need to connect a point at a distance of 30 mm from the edge with the “zero” point at the end of the pipe. Draw two lines on both sides.
Next, use a grinder to cut a piece of pipe according to the markings. In the same way, the craftsman cuts out the second piece of round pipe.
The author made a template from a plastic bottle that completely repeats the cut of the first workpiece. And using the template we cut out the connecting segment.
At the last stage, all that remains is to clean and cook everything. For more information about this method, watch the video below. This review is based on a video from the Welder DIY YouTube channel.
Source
Methods for aligning internal and external corners at 90 degrees
To level vertical foundations, the construction market offers a wide range of materials and tools. Let's look at ways to level a wall corner at 90 degrees with your own hands, what you need to use for this, and whether you can cope with the task with only a tape measure with a marker on hand. Let's get acquainted with the rules and subtleties of the work. After reading the article, both experienced and novice masters will be able to implement their plans.
Computer program to help
I would also like to consider the method of marking using a computer program. This is a super complicated method for those who are not used to working with a computer. It requires knowledge of a PC, programs for developments and drawings. We begin work by making a drawing indicating the size of the circle and the slope. We make a so-called virtual template.
After this, we print the image on a sheet of paper using a printer. The larger the diameter of the pipe, the more pages with markings there will be. Using scissors, we cut out all parts of the drawing and, using tape, glue them together. The finished template is applied to the pipe, and we make markings along the edge of the paper. This marking method is considered one of the most correct. If your computer does not have such programs, you can use the Internet. It is possible to download a pattern for marking on the Internet. In addition, you need to print it on a printer and cut it out. We wrap the finished pattern around the pipe and make markings.
Where you need a 90 degree angle between walls
Floor or ceiling tiles, pieces of furniture, and a classic bathroom have a strict rectangular geometric shape. Installation of such items is usually carried out close to the walls. In the case of a plumbing room, additional steps must be taken to fill the discrepancies between the edge of the equipment and the vertical surface when the angle is not 90 degrees apart.
Curvilinear gaps along the cabinet or tabletop force you to be careful in use, do not look aesthetically pleasing and attract unnecessary attention. The same applies to tiled layouts. At the same time, it will be impossible to hide the significant narrowing of the masonry even visually.
The way out of the situation involves only three solutions. This is visual camouflage with materials that fill the void, the manufacture of furniture to individual sizes with its overall increase in price, or the alignment of wall corners with wallpaper, tiles, panels, and objects. The last option is considered the most effective, since it is durable, greatly simplifies the choice regarding finishing and furnishings, and you don’t have to adjust or seal anything else.
Features of pressure tapping equipment
We pay attention to the choice of equipment; tapping under pressure is a particularly dangerous job, especially when it comes to gas pipelines. Therefore, these activities should only be carried out with tools and devices that have been tested and have passed all the necessary checks. All these requirements are also valid for devices used in water supply systems for industrial and civil purposes.
This is exactly the equipment we offer for tapping into pipelines under pressure. With it you can:
- Provide connection of additional distribution lines.
- Install devices for monitoring, auditing, and connecting sensors of protective equipment.
- Ensure that individual lines are cut off without disconnecting the main line.
At the same time, you can perform all the work necessary for the installation of such devices with safety, regardless of the environment filling the pipeline.
Right Angle Tool
The easiest way to make a 90-degree angle on a wall is to use a ready-made bench square with a minimum short side of 30 cm. Before purchasing this tool, it is important to check its accuracy. To do this, you can use a similar object and insert one into the other along the plane, or use a sheet of paper with a pencil - applying a square on both sides of the line drawn perpendicular to the base should be a complete coincidence. Next, use the same tool to check the internal and external corners of the room.
Another method is relevant in the absence of a special verified square. Here builders use the rule of the so-called “Egyptian” triangle. If the legs of a figure are equal to 3 and 4 conventional units, then the hypotenuse will be 5 similar units. It's easy to remember this approach: 3/4/5. A triangle is drawn on the floor for subsequent installation of vertical beacons, or according to the drawing, a handmade square is made from hard materials at hand: profiles, rules, timber, boards.
The third method is more convenient than others, but it will require a laser level with a function for constructing an angle. Classic inexpensive devices cannot perform this task, since they are limited by the vertical and horizontal levels. At the same time, the search for a budget universal level may come down to deviations from the parameters specified in the passport. The result will one way or another require checking with a simple square.
You can make a right angle when plastering walls not only with a square. There are special spatulas for removing internal or external seams. But craftsmen rarely work with them, since it is almost impossible to obtain strict geometry in this way - the junction of adjacent planes turns out to be round in shape and requires modification.
Marking using a sheet of paper
One of the easiest ways is to mark the corner using a sheet of paper. We fold the square sheet strictly diagonally. We take the pipe and wrap it with a folded page so that the edges of the diagonals are opposite each other. So, on the smaller side of the page we have an angle of 45 degrees. We take any marking tool and mark the location of the future pipe cut along the line of the page. To prevent the markings from being accidentally erased, you can use narrow tape. This marking method is convenient for a long pipe of enormous diameter, and the cut point of which is somewhere in the middle.
Stroyobzor.info
Stroyobzor.info - the site provides a complete description of building materials used in both low-rise and industrial construction
- home
- Site Map
- Materials Zero cycle Piles
- Brick, stone, blocks
- Concrete, mortar, cement, additives
- Bulk materials
- Concrete products
- Construction fittings
- Foundation
- Window
- Facade materials
- Insulation materials
- Roof
How to align 90 degree corners
The main task of rough finishing work is to create a level base for subsequent finishing. It is at this stage of work that the correct geometry of the room is laid out, so mistakes made at the beginning of work will undoubtedly become noticeable in the future.
In most cases, a living space is a regular parallelepiped, all of whose faces are rectangles. In order for the room to correspond to this geometric shape, it is necessary to ensure that all angles (between walls, between walls and floor and between walls and ceiling) are equal to 90 degrees.
Tools and materials
In addition to the usual tools for plastering walls, when leveling corners in a room, additional tools will be required. Below is an approximate list of tools needed for the job:
- Spatulas of different widths. The minimum set for work will be spatulas with a width of 10, 20 and 40 centimeters;
- Plastering rule. The length of the rule can vary from one to three meters. The longer the rule, the more accurately you can deduce the plane of the walls, but working with a long rule requires more physical effort. The optimal rule is 2m long;
- Corner plastering rule. It is a reinforced corner profile with a handle, which can be used both for plastering and for checking corners;
- A building level or plumb line is necessary to determine the verticality of the walls. A building level must be at least two meters long to ensure measurement accuracy;
- Construction tape;
- A nylon cord and dowel-nails will be needed to extend the outline of the room along the floor;
- Corner spatulas for final leveling of corners.
The type of plaster mixture is selected depending on the thickness of the plaster layer, the type of existing walls and the type of finishing. In addition, for plastering walls you will need the following materials:
- Primer;
- Plaster mesh;
- Wall beacons - beacons for leveling the plane of walls, have a T-shape and are made of galvanized perforated metal or plastic (to learn how to level walls by plastering using beacons, read the article here);
- Corner beacons are designed to strengthen the corners of walls, preventing chipping and cracking. Available in two versions: a simple perforated corner and a corner with a plaster mesh attached to it.
Surface preparation
Before starting work, the surfaces to be plastered must be freed from the old coating. Layers of poorly adhering plaster must be knocked off with a chisel; the remaining parts should be notched for better adhesion to the new plaster.
Next, the surface is dusted with a damp brush or construction vacuum cleaner. Dust settled on the walls will prevent reliable adhesion of the plaster to the walls, so the surfaces must be cleaned as much as possible. In damp rooms it is also necessary to treat the walls with an antifungal compound.
The primer for the surface is selected depending on the material of the walls. Brick walls absorb moisture poorly, so to treat them it is enough to use a universal acrylic primer. Concrete walls, due to their porous structure, on the contrary, strongly absorb moisture from the plaster mixture and for their treatment it is necessary to use special adhesive primers of the concrete-contact type. For porous and fragile gas silicate walls, mineral primers are suitable, they fill pores and cracks, creating a resistant film on the surface.
Priming the walls is a mandatory step when plastering walls! The primer provides better adhesion of the mixture and the working surface, reduces material consumption and facilitates the application of plaster.
To protect the plaster layer from cracks, a plaster mesh is used, which acts as a reinforcing material. Plaster mesh differs in type of material (metal, basalt, polymer) and cell size. If the planned thickness of the plaster layer does not exceed 2-3 cm, you can use basalt or polymer mesh. If the layer thickness is more than 3 cm, it is necessary to use a metal mesh, which is attached to the walls with dowel nails and a wide washer.
Introduction
Be sure to ground metal parts such as the welding table, transformer base and other non-insulated devices.
Use electrical wires and cables with insulated coating. After welding the fixed pipe joints, take a hammer and chisel and remove any remaining slag. Then, if necessary, the seam can be smoothed with a grinder.
At the moment, 3 main methods of welding metal fixed fragments are used, which fundamentally determine the concept of operation of each of them:
- In a horizontal position;
- In a vertical position;
- At an angle of 45 degrees.
The choice of a specific method for welding fixed pipe joints must be based on:
- wall thickness;
- pipeline location;
- placement angle during welding.
Combining pipes using a three-layer seam is used if the thickness is 12 mm. Each seam should be no more than 4 mm high, and the width of the seam bead should be no more than three diameters of the conductor.
As the name suggests, rotary pipes can be rotated in the desired direction, making the welding process of non-rotating pipe joints easier and there will be no need to create complex seams (for example, ceiling ones).
How to align wall corners at 90 degrees with your own hands. Step-by-step instruction
The easiest way to build verticals and horizontals in a room is to use a laser plane builder. Such a device, when installed in a corner of a room, projects laser beams that form geometrically regular rectangular planes of the floor and walls. It is enough to make marks with a marker, according to which the plaster beacons will be placed in the future. The disadvantage of this method is the high cost of such a device: prices for the simplest devices start from 5-8 thousand rubles.
The work of building walls manually is quite labor-intensive and requires great care, but it is quite possible to do it yourself.
Video that describes the main stages of work:
The first thing you need to do is check the walls of the room for verticality and find out where the walls are covered. If the wall is tilted outwards (the distance from the building level to the wall in the ceiling area is greater than at floor level), then the planned plane must be brought closer to the wall at floor level. If the wall, on the contrary, is piled inward, then when marking the room on the floor, it is necessary to make an indentation from the wall by the size of the maximum deviation of the wall.
The next step is to mark the correct rectangle on the floor. It is necessary to select the wall from which the countdown will begin (for this it is better to choose the longest wall), dowel-nails are driven into two corners of the wall (the distance from the wall should be equal to the smallest thickness of the plaster layer). A nylon cord is stretched between the dowel-nails, which will mark the first edge of the rectangle. Using a cord is convenient because the tightly stretched thread forms a perfectly straight line. Next, you need to mark a parallel line on the opposite wall, for which the same distance is set off from the dowel-nails using a tape measure and the second pair of dowels is driven in.
Now it is necessary to draw perpendicular lines, for which a square is applied to the first dowel-nail, combining one of its edges with a nylon cord, and a two-meter rule is combined with the second edge, thereby lengthening the resulting line. Having thus brought the line to the opposite wall and, having checked the resulting intersection for compliance with 90°, the nylon cord is pulled. The last face is marked in a similar way.
To check the resulting rectangle to ensure that all its angles are 90°, you can use the property of diagonals: in a rectangle, the lengths of its two diagonals must be equal.
Plaster beacons begin to be installed at a distance of 10-15 cm from the corner and are leveled from bottom to top: the working edge of the beacon is combined with the cord and secured. Next, using a building level or plumb line, the beacon is installed strictly vertically and attached to the wall. The beacons are fastened with a plaster mixture, and the installation step of the beacons is chosen slightly less than the length of the rule used.
After the plaster layer has dried, the beacons must be removed and the resulting grooves must be plastered again. In some sources you can find information that galvanized beacons do not need to be removed since they are not susceptible to rust, however, the possible occurrence of corrosion is not the only drawback of this method. Due to the different properties of plaster and metal, temperature and humidity expansion of the plaster layer leads to the appearance of cracks in the area where the beacons pass. Also, with further drilling of the walls, if the drill hits the lighthouse, it will result in the formation of a crack along the entire length of the lighthouse.
After installing the beacons on all the walls of the room, they begin to apply plaster to the walls and level it according to the rule. The internal corners of the room are “stretched” using the corner rule; this is why it is necessary to install plaster beacons with a slight indentation from the corner.
Inset. Performed by angle grinder. Video.
#1 Sculpted
People, I really need a high-quality video of yours about how you use an angle grinder when making cuts into pipes and more.
For example, two pipes of different diameters, you need to make a tee. And without any programs, chalk and templates for 17, 29, 100 dollars (yes, there are such things) you make beautiful insets.
I don’t really want to cut anything RDS. It doesn't work out evenly. Plasma if only in the summer.
- 5
- Top
- Insert nickname
#2 marat
It’s better to cut the end this way
- 7
- Top
- Insert nickname
#3 Sculpted
There, the length of the cut that he makes first can probably serve as a guide for pipes of different diameters. I'll try it tomorrow. Just one more register needs to be made for the workshop.
- Top
- Insert nickname
#4 BelaZZ
Popular message!
I have the same opinion. In the pictures, the pipe is, however, 57th, but this does not change the matter.
- 13
- Top
- Insert nickname
#5 morgmail
Popular message!
- 21
- Top
- Insert nickname
#6 Sculpted
What about different diameters and different angles?
- 1
- Top
- Insert nickname
#7 Nos
Eh, I just wish I could do it.
- Participant
- Posts: 281
- Moscow city
What about different diameters and different angles?
For a reason! https://metalgeek.com/static/cope.pcgi Different diameters, at different angles, even in my opinion it’s possible with eccentricity along the axes.
Print out the template received in PDF (or another format of your choice), cut it out, apply it to the pipe, and trace it. And apply the pipe already cut according to the template to the one you need to cut into and trace the contours.
PDF is better, because in this format the image is initially scaled to standard sheet sizes (AZ, A4, A2). The calibration “shooting” through the printer will be shorter in time than with other file formats.
He (Dan Hopper) also has an offline program under “dossey”. https://metalgeek.com/static/dan/ I really haven’t used it myself. There was no need to drain. The Internet is always available.
Post edited by Nos: 01 April 2015 12:33
- 3
Well, what a svarivaitsa.
- Top
- Insert nickname
#8 Sculpted
I looked. It doesn't work. Either I didn’t understand or more than one third needs to be cut. The pipe is approximately 111 mm. I cut it to about 37mm. I had to adjust it with a grinder. And noona the first time.
And a disk. What the hell are they doing? The mounting hole is not straight and the diameter around the circle is not the same. At 180 mm it’s normal, but these.
I had to try it as the morgmail guy said. One third is missing.
Attached images
Post edited by Lepilo: 20 June 2015 20:40
- 3
- Top
- Insert nickname
#9 BelaZZ
Popular message!
I had to do this kind of “bodygag” for a long time and extremely rarely. Today I took a few pictures of what I used and how. I also made patterns, but then threw them out as unnecessary.
I puzzled the turner to cut the marks on the “pancake” for each diameter - it is often necessary to use it for different marking needs.
A magnetic ruler is convenient for marking and makes a line for cutting - especially for small things, and takes up little space.
Rings of different diameters - they are used mainly as backing rings when welding flanges, but if you take a larger diameter than the pipe being marked, then the sector is marked conveniently.
I make lines using a corner.
Of course, you can simplify all this to manual drawing and layout, but stability, in this case, is relative.
- 17
- Top
- Insert nickname
#10 Isperyanc
Now I’m just doing this, I made a template (magnetic vinyl is available for sale), adjusted it through trial and error, and I mark both dad and mom using it. The morgmail guy said correctly, at half the diameter the width of the edge is equal to the thickness of the pipe wall, then it’s easier to remove the burrs. I remove the burr first with a fiber disc, and then with an Israeli scratcher.
- 8
- Top
- Insert nickname
#11 keria
it’s better to cut the end this way 1.JPG is much easier
The author should not have been underestimated. There weren't many pluses! Look at your picture on the right or left. The same eggs - side view. An egg, in the sense of an oval, a deviation from a perfectly round shape))) I really hope that I justified my minus and did not offend anyone undeservedly. I feel really bad for the author (Lepilo). He does everything right. The line of intersection of two cylinders of the same diameter on a plane is projected into intersecting straight lines. (Which is true not only for cylinders, but also for any bodies of rotation.) Not sinusoids, not some kind of curves, but precisely straight segments. There is such a theorem in Descriptive Geometry. Sculpting clearly demonstrates this. This theorem is named after the great mathematician. To my shame, I forgot exactly whose. You need to re-read the textbooks. If I could, I would give it 10 pluses.
Alignment of seams of internal and external corners
The final stage of plastering work is grouting the joints in the corners, which is necessary to create clear lines of the room.
In most cases, installing a plaster corner when leveling internal corners is not required; to prevent the formation of vertical cracks, it is enough to use a painting mesh with a fine mesh. The mesh is applied before the final broaching of the corners and should be buried 5 mm into the mixture. Finally, the seam of the inner corner is rubbed with a corner spatula moistened with water.
To prevent the formation of chips on the outer corners, they are additionally protected with paint corners. Before applying the final layer of plaster, the working edge of the corner is aligned vertically and in the plane of the walls, and then plastered. The corners, with a painting mesh attached to them, additionally protect the surface from the formation of cracks.
When redecorating premises, the use of even the most expensive finishing materials is often unable to mask geometric errors, so sufficient time must be devoted to leveling walls, floors and ceilings. The effort and money invested in this work pays off many times over in the finishing and installation of furniture.
Precision cutting devices
Among branded devices that could be used in everyday life to make cuts at an angle, you can pay attention to Italian-made equipment.
The Mini Cut band saw is a small-sized device with manual clamping, for working not only with pipes, but also with angles, rods, and profile elements.
The machine supports setting the cutting angle from 0 to 45º. The procedure is carried out using a tape at a speed of 45 reciprocating movements per minute. The device is equipped with a 370 W electric motor, which is powered from a household network. The maximum permissible diameter of a round pipe to be cut is 65 mm.
On an industrial scale, numerous installations with electromechanical and electrical drives have been developed for pipe cutting. Technically sophisticated devices allow high-precision thermal, oxygen and plasma cutting: