When tightening nuts and bolts (especially during the repair of suspension joints, intake manifold and other vehicle components), it is necessary to strictly observe the specified tightening torque. Detailed information about acceptable values can be easily found on the Internet.
By maintaining the exact tightening torque of nuts and bolts, the mating surfaces fit together more tightly and evenly. It is for tightening with a certain force that a torque wrench is used, which can be mechanical or semi-automatic.
Such a tool is not cheap, so it doesn’t make sense to buy it just to use it a couple of times. Of course, if you have extra money, you can buy a torque wrench. However, if your main goal is to save money and make do with improvised means, then in this case it makes more sense to make an almost torque wrench with your own hands.
So does a car owner need a torque wrench?
Some car owners and even some auto mechanics argue that a torque wrench, in general, for the average car enthusiast, is a useless and unnecessary thing. The wheels, they say, can be tightened without much precision, but everything else is the job of a specialist.
Meanwhile, these craftsmen themselves do not deny that they carry out repairs and replacements of many components on their cars themselves. Another thing is that over time, experience appears and a fairly accurate feeling of the sufficiency of the effort being applied, especially when it is a familiar and thoroughly familiar car. What should those who do not have such experience do? Broken bolts, broken studs, broken nuts or heads can all be the result of not having a torque wrench. Especially today, when foreign-made cars actively use various alloys and non-ferrous metals.
In addition, a torque wrench allows you to achieve such an important thing as uniform tightening of all bolts or nuts, which even on a wheel will not be at all superfluous, but there are situations where this is a prerequisite.
general information
| Name | approximate cost |
| Berger BG-12 TW | RUB 2,190 |
| Alca CR-V 450,000 | 3,000 rub. |
| Heyner 40 - 200 Nm | 6,000 rub. |
| Gross | 4,600 rub. |
| JTC 4933 | RUR 7,680 |
| HAZET 5120-2CT | RUB 17,949 |
| Kabo Tool ARD150 | RUB 4,244 |
| Vigor V3898 | RUB 9,130 |
| KING TONY 34464-1FG | 4,220 rub. |
| Gigant Professional TW-3 | RUB 2,401 |
This is a list of high-quality torque wrenches that can be used both in professional activities and for car repairs right in the garage. All presented models and manufacturers are reliable and have a good reputation among customers.
Tips from professionals when making a key
The tool may not work the first time, and the measurement will be incorrect. However, any experienced master can give several detailed tips, following which every beginner will achieve the desired result.
If you do not have a lever or materials for it, you can use a regular wrench with an open-end grip on one side and a box grip on the opposite side. However, the ratio of length and torque should be calculated more carefully here, since the size of the arm will most likely be a fractional number.
For better fixation of the steelyard to the lever, you should be especially careful about the place where it is installed. The best option is a carefully drilled through hole, exactly at the point where the load is applied, and the device will never slip off the handle.
Working with a homemade torque wrench
General rules for using the tool
The tool itself is a rod with a handle at one end and an indicator mechanism at the other. At the working end of the handle, a socket head or a connecting socket for a horn attachment (wrench or union attachment) is installed.
The keys are equipped with indicator and adjustment mechanisms, both with and without overtightening protection.
Next, we will consider the types of torque wrenches that are most often used in work.
Click type
Often motorists purchase just such a key because of the high measurement accuracy, durability and the presence of a convenient scale with adjustment. It is impossible to tighten the thread with such a wrench, since a fuse is provided.
The main thing is to know how to properly work with a product of this type. The bottom line is that it is necessary to set the required value of the maximum force (tightening torque) in advance.
Next, the connection (bolt or nut) is tightened as usual until a clearly audible click appears. This sound signals that the required parameter has been reached. It is noteworthy that the device will then go into the “slip” mode and it will not be possible to tighten the connection.
What is lingering force and how do you know it?
The tightening torque is an indicator of the force that must be applied to threaded connections during the process of screwing them. If the fastener was tightened with a little force than was necessary, then under the influence of various mechanical factors the threaded connection may not withstand, the tightness of the fastened parts is lost, which entails serious consequences. Also, with excessive force, the threaded connection or fastened parts can simply collapse, which will lead to thread failure or the appearance of cracks in structural elements.
Each size and strength class of threaded connections has a certain tightening torque when working with a torque wrench, which is indicated in a special table. In this case, the designation of the strength class of the product is located on its head.
How does a torque wrench work for a car?
There are two design solutions: torque limitation and visual process control. Let's look at each of them in detail.
Popular: Why are old batteries being bought up all over the country?
The so-called ratchet
Externally, it is not much different from a conventional lever with a ratchet for socket heads. Actually, this is what she is. A simple ratcheting mechanism with adjustable operating force turns an ordinary handle into a torque wrench. The secret is in the design of the ratchet. It allows the gear to rotate in any direction.
In the return direction, when you retract the handle for the next rotation of the head, the force is minimal. But in the working direction, where force is applied, the ratchet tooth jumps off the gear when the specified value is reached.
In the handle of the shank there is a rotating nozzle. It adjusts the tension of the ratchet spring.
How does the system work?
When the set torque value is reached, the ratchet gear begins to slip. The handle turns with a characteristic sound, but the nut does not tighten.
The ratcheting torque wrench is semi-automatic. It makes it possible to tighten the nuts without fear of overtightening them.
Measuring scale
The torque wrench does not have a torque limiting mechanism, but a dial or digital dynamometer is connected to the rotary mechanism. When force is applied to the handle, the needle deflects and the value of the applied force can be recorded.
The principle of operation is quite simple: the arrow maintains a constant position relative to the head of the key, and the handle bends like a spring torsion bar. As a result, the scale shifts relative to the tip of the arrow in proportion to the applied force.
The disadvantage of this model is that there is no automatic limiter. You simply control the force applied to the handle. This allows for a more accurate measurement (unlike a ratchet, which operates discretely), but there is a possibility of mechanical error when dosing force.
It is difficult to make a homemade torque wrench based on a ratchet; the technology requires metal-working machines and precision calibration. But a tool with a dynamometer is quite within the capabilities of a home craftsman.
Replacing the oil pressure sensor
To install a new sensor, you will need the following tools and consumables: two wrenches for “21”, an open-end wrench for “22” with an adapter, a rubber protective cap, an O-ring and block (usually included in the kit), a wire terminal for the sensor contact. Before replacement, you must remove the negative terminal from the battery. Operating procedure:
Remove the rubber protective cap from the top of the sensor and disconnect the wiring terminals. Unscrew the sensor from the fitting using a “21” wrench, carefully holding the tip of the fitting with a key of the same size. Remove the sensor. An O-ring and a metal washer are installed at the connection between the sensor and the fitting, which must be replaced if they are worn. The new sensor is installed in the reverse order.
Important points
- If the “native” Chevrolet Lacetti sensor fails, it is highly not recommended to replace it with a new sensor from production. The fact is that the plastic part of the housing of these sensors is very fragile and often bursts, especially in severe frosts. Therefore, it makes sense to install a device from another manufacturer instead of the original sensor. BOSCH products, which perfectly replace original sensors, are in great demand among car enthusiasts. But you will have to tighten such a sensor with a 22 key, not a 24 key. And its catalog number is 95961350;
- You will have to change the oil sensor very quickly. Since it is located under the engine, after unscrewing it, oil will flow out of the line. And here there are two options: either place some kind of container under the oil, or very quickly screw in a new sensor. But in any case, oil leakage cannot be avoided;
- Since oil leakage when replacing the sensor is inevitable, after completing the work you must check the lubricant level using a dipstick. If the level drops, you need to add oil;
- If the oil sensor has not been changed for a long time, then it is not always possible to unscrew it with an open-end wrench: it is literally “welded” to the oil line socket. This is where many car enthusiasts make a serious mistake: they put a pipe on an open-end wrench and try to unscrew the sensor with even greater force. As a result, the fragile sensor simply breaks in half, and a piece of the threaded sensor remains in the line socket. And it is almost impossible to remove it from there without damaging the socket thread. To avoid all this, you need to generously lubricate the “sticky” sensor with WD40 fluid and wait 20 minutes;
- Before installing the new sensor, pour a little oil into its hole. This will avoid the occurrence of an air lock in the engine oil line.
So, to replace the oil sensor on a Chevrolet Lacetti, there is absolutely no need to go to a car service center. Even a novice car enthusiast can handle this replacement. The main thing is not to use too much force when unscrewing this fragile device and do not forget to check the oil level after changing it. If this is not done, the “oil can” on the dashboard may light up even with a new sensor.
Varieties
Tighten the nuts; is a torque wrench necessary?
Before choosing torque wrenches for cars, you should study the available product options. This will help you get to know the devices better, and roughly understand what you need and what characteristics or capabilities you should count on when purchasing it.
It is customary to distinguish 3 types of torque wrenches. But you can add one more device to this list, which is an adapter key.
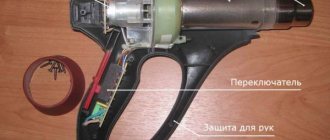
- Switches. When it comes to which torque wrench you should choose for repairing your own car in a garage, many are inclined to the simplest and most affordable option in the form of a pointer device. This key has a simple design and low cost. But the low price hides the corresponding quality. In terms of accuracy, they are much inferior to competitors, having an error of up to 10%. In this case, you should not count on a maximum tightening torque of more than 280 Nm. This key is not in demand among professional auto mechanics. But if you are doing work in the garage, and the procedure itself does not require increased accuracy, a pointer tool should be sufficient.
- Clicky. They are the ultimate. When choosing a torque wrench for car maintenance, motorists often lean towards click tools. Structurally, it includes a clutch with a given torque, which begins to operate when the specified tightening parameters are exceeded. For such tools, the torque range can vary from 40 to 360 Nm, which already significantly exceeds the capabilities of a standard pointer device. This range greatly simplifies the selection of a specific tool with the required characteristics. Click devices can be divided into household and professional ones. For the former, the error indicators do not exceed 5%, while for the latter it is even at a level of up to 3%. But in cost they are superior to switch analogues.
- Electronic. If there are increased demands on the car, it will be much more correct to choose an electronic torque wrench. This is the best tool for car maintenance, although it is rarely found in the garages of ordinary motorists. This is a professional-level device with the highest technical characteristics. The tightening scale here is electronic, and when the desired value is reached, a sound signal is heard, often supplemented by LED indicators. The range starts at 20 Nm. But the most significant feature of such a key is considered to be an error that does not go beyond 1%. The only, but significant reason to refuse to purchase an electronic device is the price. It is really high, which is why such devices are used mainly in car repair shops and service stations.
- Adapter keys. This is a special electronic device that can hardly be considered a type of electronic torque wrench. The device is equipped with a mechanical drive, to which you can connect a ratchet, and install heads and other attachments on the adapter. Dynamometer adapters are equipped with various components. There are sets of several adapters that differ in range. The device has a digital display and additional buttons for settings. The operating principle is similar to electronic keys. There is a battery inside the box. At the same time, the price is significantly lower than that of electronic torque wrenches.
Arrow torque wrench
The driver himself must decide which torque wrench he should choose for further maintenance of his own passenger car.
If you literally carry out some work on the machine several times a year, when you need 1-2 uses of such a key, there is definitely no need to spend a lot of money on buying an electronic device. It’s much easier and cheaper to go to a car service center. But for such periodic work, click devices are perfect. They are much better than pointers, have a good percentage of error, and at the same time cost adequate money.
Main threaded connections in the engine
List of main engine threaded connections and features of their tightening:
- Cylinder head (cylinder head). A very important unit, therefore, when attaching it to the block, it is important to observe not only the tightening torque, but also the order in which the bolts are tightened. As a rule, the cylinder head is tightened with a fairly large torque, starting from the center of the block to the edges in several passes. Be sure to check this information in the vehicle's owner's manual (the numbers and order may be different for each engine model)!
- Valve lid. Due to the small diameter of the valve cover studs, extreme care should be taken when tightening them and not exceeding the required torque. Also check the tightening order and torque in the manual.
- Spark plugs and glow plugs. They are tightened in any order, but very carefully, since if the threads in the engine are damaged, expensive repairs will be required.
- When tightening the injectors, also be careful: due to their small diameter, it is easy to damage the threads.
- The engine mounts should be tightened after the engine is fully installed, when it is already resting on them with its weight. If you tighten the cushions before the engine is completely resting on them and the jack is removed, the cushions will quickly tear during operation.
This procedure for tightening the cylinder head is most often used for in-line four-cylinder engines.
So, now you know the basic rules when working with threaded connections. If you don't have a torque wrench but need to tighten something in the engine, it's best to purchase or borrow one from someone. As a last resort, use a homemade one, but do not tighten the nuts “by eye”, this will most likely harm both the engine and your wallet; repairing internal combustion engines in used cars is not a cheap pleasure.
This is interesting: Gasoline prices will rise in Russia
How to measure tightness
To correctly measure the tightening using a homemade device, you need to follow a few simple rules:
- Assemble the device and bring it into working condition - attach the steelyard to the handle, set it to zero, if possible, set the weighing limit with an alarm, and at the end - put the necessary attachment on the working part of the device or initially select an open-end wrench of a suitable size.
- Place the wrench on the nut or bolt. The device will show an accurate value only if the connection with the fastener occurs directly through the lever, and with the participation of one or more adapters and extensions, an error of up to 5-8% is possible when giving the result.
- Carefully pull the steelyard so that its position is strictly perpendicular to the axis of the lever, and the load indicator is not distorted, decomposed into vectors.
- If a normal force has been achieved, the device will confirm this with the measurement result, and the nut will not budge. If the tightening was not sufficient, the fastener will rotate around its axis until the required torque is achieved.
Important!
To prevent the bolt connection from breaking, you should not put an excessive load on the homemade dynamometer, and tighten only at the nominal values prescribed in the technical manual for servicing a particular part in the car. Otherwise, there is a risk of deformation of factory products.
Retightening a bolt on a car wheel
Marking and strength class of parts
The numerical designation of the strength parameter of a metric bolt is indicated on the head, and is presented in the form of two numbers separated by a dot, for example: 4.6, 5.8 and so on.
The yield strength represents the maximum load on the bolt structure. Elements that are made from stainless steel types are designated directly by the type of steel itself (A2, A4), and only after that the ultimate strength is indicated.
For example, A2-50. The value in such markings indicates 1/10 of the strength limit of carbon steel. At the same time, products for the manufacture of which carbon steel is used have a strength class of 2.
The strength designation for inch bolts is marked with notches on its head.
Designation of the strength class of inch bolts
Maximum torque for bolt tightening
The car does not recognize the chip key
In order to properly tighten car bolts and nuts without damaging them, the technician must be aware of the maximum forces depending on the length, diameters of the elements, and the quality of the steel from which they are made. These data on the maximum torque are shown in the table.
| Thread/pitch, mm | Strength class 4.6 | Strength class 5.8 | Strength class 8.8 | Strength class 10.9 | Strength class 12.9 |
| 5/0,8 | 2,1 | 3,5 | 5,5 | 7,8 | 9,3 |
| 6/1,0 | 3,6 | 5,9 | 9,4 | 13,4 | 16,3 |
| 8/1,25 | 8,5 | 14,4 | 23,0 | 31,7 | 38,4 |
| 10/1,5 | 16,3 | 27,8 | 45,1 | 62,4 | 75,8 |
| 12/1,75 | 28,8 | 49,0 | 77,8 | 109,4 | 130,6 |
| 14/2,0 | 46,1 | 76,8 | 122,9 | 173,8 | 208,3 |
| 16/2,0 | 71,0 | 118,1 | 189,1 | 265,9 | 319,7 |
| 18/2,5 | 98,9 | 165,1 | 264,0 | 370,6 | 444,5 |
| 20/2,5 | 138,2 | 230,4 | 369,6 | 519,4 | 623,0 |
| 22/2,5 | 186,2 | 311,0 | 497,3 | 698,9 | 839,0 |
| 24/3,0 | 239,0 | 399,4 | 638,4 | 897,6 | 1075,2 |
| 27/3,0 | 345,6 | 576,0 | 922,6 | 1296,0 | 1555,2 |
| 30/3,5 | 472,3 | 786,2 | 1257,6 | 1766,4 | 2121,6 |
| 33/3,5 | 636,5 | 1056,0 | 1699,2 | 2380,8 | 2860,8 |
| 36/4,0 | 820,8 | 1363,2 | 2188,8 | 3081,6 | 3696,0 |
| 39/4,0 | 1056,0 | 1756,8 | … | 3955,2 | 4742,4 |
As a rule, the instrument scale is graduated in Nm, but sometimes you can see force indicators in kilograms on it.
Torque wrench included with sockets
Description of the lubrication system
The lubrication system serves to supply oil to the rubbing parts of the engine, which reduces friction losses, slows down wear, cools the surfaces and cleans them of wear products. The oil pump is included in the oil line and is mounted on the left side of the front of the cylinder block. The crankcase pan (often called the oil pan), stamped from thin sheet metal, is mounted in the lower part of the engine cylinder block. The engine oil level is monitored using a dipstick inserted into the tube on the left side of the rear of the cylinder block.
The oil pump sucks engine oil from the sump through a receiving tube and supplies it under pressure through two channels of the oil line to the most loaded engine parts. Through one channel, oil flows under pressure to the main journals of the crankshaft, connecting rods, then splashes to the pistons and cylinder walls, after which it flows back into the oil pan. Through another channel, oil is pumped to the camshaft, the camshaft locking journals are lubricated under pressure, and the cams are lubricated by splashing. The oil then drains into the oil pan. To increase the reliability of operation, a mesh filter is installed on the inlet pipe of the oil pump (to prevent foreign objects from entering the oil pump), and a non-separable fine filter is installed in the oil line (changed periodically). To maintain constant pressure in the lubrication system, a pressure reducing valve is provided (located in the oil pump). To monitor the oil level in the crankcase, a dipstick is installed on the left side of the cylinder block next to the oil filler neck.
TTD
| Lubrication system | ||
| System type | With forced circulation | |
| Oil pump | Internal gear | |
| Oil filter | Full flow with replaceable filter element | |
| Lubrication system volume, including oil filter, l. | 1.4 L DOHC; 1.6 L DOHC | 1.8D - FAM I |
| 3,75 | 4,0 |
Pressure reducing valve
At high rotation speeds, the amount of oil supplied by the oil pump is excessive compared to the amount required to lubricate the rubbing pairs. The pressure reducing valve prevents excess oil supply. At low rotation speeds, the regulator valve, under the action of a spring, closes the bypass (bypass) channel. But at high speeds, the oil pressure increases sharply, the oil pressure force overcomes the spring force, and the governor valve opens. Excess oil returns through the valve to the sump.
Oil filter
1 - bypass valve, 2 - pleated filter element.
The oil filter is a full-flow type with a replaceable paper filter element. Metal particles (wear products), airborne dirt particles, carbon particles and other types of contaminants can enter the oil during its use, which leads to increased engine wear or clogging (narrowing of channels) of oil lines, preventing oil circulation. An oil filter installed in the oil line allows these particles to be retained as the oil passes through it. The filter is mounted on the outside of the engine, making it relatively easy to replace the filter element. A bypass valve is installed in front of the filter element, which opens when the pressure in front of the filter increases, which occurs when the filter element is clogged with contaminant particles. The bypass valve opens when the oil pressure exceeds the force of the valve spring. In this case, the oil passes through the bypass channel, bypassing the oil filter, and is sent directly to the main oil line of the engine.
Recommended oil types
SAE viscosity table for motor oils
| SAE | Maximum viscosity | Maximum oil pumping temperature, °C | Viscosity at 100 °C, cSt | ||
| Wed (*) | at temperature, °C | Minimum | Maximum | ||
| 0W | 3250 | -30 | -35 | 3,8 | — |
| 5W | 3500 | -25 | -30 | 3,8 | — |
| 10W | 3500 | -20 | -25 | 4,1 | — |
| 15W | 3500 | -15 | -20 | 5,6 | — |
| 20W | 4500 | -10 | -15 | 5,6 | — |
| 25W | 6000 | -5 | -10 | 9,3 | — |
| 20 | — | — | — | 5,6 | 9,3 |
| 30 | — | — | — | 9,3 | 12,5 |
| 40 | — | — | — | 12,5 | 16,3 |
| 50 | — | — | — | 16,3 | 21,9 |
| 60 | — | — | — | 21,9 | 26,1 |
ISO Viscosity Chart
| ISO viscosity grade | Average viscosity at 40 °C, mm2/s | The limits of cinematography. viscosity at 40 °C, mm2/s | |
| min | max | ||
| ISO VG 2 | 2,2 | 1,98 | 2,42 |
| ISO VG 3 | 3,2 | 2,88 | 3,52 |
| ISO VG 5 | 4,6 | 4,14 | 5,06 |
| ISO VG 7 | 6,8 | 6,12 | 7,48 |
| ISO VG 10 | 10 | 9,00 | 11,00 |
| ISO VG 15 | 15 | 13,5 | 16,5 |
| ISO VG 22 | 22 | 19,8 | 24,2 |
| ISO VG 32 | 32 | 28,8 | 35,2 |
| ISO VG 46 | 46 | 41,4 | 50,6 |
| ISO VG 68 | 68 | 61,2 | 74,8 |
| ISO VG 100 | 100 | 90,0 | 110 |
| ISO VG 150 | 150 | 135 | 165 |
| ISO VG 220 | 220 | 198 | 242 |
| ISO VG 320 | 320 | 288 | 352 |
| ISO VG 460 | 460 | 414 | 506 |
| ISO VG 680 | 680 | 612 | 748 |
| ISO VG 1000 | 1000 | 900 | 1100 |
| ISO VG 1500 | 1500 | 1350 | 1650 |
Main mistakes when making a key
Any high-precision tool cannot be manufactured completely without errors, since the master has neither accurate designs nor drawings at hand, and all this can lead to incorrect measurements and subsequent breakdown of car parts. However, many professionals have answers on this matter, offering car enthusiasts a number of recommendations in order to minimize errors and inaccuracies, in particular:
- You should not use soft metal as a lever, which can easily bend when pressed, because the force applied to the steelyard, without maintaining orthogonality, will not give the desired result, and the purpose of the device will be completely lost.
- You should not choose a cheap steelyard, because the accuracy of its measurements is very questionable, and the spring quickly stretches and fails. So, as of December 2022, the cost of scales should be in the region of 400-500.0 rubles. This is not much compared to the price of the torque wrench itself - about 3-4 thousand rubles, and it is better to change the low-quality component immediately.
- When attaching the nozzle to the nut, you need to take into account that it must be perpendicular to the axis of operation of the lever, otherwise the measurement will not work.
- Most steelyards have only an informational function and do not in any way limit the actions of the master, who can easily get distracted and tighten the bolt without paying attention to the scale reading.
You might be interested in this About High Jack jacks: features of the rack and pinion mechanism, selection criteria
Thus, when using a homemade product, the master bears much more responsibility, because the device cannot have the same automatic force reduction functions as a purchased analogue.
Service station
A homemade device is best used to control bolt tension if in doubt. If it is necessary to control the tightening on any complex component part, the car owner should still contact a service station for diagnostics and repairs, and should not replace important components in his garage, because unauthorized intervention can cost much more than the money saved on the key.
Electronic engine control unit
The unit is installed in the engine compartment and secured with special brackets. AC power supply. The main function of the ECU is diagnostic, monitoring the operation of the power unit, identifying faults, and notifying on the central dashboard. To avoid negative consequences, the ECU transfers faulty units to emergency operation mode.
When you start the Chevrolet Lacetti engine, a number of indicators on the center console light up, after two seconds they go out, which indicates that all vehicle systems are working properly. If any of the indicators does not go out, it is obvious that the mechanism is faulty; prevention and diagnostics are required. After switching to emergency operation mode, engine power decreases, fuel consumption increases, the accelerator pedal becomes uninformative with periodic dips when pressed. Emergency exit is possible using software or automatically after the third trouble-free trip.
All system errors, even those that have already been eliminated, are recorded in the memory of the control unit. If necessary, they are read by a diagnostic scanner connected to a block under the steering wheel, to the right of the hood release lever.
Torque Wrench Selection
The goals you pursue form the basis of the requirements for such tools. The financial aspect is also important. The most expensive will be a key with electronic filling, but if your goal is not to achieve high accuracy, then you can take a closer look at click or torsion models. Don't forget to make sure how it fits in your hand. Comfort of use is very important, because it is necessary not only to keep the instrument intact, but also to avoid damaging its parts and to fit the fingers perfectly. The surface must be selected from non-slip materials so that the hand does not jump off the key at the most inopportune moment. Also, you should not feel any strain on your wrist with prolonged use. And now when all the details are taken into account, you can start purchasing.
Snap torque wrench
The modern design of such keys is designed to achieve the greatest efficiency of use. When the required parameter value is reached, a sound signal is emitted. This signal is different from the clicking sound that is heard when force is applied. The snap-on wrench minimizes confusion when working. Click-type wrenches have fewer moving components, which increases tool reliability and reduces wear. Snap-on keys retain calibration much longer than switch-type keys.
Coolant temperature sensor
The DTOZH is located under the intake manifold, between the first and second cylinders. The main task is to transmit temperature readings online to the ECU. Compliance with the degree is necessary for high-quality ignition of the air-fuel mixture at the moment of ignition when starting the power unit.
DTOZH is a thermistor with a negative temperature coefficient. Resistance decreases as the degree increases. If there is a malfunction, the indicator on the center console of the instruments signals.
Temperature sensor for air entering the cylinders
DTPC - installed in the end part of the intake pipeline. The air duct is located above the valve cover. The purpose of the mechanism is similar to the previous DTOZH. A malfunction (unstable operation) is indicated on the dashboard.
Often, while driving, the idle speed disappears, the car stalls, and operates unstably under load. One of the common reasons is a malfunction of the mass air flow sensor. Due to uneven roads and vibrations, the block with wires moves away from the contact board, which is the reason.
How the tool works
Semi-automatic torque wrenches resemble in shape and design a regular ratchet wrench, which is used for socket heads. The only significant difference from its “brothers” is the presence of a special ratcheting mechanism, which allows the built-in gear to rotate in two directions.
For example, to return the handle of a tool back after a full rotation, you need to apply relatively little force. But to tighten the nut you need to apply a little more force.
When the required value is reached, the ratchet gear simply begins to slip (a characteristic sound is heard), as a result of which the nut or bolt is no longer tightened. This eliminates the possibility that the thread will break.
Torque wrenches with a force measurement scale by default do not have the ability to limit torque when a specified value is reached. In this case, this moment must be controlled independently using a mechanical or electronic digital measuring scale.
A homemade almost torque wrench, depending on the design, can work according to the example of the first and second options described above.
We recommend: How to make a milling table from an angle grinder
Why do we count Newtons and meters?
Before you start making a simple homemade torque wrench for tightening bolts and nuts, you will need to do some calculations. For example, to achieve a tightening torque of 10 N*m, you need to apply a force equal to one kilogram of force to a lever or arm 1 meter long.
But in a home workshop or garage, a meter lever is not the most practical and convenient option. Ideally, it is better to use a lever within 20–50 cm. And in order to correctly calculate how much force needs to be applied to the lever to achieve the required tightening torque, you need to count Newtons and meters.
However, it is not at all necessary to go into the jungle of mathematical equations. The required values can be easily calculated in proportion. That is, if we take as a basis that to obtain a torque of 10 N*m, you need to apply a force of 1 kg on a meter-long lever, then it is similarly easy to calculate how much force will need to be applied to a lever of shorter length.
The shorter the lever used, the greater the force required to tighten the bolt or nut - this is, so to speak, an axiom. For example, if instead of a meter lever you use a lever 50 cm long, then to obtain a torque of 10 N*m you need to apply a force equal to 2 kg.
If you use a lever with a length of, for example, 22 cm, then the force will be already 4.5 kg. In other words, you need to divide the torque (10 N*m) by the length of the lever (in this case - 0.22 m) and multiply by 0.1. Using this simple formula, you can easily calculate how much specific force is required to tighten the nut.
Buy or make?
In the process of performing auto repair work, almost every vehicle owner is faced with the fact that it is necessary to tighten a bolt or nut by applying a certain force, but there is no torque wrench at hand. Don’t run to the store to buy an expensive instrument, use it for 20–30 minutes and forget it for a year.
We recommend: Universal taganok made of steel pipe and hammer
Therefore, the best option is to make a homemade torque wrench for tightening nuts and bolts. Moreover, you can make a tool like a ratchet with a ratchet mechanism, as well as one made by analogy with a simpler design - using ordinary hand scales.
Tightening with hand scales
Alternatively, as a replacement for a factory or homemade torque wrench in the form of a ratchet, you can use a regular wrench or socket wrench. We attach to it a manual scale of the “canter” or “steelyard” type (or you can, for example, take one with a digital display), and tighten the bolt or nut. This is also quite a workable option at home if you don’t have anything at hand.
To tighten nuts or bolts with a certain force using hand scales, most often a steelyard of 20-30 kg and a piece of steel pipe 50 cm long (but possible less) with a suitable internal diameter of at least 25-30 mm will be enough to could be put on the key. In the event that large torques are required, you need to select the appropriate scales.
What you will need for work:
- a wrench (open-end or socket) onto which a piece of steel pipe about 40–50 cm long is placed;
- spring canter (hand scales) with a “limit” of approximately 20–30 kg. You can also use electronic scales to make a torque measuring device.
How to make a torque wrench with your own hands so that it is convenient to use?
A meter key handle is not the most practical option. Let's use the rule for calculating force depending on the length of the lever. There is no point in studying formulas; quantities are calculated in proportions.
The shorter the lever, the more force must be applied (while maintaining the amount of torque):
- lever 1 m, torque 10 N.m., force 1 kg;
- lever 0.5 m, torque 10 N.m., force 2 kg;
- lever 33 cm (already convenient to work), torque 10 N.m., force 3 kg.
For production you will need:
- handle for working with square socket heads (for greater versatility - with an extension).
- clamp for fixing the force measurement point.
- measuring device: you can use ordinary scales such as a steelyard or a cantor. The optimal measurement range is from 100 grams to 50 kg.
Having measured the required length from the center of rotation, we fix the clamp on the lever.
The device is ready in 15 minutes. You can mark several points for installing the clamp, depending on the moment being measured.
Important! When tightening the fasteners, you need to pull the scales (dynamometer). We do not apply any force to the handle. A right angle is maintained between the lever and the direction of force (along the cantor spring).
It will be useful to have a ready-made table for calculating torque, depending on the steelyard readings.
If you don’t want to make a separate tool with your own hands, use a standard set of wrenches (open-end on one side, socket on the other). The principle of operation is exactly the same.
For each key (since they are of different lengths), we compile a calculation table in advance. You can use a ready-made smartphone application:
We enter the received data (lever length, cantor readings), and we see the finished result in newtons per meter.
Tighten the bolt with a homemade torque wrench - video
Conclusion: Having a steelyard worth 300 - 500 rubles. (it is found in almost every home), you can save on buying a factory torque wrench: the price is about 2000 - 3000 rubles.
About sports
View all posts by sposport