Principle of operation
A homemade compressor works according to a simple scheme:
- An electrically powered or manual pump can be connected.
- Air under pressure enters a sealed container (a receiver or cylinder is used).
- The design includes an outlet valve that directs air through hoses to the spray gun, impact wrench, adapter for inflating tires, etc.
As auxiliary elements, a pressure gauge is used to control pressure and an automatic system for bleeding excess air. To prevent rapid wear of the device and ensure high-quality work results, filters are connected to the output line to protect against the penetration of oil and moisture.
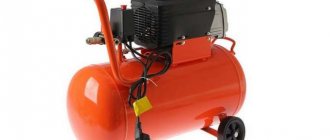
An air compressor is essential for every car owner.
Objectives of using an air collector
One of the main issues that is solved by installing an air receiver is cleaning the working environment from condensate to reduce corrosion of the pneumatic system. But drying compressed air is only one of the reasons for using a storage tank. There are other benefits to installing a tank.
Creating a supply of compressed air. When installing an air receiver, a certain volume of working fluid is stored to cover its need during periods of maximum flow. The latter can occur if a large number of consumers are working simultaneously.
Another way to solve this problem is to replace the compressor with a more powerful one. Most often this is impractical, since productive units are quite expensive.
Reducing the frequency of starting and stopping the compressor. The station automatically turns off when the set pressure in the pneumatic system is reached and turns on when the pressure drops. The difference between stopping and starting is insignificant - only two bars.
Every start of the electric motor, even if small, is stressful for the unit. Almost all compressor components at this moment experience high loads and increased wear. Therefore, you should try to avoid frequent changes in the operating mode of the unit.
The reservoir increases the volume for air injection, as a result of which the frequency between periods of operation and idle time of the compressor is reduced, and this has a beneficial effect on its service life.
Elimination of pressure pulsations. If a piston compressor is used in a pneumatic system, then air enters the line unevenly, and pressure pulsation occurs. Installing an air receiver after the piston unit is very desirable, this will eliminate the resulting impulses.
What does the air receiver consist of?
- sealed metal case for collecting and preserving the working environment;
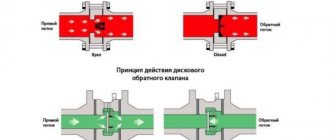
- a safety valve, which, if the maximum permissible pressure inside the container is exceeded, releases excess air;
- a pressure gauge, which is used to control the pressure in the storage tank;
- drain valve, located at the bottom of the receiver and serves to remove condensate;
- pipes through which the tank is connected to the compressor and the entire pneumatic system.
Compressor from a fire extinguisher with a motor from a refrigerator
To create a homemade compressor, an OU-10 fire extinguisher or an equivalent is suitable.
The procedure is performed in stages, below are detailed instructions:
- Clean the inside and outside of the cylinder from any remaining foam solution, dirt, rust and other contaminants.
- Insert the adapter into the thread; installation must be done hermetically.
- Fix a quad to the adapter, internal thread, size ¾ inch.
- In the engine from the cooling installation, you should find the tip of the oil fill tube. Cut off the end with side cutters and replace the oil.
- Pour the previous lubricant into a container with measuring marks to determine the amount of oil.
- Using a syringe, introduce new oil into the electric motor, adding 10–12% when calculating the amount.
- Plug the oil filler tube again, you can compress the ends or insert a bolt wrapped with fum tape.
- Find a starting relay in the motor, which, together with the cylinder, should be installed in the frame of the future unit. It is better to use bolts as fasteners, but zip ties will also work.
- Install a gasoline-type filter on the air intake pipe to clean the air received. Installing the filter involves installing a rubber adapter.
- Attach a fuel filter from a diesel engine with a device for separating moisture to the outlet line from the supercharger with clamps. Without a filter element, drops of water and oil will get into the paint.
- Connect a reducer to the line to maintain pressure inside the cylinder.
- Behind the gearbox, the hose is attached to the quadruple.
Compressor from a fire extinguisher with a motor from a refrigerator
- The remaining inputs of the quad are equipped with a pressure gauge and a relay to control the pressure level.
- To adjust the minimum and maximum pressure, a spring-type control relay is installed on the cylinder. Connect it with one wire to the engine, and the other side to the negative wire of the network. The positive wire is connected to the start button. For a high-quality connection, soldering and high-quality insulation are used.
Performance
The ability to produce a certain volume of air “over the mountain” per unit of time. The higher it is, the faster the container is filled, and the more intense the flow from the nozzle when using compressed air directly.
To combine these qualities, a large volume of the piston group of the unit and a powerful engine with high speeds are required. Plus, it is necessary to ensure cooling of the cylinders, otherwise the compressor will overheat and jam. Such devices exist; even turbines can be used as a working unit.
But the cost of the equipment does not allow it to be used en masse, especially in everyday life.
Simply put , it’s either power or performance. How to get out of a vicious circle? Use a storage container - a receiver. In industrial designs, this is a steel cylinder, which is slowly filled by a powerful, but not very efficient compressor.
Homemade low-power compressor from an electric motor from a toy. A simple solution to a pressing problem. Such a compressor is quite suitable for supplying air to an aquarium. How to make it with your own hands in detail step by step in this video.
Once sufficient pressure has been created, a sufficiently large volume of air can be supplied from the receiver in a short time. Then you need to wait until the compressor restores pressure. This is how all units work , including those installed on cars with pneumatic brakes.
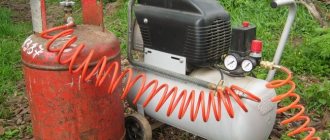
Our “Kulibins” have long learned to create a semblance of industrial installations using an auto-compressor. We take a spare tire, use our favorite “Berkut” to fill it with 3-4 atmospheres (the main thing is that the tire does not burst), and the high-pressure paint sprayer is ready.
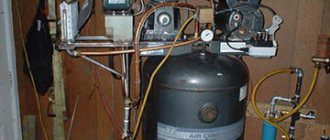
Compressor from a gas cylinder with a supercharger from a truck
An alternative way to make a compressor with your own hands is to use a 50 gas cylinder, an asynchronous motor and a compressor from the braking system in the ZIL-130. All elements are installed on the frame, but you can do without it and make a supporting element from a cylinder to which a pump, filter, electric motor, and equipment for operating control are attached.
You can make the simplest compressor unit with your own hands using a step-by-step guide:
- Weld the fitting into the air supply line from the pumping unit to the receiver.
- Attach the adapter for the output line from the receiver to the pneumatic tool.
- Weld the fitting for mounting the pressure gauge.
- Attach an adapter to connect the relief valve; it can be replaced with a relay. When the pressure rises to critical levels, the pressure will be released.
- At the bottom of the cylinder, install a ball valve to drain condensate.
- The pump and motor are fastened together using a drive belt, which is installed on the shaft pulleys.
Compressor from a gas cylinder with a supercharger from a truck
- Create an electrical installation system: a button to turn on and off, connect 2 capacitors with a capacity of 30 μF and a 60 μF starting element, a temporary relay and a magnetic starter.
- Install a device to filter the air flow to the supply line.
The manufacture of a powerful automobile compressor for painting can be carried out according to various schemes. The main advantage of these methods is the availability of materials.
Then it’s a matter of fantasy
Anyone who once rode “for power” on a moped or motorcycle without an air filter knows what deep scratches this seemingly “clean air” leaves on the piston skirts and cylinder walls.
Therefore, when thinking about how to make a compressor with your own hands, you inevitably have to think about the inlet air filter. It is enough to make the inlet pipe to match the inner diameter of the car air filter.
It must be done in the shape of the same inverted letter “G” to avoid splashing the oil outward. Of course, it is also necessary to make a seal to prevent air leaks from below. Surely there is something suitable for this in the corner of your garage?
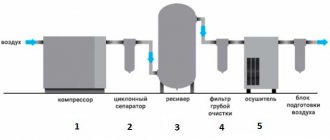
...So, let's trace the path of air through the compressor we are creating. Through the air filter from the car and the inlet pipe, air enters the “pump”.
Coming out through another pipe under pressure, the air gets rid of oil dust in the oil separator and oil filter. Then the air enters the receiver.
It should be noted that the air must pass through the receiver in order to dampen pressure surges. Therefore, if you simply screw a tee into the neck of your fire extinguisher - at the inlet, at the outlet and at the pressure gauge - this will not give any result.
Ideally, this diagram looks like this. Air enters almost to the bottom of your fire extinguisher through one of the two, longer tubes - and exits through the second, shorter one. Between the inlet and outlet holes there is a third one, into which a pressure gauge is screwed in, indicating the air pressure in your fire extinguisher.
A bypass valve or relay is connected in parallel with the pressure gauge. There are also pressure gauges that combine a relay option. Next, from the outlet pipe of the receiver, air enters a hose capable of withstanding a pressure of 6 - 8 atmospheres for use.
If you frequently change the tool connected to the compressor, it is reasonable to install a special pneumatic lock-connector at the end of the hose. It allows you to connect and disconnect the tool with one simple movement of your fingers.
Interesting!
If you only work with one thing each time, then you can get by with a regular ball valve in front of the hose. In the same way - convenient, useful, but not included in the “necessary package” - is a second pressure gauge showing the pressure in the hose.
As already said, this is the required level of equipment. These are the tasks that must be solved if you decide to build a compressor for your workshop yourself. Then it’s just a matter of the master’s imagination.
You can, for example, install a cooler for cooling. It’s no secret that air heats up when compressed. Instead of a car air filter at the inlet, you can install a water filter, similar to a hookah.
You can install two in series - instead of one receiver. Or make a salt filter, dry the exhaust air... For each purpose there are different means.
Making a 220 V electric air compressor with your own hands
Making a compressor with your own hands is easier than it seems at first glance. Let's look at the basic principles of how to make a compressor step by step.
Necessary materials
Properly preparing materials is half the job of assembling a compressor unit successfully completed. To create a classic device operating from a 220 V network you will need:
- pressure gauge;
- pressure control relay;
- gearbox with built-in oil and moisture protection filter;
- gasoline engine cleaning filter;
- crosspiece for water with internal thread;
- thread adapters;
- clamps or ties;
Making an electric air compressor with your own hands
- engine;
- receiver;
- engine oil;
- switch for working with voltage 220 V;
- brass tubes;
- hose made of oil-resistant material;
- board;
- medical syringe;
- corrosion inhibitor;
- washers, nuts and studs;
- means for creating hermetic connections;
- auto enamel;
- file;
- small wheels from toy cars or furniture;
- motor filter from a diesel engine.
Assembling the engine
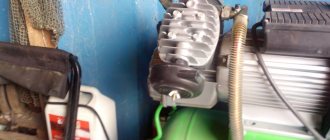
First, let's prepare the motor. Its role is to pump up air pressure. In order not to buy a special motor, you can use a motor from an old refrigerator.
Motor from an old refrigerator for making a compressor
The power unit contains a relay; it is useful for maintaining the selected pressure value in the system. Professionals note that Soviet refrigerators were equipped with more efficient motors; they are suitable for creating a compressor of greater power in comparison with imported products.
First of all, remove the motor from the refrigerator. To make it usable, the case will have to be cleaned. It is important to use a detergent that will prevent oxidation and corrosion. After cleaning the surface, the motor is suitable for painting.
Assembling a homemade compressor:
- The motor contains 3 tubes: 1 sealed and 2 open for air circulation. Determination of the output and input channel is required: the easiest way to find out about the role of the tubes is to turn on the motor.
- After external treatment, the oil must be changed. The best choice is a semi-synthetic product, which has the same characteristics as a motor product and contains various useful components. To replace it, a plugged tube is used, the end of which is cut off with a file. It is important to prevent sawdust from entering the system, therefore, after making a cut, you need to break the tube and introduce new oil with a syringe.
- It is important to properly close the oil filling channel to prevent leakage. A screw with the appropriate cross-section is selected and fum tape is applied to it. A sealant will come in handy during this process. The bolt is screwed tightly into the pipe.
- The motor and relay are mounted on a thick base board. The sensitivity of the relay requires maintaining the angle of the motor that was present in the refrigerator. Additionally, the engine is marked with the recommended position of the housing for stable and proper operation.
Compressed air reservoir
The air tank is an integral component of the compressor, without which the installation will not work. When choosing a tank, it is important to consider the amount of pressure that the cylinder can withstand (indicated on the body). An alternative option would be to use a receiver, old containers from a 10-liter fire extinguisher, since these containers are sealed and quite reliable.
The air tank is an integral component of the compressor, without which the installation will not work.
The start valve is replaced with a threaded adapter, which is screwed onto the receiver. Creating a tight connection will ensure the use of fum tape.
If there are pockets of corrosion on the receiver, it must first be cleaned with sandpaper or a grinding machine. To remove rust from the inside, pour a special product into the container and mix thoroughly. Next, install a cross adapter of the plumbing type; it is mounted using sealant.
Assembling the device
Final assembly is carried out in stages:
- The prepared receiver and motor are attached to a thick board. For fixation to the base, washers, nuts and studs are used. The location of the tank is strictly vertical. A reliable connection will be ensured by 3 sheets of plywood, on one of which a hole is cut for inserting a container. The remaining sheets are attached to the wood and plywood receiver retainer. From the floor side, furniture wheels are welded to the bottom for ease of movement.
- A rubber hose is placed on the air capture tube, to which a cleaning filter from a gasoline engine is attached. Separate clamps for attaching the filter are not required, because the inlet pressure is low.
- To prevent oil and water particles from entering the working composition, an oil and moisture separating filter from a diesel engine is installed on the outlet tube. Due to the relatively high pressure in the wire, it is recommended to use auxiliary fasteners; screw clamps are suitable.
- A cleaning filter is installed at the inlet of the gearbox; it is required to create a decoupling and direct air movement. The connection is made with a plumbing cross on both sides. A pressure switch or pressure gauge is installed on the opposite side to monitor and regulate the pressure level in the receiver. An adjustment relay is installed on top of the cross. All elements are mounted hermetically.
Materials for assembling a homemade compressor
- By means of regulating pressure, intermittent operation of the homemade structure is ensured. To adjust the relay, they act on 2 springs: one to set the maximum pressure, and the second to set the minimum.
- The electrical circuit contact is connected to the supercharger, and the second is connected to the minus phase. The second wire is connected to the supercharger via a toggle switch and to the mains phase. The toggle switch acts as a start button to activate and deactivate the device without removing the plug. All contacts are connected by soldering and then insulated.
- Painting of metal structures.
After creating the compressor, all that remains is to check its performance.
Testing and setting up a homemade compressor for painting cars
Having made a powerful compressor with your own hands, you should connect the spray gun to it.
Verification algorithm:
- Set the toggle switch to the inactive position, connect the plug to the electrical circuit.
- Initially set the relay to a low value and start the installation. Monitor work using pressure gauge readings. Now the user should make sure that the relay is working properly; it should open the circuit when the indicators are exceeded.
- To check for leaks, use a soap solution to wet all connections.
- Now the spray gun is turned on to release the air from the container. If the system is working properly, after the pressure drops the device should turn on.
If the device has passed all stages of testing, it is recommended to test the device in action by trying to paint a body element. The greatest attention is paid to the quality of the layer and composition, as well as stability of operation.
Testing and setting up a homemade compressor for painting cars
Carpenter versus joiner
“The viper with wheels is here!” KF "Kin-dza-dza"
The second stage of assembly is carpentry. I took ready-made chipboard plates “from stock” and screwed furniture wheels onto them with self-tapping screws, having previously drilled the seats for them with a thin drill (this way they are screwed exactly in place and much easier)
Be sure to ride the newly made product around the apartment (you need to check it out! =) ) - you will be guaranteed the attention and interested reaction of your family (from the category of bad advice, it would be worth leaving a note “never repeat this yourself”). Since I was making a two-level stand, the next step was to mark and drill holes for the studs
I screwed the nuts approximately to the middle of each stud, measured out the perforated tape with a reserve (so that it would be a “bed” for the fire extinguisher) and hoisted the latter to the place intended for it. Attention!!! Be sure to cover all bitten off areas of the punched paper tape with electrical tape or other soft material to avoid the possibility of injury, or treat it so that there are no sharp edges or burrs left. After positioning the fire extinguisher, I placed two more perforated tapes on top and secured them with nuts. If you use a prepared hydraulic accumulator as a receiver, then most small (5, 6, 8 liters) “horizontal” type models have wonderful claw brackets at the bottom and top. The lower ones can be screwed to the base, and a compressor can be placed on the upper ones. In my case, which I use as an example, the structure consists of two levels. The “second floor” of the structure must be prepared before installation. We find suitable holes on the legs of the compressor (there are many of them), and, maintaining the geometry, mark and drill them on the “second floor”. It’s okay if the holes are slightly larger than the diameter of the bolts (I used M8), wherever needed I used wide washers. We mount the “second floor” plate, looking at the diagram that we talked about in the first part. We install the compressor. In order to reduce vibration, it is necessary to provide some damping elements. I used ordinary plumbing silicone gaskets as them, making a kind of shock absorber out of them. We fix the compressor, do not forget to put washers. We try on the air distribution module to the receiver. If something sticks out, or is simply poorly positioned, the design can be changed. After fitting, we screw it on. Using a flexible hose, fum tape and clamps, we connect the outlet of the compressor and the inlet of the air preparation unit. The clamps must be tightened well, ensuring a tight fit of the hose - otherwise oil may leak and splash on the compressor side, and air may leak from the air distribution module side.
Recommendations
We recommend that you read these tips:
- The tank must be cleaned inside and out, otherwise progressive corrosion will create a hole. Sandblasting is one of the most effective and simplest cleaning methods. You can create a sandblasting chamber with your own hands with relative ease.
- Before work begins, the body elements are straightened. You can go the standard route and use a hammer, hoods, spotter and then paint the body, but the developed PDR technology helps eliminate damage without painting.
- Be sure to paint with a spray gun after applying the primer. Acid primer for cars is extremely effective, but has features of operation and compatibility with other materials.
- Before painting, all adjacent elements are either dismantled or covered, especially glass. If paint gets on glass, there is a risk of damage to the material during the removal process. A car glass repair kit will help restore glass from most damage. Car roof rails are difficult to dismantle; it is better to cover them with film and wrap them with tape.
Should I buy a unit or assemble it myself?
Therefore, it makes sense to make a compressor for painting a car yourself. To do this, it is worth studying in detail the structure and operating principle of a real, factory compressor. And it is the same for all samples. High pressure is created in the cylinder. The method of air injection is not important - it can be mechanical or by hand. In the case of manual supply, we save a lot of money, but where can we find a slave capable of pumping air continuously? The automatic process will eliminate many disadvantages and problems. An exception is changing the oil in the compressor. Only the mechanism is capable of continuously supplying a stream of air into the cylinder! The theory is simple; making a personal compressor station with your own hands is quick and easy.
Why do you need a receiver in a compressor?
The compressor receiver performs several important functions:
- Stabilizes the air pressure supplied to the working area (differences in pressure values are inevitable, since a single cycle of operation of any compressor involves a suction phase and an air injection phase).
- They provide the supply of compressed air for some time in the event of interruptions in the operation of the compressor, or when an additional consumer is connected to it.
- Cleaning the air from accumulating condensate, since high air humidity, which increases with increasing air pressure, leads to intense corrosion of the steel parts of the compressor.
- The accumulation of compressed air in the receiver for the compressor leads to a subsequent reduction in the total vibrations in the system, which, in turn, reduces the overall noise level and reduces the level of loads on the base of stationary units.
When performing work involving the production of compressed air in particularly large quantities, a standard receiver may not be enough. For example, when sandblasting surfaces with a large area, in order not to purchase a more powerful compressor, an additional receiver is often used.
The presence of a receiver, in addition, allows you to use the compressor periodically, i.e., reduce its consumption of electrical energy.
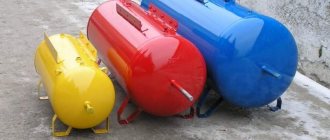
Structurally, the compressor receiver is a sealed tank with a certain capacity. For mobile compressors, receivers up to 50...100 l are used, for stationary ones - up to 500...1000 l. It is equipped with air-cleaning filters, condensate drains and shut-off valves for connection to the main unit and to the working device that consumes compressed air - nozzle, spray gun, etc.
The container is made of steel, from corrosion-resistant steels of type 10ХСНД or 16ГА2Ф. In exceptional cases, for particularly low-power compressors, receivers can be made of plastic or even high-strength rubber.
The layout of receivers can be horizontal or vertical. The first is used in mobile units, the second – in stationary ones. Each variety has its own advantages and disadvantages. In particular, it is easier to drain condensate in vertical receivers, but horizontal receivers are more compact and require shorter pipelines.
Types of equipment
Silent air compressor
Compressor receivers can be vertical or horizontal. Containers of the first type are more in demand because they are compact in size and allow rational use of the production area.
Equipment examples
- Model:
DHT 3000.40 - Capacity:
l/min - RUB 1,529,975
- Model:
DHT 500.40 - Capacity:
l/min - RUB 347,875
- Model:
RV 110/10 - Capacity:
l/min - 15,800 rub.
All models
All air collectors, regardless of configuration, can be easily combined into a common network if necessary. Moreover, installation can be performed in two methods - parallel and sequential. Each method has its pros and cons.
Equipment examples
- Model:
DHT 3000.40 - Capacity:
l/min - RUB 1,529,975
- Model:
DHT 500.40 - Capacity:
l/min - RUB 347,875
- Model:
RV 110/10 - Capacity:
l/min - 15,800 rub.
All models
Parallel connection
The advantage of this installation method is the high maintainability of the system. If one of the receivers fails, it is simply disconnected from the overall system and repaired or replaced. In addition, this method provides maximum storage throughput.
Serial connection
The main advantage of this installation option is the additional cleaning of the working environment from moisture and oil impurities. Compressed air sequentially passes through all containers in the network and is cleaned along the way. As for the disadvantages of such a connection, they include the total resistance of the receivers, which reduces their throughput.
How to choose the optimal receiver parameters?
In addition to capacity, the compressor receiver is also characterized by:
- Limit values of air humidity.
- Operating conditions (allowed difference in external ambient temperatures -15...+40ºС and relative humidity no more than 75...80%).
- Requirements for the installation location (away from heat sources, flammable and explosive materials, as well as in an atmosphere contaminated with mechanical particles - for example, near circular saws).
The requirements of PB 03-576-03 (rules for the design and safe operation of pressure vessels) also prohibit the operation of receivers that have not passed the performance check of the tank walls, as well as those that have external surface defects - cracks, dents, traces of atmospheric corrosion.
The selection of receiver characteristics for a compressor is done as follows. Set the required compressed air consumption, duration of its consumption, minimum and maximum pressure values. Next, using standard online calculation tables (for example, //www.kaeser.ru/Online_Services/Toolbox/Air_receiver_sizes/default.asp) determine the required parameter. For example, with initial air flow data of 0.1 m 3 /min, peak load duration during operation of 5 minutes, permissible pressure difference minimum/maximum of 3/4 atm, the optimal volume of the receiver tank will be 500 liters.
This method is focused on the time it takes to completely empty the receiver. There is also a simplified tabular method that correlates the volume of the receiver with the power consumption of the compressor. The ratios used in practice are:
- For a compressor with a power of up to 5 kW – up to 100 l;
- For a compressor with a power of up to 10 kW – up to 300 l;
- For a compressor with a power of up to 20 kW – up to 550 hp.
It is recommended to obtain intermediate values by interpolation. There are also experimental dependencies. For example, the capacity of the receiver tank cannot be less than the performance of the compressor for 8 seconds of its continuous operation. In particular, with a compressor air flow rate of 400 l/min, the tank volume will be no less than:
V = (400×8)/60 = 53.33 (l)
Power
The ability to create high pressure without additional load on the engine.
Automotive units are in complete order with this. You can safely build up pressure up to 5-6 atmospheres. True, pumping up a wheel to the typical 2.5-3 units takes a good ten minutes (at zero initial pressure). During this time, inexpensive devices may simply overheat, so breaks are required.
This occurs due to the low performance of automobile compressors.
Functions
The compressor receiver is designed to prevent the formation of corrosion in the system by removing excess moisture. It is also capable of storing compressed air and ensuring continuous operation during increased loads. Therefore, it becomes indispensable when the productivity of the units is insufficient and the functioning of a large number of consumers.
Equipment operating in automated mode is switched on when the pressure drops to a given level and switched off when it rises. The receiver reduces the number of cycles, which increases the period of uninterrupted operation and reduces wear. The supply of compressed air is uneven due to the specific functioning of piston systems. This problem is eliminated by a special air accumulator that prevents pulsation.
Recommendations
Comments 17
Can you tell me more about the compressor, I also have one for 25 liters, but I want to install something larger, what do I need?
A blowing gun costs 200 rubles in an online store) but the compressor is cool) I also think everything is in the plans for 1000 liters per minute, put on a simple cylinder or directly on the receiver of a narrow gauge train. There are probably 500 liters or a little less
and for me a similar barbecue works as a barbecue.