This article is about pressure gauges. There is a very large selection of them in stores, but you still need to choose carefully so as not to get confused in the readings later.
Dmitry Belkin
Friends, there is a good and useful device. It's called a pressure gauge. Shows the pressure under which the water is in the system. In the vast majority of heating systems, this pressure is limited to 1.5 (one and a half) atmospheres. Why exactly one and a half? Because excess pressure should be minimal, and one and a half atmospheres is enough for private households. Let me remind you that one and a half atmospheres corresponds to 15 meters of water column or a 5 (!) storey building. Since such pillars are not observed in private construction, a pressure of one and a half atmospheres is accepted.
In water supply systems, the maximum value is 4 atmospheres. Why? And here we are dealing with limitations in the characteristics of pumping systems. Let's imagine the two most common cases.
1. We suck in water from a depth of 7 meters. In this case, in order for the pump to lift water 40 meters, it must have a maximum lift of almost 50 meters. Look in stores to see if centrifugal pumps with these characteristics are available and what their electrical power is and how much they cost. I think these are semi-professional or professional quality devices with a corresponding price. Centrifugal pumps with a maximum pressure of no more than 4 atmospheres are now widely used. We subtract 0.7 atmospheres for the rise of water and get a measly 3.3 atmospheres, both at maximum power and at minimum performance.
2. We have a good well 20 meters deep, and we use a powerful submersible pump. The situation is different here. Here you can find pumps with significantly higher lift compared to centrifugal ones. But even here everything revolves around 4 atmospheres from the surface of the earth. Let me remind you that our common pillar consists of 20 meters from the well and 40 meters above the ground. In total, the pump should lift 60-65 meters. This is frankly a powerful and expensive pump. Almost the limit of what is reasonable for private use.
Step-by-step instruction
How to measure blood pressure correctly with a mechanical tonometer:
- Take a sitting position (a sofa or armchair is suitable for this).
- Lean your back on the back of the chair, and place your feet on the floor (it is not recommended to cross them, tuck them in, throw them on top of each other, etc.).
- The left hand is freed from clothing and placed on a table or any other flat surface. The main thing is that it is not in a canopy.
- Open the cuff, insert your hand into it and secure it slightly above (2-3 cm) the elbow bend.
- Place part of the stethoscope in the form of a small metal disk on the inside of your elbow. It is important that the pulsating artery is clearly felt in this place.
- If you are performing this procedure for the first time and do not yet fully understand how to correctly measure pressure with a mechanical tonometer, then first feel the pulse with your fingers. For the future, you will know exactly where to place the metal part of the stethoscope.
- Then insert the hearing aid stethoscope into your ears.
- Make sure the air release wheel on the bulb is tightly closed.
- Place the rubber bulb of the tonometer in your hand and begin manually supplying air. The arrow on the dial will begin to move. After it reaches the 200-220 mm mark. rt. Art., stop squeezing the bulb and slowly begin to spin the wheel. The air should come out slowly, about 4 mmHg. Art. per second.
- As the air descends, you should hear a pulse. The number where the needle will be on the first beat is your systolic pressure (i.e., top). The pulse will be heard for some time. The value at which the needle will be at the last beat is your diastolic blood pressure (i.e., lower).
- Measure blood pressure on the other arm. Consider higher values as reliable. In the future, measure the pressure on the arm where it is higher.
- Both results obtained must be written down or remembered.
In general, this process will take you a few minutes. This procedure must be carried out daily, recording the data obtained. Thus, you can determine the average values of your upper and lower pressure.
Why is the pressure in the water supply weak?
Low water pressure in the water supply causes inconvenience when using many household appliances and prevents you from performing water procedures using a shower.
Low pressure, or weak water pressure, in popular parlance, can occur in the plumbing system in the following cases:
- Increased water intake on the line . This is observed to a greater extent in the summer and autumn, when it is time for gardening and stockpiling supplies for the winter, since some city dwellers, especially in the provinces, can have plots of land built directly in the courtyards of apartment buildings.
- Pump malfunction . At the distribution station, the pump may fail, as a result, the rate of water supply will decrease significantly.
- Lack of electricity at the pumping station . Surely residents of apartment buildings have noticed that when there is a power outage, the water supply also stops.
- Clogged water pipes . It is possible that scale and other debris have entered the system and clogged the internal section.
- Water leak . Due to a pipeline break, the pressure in the system drops sharply and is not restored until the accident is eliminated.
- Several problems at the same time . Misfortune never comes alone. Reasons can intersect at the most inopportune moment.
Technique for measuring blood pressure with a mechanical tonometer
Technique for measuring blood pressure with a mechanical tonometer
Note! Hypertension - why are blood pressure pills harmful? Dr. Bubnovsky about two safe and simple steps to life without hypertension Read more »
To measure your blood pressure, you need to perform a series of sequential steps:
- Sit at the table, placing the hand being examined on its surface, palm up.
- Wrap the cuff loosely around your shoulder with the hoses facing down. Secure it with Velcro.
- If the device comes with a phonendoscope, then insert its ends into your ears, and attach the head with the membrane to the place of the strongest pulsation, usually located on the inside of the elbow joint. If there is no phonendoscope, blood strokes will have to be determined visually, guided by the sensations in the hand.
- Screw the valve on the bulb all the way and use your free hand to inflate the cuff with air until you feel numbness in your shoulder and the pulsation stops. At the same time, watch the pressure gauge needle: it should reach a value of 20–30 mm Hg. Art. higher than your normal blood pressure.
- Slowly open the bulb valve. At this point, you will hear a series of beats (about 8-10 in total) corresponding to your heartbeat. Remember to look at the meter dial: the needle will quickly move in the opposite direction, towards zero. You should see what mark it will be at when you hear the first and strongest impulse of blood - this is the value of systolic, or upper, blood pressure.
- The pulse beats will gradually subside. The last audible beat of the series corresponds to the lower (diastolic) pressure. For example, if you heard the first beat of blood when the needle was at 140, and the last one was at 90, then your blood pressure is 140/90 mmHg. Art.
- When finishing the measurement, open the bulb valve completely and release all the air from the cuff.
Having certain experience and skill, using a hand-held tonometer for measuring pressure with a phonendoscope, you can measure these indicators on the leg, if necessary. The point of most audible vascular pulsation is located on the outside of the dorsum of the foot.
Who is to blame and what to do?
Summer residents can solve the problem of low pressure in the water supply quite simply : using various pumping stations or using an autonomous water supply.
Residents of multi-storey buildings will have to work hard. To do this, it is necessary to draw up a collective letter to the management organization demanding the provision of services in the proper form in accordance with the contract, and a request to recalculate payment for poor-quality services.
To draw up papers, you need to officially record the water pressure on this line.
Diagnostic technique
You need to relax and be silent
How to correctly measure blood pressure with a mechanical tonometer? An inflatable cuff with a balloon is fixed on the shoulder at the site of pulsation of the brachial artery. The lower edge of the cuff should not reach the elbow (2 cm from it).
You must first free your hand from clothing. Initially, a palpation method of examining blood pressure is performed. Air is quickly inflated into the cuff to a level of 70 mmHg. Art. on the pressure gauge, then gradually increase the air pressure in the balloon by 10 mm until the pulse on the radial artery completely disappears. Then the air is gradually released until a pulse appears.
This method helps prevent overinflation of the cuff in the presence of the phenomenon of auscultation failure.
After the palpation method of recording pressure, the auscultatory method is carried out. To take measurements you will need the same thing and a phonendoscope.
The phonendoscope should be placed at the level of the ulnar fossa (a little higher and closer to the middle). Gradually pump air into the balloon so that the pressure in the cuff exceeds the pressure at which the pulse in the artery disappears by 20-30 mmHg. Then they open the valve a little and monitor the Korotkoff sounds and their changes.
- How to correctly measure blood pressure with an electronic tonometer: measurement technique
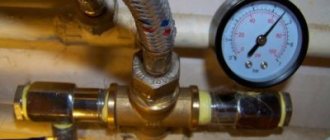
How to measure water pressure in a system
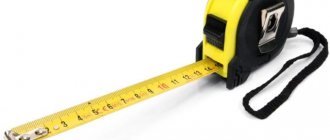
The question disappears if you already have a pressure gauge at the system inlet. If not, then you will need 5 minutes of time and the following useful things:
- Pressure gauge for water.
- 1/2 inch threaded fitting.
- Hose of suitable diameter.
- Worm clamps.
- Plumbing tape.
the hose on one end on the pressure gauge, the other on the fitting. We fix it with clamps. Let's go to the bathroom. We unscrew the shower head and replace it with a fitting . We switch the water between the shower and faucet modes several times If the joints are leaking, then wrap the joint with plumbing tape . Ready. Look at the pressure gauge scale and find out the pressure in the water supply.
The hose option is universal . However, instead of a hose with clamps, you can use adapters with a 1/2- inch outlet. The required inlet adapter thread depends on the specific gauge thread ( metric , 3/8 , 1/4 ).
Hand-held device
A manual tonometer for measuring pressure is an air-filled cuff with Velcro, connected by hoses to a rubber pump - a bulb and a meter (manometer). The cuff is wrapped around the patient's shoulder and fastened. The bulb is equipped with a screw-on valve. By compressing it several times, air is pumped into the cuff.
The most common breakdown of a mechanical tonometer is a violation of the seal of the bulb: the bulb bursts, or an invisible crack appears on it over time, which requires replacement of this part of the device.
In addition, some devices come with a phonendoscope for listening to blood impulses in the arteries. These blood pressure monitors are certainly more convenient.
Basic parameters when choosing a pressure gauge
The choice of pressure gauge depends on many parameters, which we will try to describe in this article.
Pressure gauge measuring range.
Standard range of pressure gauges: 0-1, 0-1.6, 0-2.5, 0-4, 0-6, 0-10, 0-16, 0-25, 0-40, 0-60, 0-100, 0-160, 0-250, 0-400, 0-600, 0-1000 kgf/cm² 1kgf/ms²=0.980665 bar=0.0980665 MPa=98.0665 kPa
Standard range of pressure ranges for pressure and vacuum gauges: -1..+0.6, -1..+1.5, -1..+3, -1..+5, -1..+9, -1..+15, -1 ..+24 kgf/cm²=bar=atm=0.1MPa=100kPa
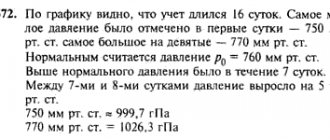
If you are in doubt about which scale the device is needed for your purposes, when choosing a range, the main factor is whether the operating pressure falls in the range from 1/3 to 2/3 of the measurement scale.
When choosing a scale range, you need to know that the operating pressure should fall in the range from 1/3 to 2/3 of the measurement scale. To ensure stable operation, you should buy a device with a scale of 0-10 atm, since a pressure of 5.5 atm falls in the range from 1/3 to 2/3 of the scale of 3.3 atm and 6.6 atm, respectively. Provided that the pressure is less than 1/3 of the scale, the error in pressure measurement increases significantly. Provided that the measured pressure is more than 2/3 of the scale, the device operates in overloaded mode, which entails a reduction in the service life of the pressure gauge.
Pressure gauge accuracy class.
The choice of pressure gauge depends on the accuracy class. The accuracy class is the permissible percentage of error in the measurement results of a device relative to the measurement scale.
There is a standard range of accuracy classes for pressure gauges: 4, 2.5, 1.5, 1, 0.6, 0.4, 0.25, 0.15. You can calculate the pressure gauge error yourself. For example, if your device is 10 atm and has an accuracy class of 1.5, the permissible error is 1.5% of the measurement scale (0.15 atm). If the error of your pressure gauge exceeds this value, the device must be replaced. Without special equipment, it is impossible to determine that the device is faulty. Only a specialized organization that has a testing installation with a pressure gauge of a high accuracy class, which is the standard, can establish a discrepancy in the accuracy class. The problem pressure gauge and the reference device are connected to the pressure line, and then the readings are compared.
Pressure gauge diameter.
This parameter is important for devices with a round body. Standard diameters: 40, 50, 63, 80, 100, 150, 160, 250 mm.
Location of the fitting.
There are two options. Radial arrangement - the connecting fitting comes out of the pressure gauge from below. End - the fitting is located at the rear, on the back of the device.
Connecting thread.
The most common types of threads for pressure gauges are metric and pipe threads. There is a standard range of thread types: M10x1, M12x1.5, M20x1.5, G1/8, G1/4, G1/2. Devices from imported manufacturers are characterized by pipe threads. For domestic pressure gauges - metric.
Intervalidation interval.
The period after which the pressure gauge must be calibrated is called the calibration interval. New devices have initial factory verification. This is evidenced by the verifier’s mark located on the dial or on the pressure gauge body, and a mark in the passport. Primary verification lasts for 1 or 2 years. For pressure gauges that are used for personal purposes, verification is not critical, so you can choose any pressure gauge. For departmental facilities - factories, furnaces, heating points, etc., after the expiration of the initial verification period, the pressure gauge is subject to re-verification at the center of standardization and metrology, or in specialized organizations that have a license for verification and the corresponding equipment. You should know that re-verification, as a rule, costs more than buying a new device, or is equal to it. In addition, a fee for returning the device is added to the amount. If the pressure gauge does not pass re-verification, you will also have to pay for repairs and subsequent verification.
Based on the above, the choice of pressure gauge depends on:
- Purchase a pressure gauge that has an initial verification period of 2 years.
- Before sending the device for re-verification, calculate all the costs and evaluate whether this event is profitable. The calculation includes the cost of re-verification and payment for repairs if necessary. For example, if the system was subjected to hydraulic shocks from medium pulsation, then after 2 years of service, as a rule, 50% of pressure gauges do not pass re-calibration.
Operating conditions for pressure gauges.
If the operation of the device involves special impacts on the pressure gauge, such as: work with viscous substances, exposure to aggressive media, work in conditions of high vibration, in conditions of high (more than +100°C) and low (less than -40°C) temperatures, you must use a specialized device designed to work in appropriate conditions.
You can familiarize yourself with pressure heads manufactured by us in the catalogue.
How much more accuracy do we need?
In general, everyone decides for themselves. For many applications, it is also important that the needle has moved from zero. The accuracy of a pressure gauge may be needed to inflate the battery diaphragm tank. Particular precision can be useful if the battery tank needs to be pumped up without releasing the water pressure. But here we also care about the error of the pressure gauge, which will measure our air pressure. One way or another, it is better to have an accurate pressure gauge than an inaccurate one. Moreover, a pressure gauge is a relatively cheap thing and it’s not a sin to pay a little more for better quality. Let me remind you that this, as always, is my personal opinion.
Normal oil pressure value
Since motor oil is a liquid, the unit bar is used to measure its pressure. Differences in the design of internal combustion engines do not allow us to operate with exact values, but it is quite possible to determine the operating range of permissible pressures.
When idling, the oil pressure must be at least two bar. This figure is valid for most engines.
In operating mode, when the engine speed reaches 4-5 thousand, the oil should be pumped at a pressure of 4.5-6.5 bar.
If the engine is not able to create such pressure, then it is time for a major overhaul. Well, if the oil pressure is too high, there is a risk of the pressure relief valve breaking.
We recommend
“The oil pressure button came on: causes and solution to the problem” More details
You can determine the normal value of oil pressure in a particular internal combustion engine using tables containing these parameters for all engines of the same manufacturer. Such data can be found in manuals - special technical documents that describe operation and repair, as well as on thematic resources on the Internet.
To correctly measure oil pressure on the same “Kalina” or a foreign-made car, you must have information about the exact value of the norm.
Pressure gauge scale units
I suggest everyone focus on bars. This is a non-systemic unit of pressure measurement. It shows a value close to the physical and technical atmosphere and is the most convenient. Consider the bar (0.1 MPa) as an abstract atmosphere and don't worry. Why are physical and technical atmospheres different? Because getting attached to a column of water is dangerous. Our actual water column also depends on atmospheric pressure. But, I repeat, all three units are approximately equal to each other. If the pressure gauge scale is calibrated in kgf/cm2, then you need to keep in mind that 1 kgf/cm2 is exactly equal to one technical atmosphere, or 10 m of water column. More details about pressure units can be found in a special article about plumbing. I strongly advise against paying attention to a unit such as Psi, or pounds per square inch. This is not our unit and you shouldn’t even try to get used to it. Although, if you wish, of course, you can get used to inches and pounds and feet. But you need a very great desire and a lot of practice.
Briefly speaking
- Technical atmosphere (1 atm) = 10 m water column = 1 kgf/cm2
- bar - has an intermediate value = 10.197 m water column = 0.1 MPa
- Physical atmosphere (1 atm) = 10.33 m water column
For the purposes of determining water supply pressure, all these pressures (5 different units of measurement) are approximately equal. The extreme differences are 33 cm of water column or about a bucket of water. Not by weight, mind you, but by height. Since we measure in meters, we neglect 30 centimeters.
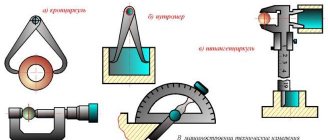
Types and design of the device
Depending on the purposes for which the devices are used, they are divided into different types. The most common are spring pressure gauges. They have their advantages:
- Measuring quantities over a wide range.
- Good technical characteristics.
- Reliability.
- Simplicity of the device.
In a spring pressure gauge, the sensing element is a hollow, curved tube inside. It can have a cross-section in the form of an oval or an ellipsoid. This tube deforms under pressure . It is sealed on one side, and on the other there is a fitting with which the value in the medium is measured. The end of the tube, which is sealed, is connected to the transmission mechanism.
The design of the device is as follows:
- Frame.
- Instrument arrows.
- Gears.
- Axis.
- Leash.
- Gear sector.
Read also: 5Ge200af with precious metal content
A special spring is installed between the teeth of the sector and the gear, which is necessary in order to eliminate backlash.
The measuring scale is presented in Bars or Pascals. The arrow shows the excess pressure of the medium in which the measurement is being taken.
The principle of operation is very simple. The pressure from the medium being measured enters the tube. Under its influence, the tube tries to level out, since the area of the outer and inner surfaces has different sizes. The free end of the tube moves, and the arrow rotates at a certain angle thanks to a transmission mechanism. The measured value and the tube deformation are in a linear relationship. That is why the value that the arrow shows is the pressure of a certain environment.
Which fire extinguishers have a pressure gauge installed?
According to SP 9.13130.2009 and the General Technical Requirements for Fire Extinguishing Agents, the P sensor is installed on rechargeable pump-type models:
- powder;
- air-foam;
- emulsion;
- carbon dioxide.
Fire inspectors do not have the right to require company management to have fire equipment with a sensor in the premises.
The most popular fire extinguishing agents with a pressure gauge are powder ones. They are used in schools, kindergartens, hospitals and other public places. Manual small-sized models are used to fight fires in cars.
Functions of the car oil system
Previously, engine oil was used only to minimize wear on internal combustion engine parts, but in modern cars it performs a much wider range of tasks.
In addition to lubricating, engine oil removes heat from heating components and acts as a hydraulic fluid in the following components:
- in valves with hydraulic compensator;
- chain or timing belt tensioner;
- couplings and other mechanisms.
In modern car engines, motor oil is pumped into loaded components under pressure. The oil pump is responsible for creating this pressure. If the pressure is insufficient or too high, it is considered a failure.
With low oil pressure, the internal combustion engine wears out very quickly. If the pressure is too high, the seals are squeezed out, seals and gaskets leak, and lubricant penetrates into places where it should not be.
Insufficient pressure causes oil starvation of the engine, which also leads to premature wear of the power unit. This is often accompanied by malfunctions in the internal combustion engine hydraulic system. As a result, significant damage appears in the engine, the repair of which is expensive.
Oil starvation is a direct cause of premature exhaustion of engine life.
It is not uncommon for the hydraulic timing chain tensioner to break, which leads to an inevitable collision of valves and pistons. The damage resulting from this makes the engine beyond repair. And now the car owner is forced to purchase a new power unit, but can he afford these unexpected expenses?
Most motorists are aware of the negative consequences of low engine oil pressure. In this case, the increased oil pressure is ignored. And this is a dangerous misconception, because due to fluid leakage through the seals, the normal operation of the engine can also be disrupted.
The instrument panel of any car has a warning indicator that warns of low oil pressure in the engine. Some car models are equipped with instruments that accurately indicate the measured value. Experienced drivers know how to check oil pressure in the absence of standard monitoring devices. This can be done using a specialized device - a pressure gauge.
Often you cannot do without a service that will carry out a complete diagnosis of your car. You should contact them in cases where there are problems with the car engine. This is a reasonable and timely step, otherwise repairing neglected faults will cost much more.
It should also be borne in mind that different cars have different engines with different technical characteristics, which means that the low and high engine oil pressure settings will also be different.
Symptoms of low blood pressure
Most doctors consider chronic low blood pressure to be dangerous only if it causes noticeable signs and symptoms, such as:
- Dizziness
- Nausea
- Fainting
- Dehydration and unusual thirst
- Lack of concentration
- Blurred vision
- Cold, clammy, pale skin
- Rapid breathing
- Fatigue
- Depression
A single deviation from normal blood pressure readings is not a cause for concern unless you are experiencing any other symptoms.