A generator is a kind of power plant that provides energy to all engine systems: power, cooling, ignition, so its failure will inevitably lead to other malfunctions. To prevent breakdowns, it is necessary to systematically diagnose it, and if problems cannot be avoided, repair it immediately.
In this article we will talk about how to check the generator for performance without resorting to the help of specialists. But first, let's look at the symptoms of its possible malfunctions.
Main signs of generator malfunction
The following signs will indicate that the generator has failed or there are problems with its operation:
- constant lighting of the warning light in the form of a red battery on the dashboard, which indicates that the generator is not charging or is producing insufficient current;
- constantly discharging battery;
- interruptions in the operation of electrical equipment (lighting and alarm units, multimedia, heating and ventilation) while the engine is running;
- the appearance of a characteristic burnt smell in the cabin (engine compartment);
- excessive heating of the generator stator;
- hum (rustle, whistle) of the generator.
The appearance of such signs is a serious reason to conduct a diagnosis. To do this, it is not at all necessary to go to a service station, since it is quite possible to check the generator’s functionality on your own, especially if you have even the slightest skills in handling a car tester. But first, let's talk about the main breakdowns.
Main faults
The generator may have malfunctions of both mechanical and electrical nature. These include:
- failure of the voltage regulator;
- malfunction of the diode bridge (rectifier unit);
- short circuit of the rotor field winding;
- short circuit of the stator windings;
- brush wear;
- bearing wear.
Next, we will talk about how to test the generator for performance yourself, based on the symptoms present and possible malfunctions.
For what reason can a generator fail?
Since the sign of a generator malfunction is almost always the same, it is impossible to immediately identify the reasons why it failed without special equipment. There are 4 main failures due to which the generator may become inoperable.
- Bearing jamming . During operation of the machine, there is a constant movement of elements in the generator, which leads to the disappearance of lubricant and further jamming or complete jamming of spare parts. Since the bearings have a high density, the first thing that breaks is the belt, which is responsible for their rotation. If the belt breaks, then you should think about replacing or rebuilding the generator.
- Winding burnout . A burnt winding can occur for various reasons. The most common is the ingress of chemicals and salt that are sprinkled on roads in winter. After the wiring has burned out or simply lost its integrity, the generation of current stops.
- Wear or jamming of brushes . Problems in the brush assembly arise because the graphite rods are worn out. This is a fairly common problem, as many car enthusiasts forget to replace brushes in a timely manner.
- Regulator relay failure . This part prevents overcharging of the battery and brings the voltage to the specified parameters.
Since it is not always convenient to check the generator on a car in the field, it is worth carrying out scheduled maintenance in advance and not neglecting the symptoms of imminent failure.
Checking the voltage regulator
The regulator is designed to stabilize the generated voltage before supplying it to the vehicle's on-board circuit, including the battery for recharging it. The only way to determine its serviceability yourself is to check the charging of the generator, or rather, the amount of voltage it supplies to the battery terminals. Depending on the make and model of the machine, it can range from 13.5 to 15.5 V. Therefore, before checking the operation of the generator to ensure that the regulator is working properly, you need to find out exactly what voltage it should produce. This information can be obtained from the vehicle's owner's manual.
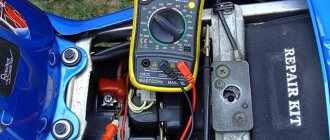
How to test a generator with a multimeter? To do this, switch the device to voltmeter mode and, observing polarity, connect its probes to the battery terminals with the engine not running. A voltage between 12-12.8 V is considered normal. Next, start the engine and repeat the procedure. The voltage at the battery terminals should increase to 13.5-15.5 V. Only in this case can the regulator be considered operational. An increase or decrease in voltage, on the contrary, indicates that it is faulty.
Purpose of a car electric generator
This device converts torque into electricity. This element feeds:
- car ignition system;
- automotive lighting;
- electronic equipment of the car (for example, on-board PC).
The power of the electric generator may not be enough when all consumers are turned on. This will cause the batteries to drain quickly. When the full load is turned on, the voltage of the generator of the VAZ 2110 car and other models of the manufacturer drops below the permissible value, which leads to battery discharge. .
How to check the diode bridge of a generator without removing it from the car
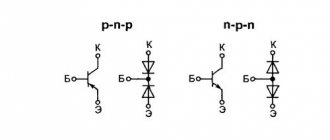
The diode bridge acts as a kind of rectifier, converting the alternating current generated by the generator into direct current. It usually consists of six semiconductor diodes, three of them are “positive”, the other three are “negative”, i.e. the first pass current in one direction, the second in the other. The rectifier can be checked either with the generator removed or without dismantling it. Let's consider both options.
Before checking the diode bridge of the generator without removing it, it is necessary to disconnect all wires from it and from the voltage regulator, having first disconnected the ground terminal from the battery. First, let's check the rectifier for a short circuit. Turn on the multimeter in ohmmeter mode, connect the positive (red) probe to terminal “30” of the generator (positive contact of the bridge), and the negative one to the generator housing. With a working rectifier, the device readings will tend to infinity. If the resistance is several ohms, the rectifier is faulty.
Read also: Gas consumption per 1m2 of fused roofing
Now let's talk about how to check the generator diode bridge for breakdown. Let's start with the positive diodes. Again, connect the positive probe to the corresponding bridge contact (pin “30”), and the negative probe to the rectifier mounting bolts (brackets). In this case, the resistance should also tend to infinity. Otherwise, one or more diodes are broken.
Let's move on to "negative" semiconductors. We attach the red probe of the tester to the rectifier mounting bolts, the black probe to the generator housing. Resistance tending to infinity is a sure sign that the diodes are intact.
Which electric generator should I buy (articles, manufacturers)?
When checking a generator, it sometimes turns out that the device needs to be replaced. To choose the appropriate version of the generating unit for a VAZ, you need to take into account the type of engine (with a carburetor or injector) and the configuration of the internal combustion engine.
It is better to install models of generating units manufactured by VAZ partners. Among the latter, electric generators KZATE 9402.3701 and 372.3701 are distinguished. The first option produces a current of 80 A and is installed on the engines of AvtoVAZ 2111 cars. Devices 372.3701 are less powerful, delivering 55 A.
The most popular brands of generators for VAZ internal combustion engines
If you cannot find one of the above parts, you can give preference to compatible generating units. Among the most famous manufacturers of electric generators at VAZ are:
- LKD - the brand is distinguished by the production of devices that are not of the highest standard, but still suitable for use.
- Fenox - the manufacturer stands out for its high-quality assembly of products.
- “Pramo” - generating units of this brand have a different design than models from previous manufacturers, which makes it possible to obtain power up to 100 A;
- “StartVOLT” - devices from this manufacturer are equipped with digital voltage regulators and a pair of additional diodes. The latter help to increase the productivity of the electric generator (up to 120 A).
If you want to save money, you should choose Chinese brands of generators. Domestic manufacturers produce electric generators with an optimal ratio of quality and cost.
Checking the rotor winding
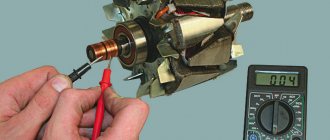
A common malfunction of a car generator is short-circuiting of the windings. This can happen as a result of a sudden voltage surge, water ingress, brush wear, etc. Since you can check the generator with a multimeter for the integrity of its windings only by gaining full access to them, you will need to dismantle the entire assembly. We will not describe this process, since it differs for different cars. Before checking the removed generator for operability of the rotor winding, it naturally needs to be disassembled.
After removing the rotor, we find slip rings on its shaft. There are only two of them. Having turned on the multimeter in ohmmeter mode, we connect its probes to these rings. The device should produce a resistance within 2-5 Ohms. These are normal indicators for a working rotor. A higher resistance indicates poor contact between the rings. In the opposite case, when the instrument readings approach zero, an interturn short circuit most likely occurs.
Dismantling and installation of an electric generator
The procedures for removing and installing the generating unit will be considered using the example of VAZ 2108, 2109. Algorithm for the dismantling procedure:
- Disabling the car battery.
- Disconnecting the generator terminals (located on the right).
- Loosening the drive belt tension adjustment nut (located on top).
- Removing the strap from the pulley.
- Removing the adjusting bar (the same bar where the nut was loosened).
- Unscrewing the bracket mounting bolts.
After this, the generating unit can be removed. You can remove the generator, for example, on a VAZ 2114 with a 16-valve internal combustion engine from Super Auto according to the same sequence. The device must be installed in reverse order.
How to check the generator for the operability of the stator windings
Let's move on to the stator. It has several windings, each of which must be checked separately. But before this, you must definitely disconnect the wires connecting the terminals of the windings and the diode bridge.
We connect the probes of the multimeter, switched on in ohmmeter mode, to the terminals of each of the windings in turn. The working winding should have a resistance of about 0.2 Ohm.
Next, you need to measure the resistance between the common terminal (zero) of the stator and the terminal of any of the windings. It should be at least 0.3 Ohm.
Generator bearing wear
A car generator has two bearings. One of them is fixed to the rotor shaft, the second is pressed into the central part of the cover. A hum or whistle coming from the generator while the engine is running is a sure sign that one of the bearings has given up its life. A related symptom may be heating of the generator housing. If you notice these signs, hurry to replace the bearings. Otherwise, this will lead to distortion of the rotor shaft or jamming with all the ensuing consequences.
You can check the bearings by removing the alternator belt and turning its shaft by hand. If the rotor rotates easily, without jerking or play, the bearings will still serve. If rotation is difficult or there is play in the shaft, do not delay replacing the bearings.
The generator is a miniature electrical station that supplies power to many components of the car: ignition, cooling, electrical wiring. Therefore, its failure will certainly entail other malfunctions. To prevent problems, you need to have this part diagnosed and repaired from time to time.
It will be useful for any motorist to know how to check the operation of a generator in a car, but first you need to understand the possible signs of a breakdown.
DIY generator repair
Stator repair usually means rewinding the generator stator. For this procedure you will need an impressive set of tools:
- Winding machine;
- Copper wire (about 8 coils may be required);
- Tamping;
- Drilling machine;
- Device for drying a varnished stator;
- Hammer, set of screwdrivers and keys.
Winding the stator of a car generator is the repair of the stator. First you need to remove the stator itself from the generator. The old winding is scorched, but before this, a diagram of the generator stator winding must be drawn up, identical to the old three-phase or single-phase winding. When scorched, the magnetic properties of the metal stator package do not deteriorate, so there is no need to worry. When the winding is completely burnt, the seat should be completely cleaned. Syntoflex insulating gaskets are cut and installed in the grooves.
The winding should be rewinded according to a pre-drawn pattern. The linear principle is used in a single-phase generator, and the three-phase stator winding involves a star or delta connection. When rewinding, the wire from the first groove should go directly to the fourth. First, half the turns are wound in one direction, then the second half in the opposite direction. The grooves are sealed with the protruding parts of the gaskets, after which the coils need to be tapped with a hammer. To avoid damaging the winding, you need to use a spacer.
Before checking the performance of the stator with currents, you should make sure that there is no short circuit. If there is a short circuit, it means the insulation was installed poorly. You should find the problem area and, using a gasket, eliminate the breakdown.
Before impregnation with varnish, you need to check the dimensions of the rewound unit; it should not protrude beyond the edges when assembling the generator. The contacts are connected with a thread that will not melt when dried and placed in a container with varnish. After impregnation of the stator, it is placed in an oven for drying, after allowing the element to flow around. If there is no suitable furnace, the stator can simply be suspended by installing a heating element underneath. When the varnish stops sticking, drying is complete. When using heating, drying usually takes about 2-3 hours.
When the generator operates unstable, for many the solution to the problem is to replace the entire unit. But if you know how to check all the elements of the generator, then even the stator winding procedure will be within your grasp.
Symptoms of malfunction
may indicate a generator malfunction :
- the warning light on the dashboard is constantly on;
- The battery began to discharge quickly, and recharging does not save the situation;
- there are malfunctions in the functioning of electrical equipment (ventilation and heating, multimedia devices, alarm system and lighting), even if the motor is working properly;
- there was a smell of something burnt in the car interior;
- the generator began to whistle or rustle.
If you notice these symptoms, you should immediately go to a car service center for a thorough diagnosis. However, you can check the functionality of the generator on your own, especially if you have the skills to use an autotester.
Common breakdowns
Generator faults can be electrical or mechanical. These include:
- loss of functionality of the voltage regulator;
- breakdown of the rectifier unit (diode bridge);
- short circuit of stator windings;
- current short circuit in the rotor winding;
- wear of bearings and brushes.
Read also: Flux based on zinc chloride
Voltage regulator
The purpose of this unit is to normalize the voltage before feeding it into the automotive electrical circuit. You can check the serviceability of the regulator by checking the voltage that it supplies to the battery terminals. This indicator depends on the model and brand of the vehicle and varies between 13.5-15.5 V. Therefore, you should find out in advance what voltage your particular type of regulator produces. This can be done by studying the manual for using the machine. For example, you can take a VAZ 2107 or 2110 car, since these vehicles have the most typical faults associated with the integral and relays.
Using a Multimeter
To check the VAZ 2110 generator with a multimeter, you need to switch the device to voltmeter mode. Then you need to connect its probes to the battery terminals. The most important thing is to observe the polarity and turn off the car engine. The voltage normally varies from 12 to 12.8 V. Next, the procedure should be repeated, but with the engine running. The voltage readings should rise to 13.5-15.5 V. Lower and higher voltage values indicate a malfunction of the generator.
Checking the generator without removing it from the car
A bridge of diodes performs the functions of a kind of alternating current converter. It contains three negative and three positive diodes.
Before checking the bridge, you need to disconnect all the wires coming from it and from the voltage regulator. You also need to remove the ground anchor from the battery in advance. First you need to check the rectifier for short circuits. We activate the ohmmeter mode on the multimeter and connect the red (positive) probe to the positive contact of the diode bridge, and the negative probe to the surface of the housing of the generator itself. If the rectifier is fully operational, then the readings of the measuring device will go to infinity. In other cases, the rectifier will be inoperative.
Testing of stator and rotor windings
A common breakdown of a car generator is a short circuit in the windings. It occurs when current surges are too intense, brushes wear out and liquid gets in.
So, you need to remove the rotor and find a pair of slip rings on its structure that will need to be ringed. Having started the ohmmeter mode on the multimeter, we connect the probes to these rings. Normal resistance is 2-6 ohms. If you get large values, then there is a loss of contact between the slip rings. If the device shows lower values, then an interturn short circuit has occurred.
The starter has several windings at once. They need to be checked separately. However, first you need to disconnect the wires that connect the diode bridge and the winding terminals.
Then you should measure the resistance between zero and the terminals of the windings. The normal value is no less than 0.3 Ohm.
Wear of brushes and bearings
If you have already disassembled the generator, then it is advisable to check the condition of the brushes. They can wear out or break due to misalignment of the rotor shaft. If the brushes are damaged, they should be replaced with new ones.
Inside a car alternator there are a pair of bearings. One is fixed on the rotor shaft, the other is in the center of the cover. The whistling and hum of the generator when the engine is running is a clear sign of bearing wear. In this case, the generator housing can become very hot. If you notice such signs, it is better to replace the bearings immediately, otherwise you may encounter more serious problems.
You can check the bearing by removing the belt from the generator and trying to rotate its shaft with your own hand. If the part rotates freely and easily, then everything is in order. If it is difficult to rotate the rotor, then you should not delay replacing the bearings.
How to check the generator for performance? Self-check and repair of the generator
A generator is a typical electrical station that provides energy to all engine systems: power, cooling, ignition, so its failure will inevitably lead to other malfunctions. To prevent breakdowns, you need to systematically diagnose it, and if problems cannot be avoided, repair it immediately.
In this article we will talk about how to check the generator for performance without resorting to the help of professionals. But before that, let's look at the symptoms of its possible defects.
Device for mounting AvtoVAZ electric generators
Sometimes, to check the functionality of such devices, it is necessary to completely dismantle them. Before checking a generator removed from a VAZ 2110 and other cars from the same manufacturer with a multimeter, you should understand the structure of the generating unit.
The design may differ slightly depending on the modification of the device. But the main components of electric generators include the stator, rotor, aluminum covers, pulley, brushes, and bearings.
Rotor design features
The part is made in the form of a shaft with a corrugated surface, pressed steel bushings, and beak-shaped poles. Together these elements form an electromagnetic core.
Between the poles on the bushing there is an exciting winding protected by a plastic housing. A cooling impeller and a generator pulley are attached to the front of the shaft. The rotor is installed on bearings. The rear ball bearing is pressed onto the shaft. The front one is fixed with special washers on the cover.
Generator stator structure
This device is made of thin plates (up to 1 mm thick) made of electrical steel. The inner surface of the stator has grooves for laying three-phase windings. Each winding includes 6 coils.
Mounting the VAZ electric generator
When servicing such devices, it is often necessary to remove them. The generating units are fixed using special brackets secured with bolts. It is more convenient to unscrew this mount while under the car.
Drawing of the VAZ 2108-2115 generator
The electric generators are also attached to the drive belt tensioner plate. Fixation is carried out using a nut. Different AvtoVAZ vehicles are equipped with different types of drive belts. For example, model 2108 (and its modifications) has V-belts, and VAZ 2111 has poly-V-belts.
This difference is due to the different configuration of the internal combustion engines of VAZ cars. Newer models (for example, 2114b 2115) are equipped with powerful air conditioning systems and electric power steering. Therefore, they require better adhesion of the belt to the pulleys, as well as a current output of 80 A or more.
Main signs of generator malfunction
The following signs will indicate that the generator has failed or problems have arisen in its operation:
- constant lighting of the warning light in the form of a reddish battery on the dashboard, which indicates that the generator is not charging or is producing insufficient current;
- constantly discharging battery;
- interruptions in the operation of electrical equipment (lighting and alarm units, multimedia, heating and ventilation) while the engine is running;
- the appearance of a corresponding burnt aroma in the cabin (engine department);
- excess heating of the generator stator;
- rumble (rustle, whistle) of the generator.
Read also: How to use a dt 838 multimeter for dummies
The appearance of similar symptoms is a serious reason to conduct a diagnosis. To do this, it is absolutely not necessary to contact a service station, because you can completely check the generator for operability on your own, especially if you have even the slightest ability to use an auto tester. But first, let's talk about the main breakdowns.
Multimeter - what is it
A multimeter is a measuring device used to measure resistance, current or voltage. Also, using such a device you can check the wiring for breaks. Each of these measurements involves the use of separate measuring instruments, such as a voltmeter, ammeter or ohmmeter. Therefore, a multimeter is considered a universal tool (mulmeter = voltmeter + ammeter + ohmmeter). In practice, analog and digital multimeters are used.
What is a multimeter
Analog
This multimeter is equipped with a special hand, like on a watch, by the movement of which the measurements are read. The analog multimeter is also equipped with a measuring scale with resistance, current and voltage values. The device is inexpensive, so it is very popular. The disadvantages of an analog multimeter include measurement errors (this mainly applies to products made in China).
Analog multimeter
Digital
Unlike an analog multimeter, a digital multimeter has an LCD or LED screen that displays data. These devices are easier to use and also have high accuracy, which cannot be said about cheaper analogues.
Digital multimeter
Note! Some types of digital multimeters can work in conjunction with a computer, transferring data obtained as a result of measurements to it.
Video - How to use a multimeter
Checking the voltage regulator
The regulator is designed to stabilize the generated voltage before supplying it to the vehicle's on-board circuit, including the battery for recharging it. There is no other way to find its serviceability without the help of others than to check the charging of the generator, or more precisely, the amount of voltage it supplies to the battery terminals. Depending on the make and model of the car, it can range from 13.5 to 15.5 V. Therefore, before checking the operation of the generator to ensure that the regulator is working properly, you need to find out exactly what voltage it should produce. This information can be obtained from the vehicle's owner's manual.
How to test a generator with a multimeter? To do this, switch the device to voltmeter mode and, observing polarity, connect its probes to the battery terminals with the engine not running. The usual voltage is 12-12.8 V. Then start the engine and repeat the function. The voltage at the battery terminals should increase to 13.5-15.5 V. Only in this case can the regulator be considered operational. An increase or decrease in voltage, on the contrary, indicates that it is faulty.
How to check a VAZ generator
Checking the VAZ 2101 generator
-2107: 1. Checking the positive and negative valves of the rectifier unit
Reason for lack of battery charge on VAZ 2101 How to find
Make money on YouTube by connecting to the Channel Group affiliate program.
Checking (diagnostics) of the Lada Priora (VAZ-2170) generator
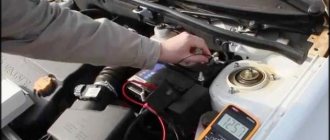
We start the engine, let it run for a few minutes, then press the gas pedal and bring the engine crankshaft speed to 3,000 rpm.
We turn on all consumers: external lighting, high beam headlights, heated rear window, heater fan, windshield wiper, hazard warning lights, etc. We use a voltmeter to measure the voltage at the terminals of the battery, which should be above 13.0 V. If this is not the case, it is faulty voltage regulator with brush assembly, generator windings (break or short circuit) or the contact rings of the generator rotor are oxidized.
In order to make sure that the voltage regulator is working properly, turn off all consumers, except for the high beam headlights, and measure the voltage again. It should be between 13.8–14.4 V.
To check the voltage regulator removed from the generator...
...we connect a lamp (1–3 W, 12 V) to the brushes, and a DC power source to the terminals of the brush holder, first with a voltage of 12 V, and then 15–16 V. In the first case, the lamp should be on, in the second - not. If the lamp lights up in both cases, there is a breakdown in the regulator; if it doesn’t light up, there is a break or broken contact between the brushes and terminals of the voltage regulator. In both cases, the brush holder with voltage regulator must be replaced.
To check the rectifier block valves, you can use a probe with a 1–3 W lamp or connect the battery through a 1–3 W, 12 V lamp.
We dismantle the generator and remove its casing. Disconnect the “positive” terminal of the voltage regulator from the rectifier unit.
We connect the “plus” of the probe to the “B+” terminal of the generator, and the “minus” to its body (for clarity, the voltage regulator has been removed). If the probe lamp is on, then there is a short circuit in both the “positive” and “negative” valve blocks.
To check the short circuit in the “positive” valves, we connect the “plus” of the probe to the “B+” terminal of the generator, the “minus” - to the terminal of one of the phase windings of the stator. If the probe lamp is on, one or more “positive” valves are broken.
To check the short circuit in the “negative” valves, we connect the “plus” of the probe to the terminal of one of the phase windings of the stator, and the “minus” to the generator housing. If the probe lamp is on, one or more “negative” valves are broken or the stator windings are shorted to the generator housing.
A break in the valves is determined by a sharp decrease in the output current. However, this may also be a consequence of a break or short circuit in the generator windings.
To check the short circuit in additional valves, we connect the “plus” of the probe to the terminal of the rectifier unit, and the “minus” to the terminal of one of the phase windings of the stator. If the probe lamp is on, then there is a short circuit in one of the additional valves.
A break in the additional valves is determined by low voltage (below 13.8 V) at the “D+” terminal of the generator at an average rotor speed.
If the rectifier unit fails, we replace it as an assembly.
We inspect the stator windings. There should be no signs of overheating on the winding insulation, which is a consequence of a short circuit in the valves of the rectifier unit. If there are signs of overheating on the windings, the stator must be replaced.
How to check the diode bridge of a generator without removing it from the car
The diode bridge plays the role of a typical rectifier, converting the alternating current generated by the generator into constant current. Usually it consists of 6 semiconductor diodes, three of them are “positive”, the other three are “negative”, i.e. the first ones pass current in one direction, the second ones - in the other. The rectifier can be checked either with the generator removed or without dismantling it. Let's look at both options.
Before checking the diode bridge of the generator without removing it, you need to disconnect all the wires from it and from the voltage regulator, having previously disconnected the ground terminal from the battery. First, let's check the rectifier for short circuit. Turn on the multimeter in ohmmeter mode, connect the positive (reddish) probe to terminal “30” of the generator (positive contact of the bridge), and the negative one to the generator housing. With a working rectifier, the device readings will tend to infinity. If the resistance is several ohms, the rectifier is faulty.
Now let's talk about how to check the generator diode bridge for breakdown. Let's start with the positive diodes. Again, connect the positive probe to the corresponding bridge contact (pin “30”), and the negative probe to the rectifier mounting bolts (brackets). With all this, resistance must also tend to infinity. Otherwise, one or more diodes are broken.
Let's move on to “negative” semiconductors. We connect the reddish probe of the tester to the rectifier, the dark one to the generator housing. Resistance tending to infinity is a sure symbol that the diodes are intact.
What is a generator
A generator is an alternating current device that produces electromagnetic excitation during operation.
The generator design has a built-in rectifier unit, equipped with diodes made of silicon, as well as an electronic voltage regulator. Thus, the unit creates electrical energy from mechanical energy and energizes the car’s battery, and also provides energy to its devices and systems. The connection diagram for the generator on Niva-2121, 21213, 21214 is shown in the figure.