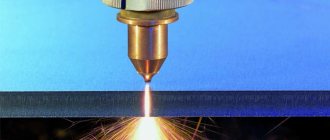
It is most convenient to weld thin metal using argon arc welding. With TIG inverters you can create narrow joints with minimal heat input. You can quickly weld thin metal with a semi-automatic MIG. But when you only have an RDS inverter at hand and you need to connect two sheet workpieces of small cross-section, difficulties may arise. Let's look at common mistakes beginner welders make when working with thin metal, as well as tips and MMA equipment that will help cope with this task.
Most new welders get corneal burns when welding thin metal because they try to grip the sides without a mask. The fact is that the lower the current, the less bright the electric arc. Under such conditions, it is difficult to see the connection line through a dark filter and accurately place the tacks. After welding without a mask, your eyes hurt a lot, you may feel a feeling of “sand” under your eyelids, and the blood vessels in the eyeball turn red.
Selecting a welding machine
To be able to weld two thin-walled sides of a product at home, a competent selection of an RDS inverter is required. Not every model is suitable for this task. When choosing an MMA machine, pay attention to the minimum value of the welding current. When purchasing, most people look only at the maximum threshold to determine how thick a workpiece the inverter can “cook.” When you have to frequently weld thin-sheet steel, the lower amperage range is important.
It is easier to weld thin metal with coated electrodes if you use an MMA inverter with the additional functions “Arc Force” and “Anti-stick”, as well as “Hot Start”. For example, BARSVELD Mini ARC-160, ideal for welding thin-sheet steel, is equipped with these three modes.
Additional functions
For example, to work with a cross-section of 0.8 mm, it is necessary to reduce the current to minimum values of 10-20 A. But not all RDS inverters are capable of this. For some, the lower threshold is limited to 30 A.
"Fast and Furious" (Arc Force) HideRead more
The function allows you to automatically change the strength of the welding current to prevent the attenuation of the electric arc. For example, you set the value to 40 A and are welding. Bringing the electrode tip too close may cause the arc to go out. At such a moment, the device “feels” the reduction in the air gap and briefly adds another 10 A (the total with the initial setting is 50 A).
This is enough so that the arc does not go out and the welder equalizes the distance between the electrode and the workpiece. As soon as the situation has stabilized, the inverter itself reduces the current to the base 40 A (or whatever you set on the strat). Therefore, burn-throughs are excluded. The function is useful both when welding thin steel and when working without a hand support, when it is more difficult to control the air gap.
"Antistick" HideRead more
This function helps save consumables when welding thin metal. Since the arc is short, sticking of the tip of the rod to the surface of the workpiece is inevitable. When this happens, the electrode must be wiggled sideways to disengage it from the workpiece. This will cause the coating to fall off. Afterwards, it is necessary to burn the tip on a rough workpiece, which slows down the work and leads to excessive consumption of electrodes.
When the tip is stuck, the inverter cuts off the welding current from the cables. The welder easily disconnects the electrode without destroying the coating. As soon as the circuit is open, the machine restores the current supply and you can continue welding without delay.
“Hot Start” HideRead more
It is more difficult to ignite an arc when welding thin metal with an electrode due to the low current. It is required to actively knock on the surface of the product and catch an electrical discharge of low height. The tip was slightly removed from the surface and the arc went out. To simplify the first ignition when the electrode is cold, the Hot Start function is useful. The mode gives increased voltage at start and reduces it to a safe voltage when the arc is lit. It saves time, it’s easier to cook, and you’re less irritated.
Important!
When choosing an MMA inverter for welding thin iron, pay attention to the presence of all three functions in the device.
It happens that the equipment has only one additional mode, for example “Anti-stick”. In this case, the model is much inferior to those that have all three auxiliary functions. Practice shows that welding of thin iron occurs with better quality when devices that produce direct current are used. The type of DC current must be specified in the characteristics of such equipment. AC/DC models that can switch between alternating and direct current are suitable.
What does a novice welder need to get started?
To start training, you will have to select the appropriate equipment and equipment.
Particular attention should be paid to personal protective equipment, since welding work is a process harmful to vision and respiratory organs.
It will be necessary to equip a workplace; if it is in a workshop, then the room should be equipped with effective exhaust hood and sufficient lighting.
If you decide to start training outdoors, be sure to do so on dry ground and under a canopy that will protect you and the equipment from rain.
The workplace should be spacious, not cluttered, and not restrict the welder’s movements.
Cables should be laid out in such a way that they will not be stepped on or tripped over when moving around workpieces.
It is better to choose scraps of rolled stock and steel sheets as blanks for practicing skills. It is not recommended to start with critical structures.
Selecting Electrodes
First of all, we note that for welding thin sheet metal it is important to choose the correct electrode diameter. 4-5 mm rods will create excessive resistance and will not allow the arc to burn normally at low currents. Therefore, when welding thin sheet steel, electrodes with a diameter of 1.6-3 mm are used. The thinner the metal, the smaller the diameter of the rod.
Next, you should pay attention to the characteristics of the electrodes. Let's take for example Barsveld OZS-12 ⌀ 2.0 mm (Premium). They have a rutile coating, which provides:
- easy initial and re-ignition;
- absence of a dielectric tip at the end during attenuation (convenient for reuse after a while);
- beautiful seam;
- light welding on rusty or primed metal;
- low filler metal spatter;
- soft arc burning.
Having purchased OZS-12 ⌀ 2.0 mm (Premium), you will be able to weld thin metal with direct or alternating current in any spatial position. Slag after welding is removed very easily. Good electrodes for working with sheet iron are ANO-21 ⌀ 2.5 mm (Premium), belonging to the E46 type. From the ESAB brand, we recommend ESAB MP-3 electrodes ⌀ 3.0 mm if you are going to weld iron with a cross-section of 1.0-1.5 mm.
The listed electrodes have a rutile coating, so when the arc extinguishes, a “visor” does not form. Consumables with the main type of coating are prone to this effect. The presence of the visor makes it more difficult to re-ignite the arc, since more forceful tapping is required to break the tip of the coating and ensure contact of the conductive rod with the workpiece.
If more than 4 months have passed since the production date of the electrodes, we recommend calcining them first. At home, this can be done in an electric oven, heating it to a temperature of 170-200 degrees. Then excess moisture will be removed from the coating, during welding the arc will not crack much and splash the metal, the seam will be neater.
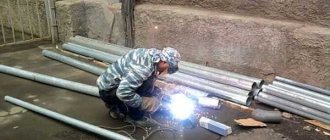
Features of welding pipes with thick walls
Pipes with thick walls are used in various areas of the national economy and industry. For example, the Turkish Stream pipeline uses pipes with a wall thickness of 39 mm, while high-pressure pipelines can use pipes with a wall thickness of up to 52 mm.
If the thickness of the pipe walls exceeds 20 mm, then welding of such pipes can be carried out using layers of increased thickness. This method allows you to increase the strength of the connection by 10-15%. In this case, welding of such pipes must be carried out simultaneously with 2 welding machines - one of them applies a regular layer, and the second - a thick layer.
As experience has shown, there are already results on welding joints with an increased layer thickness, in which joints of 45 mm were welded in 3 passes with a thickness of one layer of 15 mm. In this case, the joint had two types of edge bevels, one of which was Y-shaped, and the other was two-stage.
Machine settings for welding thin metal
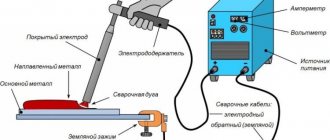
Because the metal being welded is thin, it is important to set the manual arc welding inverter to reverse polarity. This means that the electrode holder cable connector is inserted into the socket with the “plus” sign, and the ground cable is connected to the “minus” socket. Due to reverse polarity, the heat of the electric arc is concentrated at the tip of the electrode, and not at the workpiece. This happens according to the laws of physics, since electrons move from “minus” to “plus”. With reverse polarity, the thin metal overheats less, which helps reduce the number of burns and thermal deformations.
A novice welder must be able to correctly set the current strength when welding thin metal with a coated electrode. We offer recommendations for setting up the inverter in the table.
| Thickness of welded metal, mm | Electrode diameter, mm | Current strength, A |
| 0.8 | 1.6 | 10-20 |
| 1.0 | 2.0-2.5 | 25-35 |
| 1.2 | 2.5 | 40-50 |
| 1.5 | 2.5-3.0 | 45-60 |
Possible difficulties
Problems that arise when restoring parts:
- The damage affects the threaded holes intended for mounting the sensors. After repairing the fracture, it is necessary to drill the channel and restore the thread, but mechanical stress can destroy the seams. In this case, you will have to refuse to install the sensor or purchase a new unit.
- The crack runs through the cooling jacket or the engine oil supply passages. When carrying out welding work, complete or partial overlap of sections occurs. Such repairs lead to accelerated engine failure (due to local overheating or oil starvation).
- The resulting weld is not airtight, so a layer of epoxy resin must be applied. Before treatment, clean the surfaces from carbon deposits and degrease (for example, with paint solvents). After polymerization, epoxy resin does not allow liquid to pass through, but cannot withstand vibration loads and temperatures above +120°C. After welding with a ferrocopper electrode, the seam is treated with a 10% ammonium chloride solution for sealing. The reaction products fill the pores and reduce the risk of liquid leakage.
Tips for welding thin metal with an electrode
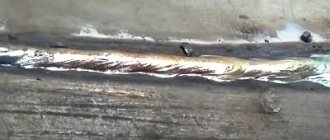
So, let's look at the technique of welding thin metal in practice and give a number of useful tips from real welders. We use an RDS inverter welding machine with direct current and set the current strength according to the values given in our table. To prevent the sheet structure from moving, we recommend securing it with clamps. Edge cutting when welding thin iron up to 4 mm is not performed.
Place the sides of the parts to be joined as close to each other as possible. There is no need for a gap here. If an overlapping connection is structurally permissible, use this - there will be no burns or the roller falling down.
Next, follow our recommendations:
- Light the arc on the rough workpiece and only then start welding. This way you won’t have to knock on the product, and there will be no traces of arc contact on the front side of the structure.
- Keep the arc not strictly in the center of the joint, but on one side of the workpiece. This will help avoid burn-through at the very beginning of work.
- Move the electrode quickly with minimal lateral oscillatory movements.
- Try to keep the tip of the electrode as close to the surface of the workpiece as possible. The arc will be clearer, the filler metal will be transferred more easily, and there will be normal penetration. But a short arc requires skill (“a trained hand”), so practice on a rough product with a similar cross-section.
- To prevent the metal from falling through on the back side of the seam, use a backing. An iron table will not work - the product will stick. It is best to place a plate of graphite or copper.
- If burns occur despite the minimum welding current, weld the seam with an intermittent arc. We welded 5 mm and removed the tip of the electrode from the weld pool for a second. Then the arc was excited again and 5 mm was welded. This slows down the process, but allows the deposited metal to cool.
- Hold the electrode at an angle of 30-45 degrees. A right angle to the product increases heating and promotes burns.
When the settings of the RDS device do not allow you to reduce the current further, use a ballast rheostat. If the work is one-time and purchasing a ballast is unprofitable, connect a steel spring to the ground circuit, placing it between the clamp and the product. By rearranging the mass clamp along the coils of the spring, you can regulate the current strength due to resistance.
To minimize thermal deformation, follow the welding order of long seams. For example, when welding a large container (shower tank, car fuel tank), start welding from the end of the joint, leading the seam towards you. Boil 8-10 cm at a time and move forward. The new seam ends at the beginning of the previous one. Each short penetration will bend the surface inward, but due to the large number of seams, such “waves” will be barely noticeable than one large deflection of the plane when welding with a continuous seam from left to right.
How to cook properly
To understand how to cook properly, a small amount of theory should be supplemented with a large amount of practice. It’s best to start learning by welding scraps of corners, fittings, and metal plates. Only after you “feel the seam” with your own hands can you begin to connect more or less important structures.
Arc Welding Process
There are several types of devices; in order to learn how to cook correctly, it is best to start with an inverter. It allows you to smoothly regulate and maintain a stable operating current, is slightly independent of the level and stability of the voltage in the supply network, and does not create voltage surges in this network.
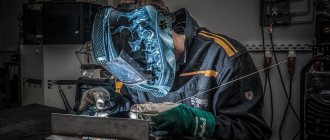
Selecting a welding helmet
As we mentioned at the beginning, when welding at low currents, the light from the arc is less bright, so the joining line is difficult to see. Due to insufficient lighting, you can even put a stitch bypass. It is more convenient to weld thin metal with coated electrodes in chameleon masks with a darkening range of 4-8 DIN or 9-13 DIN.
Unlike a mask with a conventional light filter, in a chameleon you can precisely point the tip of the electrode at the junction. This reduces the number of “bunnies” and helps keep the front surface of the product clean. Adjustable darkening power from 4 to 8 DIN makes it easy to adjust to different low welding currents.
We recommend buying a BARSVELD MS 307 mask with ASF-707 with a range of 5-8 and 9-13 DIN, which has a large viewing window of 98x87 mm. Thanks to this, a good overview is maintained in all spatial positions. Full Color technology conveys everything in natural colors and it will be easier for a beginner to distinguish the molten slag of the electrode coating from the liquid metal. The price of the mask is a little more than 5,000 rubles, which makes it quite affordable even for household welding in a garage or country house.
Tools and protective equipment
Uniforms and personal protective equipment include:
- welder's mask with a built-in light filter to protect the eyes from bright light and ultraviolet radiation from the arc;
- split-leaf gloves—gaiters to protect hands from splashes of hot metal;
- thick clothing made of non-flammable fabric;
- cap under the mask;
- durable shoes.
- a respirator to protect the respiratory system from generated gases and dust, especially when working with non-ferrous metals.
Read also: How to reduce the fuel supply to a carburetor
You will need the following tools, materials and equipment:
- Angle grinder (grinder) for cutting workpieces and cleaning seams;
- A set of hand tools - hammers, chisels, pliers, etc.;
- Metal brush for cleaning workpieces;
- Clamps and clamps for connecting workpieces;
- Electrodes.
And finally, the inverter with the included cables and holder.
Additional Information
After completion of the work, the surfaces must be treated (for example, if any unit is being installed). In a workshop setting, a milling machine is used to level the plane; in a domestic situation, an angle grinder is used. At the same time, it is important not to damage the mating surfaces with high precision processing (for example, for installing a clutch bell, front cover or head).
We recommend that you read
How to solder a cooling radiator yourself
Welding an automobile cylinder block requires a highly qualified worker. Mistakes made lead to a decrease in the strength of the assembly; with cyclic temperature changes (the part warms up to +90°...+95°C and cools down to ambient temperature), new cracks may appear. In case of a large area of damage, it is possible to install patches from a sheet of steel, which are welded into cast iron. The decision on the method of restoration and the feasibility of repair is made by the master, based on the qualifications and equipment available.