In the auto body repair business, fixing dents is an everyday activity.
From the moment it became clear that such a defect was easier to eliminate by pulling the metal outward, a special device appeared, called a spotter.
Its use reduces the time it takes to restore the shape of sheet metal, and therefore the usefulness and efficiency of such equipment in a body shop remains at the highest level.
It is interesting that this name refers to any resistance welding machine, but only in the CIS countries spot welding machines designed specifically for restoring a car body are called spotters.
The main device of the spotter
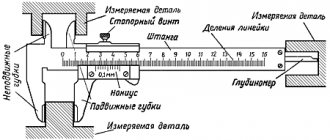
Diagram of a welding gun.
The main device of a spotter is a welding gun. For continuous operation, it is advisable to use a production device. You can make it yourself from a construction glue gun or use a semi-automatic welding device. From getinax or textolite you need to cut out two parts of the same size and shape, 12 - 14 mm thick. In one of the parts, in the cut-out recess, you need to install a bracket 3 for attaching the welding electrode, and, if desired, a light bulb 8 with a “Backlight” button 4 and an “Impulse” switch.
The bracket for attaching the electrode must be made of copper material with a square or rectangular cross-section. As a welding electrode, you can use a copper rod with a thickness of 8 - 10 mm. It is desirable to provide in the design of the gun the possibility of changing the electrode without disassembling the gun. To connect the gun to the spotter, you can use a combination of a welding cable of the required cross-section and a 5-core control cable with a core cross-section of 0.75 - 1.0 mm2. The control cable is connected according to the diagram: three wires - to the “Impulse” switch, two wires - to the backlight bulb and its switch. The welding cable must be thoroughly cleaned and soldered into the hole provided in the bracket.
The cost of this device is a considerable amount, incomparable with the expenditure of time and money (if manufactured independently). The manufacturing process of this device is simple. You need to cut off the parts from the gun where the sealant bottle is inserted.
Weld three racks of metal rod with a diameter of 6-10 mm onto the remaining cover. A thrust ring made of a rod of the same thickness with a diameter of approximately 100 mm should be welded to the other ends of the racks. It is advisable to wrap the ring with several layers of insulating tape or masking tape so that it does not weld to the leveled surface. It is necessary to cut off the curved part and stop of the rod. In place of the stop you need to weld a mount for connecting the cable from the spotter; you can use a bolt with two nuts with M10 thread. The second end of the rod must be sharpened into a cone with a diameter at the end of 3 mm. The time required to manufacture such a device will be about an hour.
When working with homemade and industrial spotters, you must follow safety precautions. To prevent the voltage from the device from damaging the vehicle equipment, it is necessary to disconnect the terminals from the battery.
What is a spotter and can you make it yourself?
A do-it-yourself spotter is most often used for straightening a car and leveling out dents on metal. This type of equipment is very popular among workshop technicians, since during the process of straightening the body there is no need to dismantle the fender or door of the car. All work can be carried out directly on the outer part of the casing. It is especially convenient to work with the device in those places that are difficult to get to.
Welding with a spotter does not leave deep marks and, after leveling, can be easily removed with a grinder.
The fact is that heating and cooling at the point of contact occur so quickly that the metal does not have time to oxidize and react. Moreover, homemade models can be adjusted in such a way that the current strength and exposure time can be changed depending on the thickness of the metal that needs to be processed.
Two cables come from the body of the device: ground and a working wire with a gun. The gun is what the welder operates in his hands.
The operating technology is as follows: The mass is fixed to the body of the car from which the battery has previously been removed. The gun starts the current flow. When the trigger is pulled, a discharge occurs that melts the metal. At the same time, or before this stage, the master knocks out small “mounds” with a reverse hammer, onto which a discharge is applied by a spotter. They are subsequently cleaned, thereby thickening the metal and obtaining the necessary shape and strength.
For your information! The action of the spotter is based on such a physical phenomenon as current resistance. In this case, the use of conventional welding materials (consumable electrodes, welding wires and others) is not required.
Unit design properties
The device consists of components such as a box, a gun, a cable, and an electrode.
The box contains the entire apparatus system that is necessary for welding . In order to carry out body work clearly and quickly, you must adhere to the order and technology of the process.
If the surface has undergone deformation, it must be cleaned of any coating. It could be rust, paint or varnish. This stage is very important, since the quality of the metal connection directly affects the outcome of the entire process. Contacts are attached to the surface that has been adjusted. A fastener is welded onto the cleaned area of the damaged area, to which the device in question is connected.
Following this, the device is grabbed with a gun, after which the dent is pulled out. For leveling, they resort to using a hammer, hydraulic cylinders and other devices. Pay attention to the thickness of the metal. Here you should understand what equipment will make it possible to straighten the machine so as not to cause harm to it. The back hammer is not used in combination with aluminum. In addition, not every unit can cope with a galvanized body. When the body straightening is completed, the welded part is twisted. The contact area is cleaned with a grinding machine.
Functionality of serial model spotters
Spotters, mass-produced in production conditions, have a number of popular functions. Among them:
- possibility of welding repair washers;
- welding of a metal electrode followed by pulling out the metal of the part;
- using the device complete with graphite electrodes, which make it possible to perform metal upsetting (heating and subsequent cooling);
- ease of maintenance, ease of operation;
- two modes for performing welding work - constant switching on (this mode uses a carbon electrode) and short-term switching on, which can be adjusted in time (this mode is used for welding repair washers or a metal electrode);
- equipped with a forced cooling system (the design of the device also includes a thermostat, the functions of which include turning off the spotter when it overheats, as well as turning it on when cooling to the required temperature).
One of the variations of factory spotters and related devices for various purposes
Inverter based device
Homemade spot welding machines, made on the basis of a welding inverter, are distinguished by their simplicity of design, have the power necessary to work with most metals and can be easily made by hand.
The simplest spotters can consist of the following elements:
- Inverter housing.
- Cable.
- A sharp rod or electrode.
- Stadder pistol.
The easiest way to make such a machine for contact welding is using inverters, to which a welding gun is attached via a cable. You can use either ready-made purchased studder guns or make them yourself based on a metal sealant gun.
Advantages of self-made spotters:
- Possibility of pulling out metal parts without damaging the original paint layer.
- Ease of use.
- Versatility of use.
- Possibility of performing metal upsetting using graphite electrodes.
- The presence of two or more modes of welding work.
- Simplicity of design.
- Affordable cost of the components used.
Features of using a spotter
The device is used in straightening work for:
- adjustments to the body surface without dismantling;
- welding of body elements.
The device is especially convenient and effective for influencing areas or parts of a machine with a hidden or inconvenient location. The spotter is used when it is impossible to use alternative straightening methods due to limited access to the damaged area.
The principle of operation of the tool comes down to several main stages:
- Cleaning the damaged area of paint, putty, primer residues, etc.
- Welding special fastener parts to the deformed area.
- An inertial hammer is hooked onto the clamp, and the metal is leveled with it.
A useful property of the device is the ability to warm up the part. In the process of heating and cooling, shape and rigidity are restored faster and more effectively.
Sometimes, when the need arises to perform urgent welding work, the master cannot do without a special apparatus
Design and principle of operation
Working as a spotter involves heating a small area of a body element; the effect causes minimal damage to the car.
The welding algorithm includes the following stages:
- A fastening element is welded to the damage site.
- The reverse hammer is hooked onto the latch.
- Pulling is done manually, but auxiliary tools are often used.
Straightening with a spotter is carried out without much effort, this allows you to carry out repairs in any garage.
Scheme of an elementary unit:
- frame;
- cable;
- studder (nozzle);
- electrode (can be replaced with a sharp twist).
Any box serves as a housing to which all components of the device are attached.
The main design element is the welding gun. The homemade version does not allow long-term operation and is somewhat inferior in characteristics, but is suitable for work with small volumes of straightening. Long-term operation is implemented in a factory device.
The biggest advantage of the spotter is that the force is applied only to the outer surface of the damaged part
Is it possible to make a spotter with factory specifications?
If you correctly calculate the parameters, select the appropriate components and make high-quality not only the power supply, but also the tool accessories, then a homemade spotter in its functionality will be no different from its factory counterpart. If you have some amateur radio skills, it is easy to make the power supply and the necessary wires yourself. As a welding gun, you can use any product of a suitable shape, the design of which would allow you to strengthen the threaded contacts at its ends and would be convenient to use.
The gun and reverse hammer will require several parts, which are best turned on a lathe. Some electrode tips can be made with your own hands using ordinary plumbing tools, but some are still better to order or purchase ready-made. In order to operate a home-made device, additional devices may be required (pullers, combs, rods), which can also be made independently. Consumables for a spotter (welding washers, studs, corrugated wire, carbon electrodes, etc.) are inexpensive and are freely sold in specialized stores.
This is interesting: Seam (roller) contact welding - application, diagram, GOST
The main difference and technical parameters
Most models are presented in the same form:
- A device by which the contact welding process occurs;
- Grounding cable;
- The wire to which the current is supplied is attached to the end of the welding gun - the main element.
For greater efficiency, the gun can be equipped with various attachments, so the user can make any repairs without any problems.
There are controls on the front panel that make it possible to adjust the tool by power and current, which is very useful for working with some parts. Modern models have an informative screen that allows you to see the current technical parameters, which allows you to keep the process under control.
Working diagram of the spotter
To correctly assemble the tool, you need to understand the basic operating diagram of the spotter.
This scheme works according to the following principle: when the spotter is turned on, voltage is supplied to transformer T1. Next, it is converted and supplied from its secondary winding to the diode bridge. Then it passes through the closed contacts of the “Impulse” switch to capacitor C1, which begins to charge. Since the thyristor is closed at this time, no electric current is supplied to the welding transformer.
Schematic diagram of the spotter operation
To start this transformer and receive welding current on its secondary winding, it is necessary to change the position of the “Impulse” switch, which will disconnect capacitor C1 from charging and connect it to the thyristor control circuit. The current generated as a result of the discharge of the capacitor first passes through the resistance (R1), which is responsible for the operating modes of the device, and enters the control electrode of the thyristor, which leads to its opening.
For argon and plasma welding
Torches for semi-automatic welding are also often called pistols due to the presence of a button on the handle. When the device is turned on, welding wire and shielding gas are supplied to the welding area.
For a semi-automatic machine, you need to set the welding parameters correctly. The performer only needs to move the gun along the joint and maintain a normal arc length; the result will be a high-quality seam. When using a fireproof tungsten electrode in the gun, the welding wire is fed separately.
In plasma welding, the welding gun is called a plasma torch or cutter. In it, when an electric arc is formed and gas or water is supplied, a plasma jet is formed, which melts and cuts the metal. If welding is required, welding wire is additionally used.
DIY manufacturing algorithm
To successfully manufacture a spotter, you need to study the features of its design and understand the basic functioning of welding equipment. Under such conditions, it will be possible to use available materials and suitable parts.
Tools and materials
The operation of this unit is accompanied by a significant increase in temperature, especially in areas located after the power cable.
To assemble the device yourself, you will need the following parts:
- a transformer that reduces the voltage to 12 volts through a relay;
- 200 volt thyristor;
- 30 amp relay;
- diode bridge;
- special buttons for control and monitoring;
- contacts for connecting the wire to a 220 volt network.
Inverter spotter circuit
Due to its high power and performance, inverter spotter designs have become popular on the Internet. Based on them, it is quite simple to make a device with your own hands. The device is connected to the network using a transformer and a diode bridge.
Assembly
To get these characteristics:
- The welding machine needs to replace the secondary winding of the transformer with busbars with a cross-section of at least 160 square millimeters.
- To complete the work, you will need an assistant, and you also need to prepare a hammer.
- Tires must be carefully insulated using three layers of high-quality materials that do not conduct electric current, insulating tape around the edges, and paper tape inside.
- Rivets must be installed on open areas.
general information
A spotter is a welding machine used in body repair. At its core, a spotter is very similar to spot welding, but externally these are two completely different devices. Spot welding has two metal electrodes with sheet metal placed between them. In the case of a spotter, the technology is different. Let's take a closer look at it.
The spotter has two terminals: ground and a wire with a working “gun”. The mass must be attached to the car body (do not forget to remove the battery from the car in advance). At the end of the “gun” there is a special clamp where you can install a special nozzle. When you press a button on the working “gun”, the welding current begins to flow. During the process, the welding site begins to gradually heat up. The resistance increases and the metal begins to melt in a certain area. At the same time, the rest of the body does not overheat. Metal is stuck, which can then be pulled out.
Let's explain it more simply. The spotter does not heat the entire part, but only a certain point (as is the case with spot welding). The heating is small, slightly less than the melting point of the metal. The fastening nozzle is pressed against the metal surface and at the moment of resistance it is securely attached, thanks to which you can then pull out the same dent in the opposite direction. Later the nozzle can be easily detached from the metal.
From spot welding there is both heat and force. The heating is carried out by the device, and the force is carried out by the master, who presses the nozzle to the metal. Therefore, this type of welding is not called spot welding, but resistance welding.
There are two types of spotters: inverter and transformer. A transformer spotter can be made at home from a transformer. But an inverter spotter can only be assembled in a factory setting. Because its construction uses complex, expensive components.
Device for resistance welding from a welding machine
A resistance welding device works according to a similar scheme. It does not use arc electrodes with a carbon additive. The welding process is based on the flow of high currents at the point of closure of the contacts of the welding gun.
If you have a welding machine, making contact welding based on it is not difficult. You just need to assemble the control unit and the contact welding gun, which will be connected to the working wires of your electrical appliance.
The control unit is designed to quickly connect the supply voltage to the primary winding of the working transformer. It can be assembled using a powerful relay, thyristor or triac circuit.
Please note: The main condition is that the start button must be at hand on the contact gun, and it must not be fixed. Otherwise, you can create a short circuit in the secondary winding, which will lead to overheating of the device. The operating voltage supplied to the button must be safe for the operator
Since the voltage on the electrodes of the contact gun does not exceed a few volts, the entire welding process is safe from an electrical point of view. Potentially you can only get burned on hot metal
The operating voltage supplied to the button must be safe for the operator. Since the voltage on the electrodes of the contact gun does not exceed a few volts, the entire welding process is safe from an electrical point of view. Potentially, you can only get burned on the hot metal.
The entire structure of the contact gun must be brought into an open and disconnected state under the action of springs. That is, as soon as you release the handles of the pliers, the electrodes will immediately be de-energized and removed from the welding spot.
The gun can be made in any configuration, the main thing is ease and safety of use. Let's take a factory device as an example.
The contacts must be copper or brass, otherwise they will be welded to the surface being treated. Thickness (diameter) 5-15 mm. Since the electrodes wear out, it is necessary to provide for the possibility of replacement.
IMPORTANT! It must be remembered that a conventional welding machine, adapted for spot welding, operates in non-standard modes for its design.
Therefore, it is necessary to monitor possible overheating of the transformer, and, if necessary, take breaks in operation.
Main components of a spotter
The main components of the equipment are:
- puller;
- diode bridge;
- relay - 30 A;
- inopuller (reverse hammer);
- transformer – 1500 A;
- contactor – 220 V;
- control unit with thyristor - 200 V.
Frame
The device must be functional and convenient. The size is selected individually. It is necessary to place the control elements correctly. It is advisable to treat the surface with a dielectric material.
The body can be made of materials such as plastic, metal, wood. Can be used:
- A box made of metal from old equipment that fits in size.
- Galvanized thin sheet metal or powder coated.
- System unit for PC. It is convenient because it is available for installing coolers and microcircuits. For protection purposes, you can use a wooden box with a hinged lid.
Rivets and self-tapping screws are used for fastening.
Power supply
A transformer with a diode bridge assembled on D226B diodes is the main components of the power supply. They charge the capacitor (C1), which facilitates the opening of the thyristor, which is located in the diagonal part of the bridge. The voltage duration is adjusted using a resistor (R1).
Any power supply capable of providing 10 V can be used for the unit.
Power cables
The choice of cables is made taking into account the correctly selected cross-section. Calculation scheme: per 1 mm2 - 10 A. The length for the mass should not be more than 1.5 m, for the working one - 2.5 m. If the specified parameters are not taken into account, the welding operations will not be performed efficiently.
The ends of the wires are secured with connecting elements. For this purpose, terminals used in threaded connections can be used. As well as special devices that provide connection speed on the unit and the gun, for example, a crocodile.
Control circuit
To correctly assemble the device, you should familiarize yourself with the unit diagram:
- when connected, voltage is supplied to the device;
- the current, being transformed, is directed to the diode bridge;
- then it hits the capacitor and charges;
- the position of the switch changes;
- the capacitor is disconnected from the charger;
- the voltage passes to the thyristor circuit and promotes opening;
- an electrical impulse is sent to the device;
- strong stress is generated through secondary processing;
- after the capacitor is completely discharged, the thyristor closes;
- the magnetic circuit of the unit returns to its original state.
To recharge the capacitor, a change in the switch position is required.
Welding gun
It is considered the main device of a spotter. Must have a design that allows electrode replacement without disassembly. The latter should preferably be made of copper and have a diameter of 8-10 mm.
To make your own pistol, you should use the following devices:
- a non-working drill, with the internal part removed;
- semi-automatic welding equipment (working part);
- glue gun for installation work.
A barbell and a weighting agent are used as additional equipment.
To connect to the unit, a combination of 5-core wire with the appropriate cross-section is used.
Equipment
To make a spotter, you will need the following materials:
- clamp;
- fasteners;
- cable(3 m);
- metal sheet;
- corner 20*20 frame;
- power cable;
- variable resistor (100 Ohm);
- textolite board (6 mm);
- pistol grip;
- cables for winding (from 70 mm2) – can be replaced with busbars made of copper or aluminum with the required cross-section;
- brass rod (diameter 16 mm, length 250-300 mm);
- brass blank (diameter 60 mm, length 100 mm).
Types of spotters and their prices
By design, a spot welding machine can only belong to one of two groups:
Inverter
Thanks to the converter, which allows you to receive energy from any voltage, these models are used to perform multitasking work.
They have compact dimensions and provide high quality welding, since there is no drop in current during operation.
Price – from 25 thousand rubles.
Transformer
Powered by AC power, designed to perform simple operations.
The most extensive capabilities here are provided by models operating from three phases of power supply, due to their increased power.
Among the disadvantages, it should be noted that such models are not able to work with galvanized surfaces.
Price – about 15 thousand rubles.
Some craftsmen use the so-called battery spotter, which consists directly of a battery and a retractor relay.
This homemade device will cost much less than the factory versions of any plan; it does not require a network connection when operating, but naturally has serious disadvantages:
- Short operating time, need to charge the battery.
- No time relay.
- Lack of ability to adjust basic operating parameters, such as current.
Devices for resistance spot welding can be divided into 2 more groups, depending on the type of material they can work with:
Designed for straightening conventional steel bodies.
Multifunctional
In terms of the number of types of work performed, there are truly multifunctional spotters capable of not only leveling surfaces, but also performing spot welding, as well as soldering metal with carbon electrodes.
By the way, a welding spotter, based on the method of forming a welding point, can be:
- For single-sided spot welding using a special electrode.
- For double-sided spot welding with special pliers with manual or pneumatic drive.
Mini spotter
In addition to full-fledged welding installations weighing more than 10 kg, you can find on sale a mini-spotter for one-sided welding and leveling surfaces with a maximum welding current of about 1.5 thousand amperes and weighing only 4 - 5 kg.
Such portable options are supplied in convenient cases, comparable in size to a pistol-type soldering iron, and their average cost is 20 - 40 thousand rubles.
Types of equipment
There are two main types of devices: transformer and inverter. Based on the scope and method of use, two more groups are distinguished: for straightening and welding of the body using the contact method. Straightening spotters are small devices for manual work.
They are always equipped with a reverse hammer and additional parts for repairs. The design contains special pliers. Most devices are low power. Due to the low accuracy of welding work and rapid overheating, the spotter is not able to provide high-quality welding.
Spotters are also classified according to the required power supply voltage. Standard devices are designed for 220 V, and powerful ones 380 V.
How to make a spotter?
Before you start assembling the spotter with your own hands, it is necessary to take preventive measures when working with current - there must be a rubber mat under your feet, and all safety rules when working with electrical appliances must be scrupulously observed.
Necessary materials
In order to make a spotter with your own hands from an inverter, you will need:
- a 12-volt drive that provides push-button control of the relay (you can use a suitable transformer from old equipment);
- thyristor designed for a voltage of 200 volts;
- relay (30 Ampere);
- diode bridge;
- contact group for 220 volts;
- any suitable button for control.
A semi-automatic welding machine can be an excellent basis for a homemade spotter.
Assembly
How to make a spotter from a welding device? It is very important to change the initial configuration so that the spotter output from the inverter has a current strength of 1500 Amps
The assembly process consists of the following steps:
- The secondary layer is removed from the device (usually there are two of them).
- Calculate how many turns are needed per 1 volt. To do this, we wind copper wire onto the primary winding, after which we measure the volts and divide the resulting figure by the number of turns.
- A bus is made from the secondary winding. In this case, the cross-section of this element should be equal to or even greater than 16 millimeters, and the voltage should be 6 volts. If the cross-section has a smaller diameter, then we divide the tire into several parts, after which we secure all the components with tape.
- You will need two tires with an insulating winding. Insulation should be carried out gradually in the following sequence: a layer of electrical tape – a layer of adhesive tape – a layer of electrical tape. Installation of rivets on open edges is allowed.
- We wind the resulting buses onto the transformer. Since this procedure is quite complicated, those who have never wound such elements will need outside help and additional tools, such as a hammer. The transformer and the primary winding do not have to be tightly connected; it is enough just not to damage the busbar and ensure that it sits evenly.
- We measure power. If it meets the required parameters, the spotter manufacturing process is nearing completion. If deviations are found, you can try changing the connection of the wires to the primary winding.
Transformer manufacturing
One of the most important parts of a homemade spot welding jig is the transformer. Its production is considered the most labor-intensive process.
It can be produced on a ring or w-shaped iron with aluminum or copper wire. Between the wound wire, multilayer insulation is made of transformer paper or varnished cloth. To ensure optimal reliability, the paper is impregnated with paraffin.
Making a studder
A welding gun can be made from a semi-automatic machine by making some changes. An axle made of brass is attached inside the semi-automatic device, and the pliers are made of a pipe with a diameter of 2x2 cm. The conductor connecting the gun and the transformer must have a cross-section larger than or equal to the cross-section of the bus.
The productivity of the device also depends on the parameters of the wires - the shorter and thicker they are, the more efficiently the unit will function.
Transformer production stages
Assembling the transformer is a mandatory step in the manufacture of a spotter from a welding machine. This kind of work is the most difficult. Winding requires a lot of time, but this step is not necessary. The winding is carried out on a ring iron. The wire for the secondary winding should be made of aluminum or copper. High-quality insulation should be laid between the coils. Transformer paper in several layers is suitable for this. For maximum reliability, it is impregnated with paraffin.
The pistol is made from a semi-automatic machine . It will require some additions to secure the tool to the drawing device. To make pliers, a simple 20 by 20 mm pipe will do. The power wires connecting the transformer and the gun must have an identical cross-section. Alternatively, they must exceed the tire cross-section. Do not use wires that are too long. Their maximum size should be 2.5 m. The operating cable connecting the transformer and the gun should be made on the basis of a thermally insulated commutation cable. Each time it is heated, this layer will shrink.
Specifications
The reverse hammer for body repair, made from an inverter, has a number of features. Technical characteristics of different models may differ, but their functions and purposes are similar.
Both homemade and factory-made devices, which have industrial purposes, have their own important functions:
- attaching washers to the surface using a spotter;
- welding occurs spotwise using an electrode, which stretches the surface of the car;
- the ability to warm up parts, align them and cool them;
- the simple design of the device makes it easy to use;
- two operating modes - one short-term with time regulation, and the second constant;
- the presence of an automatic temperature control system, which consists of turning off the device and cooling the part at high temperatures, as well as turning on welding if necessary.
The technical characteristics of the homemade device are as follows:
- availability of 220 volt voltage for proper operation of the device;
- operating frequency 50 Hz;
- maximum power 10 kW;
- maximum current 1250 A;
- the secondary winding must have a maximum voltage of 9 V;
- set time up to 1.1 seconds;
- two operating modes: one for spot welding with a timer, and the second constant, for regular;
- when spot welding, the maximum current should be no more than 15 percent of the maximum when welding metal;
- for coal welding, the maximum percentage should not exceed 75%;
- the spotter needle and its washer must have a traction force of 100 kilograms for normal operation;
- product dimensions 295x830x375 millimeters;
- The maximum weight of the entire device is 31 kilograms.
Body repair with a spotter: what could be simpler?
What is needed for high-quality body repair? Skillful hands and reliable garage equipment are simple aspects that determine the profitability of an auto repair shop. After all, an excellent result of the work performed and a satisfied client are better than any advertising!
You will need a whole arsenal of a tinsmith, and in addition to straightening tools, also spot welding machines. After all, with them you can carry out not only welding work when connecting two metal sheets, for example, when repairing a roof or racks, but also use spot welding at different stages of straightening work.
A spotter is especially useful when you need to straighten a dent in an area that is difficult to get to from the opposite side, for example, if the damage occurs on a door or fender.
The great advantage of spot welding is the local heating of the metal only at the point of contact with the electrode, which reduces the thermal effect on the material and eliminates its deformation, the appearance of cracks, and deterioration in performance properties.
With certain skills, you can return a repaired part to properties as close as possible to the factory ones!
An example from the practice of car repair business
Now spot welding machines are used not only in large specialized body repair centers, but also in small private workshops. Some will say that purchasing such equipment for such activities is not entirely justified. After all, let’s face it, by the standards of a private owner, its acquisition will require considerable expenses. But practice proves that everything is quite the opposite.
Let's take, as an example, the activities of a garage technician who repairs cars and maintains a blog on the Internet, where he presents the results of his work and shares his experience. His workshop is located in a garage adjacent to a private house. Therefore, it cannot be called a car service in the broad sense of the word.
But there are clients who have been served only here for several years now. Correcting defects on the body takes up the lion's share of all work, and over time the master realized that the use of so-called “universal” semi-automatic machines does not always pay off.
To offer better and faster service, he purchased a mobile spot welder - a spotter.
By posting photographs of completed work using new equipment on his blog, the master emphasizes that this is reaching a new level. Now it does the job faster - even a deep dent can be pulled out with minimal effort.
Customers are satisfied, profits are growing, and within a few months of using the welding equipment, we managed to recoup the costs of its purchase. And the master learned quite quickly, because working with the spotter is very easy.
Here we will not describe for a long time the technology and design of these devices; you can learn more about this by reading the article Spotter - high-quality welding in a split second! Now our task is to understand how to use resistance spot welding in body repair, and what opportunities this opens up for the tinsmith.
Spot Welding: The Basics
Have you bought a spotter, but haven’t had time to really work with it? Or are you just planning to buy it? Surely, you already have some idea about it, but still we will tell you about the most important thing in using a spot welding machine. Knowing the basic rules of operation, you can avoid common mistakes.
Let's start with the fact that the operating voltage in the workshop's electrical network must correspond to the parameters of the spotter, designed for connection to a single-phase or three-phase network.
A circuit breaker must be installed. By the way, there are also combined devices that can operate at a voltage of 220 or 380 V.
They are suitable if the enterprise has a three-phase network and also has a single-phase backup generator.
Do not forget! Always ground the area of the body being repaired; weld the ground washer as close as possible to the welding site. By the way, this can be done using a spotter.
As for servicing a specific car, before starting welding work you need to study its characteristics, namely, the thickness of the body metal in the area being repaired.
Based on this, you need to set the current strength . You can do this manually or enter data on the thickness of the metal into the system, and then the spotter will adjust automatically.
Do not weld too thick body elements, because each device has a maximum allowable metal thickness, for example, 1+1 mm (that is, you can weld two overlapping sheets, each with a thickness of 1 mm, or one sheet with a thickness of 2 mm). As a rule, for cars, the thickness of the body metal is 0.6 - 0.8 mm in non-strength elements and can exceed 1 mm in body parts such as the roof and floor.
You also need to adjust the pulse duration . For this, an automatic timer can be provided, which allows you to set the heating time within, for example, from 0.1 to 2 seconds. If you work in manual mode, then the exposure time must be controlled by pressing the gun lever.