Hand saw wiring methods
This is best done on special equipment - an adjustable machine. Using an indicator, you can determine the correct deviation of the tooth, so the work can be done in a matter of minutes.
If the machine is difficult to find, you can open the hacksaw manually
.
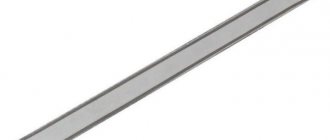
However, performing the procedure will take a lot of effort and time, and besides, you cannot do without a special tool - wiring
, which you can make on your own. It is a metal plate with a sawn groove 1.5 mm wide and 5 mm high. The saw is clamped in a vice and with this groove the tooth of the tool is grabbed and moved in the desired direction.
This must be done in a certain order.
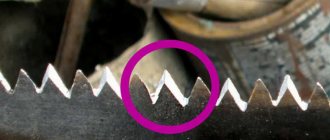
. First, the teeth are deflected through one in one direction, then the rest in the other. In this case, there should be no distortions, and the teeth should be straightened symmetrically. It is not the entire tooth that bends, but only its top (that is, its third part), otherwise it may break. The width of the setting should be equal to twice the thickness of the blade; if the teeth are set too wide, the hacksaw will be difficult to move, and too much wood will go into the sawdust. In addition, if the tool is set incorrectly, the tool will “wedge” and an even cut will not work.
You can also open the saw using a screwdriver or chisel. The tool is placed between the teeth and rotated; before this, the saw should also be clamped in a vice.
A good machine is the key to success
Let's look at this process in more detail.
The adjusting machine must perform the following functions:
- accurately and equally for any width of the band saw for all its teeth, set the height of only that part of the tooth that needs to be set apart;
- bring each saw tooth under the pusher in exactly the same place;
- when setting each tooth, first ensure that the body of the band saw is clamped in such a way that it does not have the opportunity to bend when the pusher presses on the tooth (to eliminate the “swing” effect);
- bend the tip of the saw tooth by a certain amount along a broken line, and not along a radius;
- push the band saw body away from the stationary plate after returning the body clamping mechanism to its original position, so that when the next tooth is fed for setting, its cutting edge does not cut the indicator tip;
- be able to press the tooth being set again to check and, if necessary, adjust the resulting set.
When pressing multiple times to check the misalignment of even one tooth, the difference in the indicator readings should be a maximum of one or two divisions.
If the setting machine fails to perform at least one of these functions, the teeth of the band saw can only be set poorly or very poorly. But 99% of adjustable machines are manufactured in such a way that they do not perform one or more functions, and besides, they themselves are of very poor workmanship.
Therefore, you can use a band saw on them only on a whim, which very rarely works out well. Accordingly, she saw and sawed like that.
How to sharpen a hand saw
After cutting, the saw must be sharpened
. This procedure does not require special equipment; you can get by with a regular triangular file. The sharpening technique with this tool is as follows. The file is taken by the handle with one hand, by the tip of the tool with the other and moved away from you, pressing the teeth smoothly and evenly, then in the opposite direction without touching the teeth. The teeth of a hand saw must be sharpened on both sides, from the top to the bottom.
After sharpening, burrs may form on the edges of the teeth, which will negatively affect the operation of the tool by chipping and dulling the teeth. They must be removed using a fine-notched file.
During operation, the saw becomes dull, so sometimes the teeth are sharpened with an emery block. Constant sharpening evens out the setting so that the saw remains in working condition; the setting of the teeth must be repeated periodically. However, major setting and sharpening of the teeth is not required too often.
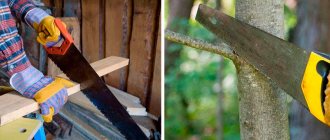
How to saw with a two-handed saw - detailed instructions with description
At first glance, the process of sawing with a two-handed saw may seem easy and straightforward. However, as soon as a beginner takes up a hacksaw, it immediately becomes clear that this is a job for real and strong hands. However, you don’t have to have a mountain of muscles to properly cut wood with the Druzhba-2 saw. To do this, you need a little experience and also understand the principle of operation.
This is interesting!
Even if you have experience working with short-stroke hacksaws, a beginner who picks up a two-handed saw for the first time will be unpleasantly surprised.
If an experienced sawyer stands at the other end of the saw, then a beginner will have a hard time until he masters the principle of operation of the device. Instructions on how to cut logs and trees with a two-handed saw are as follows:
- First, the log must be secured by placing it on the “goats”. It must be taken into account that it is most convenient to carry out the work while standing on your feet, so even if the log lies on the ground, then in order to cut it correctly, you should place it on a special stand - sawhorses
- The section of the log that is sawn off from the main part should hang above the ground
- Both sawers take a comfortable position with their feet shoulder-width apart. The main thing here is to firmly support your feet, otherwise the possibility of injury cannot be ruled out.
- Ideally, it is recommended that one of the sawers position himself slightly higher than the other, for example, by placing a tray. This will speed up the cutting, but is not at all mandatory.
- By holding the handles of the tool, you can begin. The main thing when working with a two-handed hacksaw is synchronized work with your hands. The effectiveness of achieving the final result depends on smooth hand work.
- The principle of pair sawing is as follows: it is necessary to apply force only in one direction - to pull the blade towards you. There is no need to push the tool away from you, since this task is assigned to your partner. While the partner is pulling the blade towards himself, the hand of the first sawyer is resting
- In this way, not only work efficiency increases, but also rapid fatigue is eliminated
The speed of achieving results is influenced by many factors, such as the thickness of the log, the length of the blade, the quality of sharpening the teeth, as well as the synchronized work of the sawmills. It is worth noting that with the right approach to sawing, it is possible to achieve fast sawing comparable to the operation of a chainsaw.
This is interesting!
If the blade has signs of corrosion deposits, then before carrying out work it is recommended to clean the surface with fine sandpaper (to speed up the work, you can use a hand brush for metal), and then apply machine oil to reduce resistance when working with the tool.
Hand saw care
You need to be able to not only trim and sharpen a saw, but equally important is its proper storage. When the saw is not used for a long time, it should be kept in a dry and warm room, otherwise, if moisture gets on it, it may rust. Even if the tool is treated with special means, this will not guarantee that it will not be subject to corrosion.
Source: kremonty.ru
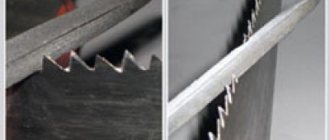
The main cutting element of any hand saw is a series of teeth cut on the blade and representing wedge-shaped cutters. Wood, in the manufacture of all kinds of products from it, is sawn along, across and at an angle Θ to its fibers; in this regard, transverse, longitudinal sawing and sawing at an angle to its fibers are distinguished, and in each case they use the appropriate type of saw, which differs from others in shape teeth
When cross-cutting, cross-cut saws are used, the cutting edges of the teeth of which, when moving in the wood, cut its fibers like a knife and form a cut. Longitudinal sawing differs from cross-cutting in that the direction of movement of the saw is parallel to the grain of the wood. The leading edges of the teeth of rip saws plan wood, like knives in planes, and, going deeper, form a cut. When sawing wood at an angle Θ, universal (mixed) saws with teeth that are an intermediate form of teeth for transverse and longitudinal saws are used to its fibers.
Sharpening the saw
Sharpening saw teeth is an art of its own, requiring faithful hands, a good eye, and attention. It is not difficult to learn this business, you must have the desire and strictly adhere to the following rules:
- The saw blade must be rigidly fixed in a special device made of wood, which is also firmly installed on a well-lit work table. Sharpening saw teeth on stools or knees does not give satisfactory results.
- You should use a personal file, followed by cleaning the sharpened edges of the teeth with a velvet file (with a fine notch) or a needle file. It is advisable that the file be new, sharp and with a mounted handle. If you don’t have one at the right time, you can use a second-hand one, but it must be cleaned with a steel brush and rubbed with charcoal so that the file does not become clogged or dull. When sharpening a tooth, the file must grip the metal and remove its layer depending on the force of pressure. And if it slides over the tooth without removing the metal, then the saw teeth are overheated or the file is worn out. In this case, it is necessary to repeat sharpening with a new file. If in this case it slides along the tooth, then you just have to take another saw.
- The handle of the file is clamped with your right hand, and its end is held with your left hand and the file is directed towards the teeth of the saw. How to use a file depending on the type of saw is described below.
- The pressure of the file on the teeth should be smooth and uniform and only in one direction away from you. When returning the file to its original position, it should not touch the teeth.
- You should try to grind the metal from the edges of the teeth to a minimum of the same thickness, moving the file the same number of times with the same pressure, which allows you to maintain the angles, pitch and height of the teeth after sharpening.
- Burrs form on the edges of the tooth on the side where the file exits, which reduce the sharpness of the tooth, and if they are not removed, then during the operation of the saw they chip and the teeth become significantly dull. To remove burrs, the edges of the teeth are sharpened with a file with a velvet cut and the burrs are removed from the side edges with a wet whetstone.
- After sharpening the teeth, you need to check their sharpness. Look at the point of the needle and the edge of the razor blade: although they are sharp, they do not shine in the light. And if they are dulled, then rounded surfaces appear on the tip of the needle and on the edge of the blade, which reflect light and shine well. This principle is used to check the quality of saw teeth sharpening. To do this, place the saw in front of your eyes and examine its teeth along the blade. If their cutting edges and tips do not shine, then the saw teeth are sharpened satisfactorily, and if some of the teeth are shiny (this often happens), then they need to be sharpened with a velvet file, remove the burrs and again check the reflection of light on their edges and tips.
Crosscut saws
. The teeth of cross-cut saws are sharpened using a finely cut triangular file with an apex angle of 60°.
To sharpen the teeth, the saw is clamped into a special device that allows you to set its blade at an angle of 45-50° to the plane of the work table. The file is led parallel to the work table at an angle of 60-75° to the saw blade and thus the left edge of A1A2B2B1 is sharpened in the first tooth.
Band saw design
Machine with a band saw
The band saw belongs to the category of cutting tools and is an integral part of specialized wood processing equipment. It is a closed belt with teeth on the outer edge.
For production, special grades of steel are used - 9ХФ, Б2Ф or С75. During the production process, teeth are treated with high-frequency currents. This increases their hardness. It is this fact that affects the spread of cutting edges and maintainability. Often several types of steel are used in manufacturing. The main belt is made of spring, and the cutting part is made of steel with a high content of tungsten or cobalt.
Features of using band saws for wood:
- wood requirements. The harder it is, the faster the blade will become dull;
- installation conditions. The tension indicator must be observed. If it is less than required, sagging will occur. With strong tension, the likelihood of fabric breakage will increase;
- periodic sharpening. This will require a special machine.
Completing the last point will increase the service life of the strip structure. However, sharpening it yourself is problematic - you need to choose the right layout and maintain the angle of the blades.
Saw material
Band saws are made from different materials, depending on what material they are intended for cutting.
Wood saws are made from alloy tool steel with a hardness of 40-45 HRC. Domestic manufacturers use steels 9ХФ, В2Ф (for metal band saws), etc., foreign manufacturers use their own steels (C75, Uddeholm UHB 15, etc.). When the teeth of such saws are hardened by high-frequency currents, they can acquire a hardness of up to 64 HRC and higher.
Hardened band saw teeth
Saws for cutting carbon steels and non-ferrous metals of small thickness are also made from tool steel with mandatory hardening of the teeth with high-frequency currents. However, more often, bimetallic saws are used for cutting metal, in which the blade is made of spring steel, and the strip on which the teeth are cut is made of high-speed steel with a high content of tungsten and cobalt. After hardening, it acquires a hardness of up to 65-69 HRC. High-speed steel is welded to the base of the saw using an electron beam.
Making a bimetallic band saw
Bimetallic saws are capable of cutting thick metal from tool, stainless, heat-resistant and other steels, titanium alloys and other metals.
Bimetal Band Saw
Teeth with greater wear resistance are obtained by surfacing them with stellite (an alloy based on chromium and cobalt with additions of tungsten and/or molybdenum) or by soldering plates of hard alloys to them. Such saws are superior in cutting capabilities to bimetallic ones. They are used for cutting fiberglass, tires, cables, reinforced plastics, heat-resistant alloys, graphite, aerated concrete, bricks and other materials that are difficult to cut.
Band saw with carbide teeth
This is interesting: Riveter for threaded rivets - classification, types, use
How to set the teeth of a wood hacksaw
A saw is often used to process wooden blanks and change length and shape. This tool is represented by a combination of a working part and a handle. In this case, the working part is represented by a metal plate with cutting elements, which are located in a certain sequence relative to each other. Only with proper and timely maintenance can the possibility of product wear be eliminated. An example is the setting of the teeth, which is performed from time to time to ensure smooth movement of the tool along the resulting cut.
Characteristics
Band saws have three distinctive features. They are made only from special grades of tool steel, which ensures high strength and wear resistance of the teeth. Russian manufacturers usually use steel categories 9ХФ and В2Ф, foreign companies prefer the C75 series. In any case, the hardness of the material must be at least 45 HRS.
The cutting width of a band saw blade is much narrower than that of its circular saw counterparts. As mentioned above, this is a fundamental factor when processing valuable wood and industrial wood.
Saws can easily handle workpieces of any length and diameter. At the same time, a properly sharpened band saw ensures high production productivity.
It should be clarified that the reliability of closed saws is explained by the heterogeneity of the material used to make the blade.
In particular, the body of the sawing tool is usually made of spring steel, which has incredible resistance to tension and dynamic loads. The cutting edge is made from steel grades with a high content of tungsten and cobalt. The individual parts of the fabric are welded together by high-frequency currents. Tools made using this technology can be used for sawing metal.
Device for setting saw teeth
Setting the cutting edge in different directions eliminates the possibility of the blade getting stuck during operation. An example is the case when, when cutting a thick log, the blade cannot be moved and removed. Also, the saw can jam due to the heating of the metal and its expansion, the hot part can heat the resin and turn it into a kind of glue.
You should use a tool for setting the teeth of hacksaws in order to avoid such problems. Do not forget that mistakes made during work can lead to even bigger problems. The procedure in question can be carried out using the following tools:
- There are special mechanisms. They allow you to manually shift individual elements relative to each other. It is worth considering that this version is manufactured for specific products.
- Mechanical wiring is most often used. They allow you to change the angle of position, as well as their width. This tool is characterized by higher efficiency in use.
- The improvised version is not intended for working with a hacksaw on wood, but can be used for this purpose. An example is pliers and other improvised tools found in almost every workshop.
If sawing is carried out frequently, then experts recommend purchasing a special device that allows you to quickly set the required angle.
Band saw routing
Before forming the cutting edge, the teeth must be set correctly. During the entire period of operation, due to constant loads, their location may change. Therefore, the geometry is adjusted first, and then sharpening occurs.
The setting is a bend of the teeth relative to the plane of the main blade. This procedure is performed only on a special machine. In case of large discrepancies along the entire length of the belt, premature damage or breakage of the web may occur. Therefore, before this you should decide on the type of wiring.
The angle of inclination must correspond to the original one. The type of wiring is also taken into account, which can be as follows:
- classical. Alternate bending of the teeth relative to the blade to the right and left sides;
- cleaning The first and second teeth deviate to the right and left, but the third remains unchanged. This technique is used for saws that are intended for processing hard rocks;
- wavy. The setting angle for each tooth is individual. As a result, they form a cutting edge that resembles a wave. The most complex type of wiring.
During bending, not the entire tooth is subject to deformation, but only part of it. Often the deviation occurs by 2/3 of the total height.
How to properly spread the teeth of a hacksaw?
A fairly common question is how to set the teeth of a hacksaw on wood. If they are offset in one line, the cut is narrow and the working part gets stuck in one place. In this case, the metal quickly heats up, due to which it begins to expand. In order to set the teeth efficiently, it is recommended to use special mechanisms. Recommendations for the work being carried out are as follows:
- The saw is clamped in a vice for secure fixation. You can eliminate the possibility of damage to the working part by using plywood as a lining.
- All cutting elements are bent one at a time to the recommended angle.
When considering how to make a cut on a hacksaw, we note that several elements deflected at a larger angle can make sawing more difficult.
New machine - correcting manufacturing inaccuracies
After reading everything described above, you can independently check and, if possible, correct your adjusting machine. However, it is easier and cheaper to buy a good new one. The only way to check the machine is to check the resulting pattern. When pressing multiple times, the difference in the values on the indicator should be a maximum of two divisions. As an example, I’ll tell you what we had to do when one of our clients asked us to bring his machine to working condition.
Externally the machine looked very beautiful. But when we tried to run a band saw on it, it turned out that almost all the components were made poorly. The spread of the values obtained when pressing again was more than ten units, which did not allow making a high-quality determination on it.
1. The movable plate was not perpendicular to the base plane (small vertical and horizontal deviation).
The body of the saw was clamped somewhere in the middle and more strongly from the right edge and only part of the plane of the ends of the thrust pins. The upper part of the saw body remained free. "Swing" effect.
The plate was ground.
2. The springs of the thrust pins are long and too stiff, preventing the pins from completely moving into the grooves of the movable plate.
The body arched. "Swing" effect.
The springs were cut and stretched.
3. The tooth pusher was in the form of a cone made of non-hardened material.
It quickly flattened at the end, making divorce difficult.
Replaced with a pusher with a ball at the end.
4. The indicator stop is not parallel to the plane of the band saw, the plane of its end is not trimmed (the indicator readings changed depending on the location of contact).
The end is not hardened - a pothole will appear very quickly, and if hit, it will also result in an inaccurate mark.
The indicator mount has been changed. The end plane is leveled. The pusher tip is ground and hardened.
5. Lower non-adjustable supports for the back of the saw. It is impossible to set the required height of the part of the tooth being set. The divorce turned out not along a broken line, but along a radius. Instability in the cut.
Movable lower supports are made with convenient adjustment.
6. There was no three-tooth pusher with stops for accurate tooth feeding. It is impossible to carry out a divorce in one place on each tooth. Inaccurate divorce.
Manufactured and installed.
And even after we corrected all the manufacturing inaccuracies, only band saws with non-hardened teeth or hardened teeth, but with weak fixation in the body, could be made well on the machine (types of band saws were discussed in previous articles). When setting up other types of saws, a “swing” effect immediately appeared.
Requirements for hacksaw wiring
In order to carry out the wiring correctly, you need to pay attention to the basic requirements. They are as follows:
- The procedure is carried out while fixing the instrument.
- The required angle must be strictly maintained; deviation from it causes a decrease in the quality of the resulting cut.
- At the time of work, care is taken to ensure that the surface is free of defects.
It is worth considering that too high an indicator causes an increase in the cutting width, which reduces the productivity indicator. That is why a special device must be used to set the teeth.
Setting teeth at home
Today, at home, you almost never find special devices designed for servicing hacksaws for metal. However, even in its absence, it is possible to carry out the work with improvised tools. The recommendations are as follows:
- To begin with, the hacksaw must be securely fastened in a vice. This is due to the fact that bending requires a lot of force.
- You can bend it using pliers. In order to maintain the correct angle, you must first create a template.
- You cannot skip more than one element of the cutting edge. In this case, attention should be paid to the condition of the surface, since identified defects indicate that the wood hacksaw cannot be used.
Even at home, in the absence of a special mechanism, you can carry out the correct wiring and significantly extend the service life of the wood saw. In this case, it is important to maintain the required angle, since a cut that is too wide causes a significant decrease in productivity, while a cut that is too narrow leads to heating of the working part and its severe wear.
Some companies provide services related to such work. Note that the cost of a special mechanism is relatively small, so it is best to purchase it and the procedure can be carried out repeatedly.
If you find an error, please select a piece of text and press Ctrl+Enter.
Source: stankiexpert.ru
How to determine when it's time to sharpen a hacksaw
In order not to shorten the service life of the hacksaw blade, it should be sharpened only when it can no longer perform a high-quality cut, or requires more effort when working with it. The main signs of a dull saw are the following:
- the tips of the teeth were rounded, their shape was distorted;
- the sound of the saw changed: there was a feeling that the wood was not being cut, but was being torn along the fibers;
- the cutting speed has decreased compared to the new hacksaw;
- nicks and nicks began to appear on the cut;
- The hacksaw occasionally jams even when cutting smoothly.
If at least one of the listed signs appears, then the hand saw needs servicing. This includes both direct sharpening of the teeth and their correct alignment.
How to use saw wiring
- AuthorizationRegistration
- Forum
- News
- Types of tourism
- Go on a trip
- Education
- Equipment
- ads
- Useful
- Creation
- Galleries
Saws according to their structure are divided into bow saws, two-handed saws, hacksaws, and chain saws have appeared relatively recently. The saw is a steel blade with teeth cut along one edge. The teeth cut the wood fibers and remove shavings from the cut. On two-handed saws, through a certain number of cutting teeth, sawdust ejector teeth are sometimes made. Such teeth cannot be sharpened.
I will express my subjective opinion about saws in relation to tourism. All the saws listed above were tested by me in field conditions. Perhaps my opinion is erroneous, based on many years of habit of sawing with certain saws.
Bow saws. In bow saws, the blade is tensioned using a wooden machine or a metal beam, which makes sawing convenient for one person. Actually, this is where the convenience ends. The entire assembled structure is inconvenient to carry in a backpack due to its bulkiness. Of course, you can transport it disassembled, but the likelihood of losing or breaking the component parts increases. Then, I feel some kind of internal aversion to prefabricated structures - it’s good for transportation, but to assemble and disassemble every day... even if it’s simple - no! I tried to carry only the canvas with me, and make the bow on the spot from a branch. I didn't like it either. Even in the taiga you won’t immediately find a suitable branch, then you need to prepare it and assemble the saw. It’s somehow troublesome, but in winter it’s almost impossible - damp branches break in the cold as if they were dry. Another inconvenience: sometimes it is necessary to cut a fallen tree from below (when sawing from above, the tree clamps the saw) - the onion does not fit through everywhere.
Two-handed saw. Saw blade with two handles. The optimal saw for forest hikes in the cold season. And in summer, at long-term base sites, it’s nice to have a two-handed gun. If weight and volume are not critical, it is better to leave the saw as is and not convert it into a tourist version. For longer hikes, it might be a good idea to downsize the saw a little. But here you need to not overdo it, don’t make the blade too narrow and short, and don’t turn it into a jigsaw file. I have a two-handed saw with a length from handle to handle of 800mm, maximum width 90mm. With a saw of this size, you can cut logs with a diameter of up to 30-35 cm. The saw does not require preparation - you take it out of your backpack, unsheath it, and just saw it stupidly - you don’t need to collect anything or think about it in the cold. In winter, when the preparation of firewood often takes place in the dark, the simplicity of the design will not hurt. It is quite possible to saw with a two-handed saw alone. The cover is a strip of thick fabric folded three times and stitched. Three ties are sewn to the cover. A rag cover is more practical - covers made of PVC and rubber hoses become tanned in the cold. This saw doesn’t take up much space in your backpack. I place the saw in my backpack vertically, on the side.
Sharpening a hacksaw
Like any other tool, a hacksaw will work well if it is sharp.
With frequent use, the question of sharpening a hacksaw for wood very soon arises. A hand saw for wood becomes less sharp over time; the teeth wear down, becoming rounder on the sides and in front of the edge. Therefore, it becomes more difficult to operate the saw. To restore the previous sharpness of the teeth, it is worth sharpening them. Please note that before and after sharpening, the teeth must have their original height and angle pitch.
It is also worth considering the fact that not every hacksaw can be sharpened. For example, a tool that has small teeth should not be sharpened. In addition, hardened steel teeth cannot be sharpened. A large wood hacksaw lends itself best to sharpening.
Before you start sharpening, you should separate the teeth. To ensure free movement along the workpiece, as well as to avoid pinching the tool, the teeth must be moved apart smoothly as they deepen.
The alignment of the teeth must be bent in different directions to a specific distance. After this, the width of the cut will increase and will have a larger width compared to the thickness of the teeth. There are gaps on the sides. Upon completion of the layout, the hacksaw will easily move back and forth, and the blade will not touch the surface of the cut, as a result of which the master will freely remove the wood with each layer.
When setting, it is worth considering the fact that as the width of the teeth increases, the cut will widen. Therefore, you will avoid the hacksaw getting jammed. However, this does not mean at all that if the teeth are set excessively (increasing the width), a wide cut will be obtained; on the contrary, the teeth will tear the wood and the work will become harder. The optimal width of the teeth is one and a half to two times greater than the thickness of the hacksaw blade. For this reason, to cut raw wood, the teeth should be set aside by 0.5 - 1 mm, and dry wood - less than 0.5 mm.
A special tool called a setting tool will help you bend the teeth. This is a small metal or wooden plate with a small slot, the width of which is greater than the thickness of the hacksaw. Often the wiring is equipped with an adjusting screw, with which you can achieve an even bending pitch of the teeth.
Wiring procedure:
- clamp the saw in a vise so that only one teeth peeks out
- fix the vice on a convenient flat surface, for example, on a table
- bend the teeth using an adjustable device in the opposite direction
- do not bend the teeth completely, otherwise they will break
- at the end of the setting, you need to check that the teeth are at the same distance and do not look out.
Sharpening a tool can be called a real art, for this reason it is worth following certain rules:
- securely fix the hacksaw. The blade must be secured in a vice or other wooden device that is installed in a well-lit place and on a stable surface. High-quality sharpening will not work on your knees, chair or brick.
- use high quality tools. Don't save money by buying cheap tools. You should definitely buy a quality file
- For long service life of a hacksaw, it must be cleaned with a wire brush and rubbed with charcoal. This is necessary so that the hacksaw does not clog or become dull.
- The handle of the hacksaw should be held in the right hand, and the end should be supported with the left, pointing the file at the teeth. It is necessary to press the teeth smoothly, pointing the file in one direction. When returning the file, try not to touch the teeth.
- you need to try to remove the metal from the edge of the teeth evenly. For convenience, you can count the number of movements; for each tooth it should be the same
- A file that has a velvet notch will help you get rid of burrs from your teeth. The notches on the side edges of the hacksaw must be removed using a whetstone.
At the end of sharpening, you should definitely check the quality of sharpening and the sharpness of the teeth. A well-sharpened edge does not shine.
Related Posts
Sharpening and setting the saw
The main cutting element of any hand saw. a series of teeth cut on the blade and representing cutters in the form of wedges. Wood, in the process of making various products from it, is sawn along, across and at an angle Θ to its fibers; for this reason, transverse, longitudinal sawing and sawing at an angle to its fibers are distinguished, and in this case, a corresponding type of saw is used, which differs from others in shape teeth
When cross-cutting, cross-cut saws are used, the cutting edges of the teeth of which, when moving through the wood, cut its fibers like a knife and form a cut. Longitudinal sawing differs from cross-cutting in that the direction of movement of the saw is parallel to the grain of the wood. The front edges of the teeth of longitudinal saws plan wood, like knives in planes, and, going deeper, form a cut. When sawing wood at an angle Θ to its fibers, universal (mixed) saws with teeth are used, which are the intermediate form of the teeth of transverse and longitudinal saws.
Proper sharpening of a chainsaw chain
How to understand that the equipment is dull
In the process of intensive sawing, the cutting segments of the chain become dull. And this happens not only when interacting with wood. For example, if a tire accidentally slides off a log and hits the ground, the strong abrasive action will cause damage to the cutting edges. Evidence that chain sharpening is necessary is a deterioration in work productivity: the tire stops going deeper into the wood, small sawdust flies instead of large shavings. The user has to put in more effort to get the saw into the wood. You can restore the sharpness of the cutting segments yourself by sharpening them manually. There is nothing complicated about this if you know the features of the geometry of the saw blade and the nuances of sharpening.
It is important to know! It is not recommended to saw with a dull chain. This will not only reduce productivity and require more effort from you, but will also increase fuel consumption, load on the engine and accelerate wear on the working parts of the tool.
The first part of the link is the cutting tooth. It has two edges - upper and lower (end blade). When it enters the wood, it removes a layer of it in the same way as a plane blade does. The second part is the cut depth limiter. It regulates the thickness of the wood chips. The upper edge of the cutting tooth is beveled at a certain angle relative to the line of movement of the saw blade. Such structural features dictate their own rules for processing each segment. They need their own approach.
Preparing saw equipment
Let us remind you that sharpening a chainsaw chain with your own hands is carried out without removing it from the tool. It is quite convenient to position the saw by securing the saw set with a clamp on a hard surface. This will relieve you from having to hold the tool and will also help you sharpen more confidently. Don't forget: you'll need protective gloves to protect your hands from getting cut on the saw attachment. To complete the work, you need a set consisting of a template, a round and a flat file. Working according to the template, you will be able to accurately position the file relative to the tooth and repeat the action on each of the cutting links. So, let's talk about sharpening in order.
Cutting tooth processing
To process cutting edges you need a round file. It is selected by diameter based on the chain pitch parameters. To properly position the sharpening tool, the following instructions must be observed:
- in the vertical plane, its working part should be at an angle of 90° relative to the equipment;
- in the horizontal plane - at an angle of 30° or 10°, depending on the features and characteristics of the chain.
A special template, which is installed on the tire and makes it possible to sharpen quickly and accurately, will help to strictly comply with these requirements and repeat the same position on each link. Templates of a special shape are offered for each saw model, so it is better to select branded products recommended by the manufacturer. Examples of such devices are presented in the figures below.
Having placed a file with a round working part inside the chain link and given it the desired position using a template, begin to move it parallel to the edge. Keep the tool horizontal and do not use excessive force. Also make sure that the top of the file does not protrude beyond the top of the tooth by more than 1/5 of its diameter.
Important! Make movements with the file only from yourself. Make sure that the number of movements is the same on each of the teeth
Then after sharpening they will all have the same height. For convenience, first sharpen the segments of one direction, and then change the position of the saw set and process the teeth of a different direction.
Processing the cut stop
The process is performed using the same template, just with a different tool. You will need a file with a flat blade. The sharpening template has a small window for the cut limiter. Place the template on the saw attachment so that the stop comes out of this slot. Then take a file and make several movements in the direction away from you - you need to grind off the tip of the segment protruding from the window.
Video instruction
To understand what sharpening a chainsaw chain with your own hands looks like, watch the process in this video. By following all the rules, you will return the cutting properties to the equipment and be able to continue working.
Sharpening the saw
Sharpening saw teeth. By its properties, art requires faithful hands, a good eye, and attention. It is not difficult to learn this business, you need to have the desire and correctly adhere to the following rules:
- The saw blade must be aggressively secured in a special device made of wood, which is also stably mounted on a well-lit desktop. Sharpening saw teeth on stools or knees does not give satisfactory results.
- You should use a personal file with the following cleaning of the sharpened edges of the teeth with a velvet file (with a small notch) or a needle file. It is better that the ratfil is new, sharp and with a mounted handle. If there is no such thing at the right moment, then they use a second-hand one, alas, certainly cleaned with a wire brush and rubbed with charcoal so that the ratfil does not become clogged or even dull. When sharpening a tooth, the ratfil should cling to its metal and remove its layer, depending on the force of pressure. If it slides over the tooth without removing the metal, then the saw teeth are overheated or worn out. In this case, you need to repeat sharpening with a new ratfil. If in this case it slides over the tooth, then you just have to take another saw.
- The handle of the ratfil is clamped with your right hand, and its end is held with your left hand and the ratfil is directed towards the teeth of the saw. Working with a ratfile based on the type of saw is described below.
- The pressure of the ratfil on the teeth is expected to be smooth and uniform and exclusively in one direction away from you. When returning the ratfil to its initial position, it should not touch the teeth.
- It is necessary to try to grind off metal from the edges of teeth of slightly similar thickness, driving the grinder in the same system a number of times with similar pressure, which allows you to maintain the angles, pitch and height of the teeth after sharpening.
- On the edges of the tooth, which are not familiar to the exit of the ratfil, burrs are formed, which reduce the sharpness of the tooth; if they are not removed, then during operation of the saw they are chipped, and the teeth become significantly dull. To remove burrs, the edges of the teeth are sharpened with a ratfile with a velvet notch and the burrs are removed from the side edges with a damp whetstone.
- After sharpening the teeth, you need to inspect their sharpness. Look at the point of a needle and the edge of a razor blade: although they are sharp, they do not sparkle in the light. If they are dulled, rounded surfaces appear on the tip of the needle on the edge of the blade, which reflect light and shine perfectly. This principle is used to test the sharpening properties of saw teeth. For this purpose, a saw is placed in your field of view and its teeth are examined along the blade. If their cutting edges and tops do not shine, then the saw teeth are sharpened satisfactorily; if some of the teeth are shiny (this often happens), then they need to be sharpened with a velvet notch, remove the burrs and again check the reflection of light on their edges and tops.
Crosscut saws
. The teeth of cross-cut saws are sharpened using a triangular file with a small notch with an apex angle of 60°.
To sharpen the teeth, the saw is clamped into a special device that allows you to set its blade at an angle of 45-50° to the plane on the desktop of the local computer. The ratfil is carried parallel to the work table at an angle of 60-75° to the saw blade and in this way the left edge of A1A2B4B1 is sharpened in the first tooth.
The saw teeth are sharpened in several stages. At first, the ratfil is passed along the left edges of the odd teeth located in a distant row, tuning the hands for the same movement of the device. Then they pass the file along the right edges of the same odd teeth, finishing sharpening the main cutting edges with very sharpened tips. After sharpening the odd teeth, the saw blade in the sharpening device is turned over and in this way the even teeth that are in a distant row are sharpened. When sharpening the teeth of cross-cut saws, you need to carefully ensure that each tooth has sharp main cutting edges with a dihedral angle φ = 60-75°, a small cutting edge and a sharp tip.
To sharpen the teeth, the saw blade is mounted vertically in a clamping device, which is usually mounted on a desktop. Below are two methods of sharpening the teeth of longitudinal saws, differing only in the sharpening angle φ, i.e., in the directions of the grinding file relative to the saw blade.
Source: auramm.ru
Article rating:
Save to:
How to use saw wiring Link to main publication
Proper cutting and sharpening of the band saw is half the success!
The most important factor in the success of a lumber business is the type of saws used in production. The size of the saw, the material from which it is made, and the technology used to produce it all matter.
But even using optimally sized saws manufactured to the latest standards will not allow you to make the profit you expect if those saws are not sharpened and set correctly. Improper cutting and sharpening of the saw lead to the appearance of defects on the lumber, which means its value drops significantly.
Proper sharpening and cutting of saws is especially important when working on a band sawmill. Unfortunately, in practice, many people even confuse the sequence of these procedures: first they cut the saw, then they sharpen it. As a result, the spread of the saw tooth “goes away”, and the saw needs to be set again, or, if this is not done, the quality of the finished product will leave much to be desired.
If we talk about the machines on which saws are sharpened and set, then every detail is truly important here. contributed to the development of high-quality adjusting and sharpening devices.
The adjusting machine has the correct geometry: when installing the saw in the adjusting machine, the tooth root is located between the cheeks that clamp the saw. In many other machines, including from a number of well-known manufacturers, this condition is not met. Therefore, when a tooth is bent, both the tooth and the saw body are deflected. Technically, correct setting of the saw means something else: the pusher rests on 1/3 of the tooth and bends only its tip. In the manufacture of the setting machine, two pressure stops are used, which, when lightly pressing on the handle, press the tooth against the indicator head. The pusher, not reaching the tip of the tooth, shows the actual groove on the band saw. If it is insufficient, the operator presses the tooth until it is moved apart to the required size
We consider it very important to pay attention to one point: the tooth of a band saw has such a property as metal memory. Because of it, under the influence of inertia, the tooth tends to return to its original position.
Therefore, for correct alignment, it is not enough to apply one pressure on each tooth: it is necessary to act on the tooth several times so that it remembers its position. If someone tells you that it is enough to press once on each tooth, know that you are being misled.
Two clamping stops with powerful springs used in the machine show the actual saw tooth set, which is very convenient: you don’t need to endlessly unscrew and reconnect the pusher to find out how the saw tooth is actually set.
Another strong point of the company’s adjusting machine is the ease and safety of the operator’s work: the tooth is adjusted not by pressing the pusher forward by the operator, as in a number of analogues, but by the operator’s own weight and with the help of an eccentric. As a result, the operator does not experience sprains in his hands. So, high-quality adjustable and sharpening machines are something that, undoubtedly, should be in the arsenal of every sawmill owner. But in themselves, they do not guarantee the quality of the lumber; they will not allow the saw to serve for a long time if sawmills with serious technical shortcomings are used in production. For example, if the rollers are made with a cone, or they have become conical because the saw has sharpened them, then even with proper After sharpening and setting, the saw begins to find its place in the log. This will happen because the rollers are at an angle. If the pulleys on the sawmill are spread apart and are not in the same plane, then the saw does not flare clearly in the middle, but from the sides, and then the tension goes to the edge of the band blade. This also reduces the life of the saw.
So the role of correct saw setting and sharpening is, of course, great, but these factors do not determine 90% of high-quality sawing, as is commonly believed. It’s just that the saw itself will not be able to cut perfectly smoothly and not break down for a long time if, for example, a rigid tension is used at the sawmill.
If you are just starting your business and have not yet had time to familiarize yourself with all these nuances, we recommend turning to those who have been working in the market for several years. Phone number of the central office in Novosibirsk: eight. Contact us and we will advise you on the choice of equipment based on your needs and your budget.