How to set the teeth of a wood hacksaw
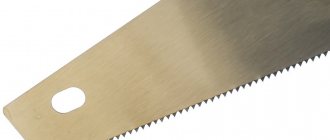
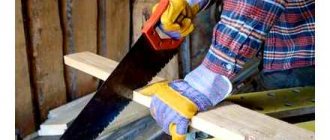
A saw is often used to process wood blanks, configuring length and shape. This tool is a combination of a working part and a handle. With all this, the working part is represented by an iron plate with cutting elements, which are placed in a certain sequence relative to each other. Only with proper and timely maintenance can the possibility of product wear be eliminated. An example is the setting of the teeth, which is done from time to time to ensure smooth movement of the tool along the acquired cut.
- To begin with, the hacksaw must be firmly secured in a vice. This is due to the fact that enormous force must be applied to bend.
- You can bend it using pliers. In order to maintain the correct angle, you should make a template first.
- You cannot skip more than one element of the cutting edge. In all this, attention should be paid to the condition of the surface, because the identified deficiencies indicate that hacksaw cannot be used.
Even at home, in the absence of a special mechanism, you can carry out the correct wiring and significantly extend the service life of the wood saw. With all this, it is important to maintain the required angle, because a very wide cut becomes a prerequisite for a significant decrease in productivity, a very narrow one leads to heating of the working part and its severe wear.
Some companies provide services related to similar work. Note that the price of a special mechanism is relatively small, so it is best to purchase it and the function can be performed more than once.
If you find an error, please select a piece of text and press CtrlEnter.
How to Sharpen a Fine-Tooth Saw with a Grinder
How to sharpen a chainsaw chain with your own hands
Who knows that the saw chain used in chainsaws requires repeated sharpening, alas, not everyone knows how to do it correctly.
Find what you drank
Asking
for sharpening a chain
is actually simple, for this purpose you need to look at the sawdust; if it consists of small dust, it means the tool needs to be sharpened.
If sharpening is impossible, it is worth changing it to a new one.
IMPORTANT. An experienced electrician leaked to the network the secret of how to pay half for electricity, a legal way. Read more
The use of an unsharpened chain leads to overheating of the motor and the formation of scoring on the cylinder.
Let's look at the main methods by which, of course, freely, sharpen
chain on a chainsaw.
How to sharpen a chain on a chainsaw with your own hands
A person who owns a chainsaw on his own household must know how to sharpen
chainsaw chain yourself. There are several methods:
- Sharpen using ratfil (a more common sharpening method, since it allows you to sharpen the tool specifically in the area where sawing work is carried out.)
- Sharpen using a special machine (} myth, the method is used in service centers, alas, it is also used in private households)
- Sharpen using a grinder. Sharpening using this method requires certain abilities. Not a common method, because It is not possible to sharpen correctly using an angle grinder.
In this video, there is an option to get acquainted with the sharpening process, very popular methods and tools used for this purpose.
Sharpening with a file
The first thing you need if you want to sharpen a chain or slightly correct it is special grinders.
File
For sharpening and straightening saw chains, two types of grinders are used. The first is a round file with a diameter corresponding to the diameter of the rounding of the working edge of the saw tooth.
To sharpen saw chains of household tools, round grinders with a diameter of 4, 4.8 mm are used, this is justified by the fact that they have a small tooth. For professional models, more massive chains with huge teeth are used, and accordingly, ratfiles with a diameter of 5.4.5, 5.5 mm are required.
If you set a goal to sharpen correctly, it is not enough to sharpen only the cutting edges of the tooth; you also need to adjust the cutting depth limiter.
If this is not done, the chain will not cut into the material being cut to the required depth, which will significantly reduce the speed of work.
and just like in the situation with a blunt chain, it leads to overheating of the saw motor due to insufficient load on the engine. This work is done using a flat file.
Description of the sharpening process using files
The first step is to straighten the saw chain
on a saw, this means placing the tool on a flat platform or table. In a forest setting, a log of huge diameter will suit you perfectly for this purpose.
Next, you need to inspect the saw chain for any flaws; these are usually cracks, one hundred percent broken teeth.
After inspection, it is necessary to set the brake to working condition, thereby blocking its movement on the tire.
The chain, when sharpened using a ratfil, should preferably be tensioned.
It is better to place a stand under the bar; use a log or a piece of a branch of suitable diameter for it, or manufacturers of sharpening tools have special clamps to hold the bar while sharpening the chain.
A few simple techniques for sharpening and setting hand saw teeth
A few common sharpening
and setting of teeth of hand
saws
.
Sources: Sharpening
Hand Carpentry
Saws
.
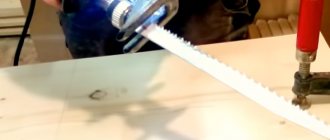
Sharpening a hacksaw for wood with a hardened tooth on an electric sharpener. Cutting for speed
How to resharpen an old Soviet hacksaw for wood with a hardened tooth
for cross-cutting wood.
The chain is sharpened by moving the file from the inside of the tooth outwards. In this case, the file should be located parallel to the special mark on the chain. This mark is applied by the chain manufacturer to indicate the standard sharpening angle.
The tooth being sharpened should be located approximately in the middle of the bar, this is necessary for the convenience of work ; during the sharpening process, you need to move the chain along the bar, not forgetting to set the brake to the working position each time.
Chain sharpening work
on a chainsaw, it is necessary to use gloves made of rough material, otherwise it is quite easy to injure yourself, because
the working surface of the teeth is very sharp. Ideally, manufacturers advise performing the same number of file movements for each tooth, but in practice this is not always possible, because
the teeth have varying degrees of damage to the working edge. To facilitate sharpening the saw chain using a file, special holders with corner markings applied to them can be used. Markings are made not only for a standard transverse cut, but also for a longitudinal one.
Tool holders are also convenient to use if you do not have sufficient sharpening experience. Experienced craftsmen do not use holders for sharpening, but can only use special devices that support the file.
Another device designed for sharpening is a manual saw chain straightening machine. It uses a regular file as a sharpening tool, which you can replace yourself. The machine is mounted directly on the tire; it also has the ability to adjust the angle of sharpening the tooth and a special stop that holds the tooth being sharpened.
Manual sharpening machine, perfect for beginners. Along with electric models of sharpening machines, manual ones have their undeniable advantage in the form of a low price. Depending on the manufacturer of the manual machine, their appearance may vary, but the principle of operation is the same for all.
Adjustment of the cutting depth is done using a flat file, so that there is a difference between the upper cutting edge of the tooth and the height limiter.
As can be seen from the figure, the depth stop is ground down in such a way as to bring the gap to the factory value. Below is a table that shows the main values of angles, as well as clearances for the most common types of chains.
As a rule, the gap size is adjusted using a special die. It is installed on the chain during sharpening, after which the depth stop is ground off.
Electric sharpening machines
To straighten a large number of chains, as a rule, in service centers or at manufacturing plants, electric sharpening machines are used. Depending on the manufacturer, the design of the machines may vary, but they have the same operating principle.
The saw chain is installed in a special guide, which is mounted on the basis of a rotating platform and has a special clamp to hold the tooth being sharpened. The latch is capable of moving in a horizontal plane.
An electric sander is installed at an adjustable angle to the tooth being sharpened, which is turned on by the operator by pressing the start button. The depth of immersion of the emery, as well as the angle at which sharpening is done, can be adjusted. The dive itself is performed by the operator.
The chain is straightened with a special grinding wheel, which can be changed if necessary.
How to sharpen using an angle grinder (grinder)
The method of sharpening a saw chain using an angle grinder is the least common because it is not safe.
In order to straighten the teeth of a chain using a grinder as a sharpening tool, you need to install it in a vice and clamp it securely. Next, the tool is turned on and the tooth edge to be sharpened is placed on the rotating surface of the disk.
A tooth sharpened in this way can differ significantly from one sharpened with a file, because During the editing process using a grinder, it is quite difficult to control the sharpening angle.
A big disadvantage can be considered the possibility of cutting the eyelet of the connecting link of the chain with the grinder disc, which will subsequently lead to rupture during work.
If in the process of working with a chainsaw the need for sharpening arises, it is better to use a special tool rather than come up with various tricks that can result not only in financial losses, but also cause serious injuries during their implementation.
Sharpening a chain is not as difficult as it seems at first glance. Any person, after studying the process of straightening chains, can independently sharpen the cutting set of his tool. Even if the first time you manage to do it not very well, you shouldn’t despair, because... With each next attempt, the result will get better and better.
Saw teeth set
The hacksaw teeth are set apart before sharpening. The blade should be tightly clamped in a vice, the teeth should be cleaned of resin and small wood dust. Before setting the teeth, it is necessary to calibrate the tool. To do this you will need a set of probes and an iron ruler. The amount by which the teeth should be bent is set by the standard and is on average 1/10 of the pitch or distance between the tips. Having measured the pitch of the teeth, it is necessary to select an appropriate set of feeler gauges or shims, the total thickness of which is equal to the setting distance.
First, you should select a random tooth and bend it a certain amount, using your eye to achieve the correct amount of bend. After that, a set of spacer pads, the total thickness of which is equivalent to the size of the spread, is pressed against the plane of the canvas. The iron ruler must be pressed with its edge against the pads and ensure that when passing past the top of the tooth, only a light touch is provided.
Then everything is simple: when the control tooth is bent to a suitable amount, a setting tilt limiter is installed on it; it should rest against the side of the saw blade. From time to time it is necessary to move the limiter in order to compensate, due to stronger bending, the reverse deformation of the teeth that appears due to the elastic parameters of the blade. Starting from the control tooth, bend all the others, alternately in the opposite direction. To speed up the process, it is recommended to first bend only in one direction, and then in the other, in both cases bending the teeth through one. It remains to add that the mark shrinks during use 2–3 times slower than sharpening. To check whether the hacksaw , you need to measure the thickness of the toothed part in different places with a caliper - it should be 20% greater than the nominal thickness of the blade.
Hacksaw tooth alignment
The width of the routing should be 1.5-2 times wider than the thickness of the saw blade for sawing hard wood, and 2-3 times wider for soft wood. Typically, the blade thickness is 1 mm, the teeth set in one direction is 0.25-0.5 mm for hard rocks, and 0.5-1 mm for soft ones.
It is important in the process of setting to achieve the bend of each tooth by an equal amount, and in principle, using special tools, this is not difficult to do. If the teeth of the blade are inconsistent - where the bend angle is greater and where it is less, then difficulties will arise when working with such a saw - teeth with a huge angle will interfere with the movement of the saw in the cut.
If you use a “setting” tool with a stop, then first the saw blade is firmly fixed in a vice, so that only the teeth stick out above the “jaws” of the vice, then the required distance is set with a stop on the tool. First, the teeth are bent in one direction, gripping the tool into the slot approximately one-half the length of the tooth. Then we repeat the function with the 2nd group of teeth, bending them the same distance exclusively in the other direction.
Model rating
Among domestic manufacturers, I would like to highlight the Enkor model range, which is made of carbide steel. One of the best representatives is the Anchor 19183 model, the distinctive feature of which is the tooth size of only 2.5 mm. The tool is supplied for sale with a comfortable handle and hardened teeth, which indicates a long service life of the product.
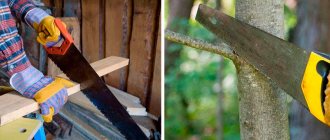
It is impossible not to highlight Japanese saws, for example, the Silky Sugowaza model, which is used for the most complex work, since the size of its teeth is 6.5 mm. Gardeners and summer residents prefer to purchase such a tool for forming the crown of fruit trees when they want to work quickly without putting a lot of effort. The special arc shape makes it easy to cut off unnecessary branches.
Swedish hacksaws are not inferior in quality to domestic ones. Among them, the Bahco brand stands out, which has established itself due to its high quality. In the universal tool category, the Ergo 2600-19-XT-HP model stands out, used for medium-thick workpieces.
Device for setting saw teeth
Setting the cutting edge in different directions eliminates the possibility of the blade getting stuck during operation. An example is the case when, when cutting a thick log, the blade cannot be moved and pulled out. Also, the saw can jam due to the heating of the metal and its expansion, the burning part can heat up the resin and turn it into a kind of glue.
READ Hammer Cracks and Doesn't Turn How to Fix
You should use a device for setting the teeth of hacksaws in order to avoid similar problems. We should not forget that mistakes made during work can lead to huge dilemmas. You can perform the function in question by using the following tools:
- There are special mechanisms. They allow you to manually shift the individual parts relative to each other. It is worth considering that a similar version is made for certain products.
- In most cases, mechanical wiring is used. They allow you to change the angle of position, as well as their width. This tool is characterized by higher efficiency in use.
- The improvised version is not intended for working with a hacksaw on wood, but can be used for this. An example is pliers and other improvised tools found in virtually every workshop.
If sawing is carried out frequently, then experts advise purchasing a special device that allows you to quickly set the required angle.
Turning process step by step
When manually sharpening with a file, it is easier to control the material removal and set the correct edge angles. The blade must be clamped in a miter box or vice, ensuring that the teeth protrude above the jaws by about 30–35 mm. Setting is done before sharpening for three reasons:
- so that the cutting edges are not subsequently damaged;
- so that a slightly stronger spread is ensured in advance, which is compensated by removing a certain amount of metal from the teeth;
- so that the direction of the cutting edges and the teeth set are uniform.
The most important rule for sharpening wood hacksaws is: the tooth must have a flat side on the side in which it was set. Thus, the cutting edges of adjacent set teeth are directed towards each other, that is, inside the channel formed by the set.
After clamping the blade, it is necessary to clarify the sharpening angle of the cutting edges. Ideally, it should be determined by the hardness of the wood being processed, but since a hacksaw is used for sawing various types of wood, a universal value of 60–75° from the plane of the tooth is set for all types of profiles. There is a certain difficulty in determining the sharpening angle relative to the plane of the blade in order to confidently control the position of the tool. This can be done using a flat metal plate, choosing the least worn tooth as a standard; usually this can be found closer to the handle.
When sharpening, you need to process those teeth that have their edges facing you. Maintaining the correct angle between the edge of the file and the blade, and also slightly tilting the file towards the edges, you need to remove 2-3 material from the cutting edges, applying pressure while moving away from you. After each pass, you need to ensure that the metal is removed over the entire surface of the edge, adjusting the position of the file if necessary. To ensure uniform sharpening, the number of file movements on each tooth must be the same. A good result of sharpening is considered to be uniform lightening of the blade descent over the entire area.
Sharpening a blade on an abrasive wheel is more difficult due to the fact that the blade does not have a stop. However, with proper skill, you can achieve accurate removal of metal from both sides of each tooth. As with hand sharpening, the movement of the cutting tool should be directed towards the flat part of the tooth, thus the entire blade is sharpened twice with a revolution.
Essential sharpening tool
To perform such a seemingly ordinary operation, you will need a fairly impressive list of tools. But, if one of them is not at hand, you can try to find a replacement for it. What you can’t do without is a workbench with a vice, since only with their help can the saw be aggressively fixed for work. The rest of the list looks like this:
- a “wiring” device, which, if missing, can be replaced with high-quality pliers. With all this, you will have to determine the approximate distance from the center for each tooth;
- a sharpening stone with sandpaper or a set of needle files and rat files;
- hammer;
- additional light source;
- In some cases, a caliper and a protractor may be useful for accurate measurements.
A special mention should be made of the method of sharpening hand saws using a grinder. In this case, you will need to have the angle grinder itself, a workbench and a pair of clamps, since the blade will need to be fixed horizontally.
There are a number of signs that indicate that the teeth are dull:
- The blade often gets stuck in wood.
- When sawing, the sound changes, it becomes more “dull”.
- The color of the teeth changes.
- The resistance of the material increases significantly.
- The ends of the teeth are noticeably rounded.
- The blade moves away from the cutting line.
Sharpening with a grinder
If you wish, you can speed up the process by using a power tool. To do this, you will need to secure the saw blade horizontally so that its teeth protrude slightly beyond the edge of the workbench using several clamps. The tighter the fixation, the less errors in sharpening due to vibration will be. Before using the grinder, you should perform the same preliminary operations as in the case of manual sharpening, namely checking the setting and height of the teeth.
READ How to Properly Sharpen a Hacksaw on Wood with a File
To remove the metal layer, not grinding, but cutting abrasive discs are used. The fact is that the interval between the teeth is small, and it is impossible to place a thick disk there without damaging the adjacent tooth. Cutting wheels with a width of 0.8-1.5 mm will be good.
When performing work, it is imperative to introduce protective equipment, at least special glasses and gloves. This will allow you to protect yourself in case of damage to the cutting wheel. The shield must also be mounted in the correct place.
The disc must be carefully passed in the space between each tooth, sharpening first one side and then the other. With all this, it is necessary to be quite good at handling an angle grinder, since the sharpening angle and the amount of metal removed is controlled only by the worker himself. If you have doubts about the success of such a project, it is better to first experiment with an old hacksaw, which you won’t be sorry to spoil in order to get better at it.
Sharpening a hacksaw
- vice;
- hammer;
- calipers;
- pliers;
- emery block;
- sandpaper.
You should also have the following types of ratfiles in your arsenal:
- thin and diamond-shaped with a medium-sized notch;
- triangular ratfil;
- triangular with velvet notch;
- needle files with notches of various calibers.
For sharpening, a special device is used that allows you to fix the blade at angles of 45 and 90 degrees. If you need to sharpen a cross saw, proceed as follows:
- the canvas is fixed at an angle of 45 degrees;
- sharpening is done with a triangular file with a tip angle of 60 degrees;
- the ratfil is directed onto the hacksaw tooth at an angle of 60 to 75 degrees;
- at first, with several movements of the ratfil, the left edges of the odd teeth are processed;
- after which the hacksaw is turned over and the left edges of the even teeth are processed.
When sharpening a longitudinal hacksaw, proceed as follows:
- the canvas is fixed vertically;
- for sharpening, a rhombic file with a small notch is used (needles can be used);
- during sharpening, the ratfil is directed strictly parallel to the table;
- Otherwise the process is similar to the previous one.
Burrs that appear on the edges of the teeth must be removed using an emery block or file with a velvet notch.
The process of sharpening a saw for the first time is quite difficult, so it is better to carry it out in complete silence and with the greatest concentration. It’s worth doing this a couple of times, and then things will become normal and go “like clockwork.”
How to determine when a hacksaw needs sharpening?
People with extensive experience simply determine this moment by the sound made by the equipment during operation, also by the change in the color of the teeth. Newcomers need to pay attention to the following signs:
- working with a hacksaw becomes difficult and requires enormous physical effort;
- it becomes very difficult to make a perpendicular cut of wood;
- it becomes difficult to hold the blade along the mowing line during operation, it begins to deviate in different directions;
- The hacksaw blade often jams.
Wiring
Before restoring the sharpness of the saw, it is necessary to adjust the teeth, in other words, move them apart. Setting is the installation of cutting teeth at a certain angle relative to the blade and each other. If you look at the set saw, you can see that they, alternating, deviate to the right and to the left from the blade itself. This configuration gives the hacksaw freedom in the deepest cuts. It doesn’t get stuck because it doesn’t touch the walls with its entire plane.
To set the correct angle for each tooth “by eye”, you need a lot of experience, which not every carpenter has. It comes after many 10s of sharpened saws. For the least experienced carpenters, there is a tool called a setting tool. A simpler version is a flat iron plate with a slot. A hacksaw is inserted into this gap with the smallest gap, into the tension .
The wiring process looks like this:
- Secure the hacksaw in a vice like this. It is necessary to ensure that the teeth protrude 2 cm above the jaws.
- The teeth are clamped in the groove and then bent in the middle.
- First you need to bend all the even teeth in one direction, then bend the odd ones in the opposite direction.
- At the end, you can spread the jaws of the vice according to the calculated width of the spread and try to pass the saw between them.
- An excessively bent tooth will hit the vice. Use pliers to bend it a little further.
READ How to Correctly Install a Trimmer Cord
Height alignment
After the setting has been completed, the hacksaw must be checked to ensure the same height of the teeth. Because the force may have been applied to it unevenly, there is a chance that teeth with the least wear will appear, which will protrude above the rest.
To identify such teeth on a hacksaw, you can use the usual method. For this, thickened paper or cardboard along the length of the cutting blade is useful. The sheet must be placed on a flat surface, for example a table, perfectly leveled, then press the cutting part of the sheet against it with force. Teeth that are out of alignment will make deeper dents on the surface.
A few simple techniques for sharpening and setting hand saw teeth.
Thanks to this, they can be easily found and adjusted before sharpening. To remove excess height, different needle files are used. While performing this work, you should strive to very much maintain the shape of each hacksaw tooth.
Need for sharpening
The most obvious advantage of sharpness is the speed of sawing. When working in the country, this is even more important than in the workshop, since you often have to work in cramped conditions, standing in an awkward position. A poorly sharpened blade gets stuck in wood, especially raw wood. In addition, there is a risk that the canvas will break and injure the worker.
The practical benefits of spiciness include:
- Accuracy of the cuts performed.
- Longer service life of the canvas.
- Savings on replacing hacksaws.
- High productivity of carpentry work.
Hand saw wiring methods
This is best done on special equipment - an adjustable machine. Using an indicator, you can determine the correct deviation of the tooth, so the work can be done in a matter of minutes.
If the machine is difficult to find, you can open the hacksaw manually. However, performing the procedure will take a lot of effort and time, and besides, you cannot do without a special tool - wiring, which you can make on your own. It is a metal plate with a sawn groove 1.5 mm wide and 5 mm high. The saw is clamped in a vice and with this groove the tooth of the tool is grabbed and moved in the desired direction.
This must be done in a certain order. First, the teeth are deflected through one in one direction, then the rest in the other. In this case, there should be no distortions, and the teeth should be straightened symmetrically. It is not the entire tooth that bends, but only its top (that is, its third part), otherwise it may break. The width of the setting should be equal to twice the thickness of the blade; if the teeth are set too wide, the hacksaw will be difficult to move, and too much wood will go into the sawdust. In addition, if the tool is set incorrectly, the tool will “wedge” and an even cut will not work.
You can also open using a screwdriver or chisel. The tool is placed between the teeth and rotated; before this, the saw should also be clamped in a vice.
What is a "stapler"
If desired, a tool for cutting teeth on a hacksaw blade can be made at home in the workshop. The main component of the tool is a matrix with a triangular cutout resembling the shape of a saw tooth. Of course, you also need a punch included in the matrix, which can rotate around its axis. To adjust the height of the cut teeth, the tool uses an adjustable stop that moves to the right or left. Its parameters change using several holes and fixing bolts.
Important: the matrix and the punch must extend into each other with a minimum gap, and the working edges of both parts must form an angle of 90 degrees
Device for setting saw teeth
Using a wrench without a factory-made stop (A) it is difficult to set the teeth of the saw well. What did I come up with?
I took a piece of steel (2 mm), cut out (see drawing) part (B), bent it at an angle of 90 degrees using a mowing line aa, drilled a hole in the center and made a thread for a 6 mm bolt. I drilled two holes with a diameter of 4 mm in the plate and the key and riveted them together. The photo shows a modified key. Using a bolt and lock nut, I set the desired saw tooth angle.
With such a device, wiring takes just a few minutes.
Vladimir Babushkin Based on materials from the Toloka newspaper. We do it ourselves"
- A Secure Grip for Unruly Plugs If you've ever had to remove a drilled-out wood plug from a hole saw, you know how difficult it can be to remove it without damaging it.
How to properly set the teeth of a hacksaw
start watching from 6.5, the beginning is about nothing.
Well, how to make wiring on a Soviet axle saw? All her canvas is red-hot! Teeth don't bend!
Fucking bitch, learn to speak. Water 90%
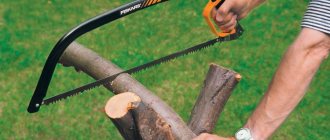
I won’t say anything about the other saws, but about the bow saw - I looked at the second “pro” and they both call this saw for “raw wood)))) guys, this type of blade is made specifically for rip sawing along the grain, and all the rest are “ordinary” for crosscut saw
When I was sharpening a hacksaw with a SMALL tooth, there was a tooth next to the gutter and it turned out that one was wide and the other was almost worn out. WHY IS THAT ?
saws and hacksaws.
Despite the advantages of a bow saw (Fig. 2a) - clean cutting, the ability to saw large boards and bars both straight and along oval lines - beginners are recommended to use a hacksaw (Fig. 2 b) with a wide blade (even in inexperienced hands this the canvas goes straight). To cut out parts with curves, it is convenient to use a narrow trigger hacksaw with replaceable blades (Fig. 2c), which have different tooth shapes. The saw must be set apart. that is, the teeth are bent alternately in different directions (at a height of 2/3 from the base). The width of the spread is considered normal if it is equal to one and a half thickness of the canvas. There is another approach: when sawing hardwood, the teeth are set apart by 0.25-0.5mm, softwood - by 0.5-1mm. A wider opening does not make sawing easier or better. The saw is set with a special wiring or a homemade metal plate (Fig. 3a) with slots 1.5 mm wide and 5 mm deep. With this cut, they grab the saw tooth, clamped in a vice between the boards (Fig. 3b), and bend it back (Fig. 3c). First, the teeth are moved apart one at a time in one direction, then in the other. After setting, the teeth may have unequal bends: some are larger, others are smaller. Such teeth need to be straightened, otherwise the cut will be uneven. To do this, it is enough to pass the saw several times between the jaws of the vice, moved apart by 1.5 mm. Or hammer two nails into a board or block at a certain angle at a distance of the required spread width, insert and pass the saw between them several times. In both cases, move the saw in the direction opposite to the inclination of the teeth.
READ How to Connect the Battery Indicator of a Screwdriver
Make sure that the tops of the saw teeth are at the same height, otherwise the saw will “jump” on the wood when working. The level of the teeth is leveled with a finely cut file inserted into a wooden block (Fig. 3d). Moving the file along the saw, grind off the strongly protruding ends of the teeth. The same is done after prolonged sawing and repeated sharpening of the teeth. When sharpening a saw, its blade is clamped in a vice (Fig. 3D). The teeth of the rip saw are sharpened at right angles to the side surface of the blade (Fig. 3g). The teeth of the cross-cut saw are sharpened in the form of a knife-shaped blade, the tip of which is directed towards the outer side (Fig. 3e, i). A chamfer is removed from the edge of the tooth at an angle of 45-60 degrees to the side surface of the blade, a point is made through the tooth - first on one side along the entire length of the saw, then on the other. First, one edge is sharpened, and then the other, forming the front (tooth tip) and side cutting edges. When burrs appear, they are removed with a file or needle file.
Having secured the marked board on the workbench or pressed it with your left knee to the stool, start sawing from the top edge of the board (Fig. 4). At the very beginning, support the canvas with the second finger of your left hand (higher from the teeth) lying on the board. Start working with the middle of the saw, making short, smooth strokes. When the blade enters the wood, release your finger and work with a full swing so that the entire blade slides along the wood. If this is your first time picking up a saw, save your finger and guide the saw with a small piece of wood. When finishing sawing, speed up the movements of the saw, while simultaneously holding the end of the board being sawed off - otherwise it will break off and the edge of the cut will turn out uneven.
How to correctly set hand saws on wood
Why sharpen and when?
With constant use, the teeth lose their sharpness, the cutting edges wear out, deteriorating the quality of the cut and increasing the time it takes to complete the task.
Buying a new one will not correct the situation for long, and it will take no more than half an hour to restore the old canvas.
Timely sharpening of the hacksaw will restore the cutting ability of the incisors, and will always allow you to have a working tool at hand.
It is worth correcting the sharpness of the cutting edges at the first signs of wear, which can affect local areas and the entire working surface.
The dimensions of the cutter set also change, and this leads to jamming during operation.
Sharpening hand saws
Why post an uninformative video? Topic not covered, dislike.
In general, the teeth of the saws are set apart so that the saw does not pinch. If the teeth are not set apart , then you simply won’t be able to saw, it’s a no brainer. It’s better to set the teeth with an adjuster with a regulator, otherwise your teeth will be asymmetrically set and the saw will cut askew.
Sorry man, I didn’t get to the point - the tediousness is off the charts... Learn to be clear, specific and concise...
Hello, two small baits are called rewards, for adjusting spikes and other small work...
that's why this whole registry office and balls I give a minus for the story
please give me a link on how to properly sharpen a hand saw thanks in advance
And I was wondering what this thing was for, it was lying around the house and not alone. but I still used an axe.
The wiring is not complete. It should have a limiter with two screws and a sector along which the bend of the tooth is set.
after the words (the divorce is done to remove sawdust from the cut) the fuck off, the divorce is created so that the cut is thicker than the saw blade, due to this the blade does not pinch in the cut and that’s all.
A hacksaw with large teeth cuts faster, but the cut is rough, with uneven edges. The degree of sharpness can be checked by running your thumb along the tips of the teeth. The setting is checked by eye: the teeth must be bent to the sides evenly, otherwise the saw will skid to the side. At the same time, check the evenness of the canvas. Even with a slight bend the saw will jam. The saw blade should bend and straighten quickly. A good saw has teeth that protrude slightly in the middle of the blade, forming a slight arc. In this case, fewer teeth are involved in engagement with the workpiece during the sawing process, while the pressure increases and the saw works better.
Figure 51 shows the sequence of preparing a hacksaw for work.
The handle is of great importance. It can be wooden or plastic, the main thing is that it is comfortable to hold in your hand. The stamped iron handle is very inconvenient to use - it makes your hand get tired faster and calluses form.
When storing the saw, it is better to put a piece of hose or PVC pipe cut lengthwise on its teeth.
To prevent the saw from getting stuck in the wood, its teeth must be set apart - bent one at a time to the left and to the right. Due to this, the width of the cut is slightly larger than the thickness of the saw blade, so that it does not get stuck in the cut.
There is a special tool for setting the saw - a setting tool
. with which the saw teeth are bent to the sides by approximately 0.5 mm
Sources:
https://c-triada.ru/masteru/kak-pravilno-razvesti-nozhovku-po-derevu-video.html https://stroyvoLGa.ru/%D0%BA%D0%B0%D0%BA-%D1 %80%D0%B0%D0%B7%D0%B2%D0%B5%D1%81%D1%82%D0%B8-%D0%B7%D1%83%D0%B1%D1%8C%D1% 8F-%D1%83-%D0%BD%D0%BE%D0%B6%D0%BE%D0%B2%D0%BA%D0%B8-%D0%BF%D0%BE-%D0%B4% D0%B5%D1%80/
How to choose your instrument: selection options
The main indicators of the instruments are:
- Canvas length . To perform precise work, small tools with a working base of about 30 cm are used. More productive and efficient results can be obtained by using a hacksaw with a blade of 45-55 cm. In this case, the path of the working edge along the workpiece increases, increasing the cutting speed;
- Web width . This indicator demonstrates the stability of the saw when performing precise work. The wide base allows for more precise control of the vertical, which ensures a clean and straight cut;
- size and type of tooth sharpening. The size of the teeth is determined by the degree of cleanliness of the cut - the more precise it is, the smaller the size and distance between the elements of the notch. The sharpening method allows you to obtain a blade designed for longitudinal sawing (triangular teeth with apexes directed forward), cross-cut (notch in the shape of an isosceles triangle), and a universal type (triangular apexes are slightly ground off for softer contact with the part);
- Wiring . To reduce friction and heating of the blade, the tops of the teeth are alternately deflected from the plane by a certain amount. Modern tools immediately go on sale fully prepared for work, but on old hacksaws the wiring has to be updated as the notches are ground down. If there are carbide brazings, wiring is not required, since their thickness is greater than that of the blade;
- The grade of metal from which the tool is made . The stronger and stiffer the canvas, the more freely the master works with it. Increases productivity and quality of sawing;
- Type and angle of inclination of the handle in relation to the cutting edge . This indicator refers to the organoleptic properties of the instrument. A comfortable handle, installed at the correct angle to the working edge, allows the worker to more confidently control the direction and quality of cutting the material, spend less effort and get a more effective result;
- Saw blade material . The harder the metal, the fewer problems with the cleanliness and accuracy of the cut. Steel from 45 HRC is considered the norm, but harder grades 55-60 HRC can provide increased operational reliability. Some hacksaws have an additional Teflon layer, which eliminates friction and heating of the blade during operation.
Some indicators can be perceived subjectively - it may be more convenient for users to work with a non-standard tool, this is normal, for each master the blade can be slightly modified (the sharpening is changed, the handle is rotated, etc.).