tags:
Welding, Heating, Reducer, Register, Technology, Oxygen, Pressure, Welding
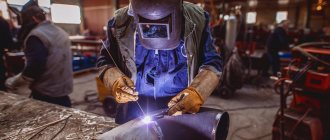
Welding is a technological process for producing permanent joints by establishing interatomic bonds between the parts being welded when they are heated or plastically deformed, or the combined action of both.
Due to its relative ease of use and the speed of joining various materials, welding is widely used.
Welding is a cost-effective, high-performance technological process, which ensures its use in all areas of mechanical engineering, construction, science and technology. For example, when replacing riveted structures with welded joints, the savings in metals is 15-20%, and when replacing cast parts with welded ones - about 50%.
It is difficult to name an industry that could do without the use of welding. Welding is used to connect parts of spaceships, turbine blades, submarine and aircraft hulls, instrument housings and microcircuit terminals. Parts connected by welding have a strength equal to the strength of the base metal.
The purpose and objectives of this final qualifying work are to study the basics of welding and cutting metals, master the technology of manufacturing a heating register, including the selection of welding materials, welding equipment, the choice of welding modes and quality control of work performed.
1General part
1.1 Description of the design.
A heating register is an integral part of the heating system, consisting of several parallel horizontal smooth pipes. In this case, parallel pipes are fastened by transverse ones through which the coolant flows. A heating battery is a register to which (in one form or another) metal elements are attached. This allows you to significantly increase the heat transfer area. Typically, this type of heating device is installed in technical or industrial premises (garage, warehouse, etc.), but living rooms are no exception. Therefore, registers are installed in both apartments and private houses with an autonomous heating system.
Technical characteristics of the heating register:
- Register dimensions: center-to-center distance along the pipe axes - 300 mm; length
- 700 mm; Ftr=70x3
- Number and length of welds: 2 seams - T1-A4, 2 seams - U19,
3 seams - C2. Length of seams - short
22 pages, 10770 words
Heating system installation
... to heating devices it is necessary to make from 5 to 10 mm per liner length in the direction of coolant movement. With a line length of up to 500 mm, the slope of the pipes ... for the installation of heating systems, polypropylene pipes “Random copolymer” (trade name PPRC) were selected. Systems made of polypropylene pipes include all the components necessary for the installation of pipelines, which eliminates the need for mixed installation. ...
- Metal thickness: pipes - 3 mm, flanges - 6 mm.
- Metal or alloy grade: 12MH
- All requirements for welded joints: welded joints in accordance with GOST 16037-89
1.2 Characteristics of the base metal
Weldability is the ability of a material to form seams similar to the base metal.
Table 1.1 - Chemical composition and mechanical properties of steel 12Х1МФ
| Brand | WITH% | Mo% | Сг% | Tensile strength, MPa |
| 12Х1МФ | 0,09-0,16 | 0,4-0,6 | 0,4-0,7 | 460 |
Classification: Low-alloy heat-resistant steel 12Х1МФ. Pearlitic grade steel. Recommended application temperature up to 510 °C Temperature of intense scaling 570 °C; work period - more
10000 hours
Application: for superheater pipes, pipelines and high-pressure manifold installations, various parts operating at temperatures up to 530°C
1.3 Determination of the weldability class of steel 12Х1МФ
Steel 12Х1МФ is heat-resistant, belongs to class IV weldability, that is, it is poorly welded. Preheating to 150-250°C and heat treatment are required.
Classification and characteristics
Two-pipe heating circuit with forced circulation of coolant
According to the manufacturing method, iron pipes can be seamless, made by hot or cold drawing and electric welded. Solid-drawn steel is more reliable and designed for higher pressure. The choice of such pipes entails an increase in the cost of installing the heating system, since their cost is significantly higher than that of electric welded ones.
The main characteristics include:
- Size and weight. The size of the product is determined by the internal and external diameters, nominal diameter, wall thickness and pipe length. All these physical quantities, including the mass of 1 linear meter. m of pipe, regulated by GOST and TU. Using them, you can easily make a choice in favor of one or another type of rolled metal. Diameters and wall thicknesses are measured in millimeters, lengths in meters, and weights in kilograms or tons.
- Strength. Strength characteristics include the ability of a pipeline to withstand a certain pressure (working, nominal, test, excess) and medium temperature. Pressure is measured in pascals and temperature in degrees Celsius or Kelvin. These are the main characteristics that guide the design of heating systems.
- Material. It can be carbon steel, stainless steel, carbon cast iron, alloy and non-ferrous metal.
Classic high temperature welding
How to weld heating from an iron pipe in accordance with building codes is indicated in GOST. Both the diameter of the pipes and the length of the system matter. SNIP will indicate how to properly weld heating pipes in each specific case: private household, multi-storey building or industrial water supply line.
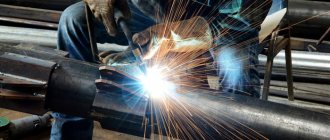
When using a gas welding machine, creating high-quality seams will require considerable practical experience. Electric welding can also create welded joints of impeccable quality, but in this case you will need not only experience, but also high-quality electrodes, the correct current level and “arc feeling”. High-quality electric welding of heating pipes is available only to real professionals.
Metal pipes are the most common material for heating systems
The strength of metal pipes is more than sufficient for the water supply system and for the heating circuit. It is the connection sections that have to be implemented in order not to deviate from the design documentation that are the “weak link” of the system. How to weld a heating pipe using electric welding is described in detail in outdated training materials and articles. In modern construction, the cold welding method is more often used for heating pipes.
Every qualified installation engineer knows how to weld a heating pipe correctly. There are a number of rules that must be followed:
The weld should not consist of scale. This happens if you weld a pipe by electric welding using low-quality electrodes. To weld metal with an electric welding machine, you must use the multilayer metal melt method
Primary weld scale is removed before the next welding layer. It is important to choose the correct current level - low current does not guarantee the strength of the weld. Excessively high current during welding is also unacceptable. If the butt welding method is used, the electrode metal or molten wire is used as the reinforcing material. Electric welding of metal pipelines and other elements of heating and plumbing systems is prohibited near flammable objects.
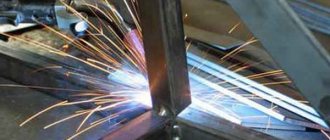
Gas welding is a universal method for creating a strong connection between metals; metal parts of different sizes can be connected in any combination.
For traditional welding you need to have special equipment and welding experience
The high temperature of the burning gas stream allows you to melt the metal in the area of local heating, and cook the metal at the molecular level. Requires expensive equipment and highly qualified welders.
How to make a long-burning solid fuel boiler with your own hands, drawings and diagrams
Before you start making a boiler, you need to decide on its design. Its choice depends on the purpose of the unit. If it is intended for heating a small utility room, garage or country house, then it is not necessary to install a water circuit in it. Heating of such a room will occur directly from the surface of the boiler, through convection of air masses in the room, like from a furnace. For greater efficiency, you can arrange for forced airflow of the unit using a fan. If there is a liquid heating system in the room, it is necessary to provide a circuit device in the boiler in the form of a pipe coil or other similar structure.
Connection diagram of a solid fuel boiler to the heating system
The choice of option also depends on the type of solid fuel that will need to be used. For heating with ordinary wood, an increased volume of the firebox is required, and for the use of small fuel pellets, you can arrange a special container from which the granulated fuel is supplied to the boiler automatically. To make a long-burning solid fuel boiler with your own hands, you can take a universal drawing. It is suitable for any type of solid fuel used.
Drawing of a long-burning solid fuel boiler with a power of 25/30/40 kW
We will tell you step by step how and from what parts you can make a long-burning solid fuel heating boiler according to the proposed scheme:
- We will prepare the place where the future unit will be installed. The base on which it will stand must be level, strong, rigid and fire-resistant. A concrete foundation or a thick cast iron or steel slab is best suited for this. The walls also need to be covered with fire-resistant material if they are wooden;
- We collect all the necessary material and tools: of which we need an electric arc welding machine, a grinder and a tape measure. Made of materials: 4 mm sheet steel; 300 - mm steel pipe with 3 mm walls, as well as other pipes of 60 and 100 mm in diameter;
- in order to make a long-burning solid fuel boiler, you need to cut a piece 1 m long from a large 300 mm pipe. You can do it a little less, if necessary;
- We cut out the bottom from a steel sheet according to the diameter of the pipe and weld it, equipping it with channel legs up to 10 cm long;
- The air distributor is made in the form of a circle made of a sheet of steel with a diameter 20 mm smaller than the pipe. An impeller from a corner with a flange size of 50 mm is welded into the lower part of the circle. For this, you can use a channel of a similar size;
- We weld a 60 mm pipe into the middle of the distributor from above, which should be higher than the boiler. In the middle of the distributor disk we cut a hole along the pipe so that there is a through tunnel. It is needed for air supply. A damper is embedded in the upper part of the pipe, which will allow you to adjust the air supply;
Schematic representation of a solid fuel boiler
- in the very bottom part of the boiler we make a small door, equipped with a valve and hinges, leading to the ash pan for easy removal of ash. We cut a hole in the top of the boiler for the chimney and weld a 100 mm pipe into this place. At first it goes at a slight angle to the side and up 40 cm, and then strictly vertically up. The passage of the chimney through the ceiling of the room must be protected according to fire safety rules;
- We complete the construction of a long-burning solid fuel heating boiler by manufacturing the top cover. There should be a hole in its center for the air flow distributor pipe. The fit to the walls of the boiler must be very tight, preventing air from entering.
Drawing with dimensions for creating a solid fuel boiler with your own hands
Useful advice! To ignite a long-burning solid fuel boiler made by yourself, the drawing of which was presented above, you need to: remove the lid and lift the regulator, fill the boiler with fuel to the top and pour flammable liquid over it, put everything in place and throw a burning splinter into the regulator pipe . When the fuel flares up, reduce the air flow to a minimum so that it only begins to smolder. After this, the pyrolysis gas will ignite and the boiler will start.
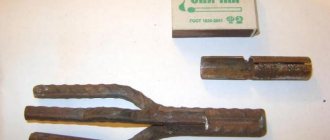
Types of electrodes
An electrode is a thin metal rod that is coated with a special compound. It protects the metal from the occurrence of corrosive deposits and determines how the weld will turn out. To figure out which electrodes to weld pipes with, you need to consider the properties of each of them. The main parameters by which electrodes are classified are the type of coating and the type of core. Products come with a melting and non-melting core.
- To make a melting core, welding wire with different diameters is used, which is selected depending on the type of work.
- To make a non-melting core, tungsten, graphite or electrical coal are used.
The electrodes are coated with cellulose, rutile, rutile-acid or rutile-cellulose coating.
Instructions for making registers yourself
The easiest way to make your own is a steel heat exchanger, although its assembly will require skills in working with welding and grinding equipment and following certain rules.
- Before installation, it is necessary to perform calculations and a drawing, which will indicate the dimensions of pipes and connecting elements, the location of fittings and connection points. The drawing will help you accurately calculate the quantity and parameters of consumables.
- The clearance between sections is taken to be 1.5D or D+0.5 cm, where D is the diameter of the pipe. The distance between parallel sections of the coil register is calculated depending on the arc element used or the turning radius (R) when using a pipe bender. In the first case, the distance is equal to twice the difference between the height of the arc element (F) and the diameter: 2(FD). In the second case, the distance will be 2R-D. With a smaller distance, heat transfer decreases.
- Since welding and grinding equipment is used during installation, be sure to wear protective clothing and shoes, and protect your face with a special mask or goggles.
- For efficient operation of the register, strict parallelism of its sections is necessary; a level, plumb line and construction angle will help to control this parameter during the work.
- An air vent is installed at the top point of the register, farthest from the supply pipe, to get rid of air pockets in the circuit. When installing a parallel heat exchanger with collectors, air vents are placed at the top point of each collector.
- To secure the register you will need stands and brackets. The more massive the structure, the more fasteners will be required.
Work order
- The work area is being cleaned.
- The register elements are marked and cut in accordance with the drawing.
- The inner and outer surfaces of the pipes, as well as the edges of the holes, are cleaned of debris and rust with a steel brush.
- The plugs are cleaned of debris and plaque. Holes are drilled in two plugs for connection to the heating circuit.
- Plugs, jumpers and connecting pipes or manifolds are welded in accordance with the drawing. The parallelism of the sections is checked after joining each element.
- Welds are cleaned.
- The tightness of the resulting register is checked: the outlet hole is hermetically sealed, and water under pressure is poured through the input hole. If even small drops appear on the seams, it is necessary to drain the liquid and further boil the seam.
- If necessary, coat the heat exchanger with heat-resistant metal paint.
- The register is secured to supporting and hanging elements.
- Connected to the heating system.
Selecting a welding machine
There are three types of welding machines. Which one to choose depends on the welding method and the material being processed. Device types:
- Step-down welding transformers. This is a reliable device that is used for welding carbon steel. The quality of the seam is average.
- Welding rectifiers. Suitable for carbon and aluminum materials, as well as stainless steel. The seam quality is high.
- Welding inverters. A universal device that is suitable for any material.
You cannot use damaged equipment when welding heating pipes using electric welding. Therefore, before starting work, the equipment is carefully checked.
Work technology
First you need to prepare the workplace and protective equipment. To figure out how to properly weld heating pipes, you need to practice on a separate piece of metal. To do this, you will need a thick pipe and a universal electrode with a diameter of 3 mm and above, since it is easier to learn how to make seams with it. Work process:
- One welding cable has a holder. An electrode is inserted into it, then the cables are connected.
- The device has 2 cables and 2 current outputs with positive and negative polarity. The end of one cable is equipped with a clamp that connects to the part, the end of the second is a holder for the electrode. Polarity is chosen depending on the type of work. The best heating of the metal occurs with straight polarity.
- There are 2 ways to light an arc. To do this, the tip of the electrode is tapped several times on the part or drawn along the seam (chirping).
- The type of weld on the pipe depends on the inclination of the electrode. The main inclination is 30-60°. To deeply heat the metal, the electrode is tilted at a “backward angle.” In this case, the bath and molten metal flow behind the electrode. If surface heating is required, then the angle of inclination is changed in the opposite direction.
Each material and type of seam has its own electrode movement. For homework, it is enough to master some of them
During work, it is important to monitor the size and condition of the weld pool. To do this, movements are accelerated or slowed down
How to weld pipes quickly and easily for novice welders
Watch this video on YouTube
How to weld plastic pipes
Welding of plastic pipes takes place using a special technology, because due to the high temperature, sagging often forms inside them. Therefore, welding work must be performed carefully. But if the temperature is too low, the parts will not be fixed. Work order:
- The welding machine is placed on a stand and heated to 260° C.
- The end of a plastic pipe and a fitting of a suitable diameter are inserted into the welding nozzle so that they are located in the same plane.
- If the pipe is thick, then the temperature level is increased. When the parts warm up, they are removed from the device and connected.
When the seam hardens, the pipe is checked for leaks. Products with a large diameter (over 63 mm) are soldered joint-to-joint. The cut of the end pipes is melted and connected, while pressing strongly on each other. For coupling and socket soldering, hand-held instruments are used. They are equipped with a centering element and attachments that hold the workpieces. All pipeline parts are driven into a heated welding machine and soldered. To ensure that the parts are connected, all work is carried out quickly.
Possible errors in the process
The quality of the finished product may be poor due to a defect in the weld. The defect can be located inside or outside the product, and can also be through. The reasons why it occurs during welding of metal heating pipes and other products:
- due to cheap low quality material;
- due to poor quality equipment;
- when the technological process of work is disrupted;
- due to the inexperience of the welder.
Sometimes welders reinforce the seam up to 4 mm. Because of such an error, it becomes fragile. The height of the reinforcement should not exceed 2 mm, then the seam will have maximum strength.
Heating pipe welding guide
- Connection of plastic pipes
- Welding pipes made of metal
- Welding heating pipes in an existing pipeline
To create a good and practical heating system in the house, the heating system is welded. The connection between metal and plastic pipes is slightly different and is determined by the purpose or units used.
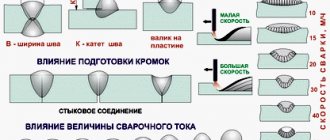
Errors when butt welding pipes.
Connection of plastic pipes
The connection of polypropylene components of the heating system is carried out in two ways:
- socket welding, when one end of the pipe fits into the other;
- sleeve welding using an additional part - a coupling.
Pipe connection by butt welding.
The polypropylene parts of the heating system are connected using diffusion welding, which is the process of heating individual parts of the system with a specialized soldering iron with a power of 1500 V and operating at a voltage of 220 V. The average heating time is 5 s. Due to its own physical properties, polypropylene begins to melt at a temperature of 270°C. The required heating value is set on a special temperature controller that is equipped with each device.
Welding of polypropylene also varies depending on the period of the year. In winter and during outdoor work, the heating time must be extended. The same rule applies to large-diameter elements, for which the heating time is at least 30 s.
The soldering iron nozzles simultaneously heat the parts intended for connecting the heating elements (pipe and coupling). When heated, “flanges” appear on the parts. After heating is completed, the parts are removed from the nozzles and combined together, pressing equally on both sides. Heated parts must not be moved or rotated after joining, as this will cause damage to the joint seam. To ensure a strong coupling, the connected parts are held for at least 30 seconds.
If the surface of the pipes has acquired a cinnamon color, this indicates excessive heating and combustion.
to come back to the beginning
Welding PP pipes: 1. Fitting socket. 2. Chamfer on the pipe cut. 3. Limit clamp. 4. Heating device sleeve. 5-6. Weld seam.
Metal structures that are part of the heating system are combined using electric welding. To implement this option, iron electrodes are used that conduct alternating current and perform the function of an “additive” that fills the weld seam.
Before making the connection, the parts must be cleaned of sand, dirt and debris. If necessary, straighten the deformed ends or cut them off. To carry out arc welding, the surfaces at the edges of the parts are cleaned to a width of at least 10 mm. The connection of parts around the circumference takes place in a continuous mode.
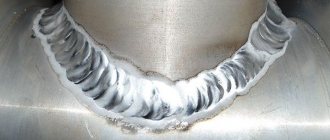
The number of layers of arc welding is determined by the thickness of the walls of the heating pipes. 2 layers - thickness up to 6 mm, 3 layers - 6-12 mm, 4 layers - more than 12 mm. Each completed layer is cleaned of slags before the next one.
For the first layer, stepwise surfacing is used. For layers - solid. When connecting, the stepwise surfacing is broken down into certain sections, and they are connected through one.
Installation of a heating complex requires great attention and responsibility regarding the first layer. In another case, the defective area will have to be cut down and all the work done again.
When applying further layers to the first layer, the pipes are turned more slowly and equally. The next layer should be started by moving a small (1.5-3 cm) distance from the beginning of the previous one. The last layer should slowly blend into the key metal and be even and smooth.
to come back to the beginning
Welding heat supply under pressure causes considerable difficulties, since pipe lines are often placed in a narrow channel or very tightly near the walls of a building. To perform welding work, a hole is cut to weld the surface inside. And then they boil the other surface of the pipe.
Start the process from the center of the section at the bottom of the pipe. The electrode is placed perpendicularly for good execution of the ceiling seam. To connect vertical seams, you need to adjust the location of the electrode. It must be directed at an upward angle. Vertical seams can be made using spot welding.
Homemade heating radiators from a profile pipe
Heating devices are an essential element of any water heating system. They are usually the most expensive part.
A good opportunity to save money would be to use homemade radiators. They are made from smooth round steel pipes or from profile pipes.
The latter option is somewhat more expensive, but allows you to reduce the depth of the device and get a more aesthetic appearance.
The use of a profile pipe for the manufacture of heating registers has a number of features.
When starting to work with your own hands or deciding to buy a “homemade” product, you need to carefully weigh the pros and cons.
Studying the basic rules by which heating registers are made from a profile pipe will help you avoid mistakes when working independently and will make it possible to make a competent choice of the necessary parameters.
Making registers yourself
Steel registers have a fairly simple design and do not require much skill to create. Almost any person who has experience working with a welding machine can make homemade heating radiators from a profile pipe. Unlike round ones, they are conveniently fixed in place, which makes welding easier.
Required materials and tools
Before starting work, you need to stock up on everything you need. Let us consider in detail what is required for the simplest three-row register.
- Profile pipe in accordance with the design parameters. Dimensions can be from 30x30x3 to 80x80x3 mm.
- A round pipe with the same wall thickness with a diameter of 25 or 32 mm depending on the cross-section of the profile pipe.
- Steel sheet 3 mm thick.
- Branch pipes with external or internal threads in accordance with the diameter and type of connection – 2 pcs.
- Steel coupling with internal thread with a diameter of 15 mm and Mayevsky tap.
Tools:
- Welding machine.
- Drill.
- Bulgarian.
- Hammer.
- Marker or metal rod.
- Roulette.
Preparation of materials:
- The profile pipe is cut into pieces of the required length in accordance with the drawing.
- The round pipe is cut into 4 pieces of 10 cm each.
- 6 plugs are cut from sheet metal in accordance with the size and shape of the profile pipe. They should be 3-5 mm smaller than the cross-section of the pipe. This will allow you to neatly hide the weld in the gap.
- The pipes are laid on a flat horizontal surface strictly parallel at a distance of 10 cm. You can use two wooden beams for support. The ends are aligned in one line. Marks are made for the holes at a distance of about 5-10 cm from the edge.
- Using a cutter or drill, the intended holes are cut in accordance with the diameter of the jumpers.
Work order
- The jumpers are fixed in place and secured by welding at 2-3 points.
- Having positioned the structure vertically, the jumpers are finally welded. It is recommended to first make a thin seam at low current, which will allow the gaps to be filled well. Next, a thick main seam is performed at increased current.
- The internal space of the register is cleared of metal debris and slag.
- The plugs are applied, tacked and welded to the ends of the profile pipes.
- Welding seams are processed. The protruding parts are knocked down with a hammer, then each seam is cleaned with a grinder.
- Holes in the register are drilled depending on the selected connection diagram. In this case, it is better to place them not in the center of the ends, but slightly higher or lower.
- Connecting pipes are welded to the holes.
- The seams are cleaned and all holes except one are plugged.
The register is filled with water under pressure and the welding quality is checked. The seams must withstand pressure up to 13 atm. - The outer surface is cleaned, degreased and painted with heat-resistant paint.
- A fitting is welded to the top row and a Mayevsky valve is installed.
Sometimes supports are welded to the register, but devices without them are more versatile. If necessary, you can always use a stand, but the weight is less and you can still mount it on the wall.
Conclusion
Homemade radiators made from profile pipes are well suited for heating large rooms. Mains-powered devices are convenient to use at sites of periodic use: construction sites, garages, workshops, cottages. Stationary registers find their application in production workshops, greenhouses, warehouses and other technical facilities.
They have a fairly simple design, which makes them relatively easy to manufacture. This allows you to make steel registers yourself, which provides significant cost savings. If you wish, you can get creative and create analogues of modern design models that can become not only effective sources of heat, but also interior decoration.
Installation of a heating circuit using cold welding
Cold welding is the joining of two or more elements without heating them. The connection is formed due to chemical reactions occurring in the adhesive. Plasticity, high adhesion and rapid solidification into a monolithic mass are the distinctive features of components used for cold welding.
The adhesive composition may include various elements to improve the mechanical characteristics of adhesive joints. The compositions are usually based on epoxy resin and a filler - a hardener. The packaging indicates whether heating pipes can be cold welded, or whether this is a composition for repairing plastic pipes of the cold water supply circuit.
Cold welding is a plastic mass that provides a tight connection of pipes
There are two types of components for cold welding:
- A plastic two-component substance, which must be thoroughly kneaded immediately before use to mix the components. The advantage of this type of cold welding: the composition is quickly prepared, stored for a long time, and requires minimal preparation before use. Disadvantage: hardens quickly, must be applied very carefully, it is recommended to use as soon as possible after preparation.
- Liquid components. Before starting application, you need to combine the substances in the proper proportion, and the glue is ready for use. Advantages of a liquid composition for cold welding: the adhesive easily penetrates deep into the joint, forming a durable layer that is resistant to mechanical stress when hardened. Disadvantage: requires special conditions for long-term storage. Different materials - plastic, metal - require different chemical components.
The main advantage of any type of cold welding is the ability to quickly repair a section of a plumbing, heating or sewer system without turning off the water supply. Welding, or in this case gluing, components can be done in conditions of increased fire hazard.
As a repair composition for cast iron heating radiators, the surface should be carefully prepared for cold welding. Despite the strength of the connection, the repaired area may not withstand the maximum pressure test.
For plastic plumbing systems, the cold welding method is recognized as one of the best solutions for local repairs when it is impossible to replace the damaged element. Cold welding is also successfully used to restore the tightness of butt seams on plastic water pipe fittings.
Cold welding is an effective method for urgent repair of any pipes
Waiting time for the finished cold welding composition: from 2 to 20 minutes, depending on the intended purpose. Temperature range – from 0 to 1300 degrees.
It is enough to read the instructions for use in detail, and the installation of the system will be successfully completed. To work you will need:
- container for preparing the composition;
- gloves to avoid contact of the composition with the skin. It is recommended to moisten them with water;
- thin spatula for applying a viscous composition to the area of use;
- compliance with safety rules when working with chemical components.
If the composition gets on the skin or in the eye area, it is recommended to rinse the affected area of the skin and if a burning sensation occurs, consult a doctor, having with you the packaging of the “cold welding” components.
Reduced heat transfer.
In order to save energy, it becomes important to reduce the heat transfer of pipes in those sections of communications that are not used for their intended purpose, for example, when moving from one building to another or in an unheated room.
There are many options for using thermal insulation materials for this. Manufacturers offer a fairly wide range to choose from, ranging from cheap fiberglass to more expensive types of polystyrene foam. You can purchase pipes with insulating elements already built into them.
To summarize, we conclude that the use of such calculations helps to significantly save money and avoid many technical obstacles when designing water and heat supply systems.
Actually, you are a desperate person if you decide to undertake such an event. The heat transfer of a pipe, of course, can be calculated and there are a great many works on the theoretical calculation of the heat transfer of various pipes.
Let's start with the fact that if you decided to heat your house with your own hands, then you are a stubborn and purposeful person. Accordingly, a heating project has already been drawn up, pipes have been selected: either metal-plastic heating pipes or steel heating pipes. Heating radiators have also already been looked at in the store.
But, before acquiring all this, that is, at the design stage, it is necessary to make a conditional relative calculation. After all, the heat transfer of heating pipes, calculated in the project, is the key to warm winters for your family. There is no room for error here.
Methods for calculating heat transfer from heating pipes
Why is the emphasis usually placed on calculating the heat transfer of heating pipes? The fact is that for commercially manufactured heating radiators, all these calculations have been made and are given in the instructions for use of the products. Based on them, you can easily calculate the required number of radiators depending on the parameters of your home: volume, coolant temperature, etc.
Tables.
This is the quintessence of all the necessary parameters collected in one place. Today the Internet contains a great many tables and reference books for online calculations of heat transfer from pipes. In them you will learn what is the heat transfer of a steel pipe or cast iron pipe, the heat transfer of a polymer or copper pipe.
All that is needed when using these tables is to know the initial parameters of your pipe: material, wall thickness, internal diameter, etc. And, accordingly, enter into the search the query “Table of heat transfer coefficients of pipes.”
This section on determining the heat transfer of pipes also includes the use of manual reference books on heat transfer of materials. Although they are becoming more and more difficult to find, all information has migrated to the Internet.
Formulas.
The heat transfer of a steel pipe is calculated according to the formula
Qtr=1.163*Str*k*(Twater - Air)*(1-efficiency of pipe insulation), W where Str is the surface area of the pipe, and k is the heat transfer coefficient from water to air.
The heat transfer of a metal-plastic pipe is calculated using a different formula.
Where is the temperature on the inner surface of the pipeline, °C; t
c is the temperature on the outer surface of the pipeline, °C;
Q—
heat flow, W;
l
—pipe length, m;
t
—coolant temperature, °C;
t
inc—air temperature, °C;
a n is the external heat transfer coefficient, W/m 2 K; d
n - outer diameter of the pipe, mm;
l—thermal conductivity coefficient, W/m K; d
in
-
internal diameter of the pipe, mm; a int - internal heat transfer coefficient, W/m 2 K;
You understand perfectly well that calculating the thermal conductivity of heating pipes is a relative value. The formulas include the average parameters of certain indicators, which may, and do, differ from those that actually exist.
For example, as a result of the experiments, it was found that the heat transfer of a polypropylene pipe located horizontally is slightly lower than that of steel pipes of the same internal diameter, by 7-8%. It is internal, since polymer pipes have a slightly thicker wall thickness.
Many factors influence the final figures obtained in tables and formulas, which is why the footnote “approximate heat transfer” is always included. After all, the formulas do not take into account, for example, heat loss through the building envelope made of different materials. There are corresponding tables of amendments for this purpose.
However, by using one of the methods for determining the heat output of heating pipes, you will have a general idea of what kind of heating pipes and radiators you need for your home.
Good luck to you, builders of your warm present and future.
Surface preparation
Before electric welding pipes, you need to prepare them for the joining process. Surface preparation sequence:
- Pipes must comply with all parameters specified in the project. They should have uniform wall thickness along their entire length, and the cut should be round.
- The pipe is cut at an angle of 90° and cleaned to a shine at a distance of 1 cm from the cut.
- Then the cut is degreased. To do this, remove all oil stains and clean off rust. If there is paint, it is removed.
If necessary, the end is further processed. The edge of the pipe cut should have an opening angle of 65° with a blunting value of up to 0.2 cm. Such a cut will help to qualitatively connect the products.
Types of welding
The essence of the process is this: when heated, the metal or alloy is deformed - melts, and when joined to the edge of another metal product, mutual penetration of particles of the material occurs. The new bonds formed in this way are molecular, which ensures high strength of the seam.
According to the welding method, welding is classified into three groups.
- Thermal – fusion welding (arc, laser, etc.).
- Thermomechanical – carried out using a magnetically controlled arc (butt).
- Mechanical - through friction or explosion.
Various elements act as a heating source; depending on their nature, pipes can be welded using 4 methods:
- arc welding;
- gas;
- laser;
- plasma.
The process itself can be manual, automated or mechanized. At the same time, the share of the manual method, even in enterprises, is at least 20–30%, and when installing ready-made heating systems in buildings, it increases sharply.
Heating registers made of smooth pipes: do-it-yourself welding and connection
Not only radiators, but also factory-made and home-made heating registers can be used as heating devices. Previously, such heating devices were most often installed in garages, warehouses, industrial workshops and other commercial facilities.
In order to reduce the cost of installing autonomous heating systems, similar products began to be used in low-rise residential buildings. It’s worth noting right away that heating rooms using heating registers is less effective compared to batteries.
The latter benefit due to the larger heat transfer area formed by additional plates that are absent in the registers of the basic design. If desired, the owner of the facility can eliminate this drawback by welding vertically oriented metal plates to round pipes.
Otherwise, this problem can still be solved by increasing the number of welded pipes of smaller diameter. This modification of the design of heating registers is resorted to not only in order to increase the heat transfer of the device, but also to implement design ideas.
For the manufacture of heating registers, smooth-walled pipes of the same diameter and the same length are prepared. The diameter can range from 32 to 80 mm.
Wider pipe products should not be used, because domestic boilers will not be able to provide the heating device with sufficient coolant.
The registers will not be able to warm up well, which means they will not provide heat to the room in which they are installed.
Using gas welding or electric welding, these workpieces, located parallel to each other, are welded together with pipes of smaller diameter. Through these transverse tubes (pipes) the coolant flows, circulating in the heating system of the house.
Option #1 - horizontal register
Most often, when manufacturing a heating register, two or three parallel pipes laid horizontally are connected. The distance between adjacent sections in the register must necessarily be 50 mm greater than the diameter. Coil designs of registers are also popular, divided into several types depending on the method of connecting devices to the heating system.
Heating registers of coil type: L - length of the heating device, D - pipe diameter, h - distance between pipes (50 mm greater than the diameter)
The length of the heating devices is selected in accordance with the dimensions of the room or room in which it is planned to install the heating system. In addition to the listed types of heating register designs, there are also:
- single-pipe products;
- four-pipe devices;
- five-pipe models, etc.
The number of pipes used in one heating register depends on the area of the heated room, the quality of the object’s thermal insulation, the presence of other heat sources in the room, etc. By sorting through the possible pipe diameters, the optimal dimensions of the products are calculated, at which the optimal temperature regime will be maintained in the heated room.
Horizontal heating registers made of smooth pipes are used for lower piping. In this case, the products are carefully placed around the perimeter of the room closer to the floor surface. In a residential building, pipes go under the windows. In industrial premises, the location of heating devices depends on the height of the ceilings, the layout of the facility and the placement of industrial equipment.
Heating registers successfully heat social facilities. Caring for such heating devices is much easier than cast iron radiators.
Option #2 - vertical registers
When remodeling apartments and expanding their living space with balconies and loggias, it is necessary to dismantle the batteries installed by the developer when handing over the property.
In this case, the dismantled radiators are replaced with vertical heating registers welded from a large number of round pipes of small diameter.
These heating devices are placed in a wall located next to the window opening.
If necessary, vertical heating registers are covered with decorative grilles, which turn an essential element of the heating system into an interior decor item.
You can disguise the location of the “bundle” of parallel pipes using mirrors, colored glass, mosaics, wrought iron grilles, as well as by placing shelves, hangers, cabinets and other useful items of non-bulky furniture.
It is possible to ensure the movement of coolant in a vertical register installed in an autonomous heating system of a private house using a circulation pump. Horizontal registers are also used for natural coolant circulation, if they are installed with a slight slope (0.05% is sufficient).
How many registers are needed to heat a house?
Pipes supplying coolant to heating devices can, to some extent, also be considered registers. And the heated towel rail installed in every bathroom is also a kind of heating register. When calculating the exact number of heating registers required for comfortable heating of a room, a number of factors are taken into account that influence the amount of heat loss:
- thickness of load-bearing walls and material of their manufacture;
- glazing area;
- Number of doors;
- thermal insulation of floor and ceiling;
- orientation of the house to the cardinal points, etc.
A simplified calculation takes into account the heat transfer of one meter of pipe. For example, it has already been calculated that one linear meter of 60 mm diameter pipe heats one square meter of living space (provided that the ceiling height is no more than 3 m).
If you purchase ready-made heating registers instead of radiators, you will not be able to achieve significant cost savings.
It is possible to reduce financial costs only if you independently manufacture register-type heating devices from materials purchased in bulk at discounts on the market. Welding work must also be done by hand.
Otherwise, the cost of a professional welder’s services will cover all the benefits from the wholesale purchase of pipes and connecting elements.
Installation methods: welding or threading?
The biggest problem when carrying out installation work on assembling and installing heating registers is welding work.
Heating appliances are assembled from individual parts outside the room, and then the heating system is installed from the prepared blanks using gas welding.
Welded seams can be replaced with threaded connections, which are inferior in strength and durability, but if the work technology is followed and modern materials are used, they can ensure long-term operation of heating equipment.
A heating register in a garage or warehouse is an independent device that allows you to heat a technical room using electricity
Homemade registers from round pipes
On the market you can purchase homemade heating registers sold by professional welders. If the finished products do not fit your size, then welding experts will make heating devices to order. The quality of home-made products is not in doubt, therefore they are built into autonomous heating systems without fear or risk.
“Samovars” with heating elements are also popular among consumers. This is the name for heating registers that independently heat individual rooms using electricity. Instead of water, oil, antifreeze or any other non-freezing liquid is poured into the pipes.
Heating of the coolant is carried out by a conventional heating element operating from a network with a voltage of 220 V. “Samovars” in their design resemble oil radiators, produced and used in extensions where it is impossible or impractical to build a water heating system.
Heating devices operate in autonomous mode, and their performance depends only on the availability of electricity.
A samovar is one of the types of heating registers that are not connected to the home heating system, but heat one of the rooms using electricity
Replacing heating batteries using a threaded connection.
Proponents of this method of replacing the heating system note that the use of threaded connections of its various parts has a number of advantages.
- Easy installation of the entire heating system. As a rule, in every apartment you can find places that are quite difficult to reach for welding. And in this case, only a highly qualified welder can perform welding work at a high level. And the use of a threaded connection reduces the entire work process to the elementary screwing of parts into each other according to the principle of a conventional construction set.
- Dismantling a heating system with a threaded connection is also quite simple - there is no need to cut the pipes, but simply unscrew them from each other.
- The threaded connection also increases the safety of installation work, since it does not require the use of high temperature, and therefore cannot lead to an accidental fire.
- When using a threaded connection, all work on installing a heating system takes much less time than when using welding. In some cases, this time difference can reach 70%.
- The cost of such installation is also lower than the cost of a qualified welder.
But no matter how great the advantages of this method of installing a heating system, the number of people using gas welding in this case is quite large. And there are quite simple explanations for this.
Advantages
- Cold welding for batteries and pipes provides reliable results for sealing cracks and leaks in the domestic water supply system;
- The embedding process does not require additional technical devices or other devices;
- Using cold welding is a safer process than hot welding;
- The cost of applying one suture is much lower than other methods;
- When creating a seam, pipes are not subject to heat treatment, which does not damage them, and also does not create stress and deformation on the metal;
- There is no difficulty in carrying out work with different thicknesses of products;
- Cold welding is suitable for plastic pipes and other products, as it is a universal fastening agent;
- The speed of repairs is relatively high and everything does not take much time;
- Cold welding for heating pipes is available in many places where relevant products are sold and can be purchased without any problems at any time.
Features of pipes for the heating system
For water supply systems designed for cold water, heating and hot water supply systems, there are separate types of polypropylene pipes that differ significantly in their technical characteristics.
Therefore, you should not use pipes intended for cold water to install a heating system, since their material cannot withstand high temperatures.
If you need to purchase pipes for installing heated floors, then you should choose special products that are well adapted for these purposes.
Advantages of polypropylene pipes
This building material has received a wide range of applications due to its incomparable characteristics, namely:
- affordable cost;
- maintainability;
- ease of installation;
- resistance to chemical influences and corrosion;
- durability;
- environmental friendliness;
- reliability, etc.
In addition, mineral deposits do not settle on the inner walls of such pipes, and heating welding using them has a low price.
The only drawback of polypropylene is its low fire resistance. It easily ignites and is unstable to very high temperatures.
Leaders of sells
For an even clearer understanding of what a distribution comb is and how to choose the best device for yourself, you need to look at the recent sales leaders. From this information, you can find out what requirements must be met and what new functions have been added by manufacturers.
You will be presented with 2 types of distribution comb and distribution manifold, common throughout the world, which have the most modern functions:
- Rehau Rautitan distribution comb for 2 pipes. Combines low price and excellent quality. The manufacturer is the famous company Rehau. The average price in Russia is 700 rubles. Serves to regulate the coolant on several circuits. You can connect to the device both ordinary cold water passing through pipes and a heated floor system, as well as other heating devices. Installation of the comb is facilitated thanks to the sliding sleeves with which it is attached to the pipes. Made of brass, this material is characterized by long service life and high strength.
- Rehau Rautitan HLV distribution manifold for 11 groups. The manifolds have the same functions as the combs, the only difference is in the number of connections - the manifold has many more, connections are made in groups, for cold and hot water separately. Rehau has proven the high quality of its devices. This is evidenced by the numerous purchases by Russians of collectors and combs from their company. The Rehau Rautitan HLV distribution manifold branches out the circuits of radiator distribution systems. All devices have passed mandatory quality checks and necessary tests, including pressure testing in emergency situations. Just like the comb, the manifold of this company is made of brass, which indicates high quality and durability. The average price in Russia for the Rehau Rautitan HLV distribution manifold is 11,000 rubles. The kit includes: eurocone, ball valves, connecting nipples and built-in air valve.
The market of modern technologies is filled with new products every day; distribution combs and manifolds are supplemented with convenient functions for ease of use. They all have their positive, and in rare cases, negative qualities. To choose the right distribution comb or manifold for your home or apartment, you should learn as much as possible about these devices, then it will be difficult to make a mistake in your choice.
How to weld heating from iron pipes Metalworker's Guide
When installing heating pipes, you often have to connect them by welding. Of course, in some cases a threaded connection may be suitable, but the percentage of this method is much smaller.
Welding metal heating pipes
As for welding steel pipes, this method has several varieties. For example: manual electric arc, gas welding (semi-automatic, automatic). To connect steel heating elements, the first type of welding is often used.
To weld steel pipes using manual arc welding, you need to use special electrodes that perform the function of an additive. They perform two functions: they conduct current to the arc and fill the seam. Their composition, dimensions and other characteristics are established by GOST. Today on the Internet you can find quite a few videos showing how this or that type of welding is performed.
Heating registers made of steel pipes.
The manual arc technology is quite simple, so you can do it yourself. It all starts with preparation.
How to properly weld a heating register
In private houses there are always several utility or technical rooms, where the requirements for the interior are low.
But you still need to heat them, and in order not to spend money on buying modern radiators, you can install a steel register welded from pipes there.
And, although everyone has seen such simple heating devices with their own eyes, not everyone knows their structure. This material is to help those homeowners who want to independently manufacture, install and connect heating registers to their system.
Construction of heating registers
Despite the fact that such heaters are considered outdated and do not have a very attractive appearance, they continue to be widely used in a variety of areas, for example:
- for heating production premises of industrial enterprises;
- as an autonomous heater in garages;
- as a water heating element built into a brick oven.
Note. A stove register made of smooth heating pipes is calculated and manufactured depending on the power and design of the stove.
By design, heating devices are divided into 2 types: sectional and in the form of a coil. In the first case, the role of 1 section is played by each horizontal pipe, the flow of coolant through them is ensured by vertical jumpers.
They are made of smaller diameter pipes in order to create artificial resistance to flow and increase heat transfer from each section.
The pipes from which the sectional heating register is made are plugged at the ends, and the coolant is supplied according to the “top to bottom” scheme.
The design of the heater in the form of a coil is clear from its name. Here the diameters do not narrow; water flows freely through the entire device, changing direction several times. The heat transfer of this register is lower than that of a sectional one, but the hydraulic resistance is less and it is somewhat simpler to manufacture.
Advice. It is preferable to make sectional heaters for utility rooms or garages, where uniform heating and comfortable air temperature are important. It is better to install coils as standby heaters at the very end of a two-pipe system. They work great there because of their low resistance.
Heating registers from smooth pipes of round and rectangular cross-section are welded. However, the generally accepted design is ordinary round pipes made of low-carbon steel such as St3, St10 and even St0. If the battery is intended to work with a steam system, then St20 steel is used.
It is not recommended to make sections with a rectangular cross-section; they are less washed by the convective air flow, which means they will give off less heat.
For garage heating, autonomous registers are made, filled with antifreeze or transformer oil, and an electric heating element is built into the lower section at the end.
Advantages and disadvantages
Before you start making heating registers, you need to evaluate all the pros and cons of these heaters, so that your expectations are not disappointed later. So, first about the advantages:
- low cost and ease of manufacture;
- low hydraulic resistance: thanks to this, the heater can be used in the “tail” of any system;
- reliability and durability: a register, qualitatively welded from ordinary pipes, will quietly serve for at least 20 years;
- resistance to pressure drops and water hammer;
- The smooth surface facilitates easy removal of dust when cleaning premises.
Unfortunately, a home-made heating register also has a lot of disadvantages. The main one is low heat transfer with a significant mass of the device. That is, in order to provide a comfortable temperature in a medium-sized room, the register must be of decent size.
Let's give a simple example taken from technical literature. If the temperature difference between the coolant and the room is 65 ºС (DT), a register welded from 4 DN32 pipes 1 m long will deliver only 453 W, and from 4 DN100 pipes – 855 W.
It turns out that, based on heat transfer per 1 m of length, any panel or sectional radiator is at least twice as powerful.
Note. The presented data were determined experimentally at a high coolant flow rate of 300 kg/h.
Other negative aspects of smooth-tube registers are not so critical, although significant:
- holds a large volume of water: the disadvantage does not play a big role if there are 1-2 such heating devices for the entire system;
- During operation, it is very difficult to increase or decrease the power of registers made of smooth pipes. You can’t do without dismantling the welding machine;
- are susceptible to corrosion and require periodic maintenance with painting;
- They have an unpresentable appearance: the defect can be corrected; if necessary, the heater is hidden behind a decorative screen.
Having analyzed the advantages and disadvantages of smooth-tube devices, we can conclude that their scope of application in private housing construction is very limited. As already mentioned, registers can be used for heating various rooms with low requirements for comfort and interior design.
Manufacturing recommendations
When selecting materials, you need to decide what pipe diameters to take and what their total length should be.
All these parameters are arbitrary; you can make a heater from any pipes, and take its length convenient for placement in the room.
But in order to supply the required amount of heat, it is necessary to ensure a sufficient heat exchange area. To do this, it is recommended to perform an approximate calculation of the register based on the surface area.
Making such a calculation is quite simple. It is necessary to calculate the outer surface area of all sections in m2 and multiply the resulting value by 330 W. Proposing this method, we proceed from the statement that 1 m2 of register surface will give off 330 W of heat at a coolant temperature of 60 ºС and room air temperature of 18 ºС.
Advice. You don’t have to do manual calculations, but use a simple EXEL program and then correctly weld the register according to the exact parameters. You can download the program in one click from the link: https://al-vo.ru/wp-content/uploads/2014/02/teplootdacha-registra-otopleniya.xls.
For a person who has welding skills, it will not be difficult to independently weld the register according to the available drawings.
It is necessary to prepare and cut pipes into sections and lintels, and cut plugs from a steel sheet. The assembly sequence is arbitrary; after welding, the heater should be checked for leaks.
When manufacturing and installing registers, consider the following recommendations:
- you should not take pipes with too thin or thick walls: the former will cool faster and last less, and the latter will take a long time to warm up and are difficult to adjust;
- do not forget to build a Mayevsky valve into the end of the upper section for bleeding air;
- when welding coils, the rotating section can be made from two ready-made elbows if it is not possible to use a pipe bender;
- Place a tap at the coolant inlet and a valve at the outlet;
- remember that the registers are installed with an invisible bias towards the connection of the supply pipe. Then Mayevsky's crane will be at the highest point.
Conclusion
Smooth-tube registers cannot be considered a relic of the past, since they are attractive due to their low cost and are still successfully used in various situations. But you should not load the system of a private home with such heating devices; the volume of heated water will then increase many times over, which will have a larger impact on energy consumption.