I have a grinding machine in my workshop. Occasionally I use it to polish some parts. The last purchased ribbon from the set recently broke. I didn’t want to go to the store for new ones, so I decided to make my own from sandpaper. It turned out, by the way, very well, so next I want to tell you about how to glue the grinder tape with your own hands and a little about it itself.
Source pinimg.com
How to do without a sanding belt for a grinder
Sanding belts for grinders are sold in hardware stores. However, a grinder is an expensive machine. Less common than, for example, portable grinders or drills. Therefore, choosing a tape specifically for your machine can be difficult.
Tapes differ in many ways, the main ones being:
- width;
- length;
- strength;
- grain size;
- softness of the abrasive coating;
- abrasive application method.
It is not surprising if the required tape is not available in stores. Therefore, you have to make it yourself from a roll of sandpaper.
What you will need:
- sandpaper with the required characteristics. Paper should be sold in rolls;
- degreaser;
- PVA glue. It is recommended to use high quality PVA;
- two pieces of wooden board;
- clamp.
Assembling a homemade knife
Having completed all the above operations and bringing the knife steel to the required hardness, we proceed to assembly. We adjust the shape of the pads to the shank of the knife and cut out two additional leather inserts.
Then we lubricate the parts with glue, install brass inserts on the glue and leave to dry for several hours.
It is better to make the extreme insert not from a rod, but from a tube of the required diameter. This will help attach the finished product to a leather strap during use, which will prevent its loss while hiking, fishing or hunting.
After the glue has dried, carefully sand the handle and blade with sandpaper. To protect the blade from corrosion, it is enough to polish it well after final sharpening and finishing.
Tools and materials
You can find a variety of abrasive materials for grinders in stores; they are sold in rolls glued to specific sizes. But the required size is not always available in stock, so strips made independently are used to replace failed tape.
Craftsmen resort to different methods: using tape to connect abrasives, gluing with a hot-melt gun, reinforced tape, special glue, etc. The process is simple, but requires care.
Required materials and tools:
- abrasive sandpaper on a fabric basis;
- ruler;
- scissors;
- glue
- degreaser;
- weight for pressing the parts to be glued.
You can save on the purchase of grinder tapes if you purchase sandpaper for the job and glue it to the required dimensions. It is worth remembering that the smaller the strip, the faster it will become unusable - wear out.
To seal the tape, there are two main methods.
- Overlapping. The main advantage of this method is that the connection is very strong, and the gap is minimized. But there is also a drawback - during operation it will “hit” at the joint. There is an interesting pattern here: the larger the abrasive, the smaller the joint will be felt.
- Butt. Here everything turns out the other way around: for a seamless connection, the probability of rupture increases, but beating during operation will be minimized.
When choosing an abrasive belt for a grinder, you need to take into account the fact that each material and product has its own grain size. There are many emery cloths on the market, differing in price and quality.
Budget products from the manufacturer Belgorod Abrasive Plant (BAZ) have a fairly low price compared to other manufacturers.
The range includes products with ceramic coating, which, due to its “aggressiveness”, is used in metal processing. But the level of quality and service life of the BAZs are represented by average indicators; during operation they quickly fail and heat up. Dust from metals begins to coke on the canvas, causing scratches and grooves to form on the material being processed. This applies to all abrasives, but with the products of the Belgorod plant the process occurs faster.
Emery cloth from manufacturers VSM and 3M is of much higher quality. The range includes abrasives for both rough work and final polishing. The products of the manufacturers in question are of a higher level of quality, but ZM has a higher price.
Amateur craftsmen advise starting work with rough grinding grain - P24. This is the largest size. But experienced craftsmen say that P36 and P40 are better options for the initial stage of work. Belts with coarse abrasives fail faster.
For the next polishing stage, sandpaper size P120, P160 or P180 is suitable. If the product requires polishing, then the next dimension will be P320 - this blade is intended for finishing. And then it is necessary to continue working with sizes P400, P800.
To clean the emery cloth, you can purchase a rubber pencil; with its help, you can remove dust that begins to coke from the abrasive.
This way the sanding strip for the grinder will last longer.
Adviсe
On the Internet, many non-professional machining workers using a grinding machine advise using belts with P24 abrasive grain for primary processing, since this is the largest grain for rough abrading of the material.
This advice is based on the opinion that large grains should, in theory, process the material faster, however, as practice shows, large grains work faster, and a belt with this grain shrinks and wears out faster.
Therefore, use belts with abrasive grain P36 or P40 during initial processing.
And buy a rubber pencil (it removes the remaining dust that cokes on the abrasive belt of the sanding machine), thanks to it your abrasive belt will last 2 times longer.
Source beauty-prof.com
Sequencing
The main stages of this work are:
- Sandpaper cutting.
- Installing a sheet of metal in a vice.
- Trimming the ends of the tape.
- Removing abrasive from its corner.
- The final stage is gluing.
Let's look at each of them in more detail.
Trimming
The tape is cut with any tool, you can use ordinary scissors. Before starting preparation, you need to make a cut line on it using a ruler and pencil (it is required that it be as even as possible).
Having completed the preparation stage, you can begin cutting.
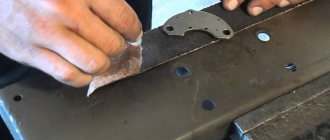
Installing the support in a vice
During the entire gluing process, it will be convenient if a thick piece of metal is inserted into a vice; corners will need to be laid out on it during preparation and gluing. Therefore, you need to firmly secure it in them.
Note! The metal sheet must be made of a material capable of withstanding the temperature of the gas burner.
Preparing the corners of the tape
The end of the sandpaper is laid out on the prepared area. It needs to be cut at an angle. At a distance of 3-4 cm from the edge, draw an oblique line with a pencil.
Note! For better stability, you can place a magnet on top of the paper.
The second end is simply cut at a similar angle.
Removing abrasive
At a distance from the edge of the prepared end to approximately 4 cm, it is necessary to remove the dust from the sandpaper.
You need to prepare a tape with the same thickness, about 10cm in length.
Next, the algorithm of actions is as follows:
- the gas burner adjusts the fire supply under the metal “table”,
- it heats up simultaneously with the sheet of paper placed on it,
- when everything is warm enough, the burner turns off,
- the hot corner must be coated well with a silicone corner to the drawn line,
- A piece of sandpaper is firmly applied on top and secured firmly (you can put some kind of press.
After some time (5-10 minutes), the load is removed. You need to tear off the second piece, which has stuck tightly and, having been torn off, will take on all the abrasive, cleaning the edge of the desired tape.
Gluing
When the gluing area is ready, it can be fastened to the second end.
The manipulations will be similar to the previous stage:
- The site and material are heated using a gas burner.
- A hot, clean area is coated with silicone.
- The second end is overlapped on top.
- A load is placed on the resulting circle, under which the joint will dry out.
When all the material has cooled and dried, a full-fledged grinder belt will be ready and can be used.
This way you can get an excellent homemade belt for your sanding machine. This method is the fastest, unlike other similar ones, since silicone dries much faster than the glue used in similar methods. You just need to have the tools and material for this.
If you have made yourself a grinder or bought one, then you may have some questions. For example, what abrasive tapes should you buy for the grinder, and can you glue them yourself? You will find answers to these questions in the text below. How to make a grinder, select the engine power and calculate the diameter of the grinder drive roller, you can read in this article>>>
Steel for making knives
Steel for making knives
Steel ШХ15
This type of steel is a bearing steel; it has all the properties necessary for the manufacture of especially durable knives. All blades made from ShKh15 steel are distinguished by high cutting performance, durability, and visual appeal. ShKh15 steel belongs to the class of low-alloy chromium materials. It can be saturated with special elements to improve hardenability and heat resistance. The steel is characterized by high homogeneity and contact endurance, which allows knives to remain unusually sharp for a long time. The metal is quite hard, which makes the products resistant to crushing and deformation. At the same time, such steel has good toughness and ductility, it does not crumble under heavy loads, and is easy to process. Dark shades of the material make the knives attractive in appearance; exclusive products made from ShKh15 steel look very elegant. All knives made from ShKh15 steel are durable in use, do not wear down for a long time, maintaining excellent cutting performance.
Locomotive Valve Steel
A material that is widely used in the manufacture of designer blades. Locomotive valve steel has all the qualities that a blade needs. In addition, this material is quite common; the exhaust valves of a steam locomotive, having served their time, can be easily forged, processed and calcined. Why is this material suitable for making knives? Everything is very simple, this steel has unique properties that make the blades the best, highly durable.
1. Sufficient hardness of the material provides the knives with resistance to mechanical stress and deformation.
2. Plasticity, which allows you to make knives unusually sharp.
3. Easy to process when sharpening blades.
4. High strength, wear resistance.
5. Endurance in contact with other materials.
6. Good material uniformity.
7. Visual appeal - white color, which remains even after processing.
Locomotive valve steel knives last a long time and do not require frequent sharpening.
Damascus steel
A unique and truly legendary type of steel, the recipe for which was once lost. Over time, craftsmen restored the composition of Damascus steel. However, no one can claim that it remains the same as it was with the Crusaders. But in any case, Damascus steel is the ideal material for knives that has the best characteristics and combines all the properties of the best metals for blades in the world.
1. Particular strength and hardness - the material is not susceptible to almost any mechanical stress, it is able to withstand enormous loads.
2. Unusual cutting performance - when sharpened, Damascus steel knives can cut thick metal wire.
3. Wear resistance, and such blades do not require frequent sharpening; they remain sharp for more than a month.
4. Durability in use - the knife will last for decades.
5. Exquisite appearance - the delicate, twisted patterns of Damascus steel fascinate with their beauty.
Steel 95x18
The main advantage of this steel is its resistance to corrosion. This indicator allows the use of knives in harsh weather conditions
In addition, 95x18 steel is flexible and ductile, which is important for sharpening and operation. The material is characterized by high strength, resistance to various deformations and mechanical stress.
Stainless steel knives made of 95x18 steel are durable in use; they do not wear down and do not lose their cutting properties for many years.
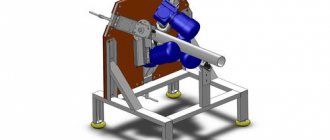
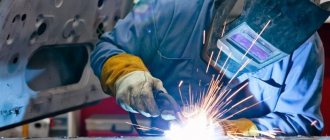
Tape grinder. Types and device. Operation and Application
A belt grinder is a grinding machine used for processing metals, wood, plastic and other materials. It consists of an electric motor that spins an abrasive belt stretched between rollers.
Grinder functions
This is a desktop machine that can be used to process small workpieces. With its help it is possible:
- Bring out the edges of knives.
- Restoring sharpening of cutting tools.
- Remove layers of rust or paint.
- Level flat surfaces.
- Grind pipes.
- Remove hangnails.
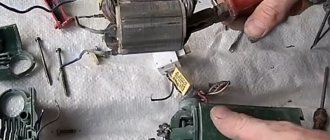
How does a belt grinder work?
The machine has a simple device, so it is often made independently using motors from washing machines or other equipment.
The design of the simplest grinder includes the following key parts:
- Electrical engine.
- Frame.
- Leading skating rink.
- Driven tension roller.
- Belt tension mechanism.
- A working platform for installing workpieces.
- Back stop to prevent the belt from breaking due to pressure during sanding.
The simplest machines have only one drive and driven roller. More massive and expensive designs include 3 driven rollers. The more there are, the longer the attached tape. The use of a short abrasive leads to its rapid grinding, so the frequency of replacing consumables increases. The use of a long tape reduces the frequency of friction of its individual sections on the workpiece and overheating of the glued abrasive. As a result, consumables last longer.
When using a grinder, the workpiece being processed rests against a table that is attached to the frame of the machine. For factory-made devices, the design also includes a folding protective glass that prevents sparks from flying into the operator’s face. As the tape is used, it stretches due to wear and tear. In this regard, the machine is equipped with a free tension mechanism. Usually he pulls up the first driven roller, which comes from the drive pulley. All other driven rollers are permanently mounted on bearings.
There are also universal machines that perform not only the function of a grinder, but also other sharpening equipment. Often on sale you can find combined devices that combine the design of emery. The use of such equipment significantly expands the possibilities for processing parts. Universal machines do not include in their design the ability to disable individual mechanisms. In this regard, when turned on, both the tape and the emery wheel rotate.
Replacing ribbons
It only takes a few seconds to replace the abrasive. To do this, just press down the driven roller, which is attached to the tension mechanism. As a result, the tape will sag and it will be possible to remove it. New sanding material is first applied to the drive roller, then to the driven rollers, which are permanently attached, and then thrown onto a pulley adjusted by the tensioner. The pull-up spring will automatically apply enough tension to prevent the belt from flying off during operation.
Belts for grinders are sold ready-made, glued into a ring, which allows them to be immediately installed on the machine. The criterion for assessing the quality of an abrasive is not only the reliability of the chips glued to the surface, but also the connection of the ends of the strip. If it is not made accurately enough and overlaps, then during the rotation of the tape, a beating of a small step is observed. This makes it difficult to achieve high quality processing of workpieces. Many users of such machines buy large tapes and glue them together themselves, using various technologies.
Comparison of grinder and sharpener
Most often, a belt grinder competes with a conventional sharpener. They perform almost the same functions, although they have significant differences, both in design and in the quality of processing.
The undeniable advantages of a belt grinder over emery include:
- More accurate machining geometry.
- Wide range of applications.
- Quick replacement of abrasive.
Due to the fact that the tape is stretched between the rollers, a flat platform is created, on which it is much easier to correctly position the workpiece and process it with minimal error. The belt remains level even despite heavy wear. As it wears away, the grinding speed simply decreases, but the area always remains level. In the case of sharpeners, their sanding wheels grind unevenly, so over time it will be impossible to achieve an even finish.
The belt grinder is also superior to the sharpener in multitasking. The exceptional skills that band saws are capable of include the ability to process round pipes along their radius, large grip on flat workpieces and smooth output of knife slopes.
Hardening a knife at home
It is very good if there is a furnace for hardening steel. You can even purchase it in a specialized store, but the pleasure is not cheap. So how to harden a knife at home without a special muffle furnace? There is a way out, and to be honest, there is more than one.
But first, you need to conduct small experiments and remember in detail all your actions. If the result is positive, then the same manipulations can be performed with a real part.
This tricky technique will help you get better at working on small workpieces and acquiring the skills to heat and cool a blade. We must not forget that different alloys require different temperatures and cooling methods, otherwise cracks and brittleness of the workpiece cannot be avoided.
Heating source
Basically, several sources of heating the workpiece can be distinguished. It is better to exclude the muffle furnace, since according to all expert estimates, it is the best in this matter. But we will try to evaluate other fairly common heating devices.
The forge copes quite well with heating workpieces. A blowtorch or propane torch may be suitable for this purpose; by trial and error, you can achieve the desired result. By the way, for these two options, you can build a small oven from refractory bricks, and the process will be simpler and the result will be positive.
Well, the last, one might say, completely unacceptable source of heating is a gas stove. If you want to spoil something, use this option.
Temperature
As has been said many times, every steel requires a certain temperature. In production, special thermometers are used for control, but in everyday life you can use a magnet (also mentioned above).
Dark spots should not be allowed; this is overheating, which will subsequently ruin the entire workpiece. If the master has enough experience, then he can determine by eye by the color of the hot metal whether the workpiece is heated enough or not. There is also such a hardening method: the part of the blade that is sharpened three times is heated to a temperature of 285 degrees, and the cutting part is heated only once, and to the maximum 950-1000 degrees.
The heating modes for each brand of steel are different:
- low-carbon steel requires heating in the range of 757-950 °C;
- steel with a high carbon content is sufficient at 680-850 °C;
- but alloying grades require from 850 to 1150 °C.
There is a whole table of colors, colors of incandescence. For example: brown-red 580-650 °C, dark red 780-830 °C or orange 950-1000 °C. So be careful and do not overheat the workpiece.
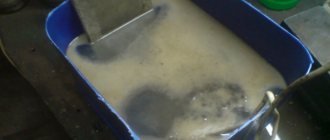
Cooling and holiday
For proper hardening, you need to maintain the correct temperature during cooling. It is preferable to cool stainless alloys in mineral oil with additives. And low-alloy steels, in aqueous solutions with salt and other additions.
There are many cooling options:
- blades with double-sided blades are dipped first into oil and then into an aqueous solution;
- Red-hot workpieces are dipped into the oil three times, each immersion taking a little longer than the previous one. And only then they lower it into the water;
- To give elasticity to the middle of the blade, this part is heated, then dipped in boiling water for 2 hours, and then in ice water.
With all these manipulations, it is worth considering that metal cools twice as fast in oil. A workpiece that has undergone hardening is subjected to a special process called tempering to restore the crystal lattice of the metal structure. There is nothing complicated in this procedure: the blade needs to be warmed up for a couple of hours. For alloy steel 270-320 degrees, for plain steel 150-200 degrees.
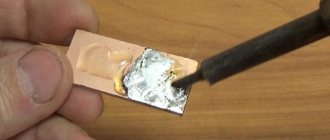
How to glue fabric to metal?
You can glue metal and fabric with contact glue, such as rubber or Moment 88. Both surfaces are smeared with adhesive, left for 15 minutes and pressed tightly against each other. Before this, the metal surface must be well sanded to create the roughness necessary for adhesion.
Also suitable are compositions for shoe repair and glue-gel for metal. Of the two-component products, Acifix 705 is suitable. The main composition is applied to the metal, and the activator is applied to the canvas, after which the parts are glued together.
Forging a knife from Soviet recycled materials
Recycled raw materials will not allow you to make a blade of the highest quality. But many people like the feeling of other materials being reborn into cutting and piercing objects. For example, forging a knife from a file or chain, spring, valve, bearing, cable, drill.
Rope knives
The cable makes good blades, but the Damascus properties are not high due to the large patterns. Cable knives contain a small amount of carbon, so a Damascus cutting edge must be welded to their bodies.
Spring knives
Many people prefer to make knives with their own hands from springs that were made back in the Soviet period. Then high-quality steel 65G was used for the spring. The properties of the metal springs are increased due to the correct ratio of the components and technological heat treatment. If the spring knives are overheated, they will become brittle.
Chain knives
Recycled material such as chains is widely used for forging. Most often these are chains from a chainsaw, but there are also motor chains from a gasoline engine.
Valve knives
To make knives with your own hands, hollow exhaust valves are taken from the valve. Not every craftsman knows how to correctly pull the knife out of the valve. Therefore this is not the best option.
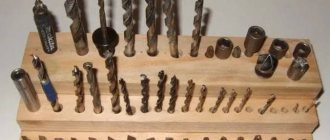
Drill knives
Good knives come from a drill. The tool steel from which the drills are made speaks for itself. If you properly harden a blade made with your own hands from a drill, it will not break under impact loads and will be able to withstand high bending loads.
File knives
To make a knife from a file with your own hands, you first need to draw a sketch - the shape of the blade and handle, choose the mounting method, as in the video. The metal for the file is carbon steel U10. Its hardness is 57 - 58 HRC. These properties of the metal are preserved during forging, and knives made from a file are strong, have high cutting performance and can withstand heavy loads.
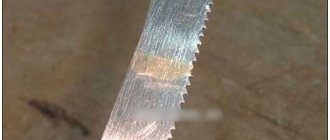
Saw knives
An alternative would be to use a powered rail saw. Their strength is even higher than that of files. Both of these products are ideal for forging knives at home. Since the old file is more accessible, we will consider the technology of hand forging from it in more detail. You can also watch the process on video.
Stages of converting a file into a knife
Forging at home should be carried out with strict adherence to all safety precautions. We will use:
We will use:
- A file (preferably Soviet).
- Material for making the handle (plastic, bone, wood, etc.).
- Shoe polish and wax.
- Gas stove or other heating device.
- A machine, a vice and a grinder.
- Magnet.
- Sandpaper.
- Material for rivets (preferably brass).
- Glue for leather and metal.
Step 1
First, we fire the file in the oven, as in the video. Heat it for 6 hours and leave it there until it cools completely. We do this so that the steel becomes the same as before factory processing. Instead of a stove, you can use hot coals from a fire. At home, you can use a gas burner for this. The future knife is placed on it in the place where the cutting part is supposed to be. A metal heat shield is placed on top so that it does not touch the file. The workpiece is sprinkled with salt, which should melt when heated. Process time – 6 hours.
Choosing a grinder belt
It is advisable to start selecting a belt grinder from the end, namely, to determine what width and height of the surface will be processed by grinding. Then compare these needs with the actual sizes of sanding belts that are commercially available.
As you know, endless sanding belts differ in their length, width and grit level. The size range of sanding belts of domestic and imported production, which are intended for use in grinders, is as follows: length 610, 915, 1230, 1600, 1830 mm, with a width of 50 and 100 mm. You can look for others, but subject to the unconditional fulfillment of the following requirements:
- The sanding belt must have an elastic fabric base;
- Maintain angular speeds of at least 1500 min -1 ;
- Possess high abrasive resistance;
- Allow relative elongation without rupture of the material of at least 10...15%;
- Minimum heating during prolonged continuous grinding.
It should be noted that for a homemade grinder, sanding belts with a length of no more than 1230 mm are better suited. Short belts wear out more because they do not have time to cool down during their idle movement, and longer ones automatically increase the dimensions of the machine without giving any visible advantages in return.
The mechanical strength of the tape material is also important. It is strictly not recommended to rely on composite tapes, even if glued with double tape: during operation, the joint stretches, and the tension of the tape weakens. Moreover, a sudden rupture of the tape with all the ensuing consequences is possible. Taking into account the fast speed of movement of the belt along the surfaces of the rollers, the specific grinding forces should not exceed 0.7...0.8 kg/cm 2 . This corresponds to the parameters of the mechanical strength of the electrocorundum tape within the range of 800...900 MPa.
It is important that before use the tape must be hung on a cylinder with a diameter of 50...60 mm for at least 48 hours. This will ensure natural elongation of the product before use.
[xyz-ihs snippet=”seredina”]
Advantages of blades made of valve steel x40
Having made a knife from such a valve with your own hands, it will serve for decades, but you must make it in compliance with all technological processes. Then realistically, at least 20 years of guaranteed pleasure, because with such a product it will be a pleasure to do any work.
Steel x40.
There are also several advantages:
- sharpening is quite easy and holds it for a long time;
- even after use with hard materials, there will be no nicks on the blade;
- excellent cutting properties;
- the hardness of the blade will be about 57-58 units on the Rockwell scale;
- no need to constantly polish, the shine will be permanent;
- easy to care for.
According to some reports, fans of making knives with their own hands report the resulting hardness as 62-64 HRC. And as an example, they give such an interesting fact, supposedly with such a product you can cut a bolt to 12 and nothing will happen to the blade. But it can be difficult to believe words until you try it yourself.
How to glue a “cobweb”?
The adhesive composition, applied to the tape on both sides and placed between the fabrics, is melted by the iron during the ironing process. The two wrong parts of the product are connected to each other, gluing to the tape on both sides. This is not difficult to do. The tape is simply inserted into the fabric pocket, which is formed by the wrong surfaces when hemming the bottom of the trouser leg, and ironed. The exposure temperature must be high enough . Only under this condition does the web melt. If something does not work out and gluing does not occur, you should spray the tape with water and repeat ironing.
This is truly the fastest way to hem products. It has many advantages, but this technology also has a disadvantage - the tape will only last a few washes. Having weighed all the pros and cons, we get to work if the positive aspects outweigh the scales.
What to use? Preparation
For work, prepare the following tools:
- Centimeter - measure the length of the side and internal seams of the product;
- Ruler – mark straight lines for gluing;
- adhesive tape - connect the edges of the bottom of the trousers;
- scissors - cut off excess fabric and cobwebs;
- chalk or a piece of soap - apply markings to the hem and cut areas;
- pins - pin up the bottom of the folded product;
- iron - melt the tape;
- ironing board - for carrying out all work on its surface;
- a piece of cotton fabric - for safe ironing.
How to hem trousers using adhesive tape?
Let's try to glue a mesh web with paper. It will be easy to work with her. The technology itself is simple:
- Adhesive tape is applied to the wrong side of the fabric along the marks with the paper facing up and ironed until it sets with the material;
- after this, the paper layer is carefully removed and removed;
- a strip of glued tape remains;
- the next part is applied and ironed;
- if the parts do not adhere to each other, they are sprinkled with water and ironed again.
The web is not used for hemming the bottom of both very thin and very dense fabrics, as well as knitted and brushed fabrics. She will stretch thin material, she will stretch herself with knitted material, but she won’t even be able to join the rest.
Preparing the trouser legs
Before gluing the tape, the trousers need to be shortened. This process is demonstrated step by step:
- put on your trousers and straighten them at your waist and hips. Pin the bottom with pins, giving the product the desired length;
- take off your pants, lay them out on the table, carefully smoothing the place of the future hem with your hand. Check that all the needles are pinned correctly and evenly;
- Mark the fold lines with a small piece of soap or chalk. In this case, the hem line must be perpendicular to the side seam;
- after 4 cm from the intended straight line, step back down and draw a line parallel to the first one;
- cut off the excess fabric of the trouser leg according to the second marking;
- now you need to lay out the product on the table so that the reduced part is the top and serves as a model for cutting off excess fabric from the bottom;
- before shortening the other trouser leg, it is important to align all the side seams from the very top to the bottom , align them and only after that mark the line for cutting off unnecessary material;
- shorten the remaining trouser leg.
Experience of forging a knife from a valve (I got the intake valve)
Attention!!!
This homemade product is posted for informational purposes only. The creation and use as a bladed weapon is prohibited; according to Article 223.4 of the Criminal Code of the Russian Federation, it is punishable by imprisonment for up to two years!
List of materials:
— valve from the engine (inlet caught); - a piece of dry maple branch; - a piece of threaded rod and a nut; - Super glue; - oil or other wood impregnation. List of tools:
- hammer; — mini-horn (my homemade one); - an improvised anvil made from a sledgehammer and hemp; — belt grinder; — grinder (angle grinder); - drill. Homemade manufacturing process:
Step one. Forging
At first I welded pieces of steel wire to the rod as a handle, but over time they fell off. Then he worked, holding the workpiece with pliers.
Everything is forged easily with a light hammer. When the steel is heated to the forging temperature, it does not ring, so by hearing I determined at what point I should forge.
I forged the rod into the plate quite quickly and easily.
Step two. Grinding
I also drew the slopes by hand, they need to be made as flat as possible, the steel will withstand, and the knife will cut well even without a razor-sharpened blade.
Step three.
Hardening Step three.
Handle and final touches The knife looks good, in an ancient style, it also cuts quite normally, at the level of a household knife, I like it.
I also have another valve, this one is already an exhaust valve, but the stem there is much narrower, I don’t know if it’s worth messing with it?
This completes the project, I hope you liked the homemade product and found useful thoughts for yourself. Good luck and creative inspiration if you decide to do this again. Don't forget to share your ideas and crafts with us!
Attention!!!
This homemade product is posted for informational purposes only. The creation and use as a bladed weapon is prohibited; according to Article 223.4 of the Criminal Code of the Russian Federation, it is punishable by imprisonment for up to two years!
Become the author of the site, publish your own articles, descriptions of homemade products and pay for the text. Read more here.
Abrasive stones
Stones, like paper, come in different grain sizes. The most popular are 320,400 and 600 units. For proper grinding, experts recommend using Indian bench stones. This method has been used for a long time.
Stones are good for removing unevenness from metal. In the old days, sand and soil were used for these purposes. And for polishing, stones with a structure harder than the blade were used. The most popular stone for polishing is sandstone.
Materials for the manufacture of valves of the gas distribution mechanism of an internal combustion engine
The valves of the gas distribution mechanism of an internal combustion engine are subject to increased requirements, therefore, for their manufacture, a combination of various materials is used, as well as the use of special surfacing and coatings. Particular attention is paid to the development of valve steels and alloys that operate at temperatures above 580 degrees Celsius. For example, the intake valves of a KamAZ diesel engine are made of 40Х10СМ2 marten grade steel. Exhaust valves operating at higher temperatures are made of EP-303M (5Х20Н4А19М) austenitic steel. The working chamfer of these valves is made by surfacing with a VZK alloy of the “Stelit” type, which contains up to 60% cobalt.
In order to replace scarce additives, nickel-based alloys that do not contain cobalt (EP-649, EP-616, EP-615) have been introduced. The disadvantages of these alloys include a decrease in hardness at a temperature of 1300 degrees Celsius, in comparison with the VZK alloy.
The inlet valves of diesel engines (SMD-60, D-240, D-65N, D-144, A-41) are made of 40Kh10STM steel, and the exhaust valves of engines (D-144, SMD-60, A-41) are made of steel EP-616, and engines (SMD-14, D-240, D-65N) - from steel 40Х10СМ2.
Special requirements are placed on the material for the manufacture of exhaust valves of a carburetor engine, formed according to the speed regime, which is subject to maximum thermal and mechanical loads. For the valves of these engines, heat-resistant steel EP970 is used, which is no different from steel EP303.
Quick polishing by hand
Many professionals say that the polishing process is best done by hand. Movements are made carefully along the blade. With this tactic you can quickly polish the blade. But there are specialists who use a grinding machine.
The rapid rotation of the circles polishes the blade faster. But this does not mean that the quality is better. This method has its drawbacks. The surface of the blade is not always perfectly smooth. It may show rough waves or scratches.
If the scratches are in one direction, this can be quickly corrected. After rough processing, it is necessary to prepare a small piece of leather and a special polishing compound with a grain size of 1600-2000 units. This paste should be used for finishing, but by hand.
Have you tried polishing the knife?
Of course! Not yet...
Preparatory stage
To make an anvil with your own hands, you need to have a piece of crane rail, approximately 25 cm, a grinder, a welding machine, pieces of reinforcement of the same length, a piece of profile pipe (about 10 cm). Also, if a master needs a conical horn, then there are two options for getting out of the situation. In the first case, a grinder is taken, a cone is cut from a single piece of rail and a cone is machined. This is a very labor-intensive process, so it is better to use the second option and weld a ready-made cone, turned separately on a lathe. Next, start marking out future parts. When everything is thought out and measured out, you can begin the main work of making an anvil with your own hands.
Internal arrangement of the forge, main fixtures
The specifics of a blacksmith’s work involve the placement of characteristic devices in the workshop:
Construction of a blacksmith's forge.
- blacksmith's forge;
- anvils and speraks;
- correct slab;
- bending plate;
- vice;
- hammers, handbrake, sledgehammer;
- tools for cutting, sharpening, drilling, chopping;
- locksmith's workbench.
In addition, it is imperative to equip the forge with a container of water to cool the forging, which will always be at hand, and a fuel box with a poker and scoop. Ensuring fire safety dictates the placement of a fire extinguisher in an accessible place.
Mirror processing
Any knife will look attractive with a blade polished to a shine. To polish a knife blade to this condition, you will need special secrets. Each master has his own polishing methods.
Whichever option is used, the result should speak for itself.
To achieve an ideal surface, the product can first be sanded by machine.
And only at the finishing stage should you start polishing by hand.
Preparation at the grinding stage also plays a significant role in the final result. Handle grinding wheels with care. High machine speed can damage the product. The grinding wheel must be used with a soft surface.
Using GOI paste
The method of working at the finishing stage with GOI paste has been known to masters for a very long time. To polish a knife with GOI paste, you need to select the appropriate type of polishing material. It will depend on the grade of steel of the workpiece being processed.
Using GOI paste, metal, plastic and glass surfaces are polished. Previously, it was made from chromium oxide and was green in color. Today it is made of aluminum oxide, and its color has become red and white.
Horns
A blacksmith’s “work table,” depending on the type, may have one or two horns; their number determines the shape of the product. If only one is present, it has a cone-shaped, rounded configuration. In the case of two horns, one is rounded, and the second may have a pyramidal shape (more often called the tail).
The purpose of such an element is to perform the function of a mandrel on which bending of strips or rods is performed, as well as rolling or welding. If there is a second pyramidal one, then bending and straightening of blanks is carried out on it, or products of other complex shapes are forged.
Some types of anvils between the face and the horn have an unhardened part of the platform; metal is cut on it with chisels.
There is often a round hole near the horn and a square hole in the tail. A circle-shaped section (15-25 millimeters in diameter) is used for stitching workpieces (instead of drilling), a square section is a kind of installation point for additional devices (lowers). There may also be two round holes with different diameters (depending on the type of product).