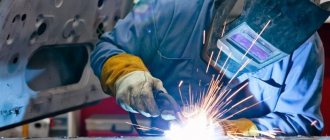
I have a grinding machine in my workshop. Occasionally I use it to polish some parts. The last purchased ribbon from the set recently broke. I didn’t want to go to the store for new ones, so I decided to make my own from sandpaper. It turned out, by the way, very well, so next I want to tell you about how to glue the grinder tape with your own hands and a little about it itself.
Source pinimg.com
How to choose a grinder belt
So, belts in the budget niche, which are represented by the products of the BAZ Belgorod Abrasive Plant, are quite cheap compared to others, which is logical.
These belts are very “aggressive”; they are designed for grinding hard, hardened steel.
This manufacturer also has ribbons with ceramics.
The disadvantages of these tapes are that they wear out quickly and also begin to heat up over time. On these belts, the metal dust that arose during processing cokes, which is why it begins to tear the grooves of the processed material.
Of course, this happens over time on all tapes, regardless of the manufacturer or the skill of the operator, but on these tapes it happens much faster.
Source ytimg.com
Higher quality abrasive belts are represented by products from ZM and VMS.
These companies even have entire series of belts and other abrasives for grinding machines, which are designed for full processing of the workpiece material, from rough scuffing to polishing.
When choosing an abrasive belt, keep in mind that the shorter the belt, the faster it wears out.
What you should know when choosing a tape
To obtain good polishing quality, it is necessary to navigate the grinder parameters, equipment characteristics and features of the surface being processed. When selecting a sample, it is necessary to analyze the following parameters:
- what type of product is needed (coarse, medium, fine or diamond abrasive);
- calculate the belt speed (it must withstand a shaft rotation speed of more than 1500 rpm);
- determine what abrasive resistance the selected specimen has;
- find out the value of the maximum permissible elongation and tensile strength (products with an indicator of at least 15% are considered good);
- on what basis the abrasive is applied (by what method and its composition);
- use the marking to determine the length of the tape;
- whether the width of the belt suits the dimensions of the machine used.
Calculation of parameters and assessment of the main characteristics of the grinder must be made before purchasing the product. This will get rid of problems that may arise when replacing it or using it incorrectly.
VIEW Grinding belts on AliExpress →
Adviсe
On the Internet, many non-professional machining workers using a grinding machine advise using belts with P24 abrasive grain for primary processing, since this is the largest grain for rough abrading of the material.
This advice is based on the opinion that large grains should, in theory, process the material faster, however, as practice shows, large grains work faster, and a belt with this grain shrinks and wears out faster.
Therefore, use belts with abrasive grain P36 or P40 during initial processing.
And buy a rubber pencil (it removes the remaining dust that cokes on the abrasive belt of the sanding machine), thanks to it your abrasive belt will last 2 times longer.
Source beauty-prof.com
Removing abrasive
If you do not first clean the abrasive on one of the edges of the sanding belt, you will not be able to properly glue the edges of the strip.
If you clean the abrasive poorly, then a bump will protrude on the sanding belt itself, and with intensive use in this place it will tear very quickly, and there will be decent runout.
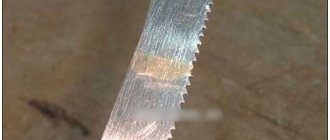
There are several ways to clean abrasives. For example, a piece of saw blade for a hacksaw will do.
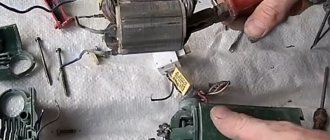
However, as practice shows. This can be done much faster using an electric sharpener (just be sure to work in a respirator and safety glasses).
Let's look at the most popular methods of removing abrasive from sandpaper, which are used by home craftsmen.
Iron method
Using an electric sharpener (sharpening machine) you can quite quickly clean the abrasive on the surface of the sandpaper, but still this method is not applicable in all situations - a lot of dust is generated.
And if there is no hood installed in your home workshop or garage and there is no way to properly ventilate the room, then you definitely shouldn’t use it.
Alternatively, you can try to clean the abrasive using a regular household iron. That is, in this case we will heat the sandpaper and then scrape it off with a knife.
The iron will need to be positioned with the sole facing up. To do this, we clamp it in the desired position in a bench vice.
After the iron has heated to the desired temperature, apply sandpaper to its surface and gradually clean off the abrasive using a knife or a piece of metal saw blade.
Removing abrasive with acetone
To make it easier to remove the abrasive manually - for example, using a regular knife, the surface of the sandpaper at the bend must be generously moistened with acetone and left for about 5-7 minutes.
During this time, the acetone will be absorbed into the sandpaper, and it will be much easier to remove the abrasive. Tested in practice.
The disadvantage of this method is that acetone has a very strong odor. It is better not to use acetone in a closed and poorly ventilated room - it may cause a headache.
If you need to glue 1-2 sanding belts, then it’s okay - you can be patient, but if there are several dozen belts, then it’s better to do the impregnation with acetone outside or with the windows wide open.
How to glue grinder tape
So, now about the most important thing - how to glue the grinder tape yourself.
If you decide to make an abrasive belt for a grinding machine with your own hands, then you will need:
- Sandpaper with the abrasive grain you need;
- DZ class PVA glue or “Moment” glue (ordinary PVA glue will not work);
- Hammer;
There are two types of gluing abrasive tape for grinders:
- Gluing the tape with an overlap;
- Butt gluing of tape;
Gluing overlapping tape for grinder
Overlapping gluing glues the tape very well; the likelihood that the tape is glued in this way is minimal.
The disadvantage of this gluing method is that at the gluing/joint site it “hits” the material. This drawback also has a logical pattern - the larger the grain of the tape, the less shock is felt on the stack.
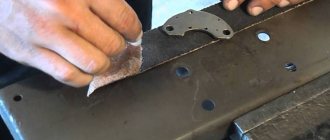
To glue sandpaper into a tape using the overlapping method, you need to remove the abrasive at the gluing site.
This can be done either on one of the ends, or on both at once.
If you remove the abrasive from one end of the tape, the tape will end up with solid abrasive grain along the entire length of the working surface, but the beating will be felt more strongly during operation.
If you want to glue the tape end-to-end, then you will not need to remove the abrasive from it, however, the strength and quality of the connection will be inferior to overlapping gluing.
Source delairukami.ru
Before gluing, you must prepare sandpaper with the required grain.
Place markings on it according to which you will cut the tape, and, in fact, cut the tape.
Next, mark the ends of the tape according to the template; the angle of the end of the tape is arbitrary, but should be in the range of 30-45 degrees. Then cut off the excess pieces.
Mark the place where you will remove the abrasive and bend it.
Use a knife to scrape off the abrasive from the bend of the tape.
Next, you need to remove the abrasive from the bent piece. This can also be done in two ways.
The first is using a solvent. It is necessary to apply the solvent to the back side of the tape, then give it a little time to dry and scrape off the abrasive with a regular knife.
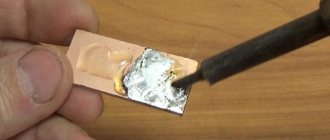
The second is with glue. The first step is to coat the abrasive grain of the bent piece with glue.
You should use DZ class PVA wood glue, as regular glue will not work.
Afterwards, you need to glue a piece of abrasive tape with glue applied onto the board or block, and then heat the gluing area with a regular iron.
Carefully tear the tape off the block so that the abrasive grain remains on the block.
The remaining grain is cleaned off the belt with a knife.
Next comes the gluing of the tape itself.
If you have cleaned off the abrasive grain from both ends of the tape, then they are both coated with glue, after which they are applied, pressed and heated with an iron for faster gluing.
If you cleaned the grain only from one end of the tape, then saturate the end without abrasive grain with glue, then place it under the second end of the tape and press it all the same way, and heat it with an iron.
At this stage, you can also use Moment glue; in this case, at the end you will need to tap the joint of the tapes with a hammer for better quality of the gluing seam.
Source delairukami.ru
Butt gluing
For butt gluing, you also need to prepare sandpaper, mark it, cut it, mark the joint, which should be at an angle.
However, after that you need to cut off a piece of special fabric - it can be silk-screen fabric, braid for gluing ribbons, silk, cambric, or even fabric from an old umbrella.
This piece is adjusted to fit the seam of the tape, after which it is impregnated with PVA glue of the DZ or “Moment” class, after which it is glued to the ends of the tape, pressed, heated and, in the case of “Moment” glue, tapped with a hammer.
Do not forget that the tape glued in this way is only supported by this fabric, which can tear and lead to injury.
Therefore, it is necessary to observe safety precautions.
Source delairukami.ru
I recommend the following video, in which the author shows how to properly glue abrasive tape for a grinder with your own hands:
Preparing the corners of the tape
To ensure that the sanding tape glued together by yourself does not tear during sanding at the first use, and generally lasts as long as possible, it is necessary to properly prepare the edges of the cut strip of sandpaper.
But let's talk about everything in order. First of all, the edges of the sandpaper need to be cut at an angle of approximately 30-35 degrees. Some craftsmen make an angle of 45 degrees.
After cutting the edges of the tape at a given angle, use a ruler to measure 2 cm, and then bend one of the edges. You will get a corner.
At the next stage, the curved edge of the sanding belt, which will be located at the bottom, must be cleaned of abrasive grain.
There is no need to clean the abrasive on the other side of the sanding belt, but it is advisable to remove a small chamfer at the very edge for high-quality gluing.
However, some home craftsmen remove abrasive from both sides of the tape at once in order to reduce runout when processing workpieces.
Before gluing, on the back side of the sanding belt (where the fabric base is located), you need to sand a narrow strip equal to the width of the bend at the opposite end of the tape - usually 2 cm.
As a result…
It is quite possible to make your own abrasive belts for such a useful tool as a grinder. To do this, you only need sandpaper with the required abrasive grain, PVA glue of the DZ class and some tools like scissors, a ruler, a pencil, a hammer and others. At the same time, homemade sanding belts will be in no way inferior to factory ones if done correctly.
Question
Write in the comments what you think is better for gluing homemade tapes - overlapping or end-to-end