Types of tachometers
The tachometer informs you about the number of crankshaft revolutions, which helps you determine at what point it is best to change gears. This makes it possible to increase the service life of the power unit and operate it competently, since the power and traction characteristics of the engine depend on the crankshaft speed. In addition, it can be used to accurately adjust the carburetor and other important idle speed components.
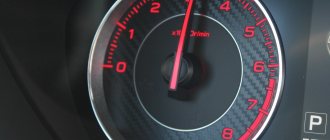
This meter can be analog, which is a display with arrows and numbers. When the needle approaches the red line, the driver must shift to a higher gear. On the digital device, information for the driver is displayed on a small screen (video author – Armadil).
Conventionally, devices can be divided into two types:
- Regular ones. They are installed at the factory that manufactures the vehicle. They place it on the torpedo.
- Remote. They are an alternative option if a factory device is not available. Remote devices have more accurate readings, so they can be used to check the accuracy of standard readings. Sometimes they are installed as tuning.
1. Standard device on the five
2. Analog device for cars
3. Remote car devices
The tachometer can be installed on both a gasoline engine and a diesel unit.
Device
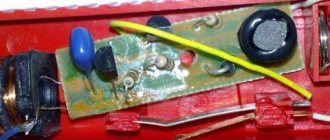
A car electronic tachometer consists of:
- digital display;
- microprocessor;
- microcircuits;
- control sensor on the idle air valve;
- counter (converter).
As already mentioned, the instrument readings are displayed on the display. The device is powered from the vehicle's on-board network with a voltage of 12 V, the current consumed is up to 120 mA.
Another advantage that a car electronic tachometer has over an analog one is the ability to combine various functions in one device:
- timer;
- alarm clock;
- odometer;
- voltage meter;
- contact closure angle meter (UOS) of a voltage breaker.
Before installation
Some car models (especially small ones) are not equipped with a tachometer as standard, so the owners of such models, more than others, need to receive important and objective information about engine operation. As a result, the car is equipped with an electronic tachometer. Car enthusiasts who are already accustomed to seeing a dial gauge on the dashboard can install a car electronic tachometer to obtain more accurate readings, implement additional functions or give the interior a more stylish look.
It is very important to note that electronic tachometers are offered for engines with different numbers of cylinders, which are indicated in its characteristics. When using the device in a vehicle with an engine with a different number of cylinders, there is a risk of receiving unreliable data.
When purchasing a car electronic tachometer, you need to familiarize yourself with its technical characteristics, and also check with the seller whether it is possible to install it on a specific car, since the reading algorithms for gasoline and diesel engines are different. There are also universal devices.
The installation method for an electronic tachometer depends on its size and design. You can fix it on top of the dashboard using double-sided tape, a bracket, or install it in a free space in the panel, perhaps instead of equipment (for example, a watch).
The principle of operation of the tachometer
Currently, tachometers are distinguished:
- Mechanical. A mechanical tachometer receives information about engine speed using a rotating cable mechanically connected to the engine crankshaft. Nowadays such devices are practically no longer used in cars;
- Electromechanical. The operating principle of electromechanical tachometers is based on the conversion of electrical impulses from sensors installed on the engine or from other electronic devices. These signals are converted into magnetic pulses that deflect the needle of the measuring device like a pointer voltmeter;
- Digital. Digital tachometers are used as part of modern computerized panels and are controlled by software and hardware. Self-installation of this type of tachometer is almost impossible.
How does a tachometer work?
To understand the principle of operation of the tachometer, it is advisable to first understand the functioning of the internal combustion engine.
Its task is to transform translational motion into rotational motion. A similar process occurs due to the expansion of gases in the combustion chamber and the further activation of special pistons, which force the crankshaft to move. The crankshaft rotation speed is recorded by a tachometer. In simple words, if you press the gas pedal, the volume of fuel supplied to the combustion chamber increases, followed by an increase in the crankshaft speed and an increase in the tachometer readings.
Ignition system for gasoline engines
Control of engine ignition processes can be organized by several methods:
- Distributor with one ignition coil;
- Distributorless with a dual (triple, quadruple depending on the number of cylinders divided by 2) ignition coil;
- Individual (for each spark plug).
In all cases, the coil receives a powerful pulse with an amplitude of 12V from a breaker (for cars before the 90s), a transistor switch, or directly from the engine control unit. It is from this point that the signal to the tachometer should be taken.
Models of electronic tachometers
Helios 148/360/361/500
They have a standard appearance. Designed for use on cars with carburetor engines, number of cylinders from 1 to 16. Mounted on top of the instrument panel.
The advantages of this series are the low price, as well as the maximum range of additional functions - almost all of the above, as well as a car parking timer and alarm simulation. The stated measurement error of the devices is quite low: up to 5 rpm. The models of the line differ in the control scheme (one or two buttons), the number of display segments (3–5), and the ability to change the brightness of the indicator.
Multitronics
Multironics DD5/DM10/DM20 tachometers are less versatile. Of these, only the first model has a clock and timer, automatic adjustment of display brightness as additional functions, the rest have only a voltmeter. The measurement error is slightly higher - at 2000 rpm it is 10 rpm, and at high speeds it is up to 3%. DD5 is also different in that it can be used for a wide range of engines - with 2, 4, 5, 6 and 8 cylinders, both gasoline and diesel. DM10/DM20 are intended for four-cylinder petrol engines only. For diesel engines, models DM11/DM12/DM20D are offered. These tachometers are also secured with double-sided tape.
Amphiton-219/250
These models are distinguished by their impressive appearance and display with color zones depending on the engine load. They are intended only for carburetor four-cylinder engines. Additional functions include a voltmeter, a battery charge level meter and monitoring the operation of the voltage regulator. Amfiton-250 is also equipped with a timer and UZSK. These models are larger than previous ones. Another disadvantage of this series is the limited measurement range: 400 – 5990 rpm.
Connecting the device
The operating principle of an electronic tachometer is based on reading electrical impulses. In gasoline units, pulses are read and supplied in a certain amount to the ignition coil. As for the diesel engine, reading is carried out from a special terminal located in the generator housing.
To connect the tachometer to a diesel engine, it is advisable to carry out work on a lift or use an inspection pit. At the initial stage, it is necessary to remove the protection from the generator, avoiding dirt getting inside the device. The next step is a visual inspection of the generator coil, which has several terminals. The tachometer contact (input wire) should be connected to the terminal that is usually marked with the letter “W”.
Also, in some sources it is recommended to additionally implement the closure of the contact that comes from the oil pump. This operation is performed to ensure that the tachometer gives correct readings after installation, as well as to eliminate other problems. It is noted that otherwise, after the engine reaches a certain crankshaft speed, a warning light may falsely light up on the instrument panel, indicating a critically low engine oil pressure in the engine lubrication system.
We also recommend reading the article about
. From this article you will learn why the efficiency of a diesel engine is higher compared to gasoline units.
If the terminal marked “W” is not initially present on the generator, then you will need to independently install a separate contact wire. The pre-prepared wire must be properly insulated. To facilitate access, the generator must be completely removed, as it will require partial disassembly. After disassembly, the wires (3 pieces) will become visible, going from the generator winding to the rectifier, which is also built into the device.
You can attach a prepared wire to any of these contacts, and then remove it outside the device body. When finished, the generator cover is put back in place and the generator itself is mounted back. It is imperative to ensure that during the assembly process the wire brought out does not come into contact with moving elements in the generator structure. Next, the tachometer wire is connected to the contact removed from the generator in the same way as when there is a terminal marked “W”. The remaining contacts of the tachometer are connected in accordance with the diagram contained in the instructions for the specific device.
It is also worth considering that directly connecting the wire to the tachometer will lead to incorrect values. Additionally, you will need a divider board, which will make the speed readings correct.
Excellent laser tachometer DT2234C+. Testing, comparison with an expensive analogue
Today we will review something quite useful for many people - the DT2234C+ laser tachometer. I'll also compare it to a more expensive tachometer from Uni-t. Disassembly is included. A household laser tachometer is used to calculate the rotation speed of various elements, can act as a revolution counter, find the maximum, average, minimum value, etc. The number of functions depends on the cost of the device and, as a rule, only the two listed above are present in inexpensive tachometers. What can they do at home?
For a PC: 1. Compare the fan rotation speed, which is produced by PWM rheobass, with the real value 2. When adjusting the fan rotation speed by voltage, watch the fan speed
For the home craftsman: 1. Watch the rotation speeds of drilling/milling etc. machines 2. Watch the revolutions for hand tools - drills, engravers, etc. 3. Use to count the revolutions of special tools - for example, when winding coils
In general, this is a useful thing for those cases when you are interested in the speed of something. Laser tachometers operate on the principle of recording a laser beam reflected from a surface and counting data. Structurally, they are made in the form of a lens (or several lenses) through which a low-power laser shines and a light receiver that receives reflected light through the same lens. The laser and receiver are located so that in the normal state (when there is no reflection of the laser beam), the laser does not illuminate the receiver. To clearly record the signal, the tachometer comes with reflective strips that you can stick to the surface of the device being measured. Stripes are not necessary if you have a clear separation of the reflected beam - for example, a black disk and a white stripe. Digital tachometers have good accuracy and are inexpensive. That's it in short. Why I bought it - I had a desire to make a revolution counter for a tabletop circular. I wanted to buy a kit - a laser/receiver unit with a cable to the main board, a rotation speed calculation board plus a display controller, a display on a cable. For some reason I was sure that such sets existed. Having spent half a day on Ali and not finding anything, I got angry and decided to buy the cheapest tachometer, so that I could then tear it apart and use it in my project. Well, I wanted the maximum number of positive reviews for the model, so that later it would not be offensive. This one was found. So, let's meet, DT2234C+
Everything arrived in a heavily dented box, but the tachometer itself was not damaged:
The box contains a carrying case. Quite convenient, by the way:
The case contains the tachometer itself, a set of reflective strips, and instructions:
Tachometer parameters:
RPM measurement
— 2.5 — 99999 rpm
Accuracy
— +-0.05% + 1 sign
Measuring distance
— 5cm — 50cm
Power
— 9V crown
Current consumption in operating mode
— 30mA
Measurement of minimum, maximum values
No backlight. The device does not have a continuous operation mode; to take measurements, you must press Test. After releasing the button, the device turns off. If you press Mem while the device is turned off, it shows the minimum, maximum, and last value in a cycle. Rear crown compartment:
The instructions say that if not used for a long time, it is better to remove the battery. Let's measure the current when the tachometer is turned off:
Current 10uA. With such a current, the battery can not be pulled out. Now the consumption is in working order. According to the instructions - 30mA
In principle, everything is the same. Now comes the fun part. Let's test the tachometer on real-life tasks. I have a CPU fan. I'll put a stripe on it. Will be compared with Uni-t UT373. This tachometer has more functions, more precisely, it has a backlight and coated glass optics
I’ll say right away that Unit-t made a terrible tachometer. Do not buy. It glitches in readings when measuring closely, gets confused when tilted at different angles, sometimes becomes dull and does not show the RPM value. So price is not always an indicator of quality. So, we glue the strip onto the fan:
We measure Unit-t:
We measure in Chinese:
As you can see, the values are very close. But, unlike Uni-t, the Chinese firmly holds readings at different angles, clearly works from 5 cm (corresponds to the instructions). The maximum distance when it was possible to measure the revolutions was more than a meter (with the passport 50cm)! I’m quite seriously thinking about tearing apart a Uni-t for a machine and using a Chinese one. Let's break it down:
Everything is as cheap as possible. The laser is simply soldered into the board without adjusting the focus, the receiver is the same. However, it works very well. By the way, the laser shines very strongly, clearly more than the safe 5mW. Then I'll dig into the board to see if I can reduce the laser current. I think this will be useful for continuous work. Since there's such a booze going on, let's take a look at Uni-t:
It can be seen that everything is done much better. The lenses are in a separate block with a mount; they are glass and coated. The receiver is in a separate plastic mount, like the laser. Those. From model to model, focus settings are maintained with good accuracy. The unit runs at 3AAA, which is also a plus. There is a backlight. However, all these advantages did not help this tachometer.
Conclusions - DT2234C+ is an excellent laser tachometer. Among the disadvantages, I would name the inability to work in constant mode and the lack of backlight
How to connect a tachometer to a generator
Study the repair and operation manual for your car. In it you can find instructions for installing and removing the standard tachometer on the injection model of your car.
Find out if there are standard dashboards with a tachometer for your car. If there are any, then the most ideal and simplest option is to purchase and install such a board to replace the one that is currently installed in your car.
To install a new instrument panel with a built-in tachometer, it is necessary to partially or completely disassemble the dashboard. Each car model has its own characteristics when removing the board. On some cars it is necessary to disconnect the entire dashboard, while on others it is enough just to remove the protective visor above the dashboard and unscrew the screws that secure the fasteners.
Differences in installation method
Unfortunately, many models, both domestic and foreign, are not equipped with a tachometer. And the measurements of the device are especially important for passenger cars, since it is the engines of small displacement and power that most often have to be tuned to the correct driving dynamics.
Today, the most common concept in the automotive market is the four-cylinder engine. All commercially available digital tachometers are designed for this engine size. If the engine in the car has a different number of cylinders, then the measurements of the digital device will be inaccurate.
The device can be installed using different methods. A remote digital device is installed on the dashboard - this device is preferred by drivers to add additional style.
A stationary car tachometer is integrated into the dashboard and, as a rule, is included as standard.
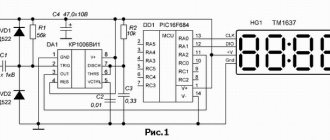
Tachometer with LCD display on microcontroller
There are two options - buy ready-made, or make it yourself. The second way will be within your power if you understand microcontroller technology and know how to program it. In other cases, it is better to purchase a finished product. Again, it should be noted that the VAZ 2101 wiring diagram will be slightly supplemented. First, you need to connect the tachometer to the positive terminal of the ignition switch. VAZ 2107 Replacing the heater radiator! In this video I will show you how to change the heater radiator on a VAZ 2107 car. Secondly, you will need to ensure that the pulses are read. This can be done in two ways:
- Take the signal from the ignition coil.
- Install the proximity sensor on the crankshaft.
The second solution will be more difficult, since you will have to upgrade the crankshaft pulley - you need to make a protrusion on it that will act on the contactless sensor. But taking the signal from the low-voltage output of the coil is a simpler solution.
Circuit diagram of a simple microcontroller tachometer
But you need to remember that during one revolution of the crankshaft exactly two flashes occur in the cylinders. Consequently, two signals will appear on the low-voltage terminal per revolution. This will need to be taken into account when making a tachometer for a VAZ 2101 with your own hands. VAZ 2105, VAZ 2106, VAZ and toe on the VAZ 2101 it is vertical as shown in. How to connect a 220 volt electric motor. In particular, at the stage of programming the microcontroller, this is necessarily taken into account in the algorithm. Which controller to choose is up to you. AtMega128, which has become a classic, will also do an excellent job. You can find a great variety of designs on it.
Testing, tachometer adjustment
If the car is equipped with a distributorless or individual ignition system, the tachometer can be connected to any coil. In this case, the readings of the engine rotation speed (rpm) will be inadequate, since an impulse is supplied to the trammel ignition every stroke, while the individual ignition is four times less likely. However, it is possible to calibrate the measuring scale in a new way.
At the first stage of testing, start the engine and check the performance of the system (arrow deflection at idle speed). As a rule, the speed in this mode is in the range of 800 – 1000 rpm.
Next, adjust the reading level. If the tachometer needle deviates slightly, you can connect an additional capacitor with a capacity of about 1 μF between the signal wire and the vehicle ground. On the contrary, if the arrow goes off scale, connect a variable resistance of about 1 kOhm to the open signal circuit and scale the signal.
The next stage is sea trials. With the engine running, the maximum speed is reached. The tachometer needle should not go into the red zone. Otherwise, the adjustment is carried out again. Before starting operation, check the reliability of connections and insulation again. And remember, additional equipment means new problems.
Checking the tachometer functionality
Everything is clear with the installation of the tachometer, thanks to the instructions outlined above. It remains to find out the reasons for the meter malfunctions. Sometimes drivers can observe a situation when the arrow begins to twitch from side to side.
There are several possible reasons for the malfunction:
- When the motor operates for a long time, the resulting vibrations can damage the device;
- faults associated with wiring: tips may become detached, contacts may oxidize, and insulation may be damaged.
These damages can be identified by visual inspection and repaired. If the sensor is faulty, it must be replaced.
( 1 rating, average 5 out of 5 )