When using a vehicle, no matter how carefully you drive it, various damages will still occur (scratches from branches, chips from stones, cracks and dents). Car polishing at workshops and services is not cheap, so you can do it yourself at home. After polishing, the machine acquires a new beautiful appearance and has water- and dirt-repellent properties. In addition, polishing has a positive effect on the paintwork of the body. Any paint coating fades after a certain time or defects appear on it. Polishing helps remove them, returning your car to its original shine and rich color. But in order for the result to exceed expectations, you need to choose the right polishing agent and paste. Polishing products include:
- Abrasive. When polishing with such compounds, scratches and cracks are eliminated from the surface of the body. But such products remove the top layer of varnish and varnish, so after abrasive polishing it is necessary to restore the surface. This polishing should not be done too often as it will remove the paint layer.
- Non-abrasive. They are designed to perform protective polishing. To ensure a respectable car, this process must be repeated periodically, at least once every 12 months.
- Silicone. They serve to fill the smallest imperfections and give the car a glossy shine. Most often they are used together with abrasives to consolidate the processing result.
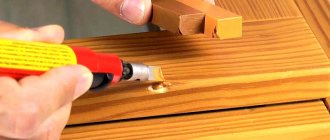
If you haven't purchased a special polisher, you can use a screwdriver with accessories. To polish a car with a screwdriver, the following materials and tools are required: screwdriver accessories, foam polishing wheels, abrasives (polish or paste), and final polishing paste.
Polishing a car with a screwdriver, necessary attachments.
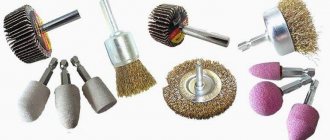
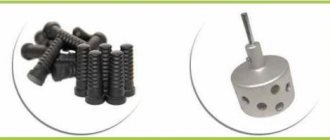
Typically, polishing a car with a screwdriver is done using the following types of accessories:
- Had tried. They are designed for cleaning surfaces before polishing and for final polishing of the body. Such circles are made from felt in the form of a cylinder or plate. Sheepskin accessories are used for final polishing of the body, as they give the surface a dazzling shine.
- Foam rubber. Keep in mind that the smaller the mesh on the ear pads, the softer the treatment will be.
- Nozzles made of leather or mugs made of fabric cord. Designed for cleaning surfaces before polishing. They are suitable for all surfaces.
Polishing the body with a screwdriver with your own hands, technological process.
Polishing a car with a screwdriver is carried out only after preparatory work. They start with washing and cleaning the car. It is best to purchase a specialized car shampoo, as it will help quickly remove any dirt (bitumen deposits, bird droppings, grease and oil stains, etc.) and wash away small grains of sand and dirt that can damage the paint layer. In addition, such shampoos cover the surface of the body with a protective layer and create radiance and cleanse the body. Therefore, every car enthusiast should have car shampoo.
Polishing the case with a screwdriver yourself must be done carefully. It is necessary to constantly monitor the condition of the paint and prevent overheating of the body surface. Be sure to remove dry varnish from foam discs, as dried varnish has a tough grain that can damage the enamel. If you ever damage your paintwork, it can be repaired by your local paint shop.
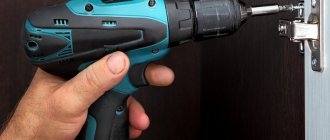
Polishing the case with a screwdriver is not a complicated procedure. First, apply an abrasive agent to the polishing wheel and to a small surface of the body and distribute the paste evenly. Polishing with a screwdriver is different from professional polishing, but this way you will significantly reduce the visibility of large defects and completely remove minor damage. Next, you need to use a special paste to smooth out the smallest cracks and scratches and eliminate transitions between areas. The big disadvantage of using a screwdriver is that it drains the battery quickly. The solution to this problem is to use two batteries and a charger. On the other hand, a screwdriver can be used for polishing hard-to-reach areas since it is small and compact.
If you doubt that you can polish the surface well yourself, contact our company. We will do all the work for you quickly and efficiently. Our specialists have extensive experience and professional skills, so we guarantee effective results. Our services, company information and grateful customer reviews are available on our website.
Polishing a car with a screwdriver, what is needed for this.
When using a vehicle, no matter how carefully you drive it, various damages still occur (scratches from branches, chips from stones, cracks and dents). Polishing a car in workshops and services is not cheap, so you can do it yourself at home. After the polishing process, the machine has a beautiful, updated look and has water- and dirt-repellent properties. And also, polishing has a positive effect on the paintwork of the body. Any paint coating fades after a certain time or defects appear on it. Polishing helps eliminate them, returning your car to its original shine and rich color. But in order for the result to exceed expectations, you need to choose the right polishing agent and paste. Polishing agents are:
- Abrasive. When polishing with such compounds, scuffs and cracks from the body surface are eliminated. But such products remove the top layer of paintwork, so after abrasive polishing it is necessary to restore the surface. This polishing should not be done too often as it will remove the paint layer.
- Non-abrasive. They are designed to perform protective polishing. In order for the car to look respectable, this process must be repeated periodically, at least once every 12 months.
- Silicone. Serve to fill the smallest defects and add a glossy shine to the car. Most often they are used together with abrasives to consolidate the processing result.
If you have not purchased a special polishing machine, you can use a screwdriver with attachments instead. Polishing a car with a screwdriver requires the following materials and tools: screwdriver attachments, foam polishing wheels, abrasives (polish or paste) and a final polishing compound.
Polishing a car with a screwdriver, necessary attachments.
Typically, polishing a car with a screwdriver is performed using the following types of attachments:
- Felt. They are intended for cleaning the surface before polishing and for final polishing of the body. Such circles are made of felt in the shape of a cylinder or flat. Sheepskin pads are used for final polishing of the body, as they give a dazzling shine to the surface.
- Foam rubber. Keep in mind that the smaller the cells on the foam tips, the softer the processing result will be.
- Leather tips or circles made of fabric cord. Designed to clean the surface before polishing. They are suitable for any surface.
Polishing the body with a screwdriver with your own hands, technological process.
Polishing the machine with a screwdriver is carried out only after preparatory work. They begin with washing and cleaning the vehicle. It is best to purchase a specialized car shampoo, as it will help quickly remove any dirt (bitumen deposits, bird droppings, grease and oil stains, etc.) and wash away small grains of sand and dirt that can damage the paint layer. And also, such shampoos cover the body surface with a protective layer and create shine and cleanliness of the body. Therefore, every car enthusiast should have a car shampoo.
Polishing the body with a screwdriver yourself should be done carefully. It is necessary to constantly monitor the condition of the paintwork and prevent overheating of the body surface. Don't forget to rinse off any dried polish on the foam pads, as dried polish is very gritty and can damage the enamel. If you suddenly damage the paint layer, it can be restored after a local car painting service.
Polishing the body with a screwdriver is not a complicated procedure. First, apply an abrasive agent to the polishing wheel and to a small surface of the body and smoothly distribute the paste evenly. Polishing with a screwdriver differs from professional polishing, but in this way you will greatly reduce the visibility of large defects and completely remove minor damage. Then, you need to sand down the smallest cracks and scratches and eliminate transitions between areas using a special paste. The big disadvantage of using a screwdriver is the rapid discharge of the battery. The solution to this problem is to use two batteries and a charging device. But the screwdriver can be used for polishing in hard-to-reach places, since it is small and compact.
If you doubt that you can polish the surface well yourself, then feel free to contact our company. We will do all the work for you quickly and efficiently. Our specialists have extensive experience and specialized skills, so we guarantee effective results. Our services, information about the company and reviews from grateful clients can be found on our website.
Source
Why do car headlights lose their attractive appearance?
No matter how well a car enthusiast cares for and protects headlight lenses, they can often be damaged by abrasive substances such as sand and small objects. This happens especially often when the car is moving at high speed.
The appearance of microscopic scratches gradually reduces the transparency of the glass. Its recovery when using rags or by washing is not observed.
If you wipe the surfaces of the car with rough and dry types of cloth, the damage may only increase, and the headlights will not perform their functions of illuminating the road efficiently.
Final polishing
A final polish will be required to achieve the factory-intended clarity of the headlight. It is carried out using a foam rubber circle, a sponge applicator and polishing pastes. The operation can be performed after varnishing, as well as without it.
- Moisten the polishing wheel with water and squeeze well.
- Apply a pea-sized amount of paste.
- Rotating the circle at low speeds, apply the paste to the headlight.
- Dry the surface.
- Polish in a circular motion.
If you use 3M brand pastes, then first take 4, then 5.
Finishing
The list of works at this stage is associated with the results of rough processing. If the protective layer is completely cleaned, then the surface is varnished, otherwise it will quickly turn yellow. If the protection remains, then it is enough to polish and finish the job.
Car Polishing Attachment for Screwdriver
Since vehicles are operated in open conditions, they are exposed to intense influences of all environmental factors. As a result, the body gradually loses its original properties. The paint and varnish coating is the first to perceive the negative impact. As a result, the car loses its visual appeal, and as the paint becomes damaged and destroyed, access is opened for the direct impact of the same factors on the body, which causes rapid damage to it by corrosion. One of the ways to protect and restore a car's paintwork is polishing.
Mistakes in choosing a polish
When polishing by hand, a special varnish is required. Polishes optimized for machine use will not be suitable. They have a finer consistency and are usually finer-grained abrasives. see also
How to quickly remove a sticker from a car: video Which polish to choose?
Experts from the German AutoBild conducted a study on the best polish and came to the conclusion that it is Koch Chemie Shine Speed Polish. An excellent “anti-scratch”, easy to use and easy to polish, the product is both cleaning and maintenance.
Types of polishing
Protective polishing is intended for vehicles with physically intact paintwork. Only a change in its color is permissible. Therefore, in most cases, such polishing is used for new cars. Its function is to protect the paint from the negative effects of the mentioned factors.
Abrasive polishing, also called restorative polishing, is intended for cars whose coating has defects in the form of cracks, chips, scratches and others.
The process of such polishing is much more complex and longer than protective polishing. This is due to some differences in work technology. Thus, restorative polishing involves preliminary removal of the top oxide layer of the paint and varnish coating and leveling out defects such as abrasions and scratches, while protective polishing consists only of applying the mixture. However, it must be taken into account that damage reaching the primer cannot be eliminated by restorative polishing.
Use ordinary rags for work
photo: Adrian Dascal / unsplash.com
Avoid polishing with ordinary rags: they leave behind micro-scratches, which will cause a lot of trouble over time. Use foam sponges with large pores, as well as special rags or napkins.
Microfiber has proven itself to be excellent for polishing paintwork: it effectively absorbs water and removes stains.
see also
Recommendations for removing scratches from a car body yourself
Cotton rags, as well as flannel or flannel, are used to apply polish, and for polishing it is better to use felt - an optimal replacement for more expensive napkins. Although mitten rags are expensive, the work progresses faster with them.
Choice of pastes or gels. How to polish a car.
In addition to polishing technology, no less important is the question of how to polish a car. By understanding the basics of manufacturing processes, you need to select polishing pastes, protective and restorative polishes. Polishing pastes are usually divided into powder and gel. The first type of paste is selected for hard surfaces with numerous damages and is polished with enamel to reduce the grain size.
Gel pastes work more carefully; they are used for sanding budget foreign cars with soft paint with relatively minor damage. Gel (paste) and aerosol (liquid) pastes in cylinders are used for different parts of the body. The gel paste is applied to a polishing wheel; it is convenient to process the side surfaces (doors, wings) of the machine. Aerosol paste is applied to the roof, hood, trunk of the car, then rubbed with a soft polishing wheel.
When using abrasive grinding pastes, keep in mind that the number of polishes is not infinite. Each varnish removes a layer of paint, sanding the car weekly will remove the paint throughout the year.
In the same way, abrasive polishing of a car is carried out after repairing car bodies and car shades. In this case, its purpose is to level the paint layer, remove paint stains, “slate skin”. After painting, it is better to use polishing gels.
You can see more details about how to properly polish a car in the video:
#Polishing headlights-1 or following the detailing lessons - Nissan Ti logbook >
This story is about.. this story is about how I decided to do things the smart way. Yes, it is not difficult to completely polish the headlights, as they should be.
— without polishing paste — without toothpaste
- no alternative methods or experiments with polishing, if not the only correct one)
The only caveat is that we replace the polisher (which is in the plans) with a screwdriver.
I did this: 1. Wash and degrease the headlight 2. Apply tape 3. Coat the entire surface with water (Radex 1000/2000/3000 mugs) 4. Dry the headlight before polishing 5. Using a screwdriver, polish with a slightly damp circle with Radex abrasive paste (number 23 , medium abrasive) at low speed 6. Polish at high speed
7. Wash away any remaining dough
The left headlight was/is
The right headlight was/is
Now the same thing in good quality
If you don’t look closely, everything is fine, the lighthouse is relatively intact. But close, oh...
Using the example of the left headlight, the texture of scratches in front
Scratch the texture after
Here you can see that the headlight has just started to fade and you need to repeat all the previous polishing steps, starting with a coarser grit (I think 400 or 600). As a result, I just haven’t polished for a long time / there weren’t enough turns / it’s all a joke, I need a polisher.
The hardest part for me with this approach was determining what maximum abrasive size was required. The fact is that theoretically it is possible to polish a large crack with finer sandpaper, but in practice this is very difficult to achieve. So I decided to start with 1000, there is nothing more yet. I can say that this polishing wheel removes marks from 1200 grit, which is much coarser.
Guys, if anyone knows how to select the size of abrasive according to the depth of the cracks, please share, I would be very grateful!
In short, there is almost no result, but there is a negative experience. I'll buy rougher leather and try again.
Ps In short, almost nothing is visible in the photos, only hair cracks and microchips are removed.
What to look for when choosing a polishing wheel
Sometimes polishing attachments are already included with polishing fluids, however, if the products are purchased separately, you need to take them into account:
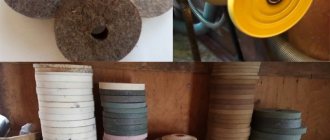
- Form. There are two types of discs: surface grinding (circular) and flap (cone-shaped). In order for polishing to be carried out as efficiently as possible, it is better to purchase products of several forms.
- Rigidity. This parameter directly depends on the type of polishing paste. If the liquid is used to restore the body, then it is necessary to select more rigid polishing wheels. To choose the right disc, just pay attention to its color: black ones are considered the softest, orange ones are medium hard and are suitable for all pastes, white circles are the hardest, so they are most often used to remove the most serious scratches.
- Diameter. It is better to purchase several discs of different diameters, then it will be more convenient for you to polish different parts of the car and hard-to-reach places. Large discs are usually chosen for polishing the body, and the smallest ones for headlights.
- Mounting type. The discs can be attached to a polishing machine or a regular drill in two ways: screwed onto a thread or fixed with Velcro. The latter option is considered universal, since you do not have to select discs based on thread diameter.
When choosing a nozzle for polishing a car, it is necessary to pay the greatest attention to the material of the sanding coating, since it will depend on it for what kind of work the wheel is most suitable.
How to polish a car at home
Naturally, at home you need to understand it in a dry, well-lit garage. You cannot polish your car on the street or in the yard, even in warm summer. Dust brought by the wind and fallen leaves instantly destroys the results of your work. Uneven drying in the sun of many types of pastes and varnishes is also important, which affects the quality of work and the overall appearance of the machine.
READ Bosch 125 Variable Speed Sander
Preparatory operations
Before starting work, it is necessary to clean the garage, removing as much dust as possible. Experienced auto mechanics do not recommend polishing a car at sub-zero temperatures or at high temperatures (more than 35-40 degrees). Before you start polishing, you need to perform a number of preliminary operations:
- Body washing (manual or non-contact);
- Removing stains and stubborn dirt (oil, bitumen);
- Bonding of decorative parts (chrome, nickel, rubber, plastic);
- Inspection of a clean body (choice of abrasives, grain size of polishing compounds depends on the degree of damage).
After washing, stains of bitumen and oil are clearly visible, which are removed manually with mild solvents, degreasers, and white spirit. No need to use screwdrivers or knives. Once the speck is moistened, it can be easily removed with a fingernail or a plastic card.
In order not to damage decorative elements (glass edging, moldings, mirrors), they are glued using adhesive tape. Professional polishers also remove nickel-plated door handles, but this is not recommended for beginners in their first experiments.
Experienced do-it-yourselfers polish the car windows while polishing the body. Technologically, the operations are slightly different (only in the composition of the pastes and protective agents), but as you gain experience, you can polish the glass yourself. It is better to close all windows on the first polishing attempt.
Restorative abrasive polishing of the body
Before you grind the machine yourself, you need to take care of the tools and consumables. There are two methods for abrasively repairing damage to a paint layer. Manual and mechanical (using a grinder). Experts advise beginners who are starting to work independently to first try abrasive polishing, which requires less material costs.
Protective polishes
After treatment with abrasives, restoration polishing pastes, filling microscratches, level the surface of the car enamel, correctly reflect light rays, which gives the paint a mirror shine. But restoring polishing does not protect the body from new damage. Protective polishes are designed to prevent minor paint damage.
READ Random Orbital Sander What is it for?
Manufacturers produce protective varnishes based on:
- Artificial and natural waxes;
- Teflon
- Wood resins;
- Silicon;
- Ceramics;
- "Liquid glass".
Before choosing a polishing paste for protective polishing, you should carefully read the instructions for use. Some of them can be applied to the machine by hand, others require the use of a mill.
The principle of operation of protective pastes is the same. They create a thin layer of paint that protects the enamel from ultraviolet radiation (paint burns less) and repels water, dirt and chemicals.
Simple soft pastes include waxy compounds that can be applied to the body with your hands and rubbed in with a special napkin. The car owner can apply preventive protection to the car body within an hour, but the soft paste can only withstand two or three contact washes.
Polishing protective pastes based on silicone and Teflon are stronger. They can withstand 30.40 washes, but you need to polish the car with a sanding machine with replaceable attachments. The polishing technology is similar to abrasive, but requires precise holding time depending on the drying of the protective composition.
For more expensive nanoceramic protective polishes, the hard outer layer is created by polymerized compositions containing tiny crystals of silicon dioxide and titanium oxides. A layer of polymer ceramics fills uneven paint, tightens microcracks, and protects the enamel from peeling. The protective properties of nanocreams increase depending on the applied layers of varnish (use up to ten layers). Professional polishers highly value ceramic varnish, NANO POLISH, CERAMIC PRO LIGHT, Restor FX varnishes. Determining the effectiveness of protective polishing is quite simple. If you pour hood water on the hood of a car, the liquid will accumulate on the surface in large drops.
Compositions under the common name “liquid glass” contain plastic solutions of silicon dioxide and sodium silicate, which, when cured, fill microdamages and uneven enamel. The mirror layer of silicon compounds obtained from quartz sand is heavier than automotive coatings, so it becomes a reliable and durable paint protection. After polishing, the car should not be washed for approximately two weeks until the protective layer has completely hardened.
By doing your own abrasive polishing, polishing your car with strong protective compounds will restore your car to its original appearance without the appearance of a new car. Protective polishing operations that need to be repeated once or twice a year will reduce the need for abrasive restoration.
Source
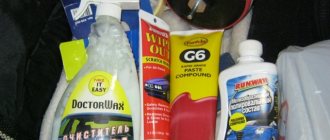
Materials and equipment
To complete the work, you will need to purchase a polishing mixture. Based on their composition, these materials are classified into several types, which differ in durability and other performance properties, which causes differences in cost.
Wax polishing mixtures are considered the least stable. They can only withstand 2-3 washes. This explains the low cost of these materials. Teflon polishes are more reliable and last up to 6-8 washes. They have protective properties against ultraviolet rays, water and oxidation. These substances provide special aesthetic properties in the form of wet shine and depth of color. Epoxy polishing mixtures, created on the basis of epoxy resins and other polymers, are considered very reliable. They last from six months to 9 months. They have dirt- and water-repellent properties and prevent the penetration of aggressive substances under the paintwork.
If you don't have a polishing machine
It’s good if you have a polishing machine, but those who have not yet acquired one use a regular drill. Most manufacturers provide polishing compounds with wipes as application tools. To speed up and simplify the work, you should use a polishing machine or drill. In any case, the device will require polishing wheels.
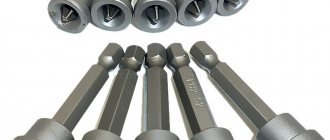
To polish these tools, prepare:
- drill with smooth speed control;
- polishing wheel 15 cm in diameter (for using abrasive paste);
- polishing mandrel with Velcro;
- wheel for regular polish (not abrasive);
- tape, napkins, rags, newspapers.
In addition, you will need sandpaper P1500 and P2500, a rubber scraper, and a water sprayer.
Preventive measures
It is best to prevent damage to the headlights, but to periodically carry out preventative wiping, which will increase transparency and remove minor imperfections on the surface.
To carry out such work, it is not necessary to contact a service center; you can do everything yourself.
The essence of preventive maintenance is that the headlight is effortlessly wiped with clean rags using non-abrasive and finely abrasive products.
As abrasive materials, you can use both special pastes (for example, GOI No. 1), creams, and improvised means (toothpaste does an excellent job).
Using this simple method will always keep your car's optical devices in excellent condition.
Everything is very simple - apply the product to a soft rag and polish the headlight with versatile movements (circular, linear).
How to polish wheels yourself
Having prepared the work surface and purchased all the tools listed above, the car enthusiast can begin to work.
The procedure is performed in accordance with the following algorithm, deviation from which can not only spoil the effect of the treatment, but also significantly damage the metal of the disc:
- First of all, you need to jack up the car and remove the wheels from the hubs, and it is also advisable to deflate the tires and remove them from the rim.
- The discs are washed using the maximum number of special products, since any oil stain during processing can subsequently react with the metal or paintwork.
- The old varnish must be carefully removed using a reagent, as a result of which bubbles appear on the surface, as well as subsequent treatment with a scraper for this procedure.
- If some areas of the varnish are preserved, the entire surface of the disc is sanded with a file or sandpaper, after which it is washed again and thoroughly wiped with dry cloths so that the disc is as smooth as possible.
- After completing the preparatory stage, it is necessary to fix the largest abrasive on the drill and begin grinding. As the surface becomes perfectly smooth and uniform, the discs need to be changed, reducing the grain size. As a result of a long operation, the metal will acquire a glossy shine, which will indicate the expected effect.
All categories
- Pregnancy, childbirth, motherhood
- Business, Economics, Finance
- Children's video lessons Aerobics for children
- Education with music
- Development of intelligence
- Child development
- Others (video lessons) Auto
- Diets
- 1C programs
- 3D Max
- ArchiCAD
- Java
- Second courses
- Bas-guitar
- Interior Design
- English language
- Children's
- Beading
- Billiards
- Ballroom dancing
Video: How to Polish a Car with a Screwdriver
For manual sanding of paints and varnishes you will need:
- Abrasive sanding leather (P-2000, P-2500);
- Water sprayer;
- Special napkins or cotton fabrics;
- Polishing pastes and polishes.
Body grinding operations
Before use, the sanding cloth is cut into small pieces and their edges are rounded so that sharp corners do not leave deep scratches. Hand sanding begins with a small area of the body, then moves away from it in different directions. Before grinding, the surface is moistened with water from a spray bottle.
The paint, impregnated with sandpaper, is sanded in two perpendicular directions, ensuring a uniform matte paint color. The process is repeated several times, wiping the water with a damp and dry cloth. After R-2000 leather, a second sanding can be done with P-2500 leather. After this, using a fine-grained sponge or plastic card, polishing paste is applied to the polished surface and rubbed with force using circular swabs with special swabs or napkins.
Polishing after sanding will be much faster if you use a sander. Instead of a machine, you can use an electric drill with a special attachment (only variable speed drills are suitable).
READ Bosch serie 6 handle broken
For mechanical polishing you will need to add the following tools to your initial kit:
- Grinding machine (with adjustable speed from 700 to 3000);
- Safety glasses;
- Grinding and polishing of discs;
- Mandrels for fastening discs of various thicknesses;
- Felt or fur sanding wheels;
- A hard brush for cleaning circles.
During the mechanical grinding process, the machine moves in a circular motion. Start at low speeds, being careful to rub in the polishing paste. Over time, the speed increases and the pressure decreases. They start working with pasta with large grains and hard circles. As a result of polishing, they are successively replaced by softer wheels and pastes with a low grain content.
Operating a sander requires proven skills, so before you start sanding your car body, you may want to practice using the removed body part. If the paste grain size, disk rotation speed and pressure are chosen incorrectly, car enamel can wear down to metal and burn out (rainbow spots of discoloration appear, paint swells). Particularly important places. Excess body, curly embossing on the hood, fenders, doors that need to be sanded with special care.
Preparing the tools
To polish your headlights yourself, you need to prepare:
- Grinding machine.
- Abrasive polishing compound.
- Materials to protect adjacent parts.
- Masking tape.
- Special shampoo.
- Protective varnish to secure results.
Polishing a black car quickly and easily using a Makita BO6050J sander! MYTH or REALITY?
You may also need a number of alternative tools in your headlight polishing kit:
- Grinding wheels and holders for them.
- Abrasive paste.
- Polishing pad made of foam rubber.
- Masking tape.
If you are a novice car enthusiast, do not strive to purchase a minimal set for polishing headlights, so as not to be disappointed with the results. You must have all the items that may be useful. For some experienced craftsmen, it is not difficult to work without using a polishing compound. They can only use one grinding machine and a set of attachments with sandpaper attached to polish headlight glass.
At the beginning of the preparatory work, keep in mind that if you purchase a complete set of tools for polishing headlights for the first time, its cost will not differ much from the price of budget headlights. Don't let this bother you.
Preparatory stage
Before starting polishing, you must select a work site. The best option is considered to be an enclosed space such as a garage, clean and equipped with an effective ventilation system. Good lighting should be provided. It is usually created from five lighting fixtures installed around the car. In the absence of such a room, work is carried out in open conditions in a shaded place at temperatures from 10 to 23˚C.
The car body must be prepared for the upcoming polishing. These works consist of cleaning it from all contaminants. The car needs to be washed thoroughly. To remove permanent substances such as bitumen, solvents such as white spirit are used. Areas that cannot be polished, represented by rubber, plastic, glass and chrome elements, are covered with tape and newspaper. When the car is completely dry, you can proceed directly to polishing.
Car Polishing Attachment for Screwdriver
What attachments are used to polish the body with a drill?
The appearance of a car often worries owners no less than its technical condition, which is why some people often polish the body. This not only allows you to give the car a representative look, but also additionally protects the paint layer from early destruction. Well-chosen drill attachments for car polishing will allow you to complete the work very carefully, ultimately obtaining an excellent result.
conclusions
Now that you have figured out how to choose the right car polishing attachments, you can easily carry out your first polishing work. Always remember that this type of work requires a delicate approach. It’s better not to take unnecessary risks and test the nozzle on another surface before use. So, by trial and error, you can create your own list of attachments that you will use in your work. Decide which material is preferable for you: foam rubber, sheepskin wool or felt. And always be mindful of the speed at which you polish the car.
However, to avoid mistakes that could have a negative impact on the condition of your car, it is better to give preference to professional detailing. Experts will quickly select equipment specifically for your case and return your car to its salon appearance without risk.
Source