The angle grinder (grinder) has become an integral part of both home workshops and large enterprises. No wonder. High productivity, wide functionality, high spindle speeds and relatively low weight have made angle grinders a leader in processing metal and other materials.
But progress does not stand still. New devices to expand the capabilities of the device are constantly appearing on sale. One of these adapters allows you to install a clamping chuck on an angle grinder. What will come of this and how to safely use such a tool is proposed to be considered in more detail in the context of this article.
- Adapter device
- Installing a cartridge on an angle grinder
- What you need to know about the grinder to use it in conjunction with the cartridge
- Areas of application for an angle grinder
- Safety precautions
Tools and materials
- electric cartridge,
- engine,
- plastic container for soap bubbles,
- sharp knife,
- hot glue,
- insulating tape,
- soldering device,
- toggle switch
Preparatory work
To make a housing in the lid of a jar of soap bubbles, use a heated soldering iron to make a hole with a diameter slightly larger than the diameter of the base of the drill. The bottom of the container must be removed. The core of the tool is made from a motor and a cartridge. An engine of suitable power can be taken from old equipment. Before attaching the engine and cartridge, they are degreased with acetone. Fastened by cold welding or hot glue.
Assembly
The work is carried out in several stages. First, the cartridge with the motor is placed in a plastic container made from soap bubbles.
The wires coming out of the electrical socket must be placed in the housing cover.
The cartridge is secured with hot glue, coating the side voids. Wait until the binder material dries.
The toggle switch is attached to the lid with glue, and the power supply wire is connected to it according to the standard circuit. If necessary, use an ammeter. Insulation is done with electrical tape or hot melt adhesive. The lid is screwed to the tube, and a drill is fixed on its reverse side.
Features of nozzles
Nozzles are used to carry out work on stone, concrete, brick and other surfaces. To ensure high efficiency, inserts based on metals with a high level of hardness are used.
Structurally, the cartridge nozzle includes several elements:
- fastening part;
- dust removal cavity;
- shank;
- spiral;
- core.
The faster the motor can rotate, the more efficiently the nozzle can move through materials.
Rotary hammer attachments are subject to increased quality requirements. This is due to the high power of the tool compared to a conventional drill. Therefore, the metal of the nozzles must withstand work in more difficult conditions and under heavy loads.
From a ballpoint pen
To make a drilling device from a ballpoint pen, no electrical elements are needed, and no skills in working with power tools are required.
You will need a ballpoint pen with an automatic mechanism, hot-melt adhesive, a stick with jumpers at the end that rotates the drill, and a drill of the required size. The main load falls on the body, so you need to choose samples made of metal or thick plastic.
Build process
The ballpoint pen is completely disassembled. A drill is inserted into the lower part of the body, from which the rod usually comes out. The shank is fixed into the hole on the stick. To ensure that the entire working structure of the tool becomes a single mechanism, the parts are fixed to the inner walls of the body with hot-melt adhesive. The drilling process will be performed through mechanical action on the stick, which serves as the handle of the device.
Information about payment methods
provides its customers with the opportunity to independently choose any of the payment methods offered below:
Payment in cash is carried out:
- When picking up goods at the checkout counter in a retail store. Including using devices that support contactless payments.
Payment by bank card is made:
- When picking up goods at the checkout in our store. Including using devices that support contactless payments.
- On the site, cards of payment systems such as Visa, Maestro, Mir and MasterCard are accepted for payment.
Security information when transferring data
Data transfer is carried out by going to the page of the authorization server of PJSC Sberbank of Russia, which determines whether you have the right to perform this operation.
All information received is strictly confidential and fully protected, as the SSL encryption protocol is used. No one can obtain your banking and personal data (except in cases provided for by Russian legislation).
When making a payment, you may be required to enter a password (in cases where your bank supports MasterCard Secure Cod or Verified By Visa technologies, which allow you to make a secure payment). It is suggested that you ask the bank that issued the card about possible ways to obtain a special password.
The Kangaroo store website supports 256-bit encryption. Payments are made in accordance with the requirements provided by the payment systems MasterCard Europe Sprl and Visa Int.
Cashless payment by invoice for legal entities:
- This is done by issuing an invoice to the buyer's email.
100% prepayment is required:
- When arranging delivery through transport companies.
- In cases of payment on the site.
- When purchasing construction, finishing and other materials that have the “custom order” feature.
- When issuing invoices to legal entities.
Toothbrush device
All parts of the brush need to be cut off, leaving only the body. Then you need to connect the shaft of the miniature motor with the drill using a collet mount. The collet clamp is purchased separately, taking into account the diameter of the engine shaft.
The chuck is suitable for shafts with a diameter of 2 mm. The brush motor has a smaller diameter. It is first necessary to grind each fastener to a cone-shaped shape. This will allow you to adjust the diameter of the engine shaft to the size of the cartridge mount.
The drilling machine can be made from a blender, electric manicure tool and other devices.
A mini-drill is sometimes equipped with a speed controller and other options.
The video shows how to make the equipment.
Among the advantages of a mini-drill, it is worth noting its compactness and low cost. In order to save money and not doubt the efficiency and reliability of electrical equipment, modern craftsmen have become adept at making power tools at home. With your own hands, today you can assemble a hand-held micro-electric drill, a high-frequency drill and more. How to make rotary instruments and components for them - read below.
Safety precautions
By attaching the clamping chuck to an angle grinder, we get a powerful, convenient, universal tool, which, if the owner is careless, can cause irreparable harm to human health. Pay special attention to this section - knowledge of basic safety rules can save you from serious problems.
- Grinders, due to their intended use, are not equipped with “ratchets”, like screwdrivers, or emergency stop systems (these are sometimes found on grinders). This means that any jamming of a tool mounted in a chuck will cause rotational motion to be transmitted to the body of the power tool, which can seriously injure the operator’s hands. It is advisable not to use powerful machines. If a person of average build can hold an angle grinder up to 800 W without any problems, then a 2.5 kW tool becomes uncontrollable when jammed.
- Use personal protective equipment (PPE). It is unfortunate to say, but our compatriots are very indifferent to this point. And this is with many examples of eye damage, hand injuries and the like. Probably, everyone who has worked with an angle grinder can remember more than one similar incident that happened to them or their friends. Don’t be lazy to use glasses, gloves, headphones and, if necessary, a respirator.
- You must also understand that the tool contains parts rotating at high speed, capable of instantly wrapping around any material that falls within their range of action. For this reason, protective clothing is required with sleeves that fit tightly to the wrists. Torn workwear with hanging parts is excluded. It is prohibited to work in three-fingered gloves. If necessary, use work gloves made of genuine leather or a substitute.
- An adapter plus a chuck with a clamped tool will significantly shift the force vectors during work. This means that your angle grinder will behave completely differently compared to traditional use. Having installed this attachment, you first need to adapt to the new dynamics in the operation of the power tool. Moreover, each replacement attachment will add innovation to your work. The first time, start at minimum speed, gradually increasing it.
Safety regulations are not something special. In principle, they are applicable to almost the entire line of hand-held power tools.
In conclusion, one thing can be said - any serious master tries to expand the capabilities of his instrument. In the case of an adapter for a cartridge, the functionality of the angle grinder increases incredibly, but it’s even more fun to figure out how else you can use such equipment.
DIY hand drill: manufacturing instructions
A small electric drill is a must-have for anyone who makes electronic crafts or does delicate decorative work. This machine is ideal for performing small work on wood, plastic and metal, and drilling printed circuit boards.
You can assemble a mini-drill at home from a chuck, a jar of soap bubbles, a motor for rotating the chuck, and a battery.
The motor can be taken from a hair dryer or grinder. An electric motor from a VCR or a motor from an old cassette recorder are also suitable for making crafts.
To make an electric mini drill you need:
- Connect the cartridge to the motor. This is best done using cold welding. But you need to work quickly and carefully: the weld quickly hardens and becomes as strong as iron. If it fails, it will not be possible to redo the connection.
- Place the cartridge in the jar. For better fixation, the cartridge must be treated with hot glue.
- Make a hole in the second base for the switch. It’s better if the switch is small and keyboard-based.
Read also: Design resistance of steel c255
To make a drill with your own hands, you should study the theory and watch a training video
The hand micro drill is ready! All that remains is to solder the wires from the motor and power to the switch, observing the polarity. To power the mini-drill, 9-12v batteries will be enough. Additionally, you can do reverse on a six-pin switch.
How to make a chuck for a mini drill
Everyone knows that a drill is a very useful and versatile tool on the farm. If you have a drill at home, you can hang a picture on the wall, straighten furniture, and repair a number of necessary items. But what should you do if you don’t have a drill at home, and constantly asking your neighbors is somehow inconvenient?
You can buy it in a store, but this device is very expensive. Or you can assemble a mini-drill with your own hands using scrap materials that are found in almost every home. We will tell you how to do this in this material, presenting to your attention several simple ways to assemble a mini-drill with your own hands at home.
Mini drill made from an electric chuck
The first option for assembling this device with your own hands is based on the use of an electric socket , which can be purchased separately, or taken from a light bulb. If you buy it, it is very inexpensive, but the cost will be justified.
Also, to assemble a mini-drill with your own hands from a chuck, you will need the following things:
- motor;
- a jar of soap bubbles;
- construction knife;
- insulating tape;
- hot glue;
- blowtorch;
- household switch.
Mini drill body and core
Work must begin by preparing the body of the mini-drill, which will serve as a soap bubble jar . This is done like this:
- Prepare a jar lid. To do this, heat up the soldering iron and use it to make a small hole in the lid of the jar.
- The diameter of this hole should be slightly larger than the diameter of the drill base.
- The bottom of the jar must be completely cut out.
Let's start working with the core:
- We connect the cartridge with the motor. Most often, motors are taken from different tools that have already been used.
- Before the bonding process, the motor must be completely degreased using acetone.
- The cartridge can also be degreased, but there is no need to water it like a motor with acetone. Regular wiping will be sufficient.
The fastening method occurs through cold welding . If this method does not suit you, you can also use hot glue. Remember that the more complex your future mini-drill, the more materials you will need to assemble it yourself.
When planting with welding or glue, you need to work extremely carefully so that everything turns out as smooth as possible. It will not be possible to redo the work later, keep this point in mind.
You also need to consider the following:
- at the mounting location on the cartridge there is a hole that needs to be covered before connecting the parts;
- putty is carried out using simple plasticine;
- Only the holes should be filled with plasticine; there should not be any left on top of the cartridge.
Manufacturing process
When you have prepared the body and core, you can begin directly assembling the drill with your own hands:
- Place the cartridge with the motor connected to each other in the jar. This must be done so that the wires that stick out from the socket are then placed in the lid of the jar.
- When the cartridge fits completely into the jar, lock it. To do this, fill the voids on the sides with hot glue and wait until it sets completely.
- Attach the switch to the cover and connect the power wires to it. It can also be placed on glue.
- We connect all the wires to the switch; the connection diagram is standard. You can use an ammeter for accuracy.
- After connecting the wires, they need to be insulated using electrical tape or hot melt adhesive.
- Screw the lid onto the jar and attach the drill to the other side.
The good thing about a ready-made mini-drill is that it can run on both batteries and electric power. We considered the option of assembling a universal model .
Naturally, without having the skills to work with electricity, it will be extremely difficult to assemble such a drill with your own hands. Below we suggest you consider options for assembling simpler drills for small household needs.
How to assemble a drill with your own hands based on the handle body
One of the options for the simplest drill is a homemade device based on a regular ballpoint pen.
To make it you will need the following materials: ballpoint pen ; drill with the required diameter; hot glue; a durable stick with handles at the end that can be used to rotate it.
Pay special attention to the choice of handle for the manufacture of a future drill, and specifically to its body, since during operation the main load will fall on the body.
The requirements for the handle body are:
- it must be as strong as possible to withstand loads;
- the best option is a body made of high-quality metals;
- If there is no pen with a metal body, choose a pen with a thick plastic base.
The build process looks like this:
- Disassemble the handle until only one body remains.
- The lower part of the body, where the writing rod usually sticks out, needs to be unscrewed.
- Instead of this part, insert a drill into the body in such a way that its working part sticks out from under the lower part, and the second part is inserted into the hole that is in the stick.
- The stick is inserted into the body at the same time as the drill.
- To ensure that the structure of the drill is complete, it is fixed to the wall of the housing using hot-melt adhesive.
- When you twist the mechanism using the special handles, the drill will rotate, providing the desired work by pressing the handle body.
Making a drill using a toothbrush
Electric toothbrushes are very convenient to use, but impractical in the sense that the bristles on them cannot be changed and after use, this expensive device, like a simple brush, has to be thrown away.
But you don’t have to do this, using the body of an electric brush to make a drill with your own hands.
We take an old electric brush and cut everything down to the body. Next, you need to connect the motor shaft to the drill using a collet clamp, which must be purchased separately.
When purchasing a collet clamp (or chuck), be sure to find out in advance what the diameter of the motor shaft in the brush is. The motors differ from each other in the diameter of the mounted shaft.
The collet clamp is inexpensive and can be purchased on the radio market or in a specialized online store. It includes a chuck and interchangeable drill bits with different diameters that are inserted into the chuck.
The most difficult thing in this case is to put a collet clamp on the brush motor. The cartridge is designed for a shaft of 2 mm, but the motor here has a smaller one. To do this, each screw for fastening must first be sharpened until it is given a cone-shaped shape so that the minimum diameter of the cartridge mount can be adjusted to the diameter of the motor shaft.
Of course, you can assemble a mini-drill with your own hands not only using brushes or old handles , but also other devices; folk craftsmen come up with new ways to assemble them every day. However, the options discussed above are suitable even for those who have never encountered anything like this and are assembling such devices for the first time in their lives.
- Alexander Romanovich Chernyshov
Do-it-yourself collet chuck: components and manufacturing procedure
The question of how to make a collet clamp with your own hands is relevant for those who are engaged in jewelry making, engraving or printed circuit board manufacturing and use such equipment. It is specialists in these categories who most often encounter breakage of the collet clamp, which can be replaced with a new production model or made with their own hands.
Homemade collet chuck turned on a lathe
There are several options for making a collet chuck with your own hands, each of which has certain nuances. However, no matter what method is used to make a homemade clamp, its price will compare favorably with the cost of a serial model.
Homemade collet coupling of the simplest design
The simplest collet, operating on the principle of a coupling, can be made of steel wire with a diameter of 1 mm.
It should be borne in mind that the collet of the proposed design is not a universal clamping device and can only be used for drills of the same diameter.
It is important that the transverse size of the drills used corresponds as closely as possible to the diameter of the output shaft of the drive motor. In addition, it is important to consider that such a collet can only be used when drilling materials with low viscosity.
DIY collet chuck
A collet (or clamping) chuck for a mini-drill is an adapter device used to clamp drills, which is attached to the output shaft of the motor. The mini-chuck allows you to use drills with a diameter of up to 3 mm. The smallest homemade drill can work with drills with a diameter of 0.7 mm.
The quality of the drill’s operation depends on the quality of the chuck and the attachment of the drill to the motor.
Therefore, the choice of clamp should be approached with all responsibility. And if a high-quality device cannot be found, it can be manufactured quite simply. In this case, you will not need to use a lathe. To make the clamp you only need an M8 screw and a closed M8 nut.
Making a collet clamp for a mini drill:
- We drill a hole with a diameter of 2 mm in the screw head;
- We take a hacksaw and apply two axial cuts to the screw body;
- In the closed nut, drill a hole with a diameter of 2 mm exactly in the middle;
- Using a larger drill, expand the hole in the closed nut to 3.5 mm;
- We make a cone out of the nut by connecting it to a regular drill and grinding it using sandpaper.
The collet is ready! Now you can insert a drill of a suitable size into the bolt and screw on the nut. To make using the drill convenient, you can make a collet for each micro-drill. A special drill stand will also help you do quality work.
Installing a cartridge on an angle grinder
To install the cartridge on the angle grinder, you must perform the following steps:
- An adapter is screwed onto the “bare” spindle of the angle grinder
- A cartridge is screwed onto the other end of the adapter
- Having previously loosened the jaws of the drill clamp, screw in the additional fixation bolt. This operation can be conveniently performed with a screwdriver with a magnetized tip.
Note! All threaded connections must be tightened immediately. Since the system “self-tightens” during rotation, it is necessary to exclude free movement along the thread during the starting jerk. Otherwise, a high-speed machine is capable of tightening the threads to such an extent that the lock on the angle grinder can be broken when unscrewing. If excessive clamping occurs, then it is better to disassemble the angle grinder gearbox and unscrew it, having first clamped the gear in a vice.
What you need to know about the grinder to use it in conjunction with the cartridge
Before ordering this adapter, it is advisable to familiarize yourself with some features of angle grinders:
- Spindle speed
Depending on the model, the rotation speed on the angle grinder spindle can range from 6 thousand to 12 thousand rpm. Compared to a conventional drill, this is, to put it mildly, a lot. For normal operation of the drill, an average of 300–900 rpm is required.
- Availability of speed controller
Many manufacturers equip their products with a speed controller. In some cases this is simply necessary. For example, when using a Velcro disc for fabric-based abrasive wheels or when working with fiber wheels. Such modifications are the most suitable for installing a drill chuck.
If you decide to install a cartridge, then these features must be taken into account. Without a speed controller, using an angle grinder instead of a drill, we get an excellent “drill killer”. By the way, if you have the necessary knowledge and skills, it is possible to install the speed controller yourself.
Do-it-yourself drill for small jobs
The drill has long ceased to be an exclusively professional dental instrument. Today, a drill with a flexible shaft is actively used to perform small decorative work, grinding, polishing, and cutting various products.
You can make a rotary drill with your own hands, similar to a mini-drill.
At the same time, it should be taken into account that for high-quality work of the homemade product you will need a fairly powerful motor. So, an 18V motor from a screwdriver is perfect for powering drills. The easiest way would be to make an engraver from an old blender.
To make a drill you will need:
- Disconnect the top part of the blender from the working part;
- Using a utility knife, remove the rubber cover on the button and use a screwdriver to unscrew the bolts located under it;
- Using a screwdriver, from the side of the power cable, pry up the top cover of the case and carefully remove it;
- Remove the circuit connected to the power cable from the blender body;
- Remove the plastic part located above the rotator from the housing;
- Remove the plastic tip from the electric motor shaft;
- Measure the diameter of the shaft with a caliper (if you don’t have one, a ruler will also work for this purpose);
- Clean the electric motor housing from oil and degrease its surface using an alcohol wipe;
- Place a collet chuck of the appropriate size onto the shaft;
- Replace the power button with a push mechanism that controls both turning the device on and off;
- Assemble the blender.
Parts for making a drill can be found at a flea market
The hand drill is ready! Such a tool will be powered via a power cable with a plug. You can power the tool with batteries, but then the batteries will have to be changed or charged from time to time.
Areas of application for an angle grinder
At first glance, this “application” may seem completely unnecessary, since it has very limited functionality. But is it? We present to your attention ways to use an angle grinder with a chuck.
- Drilling in hard-to-reach places is possible thanks to the angle grinder gearbox. An angle grinder complete with a chuck requires much less working space compared to a drill.
- If you have a speed regulator, you can attach a screwdriver bit to the chuck, which will also allow you to reach hard-to-reach places.
- By clamping the socket wrench holder into the chuck, we get a good impact wrench. A speed controller is required.
- If you attach an abrasive cutter in the cartridge, you can clean hard-to-reach places. It is noteworthy that this device will work much more efficiently than with a simple drill. In this case, high speeds decide everything; the device can be used without a speed controller.
- If you attach a flexible sleeve with a collet under the engraving cutters, you will get a powerful drill. You can attach engraving attachments directly to the chuck, without using a flexible extension.
- The chuck can also be used to fix a woodworking rolling cutter. There are several options: a) you can additionally make a movable base plate - as a result, we get a full-fledged manual rolling machine; b) in addition to the above improvements, you can rigidly fix the angle grinder with the chuck facing upwards - you will get a stationary router. 10 thousand rpm is the optimal indicator for a milling machine.
- By clamping the diamond cutter, you can process the stone, but then you will definitely need to adjust the speed.
The listed use cases are far from the limit. Here the master’s ingenuity comes first. But, as you can see, the speed controller is very useful for this layout. Often, regulators installed on angle grinders at low speeds do not ensure stable operation of the power tool. It is advisable to purchase a universal regulator (dimmer) combined with a power outlet. Moreover, this device does not have a high price. For those who are comfortable with a soldering iron and have basic knowledge of electronics, there are many simple and original circuits. Sometimes homemade products are much superior in performance to products from the Middle Kingdom.
Do-it-yourself flexible shaft for a drill
If you need to transfer the rotation of the motor of an engraver, drill or bur to an attachment, then you will need a flexible shaft. This device consists of a wire enclosed in flexible armor, twisted in several layers, and
can significantly expand the functionality of a rotary instrument. You can assemble the flexible shaft yourself.
For this you will need:
- Brass tube;
- Two M4 threaded bushings;
- Electrode shaft (diameter 5 mm) with M5 thread;
- Adapter from internal thread M5 and external thread M8 to 0.75;
- Mini quick-release chuck;
- Clamp made from an M12 bolt drilled along the axis;
- Protection for connection.
Read also: The simplest do-it-yourself switching power supply circuit
Assembling the flexible shaft. To do this, insert an electrode shaft into the brass tube and put M4 bushings on both sides of the tube. On one side of the tube we screw an adapter onto the sleeve, and onto it a mini-cartridge. On the back side of the tube we place a clamp, with which we connect the shaft from the electrode to the flexible one. For convenience, you can sand down the heads of the screws on the clamp. We put a special brass protection on the clamp and secure it with fasteners. We isolate the connection. The flexible shaft is ready! For convenience, a clamp with a plastic handle can be placed on the cartridge side.
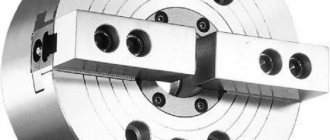
Adapter device
Actually, the adapter itself does not present any particular structural complexity. As a rule, it is machined from a hexagon for easy fixation with an open-end wrench during installation, and especially removal. On one side there is an M14 internal thread. It is designed to be screwed onto the external thread of the spindle of an angle grinder. The other end is machined with a standard M12 external thread corresponding to the thread of the clamping chuck. A hole was drilled at the end and a left-hand thread was cut for a bolt for additional fastening.
Attention! The M12 cartridge thread standard, although the most common, is far from the only one. When choosing an adapter, pay attention to the markings of the selected cartridge; at least you may come across a couple of standard thread types: M12×1.25 and 1/2 - 20 UNF.
There are also conical drill-angle grinder adapters for the corresponding chucks with conical fixation.
How to make a dynamo from an old printer motor
A dynamo is a device that converts mechanical energy into electrical energy. The operation of the dynamo is based on the principle of electromagnetic induction. That is, an electric current arises in a closed circuit of a device when the flux of the magnetic induction vector penetrating the circuit changes over time.
In other words, a dynamo is the simplest direct current generator.
In everyday life, a dynamo can be used to charge audio and video equipment, a smartphone and other low-power gadgets (for example, fitness bracelets, tablets, a toy robot, etc.). In addition, the device is perfect for powering bicycle headlights, LED strips, hand-held flashlights and other devices powered by single-phase networks.
To assemble the homemade product you will need:
- Motor (electric motor) from an inkjet printer;
- Belt and gear from the same device;
- Handle with comfortable, non-slip grip;
- Two small wooden bases;
- Four 10,000 µF capacitors;
- Diode;
- Metal corners and fasteners;
- Wires and solder.
Before making a dynamo, it is worth drawing it on paper
Making a dynamo is quite simple. To do this, you need to connect the capacitors in parallel, output the phase from the capacitors through a diode to the electric motor, and connect the zero of the capacitor through a jumper to the zero of the electric motor. Wires for connecting electrical appliances should be routed from the capacitor connected to the diode, observing the polarity. After this, you should place the entire structure on the base, fastening the electric motor to a second wooden plank so that the pulley sticks out of it. On the pulley side, place the gear with the handle and cover them with a belt.
DIY micromotor
Micromotors have found wide application in the construction of small flying objects (for example, models of microhelicopters and airplanes). The micromotor itself is a brushless DC micromotor.
You can make a micromotor from an electromagnet from the vibration pad of an old mobile phone.
For the rotor axis, you can use a drill with a diameter of 0.29 mm. To make a motor, you need to carefully wrap copper wire around the drill in two passes. The length of the winding should be several mm longer than the length of the electromagnet.
After this you need:
- Apply a thin layer of epoxy resin to the winding for gluing metals, and put an electromagnet on it;
- Make two bushings from fluoroplastic, and put them on the electromagnet on both sides;
- Place the structure on the guides under the winding and wrap it with copper wire.
The micromotor is ready! All that remains is to install valves on it and connect it to power via a microchip with 5 inputs. Instructions for making interesting crafts from motors are offered by Roman Yursi on his channel.