The unpredictable behavior of the heating element in a Chinese glue gun has become the talk of the town. The service life, according to information from Internet users, varies from a few seconds after switching on to five years of proper operation. About the power of the heating element, we came across statements ranging from “virtually does not heat at all” to “heats quite satisfactorily.” This was the reason for the curiosity that arose, which prompted me to buy, first, an inexpensive Chinese glue gun for the purpose of “opening it and looking.” That is, thoroughly familiarize yourself with the design of the device, and that’s all. I didn’t take any glue sticks; I probably won’t need them.
How to replace the heating element in a glue gun
The unpredictable behavior of the heating element in a Chinese glue gun has become the talk of the town. The service life, according to information from Internet users, varies from a few seconds after switching on to five years of proper operation. About the power of the heating element, we came across statements ranging from “virtually does not heat at all” to “heats quite satisfactorily.” This was the reason for the curiosity that arose, which prompted me to buy, first, an inexpensive Chinese glue gun for the purpose of “opening it and looking.” That is, thoroughly familiarize yourself with the design of the device, and that’s all. I didn’t take any glue sticks; I probably won’t need them.
Purpose of a glue gun
A multifunctional soldering and thermal tool is the main accessory for needlewomen and woodworkers. The main purpose of the gun is to connect elements, seal seams and joints with a special adhesive composition.
The tool is considered indispensable when performing work in hard-to-reach areas where using stationary equipment is problematic.
Glue gun diagram
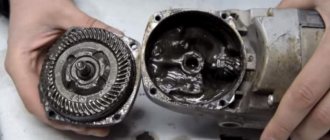
And now the melting chamber with a heating element installed on it appeared to the eye. Looks like a small jet turbine.
The clamp and thrust pad have been removed. Here is the heating element itself. I note that at the installation site it lay flat, in the center and was in direct contact with the body of the melting chamber with only one of its planes.
I unwrap the rather careless packaging - an insulator. Inside there is simply a miniature ceramic heating element and two contacts for supplying 220 volts to it.
I took a closer look at the heater and rang the two sides with a multimeter. They call, but not everywhere. The darkening visible in the photo at the bottom is present on all sides and completely covers the adjacent end side. It doesn't ring. This is a ceramic coating on top of the heating element. Designed for direct contact with the body of the heating chamber and transfer of heat generated by the heater, without placing a dielectric spacer between them. This spraying is the dielectric gasket. It became clear that the heater was installed incorrectly by the manufacturer. He was lying on his side, and was also wrapped three times in insulating material. According to the existing dimensions of the heaters, 4 of them will fit on the installation site.
Guided by common sense (as far as God has given), I began to correct the manufacturer’s “jambs”. The dimensions of the contacts were brought into line with the dimensions of the ceramic heater. Exactly in length, and 1 mm less in height.
I made a millimeter-long bend at a right angle to prevent the contact from sliding down onto the body of the heating chamber.
This is how the contacts assembled with the heater began to look (top view).
The assembly resistance (located inside the clothespin) turned out to be 6 kilo-ohms. It immediately became clear that the 20W declared by the manufacturer would not be even close to being confirmed.
Exactly according to the dimensions of the ceramic heater, I cut out two copper plates 2 mm thick. It is necessary to somehow fill the void at the installation site and take heat from the sides of the heater.
The cut was made to allow the sides to be compressed. This will add reliability in holding the heater in place and is intended to improve heat transfer.
Sectional installation diagram. In the figure there are gaps between the individual components, but in a real assembly there should not be any.
Assembly completed. The heater without a gasket stands on a designated plane (end) covered with dielectric coating, with current-carrying contacts on the sides, then four layers of mica on three sides (taken from an old burnt soldering iron), and copper plates on the sides. The seal is the insulator on the right made of asbestos. I had a piece on hand and it seemed that it would be more reliable.
Here you can see that the sides are already pressed against the copper plates and hold the entire assembly, the ceramic heater is directly in contact with the wall of the heating chamber, and the electric. contacts are far from her.
The last thing to put in place is the clamp. The junction of the wires with the contacts must be insulated with ceramic insulators or something that fully replaces them.
After assembly, the first thing I did was measure the current consumption. When turned on, within a few seconds, there is a gradual current jump of 80 - 120 - 210 mA, then a sharp jump down - 20 mA. Mains voltage 225 - 230 volts x 0.02 A = maximum 4.6 W. And on the front panel of the gun, in plain sight, there is a nameplate indicating a power of 20 W. The glue gun will actually have the stated power if you install 4 heating elements. However, let’s not dream, but rather look at the video of the heating dynamics of a correctly assembled and installed (in my opinion) heating element.
Glue gun heater.
No matter how naively the reader may encounter the topic of a glue gun, with a repeated description of recommendations for its acquisition and its further use, I will still share my improvement of this tool.
The glue gun has become popular recently because of its wide capabilities, but for some reason some characteristics of many models could be better.
A set of glue sticks with diameters from 3.4mm to 43mm with different compositions and different melting temperatures is good. Convenient charging of the rod into the heat chamber, convenient supply of glue to the surface to be glued, light weight of the tool, the presence of an additional switch, power indicator and a removable power cord. Everything is fine!. But there is one significant detail indicated in the passport data of a glue gun used in everyday life - the value of the supplied voltage and the electrical power of the heater.
As a rule, in each model of a hot melt glue gun, a semiconductor is used as a heating element, or more precisely, a semiconductor resistor. It is also a posistor (semiconductor ceramic).
Again, what is there to look for and discuss here? Simple, convenient! But it's not reliable. Why? I'll tell you in more detail.
Hot glue guns are very popular among designers, fashion designers, decorators, in television and radio workshops, and even in funeral service workshops. They use hot melt adhesive for spot gluing or gluing small parts together. In everyday life, a glue gun is not often used. This is true. It's not every day that we glue something. But in some cases, the use of hot-melt adhesive remains the only option, which is not feasible due to the failure of the heating element, which bursts from overheating and sometimes even breaks a little.
In my practice, over the course of a couple of months, I purchased several glue guns, and of different models. The technical passport of each indicated the supplied (connected) voltage and electrical (thermal) power, which in no way corresponded to the actual one. At the specified 40wt, the pistol could not cross the 8wt threshold. At 65wt the heater did not consume even 20wt. Yes. The glue melted, but only on the basis of ethylene vinyl acetate.
What is a hot glue gun
Hot glue gun is an electrical device for melting, feeding and dispensing hot glue rods. This device consists of a heating chamber, a handle and a nozzle. The heating chamber usually includes one heat element, which automatically turns off when the set temperature is reached.
The hot-melt glue gun in its familiar form was created in 1965. Hans Paulsen's invention was distributed under the Thermogrip brand. This brand exists to this day.
The melting point determines what type of glue the heat gun can work with. A heating temperature of 125 °C ethylene vinyl acetate (EVA) rods . Heating up to 165˚C makes it possible to work with a wide range of polyamides (PA) .
Additionally, there are heat guns with heating from 200 ˚C and above , but they are not as common as the first two types. Glue guns with heating around 200 C˚ are capable of working with gluten based on a wide range of polyolefins .
Converting a glue gun from 220 volts to 12 volts.
What has changed in the design of the glue gun?
Determined the length of the blank piece of nichrome wire. The diameter of the wire was not important. The calculation was carried out using standard formulas (Ohm's Laws for a section of a circuit).
- The starting point was the desired electrical power of the glue gun. I settled on (≈)34-36Wt. It follows from this: 36(wt) : 12(v) ≈ 3.3(a). The average current consumption was determined.
- Now from I=U/R we determine the resistance of the conductor, that is, the resistance of a piece of nichrome wire: R=U/I. 12(v) : 3.3(a) ≈ 3.6(Ω).
- Using an ohmmeter (tester, multimeter) I determined the piece of wire. I placed the probes of the device remotely from each other on the wire so that the device (ohmmeter, multimeter, tester) showed on the scale a resistance close to the calculated one - 3.6Ω.
Then everything was simpler and the time I spent on reconstructing the glue gun did not take more than 35 minutes.
- I removed the old heating element from the camera and the power cord.
- I ground the body of the heating chamber in a circle.
- I wound several turns of nichrome wire through a layer of asbestos paper.
- A switch was installed in the circuit of the new heater, which was mounted on the handle of the gun.
And then the most interesting part. My gun was connected to a dead car battery. Here are the parameters recorded during testing:
- The voltage at the battery terminals is 10.5v;
- heating element resistance - 3.6 Ω;
- current consumption of the glue gun heater is about 3A.
- The temperature in the rod melting chamber is 172°C after 1 minute;
- — 197°C after 2 minutes;
- — 222°C after 4 minutes;
- — 262°C after 7 minutes;
- — 268°C after 8 minutes;
- - 280°C in 9 minutes.
This is it for me! Why wait 7 minutes for a regular glue gun to heat up when this one melts in a few seconds? You can glue in a field, in a basement, in a boat, in a car. The glue consumption is not 20ml per minute (never exceeded the consumption of 12ml-16ml), but 40ml-50ml.
Adjusting the temperature of the glue gun heater.
The electrical circuit of the device is simple. At that time there was no thermostat installed. The melting temperature of the glue was regulated by turning the heater on and off via a switch. We experimented with connecting in series to the circuit of a car potentiometer (dashboard brightness control) and an adjustable charger for car batteries. Convenient too. We tried connecting the glue gun to a 6v battery. The glue did not melt as vigorously, but still the heater brought the tool into operating mode in a couple of minutes. The polystyrene ceiling tiles were installed step by step without any delays.
Subsequently, parallel to the switch, a homemade adjustable temperature controller for the glue gun was installed, which turns off the chamber heater when it reaches the set temperature. That is, when the switch was on, the element heated the melting chamber for hot-melt glue freely to the maximum temperature; when the switch was off, the gun worked with low-temperature material (within 175°C-190°C), depending on the setting of the regulator mode.
Recommendations for choosing a glue gun model
When choosing a tool, pay attention to the brand and manufacturer. Naturally, the service life of Chinese products is lower than certified products. Therefore, you should not be surprised that the tool will fail the first time it is used; the body, trigger or other element will break.
To avoid mistakes, you should:
- Determine its purpose, technical criteria and other features;
- For needlewomen and infrequent use of tools, it is enough to choose a heat gun with P = 40-60 W;
- If the main thing when choosing is mobility, you should pay attention to gas structures, compact and ergonomic, which do not require a special place in the room;
- For professional use, a glue gun with automatic glue feed and high efficiency is suitable;
- In furniture production, if you have access to an electrical outlet, an electric version of the product is suitable.
Important! Convenient and comfortable to use, the heat gun has a stable stand, a power cord with reliable double insulation and a light trigger pull.
When buying a tool, stock up on consumables. Their absence will render the product useless. Common stick options are elements with d=7mm and 11mm. The first is intended for solving everyday problems, the second - professional, industrial.
Design and principle of operation
During operation, the gun is held by the handle. On top is the barrel, which includes all the elements of the device.
When the device is turned on, the heating element located in the heating chamber is heated. A heating stick touches it, which melts at a temperature of 105-210 degrees. With its further supply, excess pressure is created, and the molten glue is pushed out through the nozzle.
Body and handle of the product
The handle is hollow. Only wires pass through it, and a trigger is installed on the side. The housing houses the entire device. It is made of plastic with a low degree of thermal conductivity. This is due to heating of internal parts.
The weight of the device is 300 g. After turning it on, the device should only be positioned vertically. You can’t lift it with its nose up and put it on its side. This is due to the presence of molten glue inside it.
There is a platform at the bottom of the handle, and a folding pad is fixed in front of the body. The gun is mounted on these support points.
Feeder
When you press the trigger, which can be carousel or slide, the force is transferred to the ring pusher. This structural element is in direct contact with the rod. The rotating ring grabs the rod and pulls it towards the heating element.
The ring pusher is the weak element of the system. If there is even a slight defect, the rod may slip through the ring.
Guide coupling
The part is made of heat-resistant rubber. One side of it is put on the heating chamber, and the other side is inserted with a glue stick.
The coupling performs 2 functions:
- It keeps the molten mass of glue from flowing into the body of the device.
- Creates temperature uniformity. In its absence, during downtime, the rod would begin to melt in front of the heating chamber.
This is another weak point of the pistol. If heated, the rubber may tear when trying to rotate the rod.
Heating chamber
Externally, it is a tube in which the heating element is located. Some types of devices have two heating elements built in. In this case, heating of the rod occurs not only in the end part, but also on the sides.
The performance of the equipment depends on the size of the chamber and the power of the heating elements. This design unit is the most reliable. If used correctly, the likelihood of it breaking is very small.
How does a glue gun work?
This diagram shows the design of a heat gun of any model. The glue stick is installed in a special hole. Then this electrical appliance is connected using a cord to a 220 volt network. However, there are models that operate not from the mains, but from a battery. Accordingly, they will cost significantly more than conventional models.
After a few minutes (5-10), the built-in heating element will melt the solid glue stick. When you pull the trigger, droplets of hot glue will be released from the nozzle of the gun.
To make it safer and more convenient to work with hot glue, the temperature of which can cause skin burns, there is a special foot (stand) on the body of the gun.
Differences between glue sticks
When gluing surfaces, rods with a diameter of 7 and 11 mm are most often used.
They have the following characteristics:
- The material is characterized by high bending strength;
- The length of the rods reaches 300 mm;
- Stored at room temperature;
- Visually transparent;
- Bonds a large number of materials.
There are also varieties of flowers:
- White. Used for gluing plastic, ceramics, tiles.
- Black. Good adhesion to carpets and leather.
- Yellow. Used for gluing paper products and wood.
The following colors are available for making crafts: red, green, blue, pink. Some rods contain shiny elements - they are used for decoration.
Power selection
Depending on the power of the device, the amount of time spent melting the glue is less. However, other factors should also be taken into account. If there is a large heating chamber and low power of the heating element, heating will occur slowly. But if final heating is ensured, then energy consumption will be reduced and there will be no risk of overheating. A powerful heating element in a small chamber will not provide such savings.
If the power of professional devices is 300-500 W, then at home 30-150 W is enough. If there is a shortage of molten glue, you will have to wait for a new portion to appear. Some devices are equipped with a temperature sensor. At the beginning of operation, there is maximum heating with a power consumption of up to 200 W. Subsequently, the economy mode is activated - 15-40 W.
At home, it is better to purchase a low-power device. Within 3-5 minutes. it will warm up, and then the heating will stabilize. The pursuit of power is justified only among professional workers, where long hours of daily work are required.
Types of thermal guns
To understand what types of glue guns there are, what is the difference between them, and which one will meet your needs will be possible through a detailed acquaintance with its types.
Depending on the heating method, the instrument can be represented by the following types:
- Gas - the source for heating the glue is butane gas, with its help the heat gun can work for 1.5 hours on one recharge (gas can be refilled from lighter cartridges, the gas heater is activated by pressing the trigger);
- Electric - the source of heating the glue is a battery or socket, which must be connected to the network, the product does not require recharging, can be used immediately after heating to the required temperatures;
- Rechargeable - a practical mobile device, it works for at least 40-60 minutes on one charge, and requires control regarding battery recharging.
In terms of price, electric options are affordable and budget-friendly.
The second, main point that you should pay attention to when purchasing a tool is the method of applying glue:
- Manual - does not have a trigger to press, glue is supplied to the element as a result of impact on the end of the glue rod;
- Automatic – glue is supplied after pressing the start button;
- Semi-automatic - the glue stick is pushed to the heating element by a rotating or fixed trigger connected to a slider running along the barrel of the device;
- Pneumatics are a professional, easy-to-use option that makes it possible to concentrate on the work, do it efficiently and quickly (the models are designed to perform large-scale work, the power parameters are at least 300 W, the weight of the product is more than 1 kg).
Depending on the features and technical characteristics, heat guns can be household, professional and industrial. Naturally, the last option is the most powerful of all.
Work process
When gluing surfaces, you should work quickly, because the molten mass hardens quickly. To do this, the points to which gluing will be carried out are marked in advance.
The work process is presented step by step in the table.
After the entire rod has been used up, a second one is inserted, which pushes out the remains of the first. To separate the glued surfaces, this place is well heated.
If during operation it is necessary to change the color of the rod, and the gun has already cooled down, then it is turned on for 1 minute. Then the old rod is unscrewed and the new one is charged. The remains of the old one are pushed out by pressing the trigger.
Application area
Various materials are glued together with a glue gun:
- cardboard;
- ceramics;
- glass;
- plastic;
- metal, leather;
- tree;
- cork.
The pistol is indispensable in the household. Options for its use are presented in the table.
| Application | Picture |
| If a tile plate has fallen off or a piece has broken off from it, then using polyurethane glue you can quickly repair the area. | |
| When laying linoleum there is good adhesion to the base. | |
| The wood adheres well to the surface when installing skirting boards. | |
| As a hobby, needlewomen create all kinds of patterns. | |
| The fabrics are well connected with melted glue. | |
| Using this glue, rhinestones or artificial pearls are attached. Dye is first added to it. |
Safety rules at work
To avoid injury during work, you must adhere to the following safety rules:
- According to the instructions, the duration of continuous operation should not exceed 30 minutes. Then the device turns off and cools down.
- It is prohibited to turn on the equipment without a rod.
- The cable location should always be at the rear.
- After the gun has warmed up, do not touch the nozzle or glue. This may cause skin burns.
- It is not allowed to carry out work with wet hands or in a room with a high level of humidity.
- Upon completion of work, the device is placed on the stand in a vertical position. In a horizontal position, glue may leak into the body.
Emerging problems and solutions
The reasons and solutions are as follows:
- If the device does not have a thermostat, then the heating does not always correspond to the marking of the rod. In this case, it needs to be replaced. The problem is also solved by the presence of a valve in the nozzle.
- The rod is clamped. It needs to be moved back.
- There is a gap between the rod and the heater. Its diameter is made with a high degree of accuracy. If the specified size is 11.2 mm, then reduction to 11 mm is not allowed. This is a marriage. In the heating chamber, due to the pressure difference, a reverse flow of glue occurs. The defective product needs to be replaced.
- Defect in the manufacture of the pistol. During breaks between work, a plug should be inserted into the nozzle. For example, a toothpick.
Other breakdowns and their solutions:
- No glue movement. The reason is that the gun is clogged. To do this, it is disassembled and cleaned. During operation, you need to monitor the nozzle and prevent glue from sticking around it.
- If the power source is a battery, then its energy is not enough to heat the glue. In this case, the device is heated at the charging station.
- If the design is cheap, the pusher may get stuck in the softened rod. It is necessary to turn off the device to cool down.
- If it is not possible to apply a dot to the surface, the glue stretches in the form of a thread, then the rods should be placed in the refrigerator for a while.
Working with a rod without a gun
If there is a rod, in the absence of a gun, you can glue the surfaces, but the quality will be low.
There are 2 ways:
- Insert the refill into the body of the ballpoint pen. After warming up, you can start working. The disadvantages include the need for constant heating.
- Apply a drop of glue to the match near the head of the sulfur or cut off a circle of the rod, cut along the diameter to the middle and put it on the match. Then set the head on fire, the glue will melt - and you can start working.
Using a glue gun is a progressive technology. In addition to ease of use, high quality gluing is obtained. The speed of hardening is also attractive. The main thing is to properly master the art of work and comply with all safety requirements.
What can be glued with “hot glue”
A glue gun is used not only for needlework, gluing rhinestones when sewing clothes and various jewelry. It is also used for gluing wood, ceramics, chipboard, plastics and other materials.
Melted glue can be used to seal cracks in window frames, seams between tiles, and perform various plumbing work (sealing joints). It is very convenient to use such a gun when restoring book bindings. You can even perform simple repairs on shoes, etc.
Do-it-yourself hot glue gun repair
A hot glue gun is a very convenient tool for home crafts, but sometimes it fails and the heating element is damaged.
I managed to restore the functionality of this device...
To repair a hot-melt glue gun, I used a posistor from the kinescope demagnetization system of an imported color monitor as a heater (TVs also have a similar part).
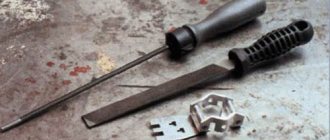
To work you need to prepare:
- small Phillips screwdriver;
- hacksaw or grinding machine;
- file;
- soldering iron;
- posistor from the color picture tube demagnetization system;
- PVC electrical tape;
- FUM tape;
- a strip of copper foil;
- mica;
- tester, multimeter or ohmmeter (to monitor insulation resistance).
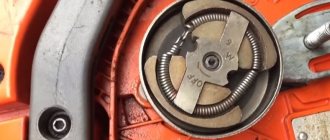
Description of pistol repair
We disassemble the gun: unscrew and tidy up the screws, unsolder the leads from the damaged heater, remove the heat block, remove the bracket holding the heater, carefully disassemble the heater, preserving the insulating film if possible.
P O P U L A R N O E:
What to do if you forgot your password? A simple solution.
There are several options to reset (change) your password in Mac OS Lion. Today I will tell you about one interesting method that allows you to reset your account settings (change your password) without rebooting your Mac. Read more…
Where does beading begin?
Beading is an interesting type of needlework. When creating jewelry and artistic products, beads are not only a decorative, but also a structural and technological element.
Let's now look at the main methods of beading.
A malfunctioning TV power supply is one of the most common breakdowns. It is responsible for providing power to all components of the TV. Since electrical networks often have deviations from the norm, frequent power outages and surges lead to failure of power supplies for televisions and other radio equipment, too.
Other reasons that render the power supply unusable: Read more...