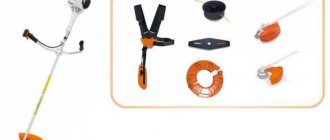
A trimmer, be it gasoline or electric, is the only correct solution for cutting grass in hard-to-reach places that a wheeled lawn mower cannot handle. Trimmers use metal knives or a special fishing line as a cutting tool, which is threaded into the trimmer reel. But, unfortunately, trimmer heads become unusable over time during use. Some problems can be fixed with your own hands, while others will require a complete replacement of the mowing head.
Body care attachments
Philips body stylers come with a special body attachment. To remove this attachment, carefully remove the back of the attachment from the device, and then remove the attachment from the shaving unit or pull it up.
To attach this attachment, simply place it on the shaving foil until it clicks.
Please note that attachments may vary depending on the model of trimmer or hair clipper used. For detailed information, see the instruction manual or contact us for help.
Scaffold winding algorithm
Depending on the trimmer model used, the type, thickness and length of the mowing line are selected. The diameter of the cord can be from 1.2 to 4 mm. It is not difficult to guess that the thicker you thread the cord, the tighter and thicker it can be cut.
There are 3 ways to find out what diameter line you can use on your mower.
- Refer to the device manual for cord thickness information.
- Look at the coil itself. It may be marked with information about the possible diameters of the mowing line.
- Insert the line into the socket. If it fits easily, you can use a cord of that diameter.
The line is wound onto a reel located in the mowing head. Therefore, it needs to be opened first (this was discussed above). There are two ways to wind the cord.
First way
To correctly determine how many meters of fishing line are needed for a particular reel, it is necessary to wind it onto the reel so that the reel does not exceed the diameter of the boards. If the line extends beyond the edges of the spool, you cannot insert it into the cap. Once you have decided on the length of the material, you need to load it into the spool, so do the following.
- You need to fold the fishing line in half, so that one end is 10-15 cm longer than the other.
- Please note that the coil is divided into 2 parts by the central side, from which charging begins. Find the recess on it and insert the cord, bent in half, into it with a little force.
- It is very important to determine in which direction the line is wound to the reel. If you look closely, you may find an arrow on the reel or a label with an arrow indicating which direction to wind. There are cases when there is no arrow on the reel. In this situation, you can look at the painted arrow on the mower head and wind the cord in the opposite direction.
- Winding should be done carefully, wrap the spool with maximum thread tension.
- Once the cord is finished, you must first secure the short end of the mowing line by inserting it into a slot of the appropriate diameter on the side of the reel.
- The other end, the genuine one, is installed in a groove on the opposite side of the coil.
- After securing the mowing line, cut off its ends, leaving an allowance of about 10 cm.
- Next, you need to install the aged reel into the mowing head. To do this, insert and pull the threads into the outlet holes of the head, insert the reel into the body, and then, applying the necessary force, pull the line out of the mounting grooves and tighten it.
- You can now put the cover on and secure it with the latches.
Cutting unit attachment
The cutting unit is the main component of the Philips styler. It has short and sharp edges, and is used for quick and precise trimming of hair length.
To remove the cutting unit from the styler body, check that there is a release button on the styler body. If it is, press the button to remove the cutting unit.
If the styler does not have a release button, place your finger under the teeth of the cutting unit and slide it out of the device. To reinstall, insert the bottom of the cutting unit into the body of the styler, and then push the toothed part in until it clicks. Don't put in extra effort; this may damage the device.
If you cannot install the cutting unit, check for foreign bodies in the styler body and try to clean it with a small brush or cotton swab.
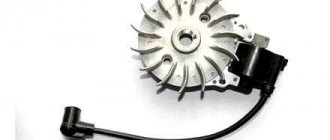
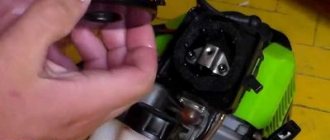
Removing the flywheel
The flywheel of the Shtil 180 chainsaw is twisted with great force, so to remove it you will need a head with a metal knob. The nut holding the flywheel is unscrewed with a 13mm head.
To block the crankshaft from turning, you need to unscrew the spark plug and install a piston stopper through the spark plug hole; if there is none, you can use an old cord from the starter, with knots tied to it and immersed in the cylinder through the spark plug hole.
It is strictly forbidden to keep the flywheel from turning by installing a power screwdriver or other tools between its ribs and the body; with this method of blocking from turning, the flywheel blades are not able to withstand the load and break off.
Repair of Stihl lawn mowers
fs 38 flexible shaft repair.
DIY trimmer repair Stihl FS 38
When using the Shtil
Sometimes the cutting head breaks, sometimes the cable breaks. Repair.
Once the piston in the cylinder is locked, you can unscrew the flywheel nut. The thread in the nut is normal, so you need to turn it to the left. Having loosened the nut, you do not need to remove it completely; just unscrew it until its upper edge is level with the tip of the shaft, after which a soft metal drift is installed on the nut and a sharp blow is made on it. Thus, the flywheel jumps off the shaft from a sharp impact and can be easily removed without the help of additional tools.
Philips Children's Clipper Attachments
On Philips children's hair clippers, the trimmer attachment is removed in a different way. You need to move it backwards on one side to remove it from the device.
Before attaching this attachment, make sure that you are installing it with the correct side (for cutting to the correct length). First, align one side of the attachment with the mount on the body of the clipper. Then press the second side of the nozzle until it clicks.
Principle of operation
The mechanism of operation of a trimmer with a weeding attachment is as follows. The transmission of torque from the motor to the hitch is carried out by means of a shaft arranged in the rod. The knives penetrate the soil, pulling the weeds along with the root system from the soil. The weeds themselves remain on the surface.
Types of construction
The design of such a device is usually equipped with one or 2 pairs of cutting parts. Instead of a gearbox, they are attached to the trimmer at the bottom of the rod or near the motor. A lawn mower works as a means of burning watery fuel.
Types of structures:
- Cultivator. It is considered the most popular attachment. Its advantage is that it simultaneously weeds and loosens the soil. The cultivator consists of disk parts that are placed on one axis.
- Three or two bladed knife. Used for cutting weeds. It is an iron plate with 2 or 3 pointed blades on the sides.
- Trimmer head with fishing line. Designed for cutting weeds. Treats row spacing. For work, two types of fishing line are used: radial section and faceted.
READ Trimmer Broken
Choose the right attachment for your device. Very heavy variants will overheat the engine.
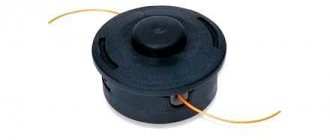
Trimmer head device
On the Russian market, semi-automatic trimmer heads are considered the most popular. A typical representative of mechanisms of this type is a universal semi-automatic head, which is equipped with electric trimmers and lawn mowers of such well-known brands as Bosch, Huter, Husqvarna, etc. Its structure is shown in the figure.
The design includes:
- housing (item 6) with a cover (item 1), equipped with special eyes (item 5), through which the cutting cord is brought out;
- spool (pos. 3), on which the fishing line is wound (pos. 7);
- pressing spring (item 4).
There are other, simpler heads.
How to weed potatoes correctly with a trimmer with a special attachment
Timely and correctly carried out weeding of potatoes will ensure the active formation of leaves and tubers of the crop. A trimmer with attachments will help you quickly and efficiently remove weeds.
Milling type working body
Designed for weeding, which painstakingly digs up the soil, facilitating the penetration of water and nutrients and saturating it with oxygen.
Properties:
- manufacturer – Taiwan;
- brands: for TAC lawn mowers;
- cost: 7900 rub.;
- knife material: steel;
- power supply: internal combustion engine;
- weight: 5 kg;
- Dimensions of the working body: width – 18 cm, cutter diameter – 20 cm.
Advantages and disadvantages of use
Advantages of using a trimmer during weeding:
- speed of task completion;
- highest quality weeding;
- copes well with young weeds;
- loosens and enriches the soil with oxygen;
- weeding with a trimmer refers to organic farming;
- possibility of weeding in small areas;
- The nozzle is equipped with a protective casing.
Disadvantages of using a weeding trimmer:
- the weight of the device increases;
- the cutter does not provide the ability to press the blades close to the soil;
- during operation there is constant vibration and noise;
- Long-term cultivation of land using this device is hazardous to health due to gasoline vapors.
KR400MP MAKITA 195710-3
Designed for small areas. The working part consists of cutters.
Properties:
- manufacturer - Japan;
- brands: EX2650LH, DUX60Z;
- cost: 17160 rub.;
- knife material: metal;
- Dimensions of the working body: width – 16 cm, cutter diameter – 23.3 cm.
Package
When you see a trimmer in a store, you will be very surprised by its packaging. Given the dimensions of the device itself, its packaging is very compact. Dimensions are 960 x 250 x 100 mm (LxWxH). It is made of thick cardboard and colorfully decorated.
The front side of the box shows an electric scythe and its model designation. Protection against unauthorized opening of the box is provided by a label indicating the article number and model - familiar to everyone who has ever bought BOSCH power tools. If the label is not torn, then you can be sure that the box contains a complete set. At the bottom, as is already customary by many manufacturers, you can see inscriptions with the main advantages of the model: simplicity, power, ergonomics, convenience.
A breakdown of these benefits can be found on the back of the box.
On the left side of the box the main technical parameters of the device and consumables used are described. When studying this information, one strange thing was noticed: on the box it is written that this is an electric hedge trimmer, although on the manufacturer’s official website this device is positioned as an electric hedge trimmer, which is more like the truth.
The appearance of the box of my copy was a little shabby, but this did not affect its contents in any way.
source
What does the trimmer attachment for weeding potatoes look like and how to use it correctly
In the traditional mind, a trimmer is designed to cut grass. But not many people know that when changing the nozzle, it is used as a device for weeding. This device greatly simplifies the work of summer residents and makes weeding of higher quality.
What attachments there are and how to use them correctly, we will tell you in the article.
Basic rules
To weed potatoes using a trimmer, several rules are followed:
- Before work, put on equipment (goggles, respirator) that will protect against dust and small particles.
- Weeding is often done once every 14 days.
- Use the device with plant heights up to 20 cm.
- The event is carried out in dry weather with the aim of mulching the plantings.
- The cutters don't deepen very much. A processing depth of up to 2 cm is sufficient. This will provide the soil with oxygen and remove dried crust.
- Do not use a device with low power for a long time - take breaks to avoid overheating of the motor.
- After treatment, the working part is disinfected in order to get rid of pathogens.
Petrol mower repair: overview of faults and effective methods for solving them. Photo instructions from the pros!
Modern technologies and equipment make it possible to produce the best and optimal technical solutions, which become effective assistants in arranging a summer cottage or personal plot. A green lawn and other plantings can grow quickly; to tidy up the local area and mow lawns, a gas mower is used, which is also called a brush cutter, trimmer, or gas mower.
Traditional scythes are inconvenient and unsafe to use; they require a significant investment of time and effort, which will help save money with gas-powered scythes that combine functionality and practicality in their design. In the photo of lawn mowers you can see various high-tech devices, which are characterized by a set of performance characteristics, including such parameters as increased productivity and long service life.
A convenient and reliable trimmer is a technical device consisting of individual mechanisms, parts and elements that can wear out, become unusable and be damaged during intensive use.
Even with regular technical inspection, maintenance procedures and careful storage, such devices and their individual parts require repair and even replacement; all repair procedures can be carried out independently.
Brief contents of the article:
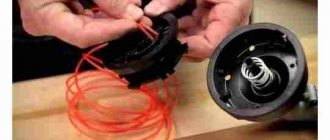
How to replace fishing line in any trimmer
How to change the fishing line in any trimmer So, first unscrew the nozzle. This must be done by rotating the drum to the right. Here we have a drum in our hands with the remains of an old fishing line. Let's open it. In most cases, the lid is locked with latches that can be opened using a screwdriver by inserting it into the holes and applying a little pressure. Or you need to release the lock and turn the cover in the direction of the arrow. In this case, the lid itself must be held, because in drums with automatic line feed there is a spring, which, when straightened, can throw out all the internal parts of the drum. Carefully taking out the reel, we remove the pieces of fishing line from it.
Now you need to take 5 meters of new fishing line and fold it in half (to find the middle). In the middle part of the reel there is a recess (in some designs - a hole), into which we need to hook our fishing line. There is also an arrow on the reel indicating the direction of winding. A fundamental detail is that if the reel has two compartments, then one half of the fishing line should be wound in one direction, and the second in the other. When finishing winding, you need to throw 15-20 cm of fishing line free. There are also two notches on the top ring of the reel through which you need to pass these risers. Specifically, we mastered the winding itself.
The final step of the line changing process is to assemble the reel. First you need to install the spring and washers in place. Then, holding the reel with one hand, the other hand needs to thread the ends of the fishing line into the appropriate holes on the sides of the nozzle. Then install the reel in its place, tensioning the line and trying not to move the spring. When all the internal elements of the nozzle are in place, you can close the drum with a lid. You just need to make some effort to get the latches into place. Voila! The mowing attachment is ready to go! When choosing a fishing line for your own motor scythe (gasoline or electronic), you should dwell on certain points, which we will discuss in detail.
READ How to Clean the Carburetor on a Trimmer
The diameter of the line. The power of the motor determines the largest diameter of the fishing line that can be used for a given braid. For example, the manufacturer of an electronic trimmer with a power of up to 1 kW recommends using a ø2 mm line, and for values around 500 W - only ø1.5 mm. Also, the manufacturer of any massive trimmer with a curved rod recommends using ø2 mm fishing line. The internal combustion engine is stronger than an electronic one - so you can install thicker fishing line, which means stronger, which allows you to mow more grass and work longer. For grass cutters with a straight shaft, you can select fishing line using the following usual method: the engine volume in 10 cubic cm corresponds to the diameter in millimeters. For example, for a Husqvarna 128R lawnmower, the engine capacity of which is about 25 cm3, you should use a fishing line ø2.5±0.2 mm. For more massive brush cutters with volumes of more than 40 cm3, the diameter of the line is limited only by the geometric dimensions of the outlet holes of the mowing head - less than 4 mm. So, a narrow line (about 1.5 mm) perfectly cuts off cultivated lawn grass, and a thick line (for example, 3.0-3.5 mm) successfully destroys weeds and even young shrubs.
Line shape. More common and cheaper to produce is round fishing line. But the requirements of ergonomics and environmental protection limit its implementation - due to its own physical parameters, it produces an unacceptably high noise level (which is comparable to the noise of the motor itself). These are traditional round line from Husqvarna or Oregon RoundLine or Chipmaster. To reduce the noise level produced by the fishing line, it is given an unusual shape - it is made spiral-shaped like the Oregon DuoLine Plus (reducing the noise level by 15 dB) or with special transverse grooves like the Husqvarna Whisper (-8 dB). Following the school laws of physics, the “working” part of the fishing line during the mowing process is only the end surface, and not the side surface. But to increase the “sharpness” of the fishing line, i.e. to increase efficiency, the cross-section is changed from round to faceted: star-shaped, square or square with teeth - Oregon StarLine, Nylsaw or Flexiblade. For example, according to the calculations of professionals, Oregon Nylsaw fishing line, thanks to its square profile, is 27% “sharper” than its round counterpart, which definitely affects the increase in mowing speed.
Functionality check
Before you start diagnosing the magneto, you need to make sure that the problem is actually in this unit. To do this, you need to check the entire circuit and make sure that there are no other reasons for the trimmer failure.
- First, you should carefully inspect the reel for cracks and other external defects on the body. Next, you will need to examine all the elements and components that conduct current and make sure that they are clean.
- The next step is to inspect the high-voltage wires. They must be in good working order and securely attached to the contacts, without traces of rust and with intact insulation.
- The next step is to check the spark plug cap. As a result of careless actions, the user often tears it off from the high-voltage wire, and then improvises and creates a homemade mount. You need to understand that any poor-quality connection in this place significantly reduces the power of the spark plug's electric arc.
- Then you should make sure that the spark plug itself is working properly. If you fill your lawn mower with low quality gasoline, the service life of this part will be significantly reduced. In addition, it may be flooded or have large deposits that impede operation. Sometimes the spark plug even gets stuck and won’t come off.
- Next you need to inspect the circuit breaker. On trimmers and chainsaws made in China, it very often breaks.
Having completed all these steps and excluded the listed components from the list of possible causes of failure, you should proceed to checking the coil. This can be done in several ways.
Method 1
The first way to check the ignition coil involves the use of special equipment (stand) . It is not available at home - you can only find it in service centers.
Method 2
Magneto diagnostics using a multimeter is a solution that can be implemented on your own if you have such a measuring device. In this case, you must do the following.
- Switch the meter to resistance mode and set the value to 200 ohms to test the primary winding.
- Connect the multimeter electrodes to the magneto ground and the output contact. If the winding is intact, the resistance will vary from 0.4 to 2 ohms.
- Turn on the tester at 20 com to perform diagnostics of the secondary winding. In this case, the first probe is connected to ground, and the second is installed in the spark plug cap. Normal values are at least 4-6 com. If the circuit is damaged, the tester will show infinity, and in case of a short circuit - zero.
Exact data on what the tester readings should be when checking the primary and secondary windings can be found in the instructions for using the trimmer.
Method 3
If you don’t have a multimeter, you can check the coil in another way.
Important! The check must be carried out carefully so that the magneto does not burn out. To do this, it is important not to touch the cylinder with the electrode.
To diagnose, you need to take the following steps:
- open the lid that covers the cylinder;
- remove the high-voltage wire cap from the spark plug without unscrewing the part itself to maintain compression;
- Place a nail without a head tightly into the cap, it will imitate the central electrode of a candle;
- use a dielectric material to tie the cap with a nail to the cylinder so that the gap between the spark plug electrode simulator and the mass ranges from 5.5 to 7 mm (it is recommended to look at the exact distance for a specific model in the user manual), but the part does not come into contact with the mass;
- use the starter to start the engine several times, holding the ignition button in the on position;
- If a spark appears, you need to consider what color it is.
A strong white or bluish spark is normal, but a faint flash of orange or yellow indicates a coil failure.
Often, a cold magneto creates a powerful spark, but when heated, due to a defect in the internal components, it does not conduct current. After the coil of the brush cutter has cooled, it starts up again and mows the grass with a fishing line or knife until the magneto heats up. This is not normal behavior and the coil needs to be replaced.
On a note! Likewise, the problem may occur when the spark plug heats up and cools down, so it is recommended to check the functionality of both parts.
The procedure for installing the disc on the trimmer
Installing the knife on the trimmer is painfully simple. To do this, use a complete key that disconnects the cutting attachment and a pin that locks the gearbox. The procedure is as follows.
- First, you should disconnect the electronic trimmer from the network, and simply turn off the gasoline trimmer. Disconnect the protective cover and move it aside.
- Next, you need to combine the holes on the gearbox and the shaft in order to insert it into their pin and lock the drive.
- If a spool with fishing line was used, it must be unscrewed clockwise.
- Then you need to find a nut to tighten the knife.
- The next step is to install the knives. Owners of trimmers are often interested in which side to put the disc on. This must be done so that the markings with numbers and signs are on top.
- Later, you need to place the boot on top, and above it - a fixing nut, which needs to be tightened tightly with a wrench.
- The last step is to install the protective cover.
As you can see, the procedure is very simple and similar for many brands, be it equipment from the Stihl or Husqvarna office.
Preliminary preparation
First of all, to wind the fishing line, you need to remove the reel (spool, spool) from the trimmer - specific actions will depend on the complexity of the configuration and the type of the product itself:
- small electric trimmers with a working arrangement of the motor and coil in the lower part, as a rule, have side keys on both sides of the reel. By pressing them simultaneously, the upper part of the reel, along with the internal contents for winding the fishing line, is disconnected, while the lower part remains on the trimmer. It is advisable to disassemble the bobbin on a flat, smooth place so that the spring included in the structure does not jump out and get lost;
- electric and gasoline trimmers with a curved rod without the ability to install a knife, as a rule, have reels with a special wing: in such designs, you should hold the spool in a stationary position with one hand, and with the other, rotate the wing nut that secures the reel on the rod counterclockwise. After disconnecting the nut, the entire reel is removed.
- electric and gasoline trimmers with the ability to install a knife on a straight rod (for example, Stihl trimmers) have a hole under the reel. To keep the rod stationary, a screwdriver or other suitable object is inserted into this hole and, with slow rotation, such a relative position is achieved when the screwdriver enters the hole and the reel is fixed. After this, the coil body is rotated clockwise (with a left-hand thread) and removed from the trimmer.
For the second and third cases, the coils, depending on the design, are disassembled in different ways. In bobbins with a wing, the wing is unscrewed; in bobbins with latches, the latches are pressed and one part of the bobbin is released from the other. If the halves of the spool are connected by thread, then it is enough to turn them by hand in opposite directions until they are completely unscrewed.
Features of discs for brush cutters
Knife discs are available in plastic and metal, also in various shapes to perform ambiguous tasks.
- Two-, three- and four-bladed knives with pronounced blades are used for mowing grass and overgrowth of trees. But they are not suitable for making hay, because they crush the shoots by cutting them a couple of times.
- Powerful four-bladed discs are designed not only for clearing grass from the ground, but also for cutting hay. They prevent repeated cutting of shoots, thereby making them suitable for harvesting for the winter.
- Discs with cutting edges along the perimeter are vital for cutting reeds and reeds. These knives are very heavy - this is the right quality for cutting thick trunks.
- Professional saw blades for brush cutters and brush cutters allow you to cut down small trees and bushes.
Plastic knives are used as replacements for iron discs. They do not need to be tightly secured in the head, but they rotate as a result of the influence of centrifugal force. The strength of plastic knives is the highest, so their service life is quite long.
Blades
The number of blades is of fundamental importance when solving ambiguous problems. So, for grinding weed, 2-3 pieces are enough. To make hay, the disk needs to have from 4 to eight blades. To destroy small shoots of trees and shrubs, instead of blades, the disks must have a huge number of small teeth.
READ How a Grass Trimmer Works
What is required for assembly
Having decided which trimmer you can eventually use to make your own snowblower, you should prepare the remaining components for assembly. This applies to consumables and tools.
The tools usually taken are:
- grinder;
- drill;
- drill;
- welding equipment;
- hammer;
- pliers;
- spanners;
- screwdrivers and so on.
The grinder will be used to cut out metal elements, as well as process, clean and sharpen them. That is, you will need appropriate discs and attachments. A drill makes holes for fasteners, and welding is useful to connect non-separable elements.
The following materials are used as consumables:
- sheets of metal;
- metal pipe;
- plastic pipe;
- metal clamps;
- bolts, nuts and washers.
A sheet of metal is needed to create the drum body, blades, and also the bucket of the future snow blower. The pipe will act as an element for choosing the direction of the thrown snow. The snow clearing attachment is attached to the mower bar with clamps.
When is it appropriate to use knives?
When using lawn mowers in summer cottages, the most popular attachment is a fishing line. It is low cost, suitable for various trimmer heads, and is safe to operate. The disadvantage of using fishing line is that it is only suitable for mowing low growth. In other situations, the string gets clogged immediately, regardless of whether a gas or electronic trimmer model is used. In addition, the vegetation is wound around the spindle, which creates significant resistance on the shaft and leads to its breakage. This can also cause failure of the piston system in lawn trimmers or burnout of the motor in electric trimmers.
Therefore, different attachments are used for mowing tall or tough vegetation. So, for cleaning tall and coarse grass, thin shoots of trees and shrubs, it is better to install and use a disc. This nozzle gets clogged even less often, which contributes to greater wear resistance of the equipment.
Material
It is not recommended to use iron knives on electric scythes, because the design features make their use unsafe for the user. This is explained by the curved shape of the rod, the absence of stops on the handles, and also the highest rotation speed.
For trimmers with a flexible shaft, plastic blades should be used for safety reasons. Their purpose is to mow soft grass and dead wood. Whereas iron discs are excellent at handling tall, dense, tough growth, shrubs, and tree shoots.
Recommendations related to repairs
Mechanical problems are associated with damage to the trimmer head. This component is most often subject to wear and tear, and this element is often in contact with the environment. There are several options for failure, which is mechanical in nature.
Electric version of the scythe
The self-propelled type of these units can be used anywhere, but only near the power supply. Silent, they are often used near schools, kindergartens, as well as hospitals and clinics. They are quite actively used on private territory.
The models are easy to operate, have low noise levels, high reliability, and reasonable prices.
Rules for replacing blades on a grass trimmer
If the disc on the trimmer is used frequently, it will need to be removed and sharpened from time to time, or replaced with a new one. This part can be made of metal or plastic, have a different number of blades, but the replacement process remains the same. Moreover, this procedure is similar for equipment from different manufacturers, be it Carver or Huter, but minor differences are likely. Changing the blade on a trimmer is quite easy if you follow safety precautions and know the correct procedure, a description of which can be found in the user notes. The entire replacement process, step by step, as well as the method of self-sharpening knives, will be described in this material.
Typical problems - causes
Malfunctions that most often occur with the magneto are typical for trimmers from different manufacturers. As a rule, this is a weak spark or its absence, as well as the presence of interruptions in this process.
Unstable sparking
If the magneto produces an intermittent spark, you must first check the contacts. They could get burnt or oily. The detected carbon deposits are cleaned off with a file, and the oil is wiped off with suede, previously soaked in gasoline. The second possible cause of the problem is that the adjustment of the gap between the contacts is broken. To eliminate it, you need to set the correct distance.
If the spark appears intermittently, it may also mean that the breaker arm pad is worn out. To eliminate the problem, you need to replace the lever with a new one. In addition, the gap should be adjusted, as with another possible cause of failure - misadjustment of the outline.
A broken capacitor can also be responsible for interruptions in spark formation. In such a situation, it is necessary to replace the damaged part, since it is impossible to repair and recharge it.
No sparking
If the magneto does not produce a spark at all, the main reason is a break in one of the transformer circuits (primary or secondary). To repair a lawn mower, you must replace the faulty part. If the primary circuit is shorted to ground, this can also cause a lack of spark. You must remove it to fix the problem.
On a note! Broken insulation of a high-voltage wire can also cause a breakdown. The situation can be corrected by replacing the wiring.
Insufficient sparking
A weak spark at the magneto is caused by a damaged capacitor. To eliminate the breakdown, it is necessary to replace the failed part.
Disc sharpening
Regardless of the properties of the disc, over time it becomes dull and begins to cut grass poorly. If the knives are still relatively new and replacement is not practical, you can sharpen them yourself.
To sharpen discs you need:
- disassemble the trimmer, remove the knives;
- closely examine the disk - if cracks are found, it is better to replace the part with a new one, because its upcoming operation is dangerous;
- bent blades can be carefully bent with a hammer;
- Taking into account the size of the disk, it is necessary to choose the right metal file, this will ensure more comfortable work;
- identically sharpen all the upper cutting edges of the discs at an angle of 30°;
- Reassemble the trimmer in reverse order.
To sharpen the disc, you can use an emery machine at low speed, setting a grinding wheel with a medium-sized grain. Using such a tool, the process will move even faster. For safety, you must wear gloves on your hands and a protective mask or goggles on your face.
So, to cut grass on gasoline and electric trimmers, plastic and iron discs of various shapes and with a different set of blades are used. They are selected in accordance with the type of work performed and the size of the area being processed. If the blades on the mower become dull, you can simply sharpen them or change them yourself. Despite the simplicity of the procedure, you need to be careful and keep safety in mind so as not to injure yourself through negligence or destroy the equipment. A more detailed description of replacing knives in relation to a specific trimmer model can be found in the instruction manual or on the manufacturer’s official website. For clarity, a general diagram of the process is shown in.
Materials:
From the point of view, hacksaw blades should not be completely hardened.
Everything you need to make a nozzle
First you need to make the base of the nozzle. To do this from a metal plate
cut out a square with a side of 100 mm. You need to mark it in such a way that there is a hole exactly in the center (at the intersection of the diagonals). To do this, measure a distance of 50 mm from the center of the selected hole perpendicular to the short side of the plate and mark the cutting lines.
We cut off the excess and get a square of 100 mm x 100 mm. Now you need to slightly round the corners and drill out the central hole for the trimmer shaft.
READ How to install mods on Minecraft PS3
Round the corners and drill the central hole for the trimmer shaft
We cut the metal sheets, measuring 8 cm from each end. We get 4 blanks with ready-made holes.
We cut sheets for metal
We cut knives from blanks
Everything is ready for assembly
Fastening the knives
The end of the screw must be riveted so that the nut does not fly off.
The end of the screw needs to be riveted
When working with a trimmer, it is important not to forget about safety precautions when using any attachments, especially homemade ones. We invite you to familiarize yourself with Dried flowers: names and photos, descriptions of species and varieties
We invite you to familiarize yourself with Dried flowers: names and photos, descriptions of species and varieties
Disk selection criteria
It is necessary to choose a plastic or iron knife, taking into account the area of the area that you plan to process, as well as the type of trimmer - electronic or gasoline. The number of blades will depend on what kind of growth needs to be removed using the tool. You can select the appropriate disk shape, number of blades and production material using the instruction manual for the device. Usually it specifies which cutters are recommended to be used to solve certain problems.
Sources:
https://agronom.expert/posadka/ogorod/paslenovye/kartofel/nasadka-na-trimmer-dlya-propolki.html https://salda.ws/video.php?id=sQSXwkTkJ-k https://hitech- online.ru/tehnika-dlya-sada/trimmer/kak-pomenyat-nozh.html https://life.comments.ua/news/lifehacks/pyatnadcat-veschey-kotorymi-pol-zuyutsya-vse-ne-podozrevaya-chto -ot-nih-pora-izbavit-sya-661812.html
Classification by cord charging method
Another important factor is the principle of loading the line into the mowing head. Due to this factor, the following types of coils are found on the market:
- fast - to charge this type of device, the operator using it does not need to remove the headset from its base. In this case, it is enough to carefully insert the cord to the center of the reel and wrap it around the base several times. It is convenient and, moreover, saves a lot of time;
- collapsible – to replace the cord, reels of this type will need to be disassembled. Beginner gardeners may have problems with this procedure, however, having gained the necessary experience, charging the head will proceed much faster in the future.
As practice shows, a fast trimmer reel is best for a novice gardener. It is durable and can be actively used in areas with a large number of hard obstacles.