If the trimmer disc is used regularly, it will need to be removed and sharpened from time to time, or replaced with a new one. This part can be made of metal or plastic, have a different number of blades, but the replacement process remains the same. Moreover, this procedure is similar for equipment from different manufacturers, be it Carver or Huter, but minor differences are possible. Changing the blade on a trimmer is quite simple if you follow safety precautions and know the correct procedure, a description of which can be found in the user manual. The entire replacement process, step by step, as well as the method for sharpening knives yourself, will be described in this material.
Replacing the disc on the trimmer
You will need to replace the disc on the trimmer regularly if you use the trimmer frequently. Even good knives become dull over time; they need to be sharpened or new ones installed. In practice, plastic and metal disks are used, having different numbers of blades and sharpened in different ways. The procedure for replacement does not depend on this in any way. During the work process, compliance with safety precautions is an important point. If the material of the cutting part of the tool allows, you can sharpen it yourself, which will save money.
Editing edges
Once the blades are sharpened, they need to be straightened. This is done using a piece of moisture-resistant sandpaper with a grain size of about 600-800 grit. The paper must be moistened with water and rolled into a cylinder with a diameter of 100-150 mm.
The purpose of editing is to remove the slightest burrs and flashes, due to which the thinnest edge of the blade can curl. The sandpaper rolled into a cylinder should be lightly pressed against the descent plane and pulled out in a smooth motion away from the grain. It is also recommended to make a smooth shift from the center to the edges.
When removing the triggers and sharpening, all manipulations were carried out on only one side of the blade. During the editing process, the knife is also processed from the back side. Here the paper is pressed almost flush against the body of the knife, but with a slight tilt towards the edge. The pressing force on the paper when editing is very small, but you need to make quite a lot of movements in order to eliminate large scratches on the shiny slope that remained after sharpening.
For reference:
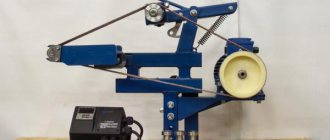
You can also sharpen a lawn mower blade by riveting, similar to a regular hand scythe. This, however, requires a special device - a headstock, as well as a specific skill. But with this method of sharpening there is no need to balance the knife.
When to use a disc rather than a line
For owners of country houses, land plots, and lawn lovers, a trimmer is an assistant that speeds up routine work. When using a tool, a number of questions arise related to which attachments are preferable to use and how to replace them yourself.
When working with a lawn mower, fishing line is often used, which is cheaper than discs. In addition to price, it also has the following practical advantages:
- can be used with a large number of trimmer heads;
- fishing line is safer to use than discs.
The disadvantage of the line is that it is only suitable for mowing short grass, because otherwise it often gets clogged. This is typical for both electric and gasoline scythes. When the grass wraps around the spindle, there is a lot of resistance on the shaft and it becomes damaged. In this case, the piston system can also fail (in gas scythes) or the electric motor can overheat and burn out (in electric scythes).
In some cases, knives are more effective. They are used for mowing:
- tall and coarse grass cover;
- weeds;
- tree shoots;
- domestic (for example, raspberries, currants) and wild (rose hips) shrubs.
Thanks to the use of knives, the tool wears out more slowly: this is due to the fact that it gets clogged less often.
Cutting attachments of this type are also called discs or cutters, but the essence does not change.
Filling the line with a trimmer
Main question. how to wind the fishing line onto the trimmer reel, securing it securely?
In the case of a device with one antenna, unwind the line to four meters, insert it into the hole inside it, securing the line at one end, and move in the direction indicated by the arrow. The edge of the thread is fixed in a groove inside the spool so that it does not unwind when it is collected.
How to fill a trimmer coil if it has two antennas? In this case, check how many grooves there are. one or two. In the first case, both antennas are directed into a common groove; if there are two of them, then each of them. in my own way. Pass 2-4 meters of thread through the hole so that the free edges of the thread are the same length, and turn the spool in the direction of the arrow. The ends of the thread are inserted into the grooves or held with a finger, the device is assembled and attached to the trimmer.
In a spool with two grooves, make the same piece of thread in the form of a loop, guide it into the groove between them, and wind the ends at the same time. How to install a 2-blade knife on a STIHL fs 55 chainsaw. Video instructions for replacing the cutting heads of a brush cutter from a reel (line) to a knife.
Then repeat the previous assembly. In the case of semi-automatic winding, the coils work as follows. the fishing line is passed through the hole inside, its ends are fixed in the holes on the body, assemble it and press the button. In this case, the thread is easily wound in the right direction.
It is important to remember that the cutting surface must be protected from hard objects so that it does not wear out. Otherwise, you will have to constantly stop and remove the reel to replace the used line. Let your work not tire you and bring you joy!
Which knife is better
Modern manufacturers offer consumers a wide selection of disc types. Cutting parts are classified according to the following criteria:
- the material used for their production;
- shape and number of blades.
Material
The material for knives is plastic or metal, which determines their purpose. The question naturally arises about which disk is better to use: plastic or metal? The choice is determined by the following factors:
- area of land intended for mowing grass;
- type of tool (electric or gasoline).
Three blade plastic blade for electric trimmer
From a safety point of view, it is not recommended to use steel cutters on electric scythes - they are almost always equipped with plastic blades. The design features of the power tool itself and its technical characteristics make the installation of metal cutting parts dangerous:
- the presence of a curved rod;
- often there are no stops on the handles of electric scythes;
- high rotation speed.
According to the rules of safe operation, plastic knives are used only on scythes with a flexible rod. Plastic blades are designed for mowing soft plants (for example, burdock, nettles), and dead wood. A metal disc cutter is used for mowing thick, tall, coarse grass, shrubs and shoots of various trees, because its cutting properties and wear resistance are higher than those of plastic analogues.
Trimmer cutter with carbide tips 40 teeth
The design, as well as the technical characteristics of brush cutters, determine the use of metal attachments when working with them:
- the presence of a straight bar increases the distance to the mower’s feet;
- comfortable handles with limiters;
- possibility of a smooth increase in speed.
Gasoline units equipped with metal discs are well suited when it is necessary to mow large areas with various types of grass or shrubs.
Metal knife on a lawn mower
Number of blades
The shape of the disc blades has virtually no effect on the quality and speed of work; what matters is their quantity. To make hay, it is recommended to use cutters with a large number of blades, for example, with 8 or 4 main and 4 additional blades. If there are few of them (2, 3), then such knives chop the grass very much. Milling cutters with a large number of small teeth are used when mowing young shoots of trees and shrubs.
Petrol mower Patriot PT453 with a metal disc for mowing bushes
Metal knives for lawn mowers can be sharpened in different ways: one-sided and on both sides. Dull or poorly sharpened cutting edges of cutters reduce labor productivity and also impair the quality of work. This increases the load on the tool and fuel consumption.
Dangerous is the collision of knives with stones, as a result of which the tool bounces, which can cause injury to the mower.
The cutting element for the trimmer should be selected according to material, size, design, based on the type of tool and the power of its engine, the amount of work to be done and the type of plants to be mowed. Partially, the instructions from the manufacturer for the model used will help with this - the recommended parameters of the cutters are written there.
Instructions for sharpening knives (blades) for hair clippers
When creating hairstyles, the blades in a hair clipper gradually wear out. For this reason, the speed, quality and productivity of work decreases. The efficient operation of the equipment is restored by sharpening the parts.
Hair clipper
The highest quality sharpening of hair clippers is done using professional equipment. However, there are ways to do this work at home. Let's look at the most common of them.
How to quickly sharpen knives on any hair clipper
There are several ways to sharpen hair clippers. In this case, various equipment and materials are used. These include:
- Professional sharpening set.
- Lathe.
- Sander.
- Kitchen whetstone.
- Sandpaper.
The procedure for sharpening blades
Sharpening knives of hairdressing clippers is carried out in several stages:
- Removing and preparing blades for sharpening.
- Sharpening and grinding knives.
- Processing of sharpened parts.
- Assembling the knife block.
- Test haircut.
- Final adjustment of the knives.
Before performing work, carefully prepare the workplace. Provide the necessary level of comfort and illumination. Place all the necessary tools and materials in their places.
Clean and lubricate knife blades after every haircut. This will help ensure long-term operation of the device.
Using a screwdriver or screwdriver, remove the fastening screws of the knife block. The removed parts are put aside or placed in a separate box. Carefully remove the upper (moving) and lower (fixed) knives.
Algorithm for installing a knife on a trimmer
Replacing the blade on the trimmer is quite simple. Manufacturers include a key for removing the cutting attachment (spool with fishing line) and a pin designed to block the gearbox. To change the disk, you need to do the following:
- remove the casing that performs protective functions;
- insert the pin into the aligned holes located on the shaft and gearbox, and in this way block the drive;
- if a spool with fishing line is installed, then unscrew it clockwise and find a nut to tighten the knife;
- put the boot on;
- blocking the gearbox with a pin, tighten the fastening nut, tightening it with a wrench;
The algorithm for installing a knife on a trimmer is demonstrated in detail in the video below.
Modern trimmers, for example, from, are easy to maintain. Replacing the cutting parts yourself will not be difficult.
When working, pay attention to safety precautions to avoid cutting yourself.
Hand mower. replacing the mowing line in the reel.
In this video I will show you how easy it is to roll a fishing line using a hand mower without any help.
If the coil is designed to work with 2 antennas, then follow these steps. On the inside of the reel we can see how many grooves are available for winding the mowing line. There might be one or two. If there is one groove, both antennas are wound along the same groove. ?
How to install the mowing head and blade on a trimmer by replacing the gas seal ring. If there are two grooves, each antenna is wound on its own groove. A reel with one groove must have a through hole into which the fishing line fits. Unwind 2-4 m of fishing line, pass it through this hole so that the fishing line sticks out equally on each side.
A regular inexpensive trimmer doesn't seem to have a trimmer for three correct windings. And we immediately wrap both antennas of the mowing line in the same direction, opposite to the direction of rotation of the coil on the trimmer and coincides with the direction that the arrow shows inside the coil.
If there are 2 grooves, fold a 2-4 m piece of fishing line in half, insert the loop formed at the bend point into the groove between the two grooves and immediately wind both ends of the fishing line in your own way. groove. The following steps are similar to the previous version.
There are also reels on which the fishing line is threaded through a through hole on the inside, the ends of the mowing line without winding are one hundred percent sewn through the holes on the outer body of the reel, the reel is assembled and the button that they usually compress begins to rotate, so the fishing line is released during operation when it wears out.
This is all. Now you understand how to properly wind the line on the trimmer reel.
How to sharpen a disc if it is dull
Walk-behind mowers are designed for mowing grass, bushes and young trees. The quality and productivity of work depends on the sharpness of the blades. Over time, knives even with pobedit tips become dull. In this case, you can go in two ways:
- buy a new cutter;
- sharpen old blades yourself without soldering.
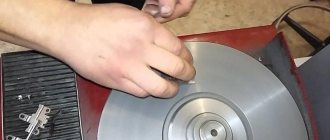
To properly sharpen knives, proceed as follows:
- carefully disassemble the trimmer, removing the cutter;
- inspect it for cracks that make further operation impossible;
- if the blades are bent, they are leveled using a hammer;
- clamp the blades securely, not too tightly, but so that they do not move;
- Based on the size of the disk, choose a metal file so that it is convenient to work;
- all cutting (upper) edges of knives are sharpened to the same extent (at an angle of 30 degrees);
- assemble the lawn mower in reverse order.
Discs tipped with hard materials are only replaced with new ones, but not sharpened.
Sharpening can be done on an emery machine at low speeds - this will speed up the work process. In this case, a grinding wheel with a medium grain size is used for work. Knives should be sharpened after wearing gloves and goggles.
Removing descents
If a knife has not been sharpened for a long time, chips are likely to appear on it. You need to get rid of them by bringing the edge of the blade at a uniform angle along the entire length of the cutting section. Please note that there may be several edges on each side, in which case the lawn mower will have several cutting planes.
Lawn mower blades have a one-sided sharpening, the descent of which, as a rule, faces upward. To set the trigger at the desired angle, you should use an electric sharpener with a carborundum stone, or, if you don’t have one, use a fine file. It is very important to remove the metal evenly from both blades. Therefore, keep the same pressure and at least approximately count the number of passes of the sharpener.
Small deviations in the sharpening angle are not critical, however, the smoother the slopes are, the longer the life of the knife will be. When shaping the blade, it always moves towards the grain to avoid the formation of large burrs and flashes. You should not use a grinder for preliminary sharpening - overheating can deteriorate the quality of the metal. However, you can install a flap or disc disc on your angle grinder under sandpaper.
How to Sharpen a Trimmer Disc Video
With the arrival of summer, many homeowners are concerned about the question of how to put a knife on a trimmer. More pressing questions are why and when to purposefully replace the fishing line on a lawn mower with a stronger cutting element. In our article we will try to sort out the whole set and give useful advice to summer residents.
A trimmer with a blade attached to it is most convenient to use for more comfortable mowing of tall and coarse grass in the countryside. In this version, the line on the brush cutter does not control. The narrow one breaks in a short time. The introduction of a thick 4.3 mm cord or homemade rods with cables forces the vegetation to wind onto the spool. This increases the load on the engine. For this reason, the piston group and other moving parts of the unit wear out in a short time.
If you mow weeds with an electronic trimmer without a knife, using fishing line alone, even a thick one with a shaped cross-section, the problem will not be solved. There is always a risk of overheating the electric motor and damaging the flexible shaft. And the problem for our client remains in the high torque of the electronic motor. The grass wound around the spindle creates strong resistance to the shaft, reminiscent of a speedometer cable, which cannot withstand it and gets twisted.
To protect equipment from early wear, domestic manufacturers have provided the possibility of installing special knives on trimmers. The design and shape of the existing cutting parts allows you to effortlessly handle not only coarsened and overgrown grass, but also successfully fight with young bushes.
While we’re taking and putting a knife on the lawn mower, let’s find out what they are and where they are used. Now domestic manufacturers offer consumers significant volumes of these types of consumables. As a result, all cutting tools created for cutting grass can be systematized:
How to sharpen a lawn mower blade in the field.
You may also like
- In the manner of the material from which it is made;
- According to the shape of its cutting blades.
You will prefer plastic or metal as the main material for the production of trimmer knives. The implementation of such consumable parts almost entirely depends on two characteristics:
Based on the safety precautions of the Russian automobile industry, it is not recommended to use iron knives on electronic trimmers. All brush cutters powered by an electronic network and a rechargeable battery are equipped with plastic blades. Depending on the manufacturer, they come in a one-piece disk-shaped design, with several blades, or as a special mowing head that provides for the installation of removable plastic blades.
A straight shaft for a gasoline trimmer and a curved one for an electronic one
Its design features do not allow you to place an iron knife on an electronic trimmer.
- The curved rod of the unit reduces the distance from its working part to the mower’s feet. If the blades collide with a stone or other hard object, the scythe is thrown towards the feet.
- The high torque that we mentioned above, if the collision of an iron knife with a rigid object, transfers a huge load to the flexible shaft of the trimmer and its engine. What causes their early failure.
- In most cases, the handle of an electric scythe does not have a limiting bar that acts as a stop. This does not exclude leg injury.
These features are used on trimmers with electronic engines only with plastic knives. When colliding with an obstacle, the blades are destroyed, thereby protecting the mower’s legs from possible injuries.
Plastic knives work well with overgrown and dry grass. They can mow nettles and burdock trunks.
sharpening the trimmer disc on a chock or wherever you wish
You may also like
The use of iron knives only on gasoline trimmers is also justified by design features.
- The even design of the bar increases the distance to the legs, which ensures complete safety for the mower.
- Comfortable U-shaped and J-shaped handles allow you to hold the tool firmly. The D-shaped handles of the lawn mowers are equipped with a limiter that rests against the leg of the mower, which does not allow the head to be allowed to approach the legs if the cutting disc encounters a hard obstacle.
- The clutch of an internal combustion engine allows you to smoothly accelerate to a reasonable level. And when the blade collides with a hard surface, it is able to absorb part of the impact.
Thus, it is advisable to use gasoline trimmers with an installed iron blade over large areas. They will effectively cope not only with tall, rough grass, weeds, burdocks and nettles, but also shrubs, and also young trees.
The shape of the blades of the disk placed on the trimmer does not in any way affect the quality of the work performed. Speed does not depend on their characteristics. Triangular, trapezoidal, rectangular shapes - this is our client's pre-sale preparation of manufacturers.
If you intend to make hay, then it is best to put knives with a huge number of blades on the lawn mower. Carefully examine discs with eight teeth or discs with 4 large blades and 4 additional ones. 2-bladed and 3-bladed knives will crush the weed very well.
Putting the knife on the trimmer is not that difficult. The manufacturer equips its tools with a special pin that allows you to lock the gearbox and a key for unscrewing the spool with fishing line. And most importantly, when changing cutting parts, observe safety precautions and the sequence of assembly and disassembly.
The method for installing the knife on the trimmer is as follows:
- Remove the protective cover;
- We block the drive. For this purpose, you need to combine two holes - in the shaft hub and in the gear cup. After aligning them, insert a pin into the holes;
- We unscrew the spool with fishing line or the fastening nut holding the boot clockwise from the hub (if the trimmer has not yet been used);
- Next, we install the cutting knife, so that the slots on the hub washer coincide with the recesses in the hole of the cutting disc;
- Install the boot;
- Tighten the fastening nut (counterclockwise) while holding the locking pin;
- Tighten it using a tubular wrench;
- We return the protective casing to its place.
As you can see, there are no difficulties. Now, of course, feel free to start mowing the weeds in this area.
Balance check
Before you put the blade back, you need to make sure that its arms have at least approximately the same weight. Otherwise, vibration will occur during operation, which will not have a positive effect on the durability of the spindle.
Balancing is carried out mainly for double-sided single and compound knives; four-blade knives are not so susceptible to imbalance. To check the knife, you need to clamp a smooth rod in a vice in a horizontal position. The blade is put on it through a hole in the center, after which attempts are made to install it strictly horizontally. If one of the arms weighs significantly more than the other, the knife will inevitably turn to one side.
Equating the weight of the arms is done by grinding a small amount of metal off the back of one of the arms of the knife. It is not necessary to achieve ultra-precise balancing, but the knife should remain in a strictly horizontal position for at least a few seconds. Once the balancing is done, you can put the blade back in place and finally refresh the look of your lawn.
How to sharpen trimmer blades yourself?
Trimmer
designed to keep lawns and hedges looking great, which is why it's so important to keep your knife blades sharp. But what if they are still dulled by hard grass or branches? You can buy a new trimmer or trimmer head. However, it is much easier and faster to sharpen knife blades yourself. Let's find out how to do this.
First, find gloves that will protect your hands from cuts. You may also want to wear safety glasses to prevent sparks from the sanding process from getting into your eyes. At the preparatory stage, it is necessary to disassemble the trimmer
, or rather. remove the blades from Carefully remove the protective mesh and determine how to attach the blades. If they are bolted on, unscrew them with a screwdriver, if they are removed under normal tension, remove them slowly. Be especially careful, do not try to tear anything off by force, use a screwdriver.
Then secure the blades so they stay in place. You can place them in a vice. You have to make sure that the hold is strong and the blades don't "go" back and forth, but at the same time the hold should not become deformed, kneading the trimmer blades is absolutely useless. The cutting blades of the trimmer should squeeze out the blemish a little
, otherwise the grinding process will be difficult.
Self-sharpening requires a special file for sharpening metal surfaces of tools. These special files are sold at gardening and gardening supply stores and are used primarily for sharpening saws. The file should not be very wide, otherwise it won't work between the blades and it will be very difficult to work with very little. Therefore, the width and length of the file should be selected depending on the size of the gap between the trimmer blades.
Rules for replacing blades on a grass trimmer
If the trimmer disc is used regularly, it will need to be removed and sharpened from time to time, or replaced with a new one. This part can be made of metal or plastic, have a different number of blades, but the replacement process remains the same. Moreover, this procedure is similar for equipment from different manufacturers, be it Carver or Huter, but minor differences are possible. Changing the blade on a trimmer is quite simple if you follow safety precautions and know the correct procedure, a description of which can be found in the user manual. The entire replacement process, step by step, as well as the method for sharpening knives yourself, will be described in this material.
Choosing the best cutting knife for a lawn mower
Some manufacturers of trimmers with a rigid transmission shaft design additionally equip their tools with not only fishing lines, but also steel discs. This does not always happen, and if such a situation is appropriate, then, if necessary, a metal disk is installed instead of the mowing head with fishing line. However, this is not always the case. First, you need to make sure that you can use a steel disc on the trimmer. Let's consider all types and designs of cutting knives produced for trimmers.
This is interesting! The mounting hole size on all metal discs is 25.4 mm or 1 inch. Models with a larger diameter are rare, and to use them you will need to use an adapter.
When is it appropriate to use knives?
When using brush cutters in summer cottages, the most popular attachment is a fishing line. It has a low price, is suitable for different trimmer heads, and is safe to use. The disadvantage of using a fishing line is that it is only convenient for mowing short trees. In other situations, the string gets clogged immediately, regardless of whether the trimmer is a gas or electric model. In addition, vegetation is wound around the spindle, which creates significant resistance on the shaft and leads to its breakage. This can also cause failure of the piston system in lawn trimmers or burnout of the motor in electric trimmers.
Features of discs for brush cutters
Knife discs are available in plastic and metal, as well as in various shapes to perform various tasks.
- Two-, three- and four-bladed knives with pronounced blades are used for mowing grass and overgrown trees. However, they are not suitable for making hay, as they crush the shoots, cutting them several times.
- Massive four-blade discs are designed not only for clearing grass from the ground, but also for cutting hay. They prevent the shoots from being cut repeatedly, thereby making them suitable for harvesting for the winter.
- Discs with cutting edges along the perimeter are suitable for cutting reeds and reeds. Such knives are very heavy - this is a necessary quality to cut thick stems.
- Professional saw blades for brush cutters and brush cutters allow you to cut down small trees and bushes.
Plastic knives are used as an alternative to metal discs. They do not need to be tightly fastened in the head, but they rotate as a result of centrifugal force. The strength of plastic knives is high, so their service life is quite long.
On a note! The advantage of plastic discs is that when they hit an insurmountable obstacle, they bounce off and there is no re-contact.
Brush cutter knives with 36–40 teeth (and with Pobedit soldering)
Yes, from my experience, these discs are the best. They are positioned as disks with victorious soldering, but there it is so overwhelming that it all falls out in 3 days. And they continue to mow perfectly due to the huge number of teeth, diameter, and then lightness. Due to the small thickness and the huge number of perforations in the disc, even not very powerful brush cutters can pull it. And this is good. And me, after switching to this disc
, I almost never use fishing line, only in the most problematic areas.
So far, about 10 acres of strong, dry, long-lasting wood from burdocks, nettles, small growth, and all sorts of other nasty things have been mowed - I think it will not soon become dull (I don’t even put on fishing line).
I don’t make hay, but I mow willow, nettles and other growth 15-20 mm thick with a disc, 255 mm I think. It’s creepy, the monster accidentally didn’t notice the 25mm steel corner sticking out from the ground and sawed it to hell, the performance of the right knife almost didn’t drop. It cuts burdocks like slightly frozen butter.
And you shouldn’t be afraid of uneven surfaces with various molehills and other pleasures. The main thing is not to run into reinforcement or stone.
The procedure for installing the disc on the trimmer
Installing the blade on the trimmer is very simple. To do this, use the supplied key to disconnect the cutting attachment and a pin to lock the gearbox . The procedure is as follows.
- First of all, you should unplug the electric trimmer, and simply turn off the gasoline trimmer. Disconnect the protective cover and move it aside.
- Next, you need to align the holes on the gearbox and the shaft in order to insert a pin into them and lock the drive.
- If a spool with fishing line was used, it must be unscrewed clockwise.
- Then you need to find a nut to tighten the knife.
- The next step is to install the knives. Trimmer owners often wonder which side to put the disc on. This should be done so that the markings with numbers and letters are on top.
- Then you need to place the boot on top, and above it - a fixing nut, which must be tightened tightly with a wrench.
- The last step is to install the protective cover.
As you can see, the procedure is very simple and the same for many brands, be it equipment or Husqvarna.
On a note! If the owner of the device wants to replace the disk back with fishing line, you can install the reel with it in a similar way.
How to remove a blade from a lawn mower
Before you begin to partially disassemble the lawn mower, you need to protect yourself and it. While an electrically driven device can be simply unplugged, gasoline lawn mowers require preliminary preparation. First of all, you need to remove the cap from the spark plug. Next, you should eliminate fuel leaks, that is, either drain the tank, or place a sealed rubber membrane under the cap and turn off the fuel valve. The lawn mower should only be turned towards the handle unless otherwise specifically stated in the operating instructions. Before turning the mower over, be sure to clamp the crankcase exhaust hose to prevent oil spillage.
Lawn mowers use blades of different configurations. In the simplest case, this is an ordinary two-bladed plate of complex shape, but the knife can also be compound - the upper blade is intended for mulching the mown grass. There are also four-bladed knives, which can be either composite or on a common base.
The knife can be fastened either with one bolt in the center through a shaped washer, or with two bolts seated on a centering hole or pin. In any case, the threads on the bolts are right-handed, so you need to unscrew them counterclockwise. To block the shaft from rotation, place a block resting on the ground under the knife. It is advisable to remember or mark the position of the blade(s) so as not to confuse anything during reassembly. Temporarily install the removed bolts into the free holes.
Disk selection criteria
You need to choose a plastic or metal knife, taking into account the area of the area that you plan to process, as well as the type of trimmer - electric or gasoline. The number of blades will depend on what kind of growth needs to be removed using the tool. You can select the desired disk shape, number of blades and material of manufacture using the device’s operating instructions. Usually it specifies which cutters are recommended to be used to solve certain problems.
Material
It is not recommended to use metal knives on electric scythes, since the design features make their use dangerous for the user . This is explained by the curved shape of the rod, the absence of stops on the handles, and the high rotation speed.
Important! The straight shaft ensures safe use of the trimmer in moments when the rotating disk encounters an obstacle. In this situation, it bounces back towards the person, so the curved structure can cause injury.
For safety reasons, trimmers with flexible shafts should use plastic blades. Their purpose is to mow soft grasses and dead wood. Whereas metal discs do an excellent job with tall, dense, hard growth, shrubs, and tree shoots.
Blades
The number of blades is important when solving diverse problems. So, two or three pieces are enough to grind grass. To make hay, it is necessary that the disk have from four to eight blades. To destroy small shoots of trees and shrubs, instead of blades, the disks must have a large number of small teeth.
Saw blade Husqvarna Scarlett 200 22 x 1
(or Scarlett 225 24 x 1) is designed for cutting down young trees with a diameter of up to 14 cm, undergrowth and bushes (elderberry, vines, blackthorn, etc.) with a brushcutter/brushcutter.
Disadvantages of the Husqvarna Scarlett 200-22 saw blade: it has a small diameter, quickly dulls, is difficult to sharpen (see how to sharpen) and the teeth bend easily.
You also need to purchase special protection for this saw blade (protective casing for brush cutters/brush cutters) and a 4.8 mm round file for a brush cutter.
Garden tools, like any other, require regular care, which includes sharpening the trimmer. In Moscow, workshops most often provide sharpening services for standard tools - knives, scissors, pliers, and less often - drills, chainsaw chains. And our “Blade” workshop can sharpen the trimmer so that the tool will help you solve your gardening issues for a long time.
Disc sharpening
Regardless of the quality of the blade, over time it becomes dull and begins to cut grass poorly. If the knives are still relatively new and replacement is not practical, you can sharpen them yourself.
Important! Only those discs that are free of soldering from hard materials are suitable for sharpening. Such parts are thrown away and new ones are purchased instead.
To sharpen discs you need to:
- disassemble the trimmer, remove the blades;
- carefully inspect the disk - if cracks are found, it is better to replace the part with a new one, since its further operation is unsafe;
- bent blades can be carefully bent with a hammer;
- Considering the size of the disk, you need to choose the right file for metal, this will ensure more convenient work;
- sharpen all the upper cutting edges of the discs equally at an angle of 30°;
- Reassemble the trimmer in reverse order.
To sharpen the disc, you can use an emery machine at low speed, setting a grinding wheel with medium-sized grain . With such a tool the process will move much faster. For safety, you need to wear gloves on your hands and a protective mask or goggles on your face.
So, for cutting grass on gasoline and electric trimmers, plastic and metal discs of various shapes and with a different set of blades are used. They are selected according to the type of work performed and the size of the treated area. If the blades on your mower become dull, you can easily sharpen them or change them yourself. Despite the simplicity of the procedure, you need to be careful and remember safety so as not to injure yourself through negligence or damage equipment. A more detailed description of replacing knives in relation to a specific trimmer model can be found in the operating instructions or on the manufacturer’s official website. For clarity, a general diagram of the process is shown in the video.
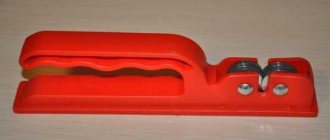
Proper sharpening of hair clipper blades
Sharpening knives for hair clippers can be done using a grinder or lathe, a stone for kitchen tools, or sandpaper. Surfaces with coarse and fine grains are needed. Between uses, the blades are rinsed with water.
Higher quality processing is guaranteed by the use of expensive professional equipment Front Plate Inveter, Adems Full Drive, NB CS-10. The devices make it possible to more accurately maintain the sharpening angle of 35-40 degrees. But for the operation of the machine, it is no less important to then correctly align the static and moving knives. The teeth of the first one should be higher; a gap of 0.7 mm on one side and 0.5 mm on the other side is required between both blades.
When do you need to sharpen hair clipper blades?
Sharpening blades for hair clippers is necessary if:
- the quality of the hairstyle obviously suffers, despite the previous technique;
- some hairs remain longer than others;
- the tool begins to tear and crush them;
- for alignment, you need to put in more effort so that the cut turns out the way you want;
- despite this, the client complains of pain during the procedure;
- If you have to cut your hair short, redness will remain on the skin.
The flat surface of a sharp hair clipper blade, despite the serrations, looks smooth and free of burrs. With a dull knife, it may be slightly wavy, which can be seen if you place it at eye level. Hairdressers sharpen their tools every 3-4 months, but if they are used infrequently at home, blade treatment is required much less frequently.
How to sharpen knives on a hair clipper
You can sharpen knives on a clipper using:
- mains-powered grinding machine;
- professional set for sharpening hairdressing and manicure tools;
- sandpaper; for sharpening kitchen tools.
The second method gives the highest possible quality, but the device costs from 60 thousand rubles. All other devices are more accessible for independent use.
What machine is used for sharpening
Horizontal grinding machine ShM-36 economy
For sharpening, a grinding machine with a polishing disc is useful. It is better if it is electric, so the work can be done faster and without defects. The process consists of several stages:
- The blade must be separated from the main body and cleaned of hair and dust.
- The machine needs to be turned on.
- The blade is pressed against the rotating disk so that the edge is ground evenly.
- When it is brought to the desired state, the process is stopped, the blade is washed to remove abrasive particles.
Overview of species
For brush cutters, preference should be given to special knives. They allow you to cut taller, tougher grass than a fishing line. In addition, the knife is suitable even for pruning young bushes.
There are many types of discs that differ in cutting edge, shape and material from which they are made.
Each type has its own characteristics.
For making cutting edges
- with two teeth - for young soft grass, lawns;
- with three teeth - for young grass, dead wood, weeds;
- with four teeth - for hard grass and young tree shoots;
- with eight teeth, they cut the grass without chopping too much;
- with 24 teeth - for hard and dry grass, bushes, thin trees;
- with 40 or more teeth - for mowing any grass, bushes, trees;
- with 80 and more - for professional lawn mowers.
Blades:
- with two - for a soft and low braid;
- with three - for mowing weeds;
- with four or more - for mowing grass for hay.
Purpose of weeding knife WINDSOR 300-3 2 mm (1)
- it is intended for making hay from seeded large upright grasses: alfalfa, sainfoin, barley, oats (productivity
10 hundred/hour);
for mowing hard weeds; for bent and tangled grasses and weeds (it turns out worse); and this is a trusty knife (for me the best) it can mow everything! (the middle of the knife is wider).
Comparing the Windsor knife with the Husqvarna knife
- It unwinds more easily.
- It moves more easily (light).
- It is easier to sharpen (the metal is weaker) and there is no question of how to sharpen it.
- It cuts easier (thinner).
- He can mow small, sparse grass.
- But such a brushcutter blade quickly wears out: in some places, three times faster than Husqvarna knives.
- But it bends, for example, when it hits a hard stump.
- But it has less inertia for chopping.
Review of manufacturers
There are a huge number of manufacturers of discs for lawn mowers. It is worth familiarizing yourself with the most popular among them. For example, the Bosch brand is known for its two- and three-blade knives . The peculiarity of the knives of this company is that each of the blades can be replaced separately from the others.
Another company known for its blade knives is Shark. The advantage of the design is that the blades are fixed relative to each other at an angle of 120 degrees. As a result, it is easy to adjust each of the blades, which is convenient for different vegetation. Another feature of knives from this manufacturer is their low weight.
Husqvarna is also known for its multi-tooth knives , especially its hay knives. Ideal for thick and dense grass. Among the disadvantages, it is worth noting the large weight of the discs and the fact that you cannot turn the knife over if one of its sides is sharpened.
Inforce knives work well through undergrowth and branches. In practice, the metal from which the cutting elements are made shows itself to be very durable. The only thing is that in some models the pobedit soldering wears off very quickly.
from Maruyama often receive positive reviews . They are characterized as very strong and durable.
The discs cope equally well with various types of grass, as well as with shrubs and trees.
Rezer discs are excellent at cutting grass, weeds, and branches. The teeth can withstand even cutting down trees 6 or more centimeters thick. However, they have the disadvantage of winding the grass onto the shaft.
The Patriot company produces high-quality knives. Users note that if you select the right disk for a specific job, it will last a long time and surprise you with its performance. Knives from this manufacturer are very easy to sharpen yourself.
Advantages of trimmer discs compared to fishing line
The trimmer disc has its advantages compared to the cord. You need to know these advantages in order to ultimately decide whether it is worth buying and using metal cutting knives. Let's consider all the advantages of trimmer discs:
- Ability to cope with different vegetation, unlike fishing line. This can be dead wood, long and thick-stemmed grass, and even small vegetation. The line is difficult to cope with medium-sized grass, and it is not able to cut thick-stemmed grass. The cord will either get tangled in the grass, or the line will quickly wear out, which is not at all rational
- High speed of achieving results. Unlike a fishing line, the disc cuts the grass efficiently in one pass (with good sharpening), without leaving “roosters”, so mowing with a trimmer with a metal circle is faster than when using a cord
- Discs do not wear out, unlike cord. Cutting knives or parts of the circle become dull, but the issue is resolved by sharpening. How to sharpen a metal trimmer wheel is described in the material below. With prolonged use, cutting devices wear out, but they last for at least 3-5 years
- Long service life, unlike fishing line, which is due to the design of the equipment
There are also disadvantages to the cutting devices for trimmers under consideration. The first drawback is that you cannot use the tool with a disc when cutting grass near obstacles in the form of trees, buildings, stones, benches, etc. When a disk collides with an obstacle, the drive slows down, which is reflected in the following disadvantages:
- Engine overheats
- The cutting parts of the disc are damaged and become dull
- Transmission mechanisms—flexible and rigid shafts (gearbox)—failure
If you plan to mow thick grass in a field, then it is impossible to do without a trimmer with a metal disc installed. The line is used for cutting small grass in garden areas near obstacles.
This is interesting! Trimmers with a curved shaft design cannot use steel blades for safety reasons. If the disc hits an obstacle, a kickback effect occurs, whereby the cutting part can get under the operator’s feet. As a result, the operator risks serious injury.
How to choose?
When choosing a blade for a mower, you should pay attention to many points. For example, discs with metal teeth are most often made in the shape of a circle. The teeth may differ in shape, type, and size. For small trees and thick grass, it is better to give preference to discs with a large number of teeth.
It is worth noting such an advantage of milling wheels for brush cutters as a quick increase in speed. However, a high moment of inertia does not have the best effect on the drive unit of the unit. For dense mowing, for tall, as well as for small coarse grass and shrubs, it is better to choose wheels with 40 or more teeth and perforations. They are able to avoid shredding vegetation, and at the same time it will practically not wrap around the circle. If the number of teeth is more than 60, then you can safely mow grass and trees with a trunk thickness of up to 7 cm.
Discs with a solid blade and without holes are heavy, so they should be chosen for powerful trimmers (more than 40 cm3). At the same time, they are convenient for mowing sparse grass and dead wood, and they are also suitable for mowing with different densities.
Discs with pobedite tips should be chosen for mowing plants near obstacles. If you need to mow grass for hay, then you should give preference to steel knives with a large number of teeth with an even sharpening. Solid discs with a number of teeth from 16 to 32 are good for cutting plants with thick stems.
For low-power trimmers, blade discs with a minimum moment of inertia are better suited. The fewer blades, the stronger the tool will chop the grass. Thus, discs with two blades are most often used for mowing uniform grass. The main advantage of this type is that it throws cut plants aside.
When making hay, it is recommended to choose knives with four blades so that the grass does not get chopped up.
The thickness of the blades is also important when choosing. Discs can be stamped or forged. The first ones are characterized by a low price, but they can be seriously damaged if they collide with an obstacle. As for forged wheels, they do not develop chips or cuts when colliding with hard objects.
For electric trimmers, you should only choose plastic blades. Their low weight will not create extra load on the engine. Soft plastic allows the knives to not break when they encounter an obstacle, but simply bend or deform slightly. It is recommended to use such cutting elements for mowing thick, soft grass.
How to catch more fish?
Instructions for correctly winding the thread on the trimmer spool:
- First of all, you need to disassemble the head. To do this, press the latch and turn the cover to the side. The coil is then removed.
- Measure the required amount of thread to cut and insert it into the socket.
- Wrap the line on both sides in the direction of the arrow.
- The 15 cm long ends should be left untwisted.
- These ends are inserted into opposite slots.
- Then the ends are fixed in the hole on the head.
- The coil is then carefully inserted into the housing by gently pressing on it.
- If necessary, the other ends of the thread can be pulled out. To do this, first pull one end of the thread and then the other so that they easily pass through the slots on the head.
- Now you need to assemble the grooves on the body and tighten the cover.
- Then press down on the reel and try to screw it in completely. If you hear a click, the reel will lock into place.
- Next, you need to stretch the free ends of the thread to the end.
How to sharpen and install?
With constant use, a gas mower will sooner or later begin to require regular maintenance. One of the important points is the timely sharpening of knives. A metal disk, of course, can work in a blunt state, but it cannot be used. This leads to decreased performance, engine overheating, and gearbox wear. Sharpening the teeth or blades is not at all difficult, but if desired, you can simply install new knives.
- First of all, the knife is removed from the device. It is not recommended to sharpen directly on a brushcutter, as it is unsafe.
- Next, you need to inspect the cutting element for chips, cracks, and damage. If they are, you will need to install a new disk.
- To sharpen knives, you can use a file, sharpener or grinder. The safest tool is a file, which even a beginner can handle. To sharpen the knife, it is placed in a vice and then manually processed at an angle of 30 degrees. This method is considered the highest quality.
When using an angle grinder, it is important not to overheat the metal, otherwise the disc will quickly become unusable. A grinder with a thin abrasive wheel is suitable for sharpening discs that have many teeth.
- Once sharpening is complete, you can put the disc back on the trimmer and check how efficiently the tool works. Do not touch the sharp parts of the knife to avoid injury.
Over time, the knife wears out and should be replaced. Installing a new disc on the trimmer is completely easy. This procedure takes no more than 5 minutes if you follow simple instructions.
- First you need to remove the protective cover, but on some models it may remain. For example, metal casings cannot be removed from brush cutters.
- Next, you should take a six-sided key (hexagon) and use it to lock the gearbox. The hole for blocking must be looked for on the side or at the end.
- After this, you need to unscrew the mowing head from the brush cutter.
- Then the disk will be installed in its place. It is worth paying attention that the inner diameter of the knife must be completely located in the groove provided for this purpose. The front side of the nozzle should be facing up.
- Now you need to secure the disk with a special washer and screw the fastening nut counterclockwise. Before doing this, it is necessary to block the gearbox shaft.
- The last stage is the installation of a protective plastic casing.
Cleaning and editing
When the knife is removed, the first thing you need to do is clean it from adhering dirt and hardened herbal juice. The easiest way to do this is to use a metal brush. The knife strip should be clean on all sides: not to a metallic sheen, but without the smallest adhering fragments.
Often, due to hard objects such as stones and chips getting into the working area, the blade is quite noticeably deformed. Most blades themselves are not straight, but the cutting edge and the strip 10-15 cm from it need to be examined for the presence of local bumps and curvatures. This is done using a short straight ruler.
You can straighten the blade with a regular hammer, the edges of which are slightly rounded. The knife is placed on a flat, massive support (anvil), then the metal is given the correct shape with weak blows. You need to edit the knife starting from the edges of the curved section, gradually moving towards the center. A crooked blade body is a minor problem, but it is very important that the cutting parts are straightened into a straight line. You also need to check the ejection blades, which often become unbent from the impact. If the blades are bent at different angles on different blade arms, this will impair air flow and the grass clippings will not be mulched properly.