If you are planning to smelt something in Minecraft and you need a smelting (blast furnace), then you have come to the right place. Crafting this item is the first step to being able to obtain iron ingots from your old equipment, which you can use to craft other items.
Blast furnaces can be found in the villages of the Minecraft world, namely in the houses of gunsmiths. If none of the local residents uses it in their work, then any of the villagers can change their profession to a gunsmith.
The smelting furnace operates twice as fast as a normal furnace and can be used to smelt ore, iron armor, and tools. To craft this object, you will first need to make a normal furnace using 8 pieces of cobblestone or blackstone in the crafting grid at the workbench.
Now that you've got the base, find out how to create a smelting furnace out of it and what you can do in it once it's all lit and ready to go.
Creation[edit | ]
Maximum and minimum smelter size
To create, you will need the following blocks: a baked brick, a smelter controller, a fired tank, a foundry tap, a smelter drain and a foundry table or foundry tank underneath. To create baked brick, you need to make cement; it is done in two ways (see screenshots). When using the first method you will receive two units of cement, with the second eight. Next, the cement must be melted in a conventional furnace. After melting the cement, you will get burnt brick. From four baked bricks, a block of baked brick is made, used in the construction of a smelter. The controller is crafted from 8 baked bricks (similar to the chest recipe).
Red dust[edit | ]
The smelter also fully supports working with red dust and the mechanisms that operate on it. For example, you can install a button or lever on the controller itself, or provide a signal using red dust. In order to automate this system, you will need to create an endless cycle of red dust. However, in any case, it is necessary to manually collect the resulting materials.
- Tinkers construct adds alloys of different metals to the game. Alloys are created when 2 or more metals are mixed in precise proportions in a smelter.
- Bronze
- the most common alloy. It is made in a ratio of 3 copper to 1 tin.Block, ingot and fragment of bronze.
- Aluminum brass
is a useful alloy that can be used for casting casts. It is made in a ratio of 3 aluminum to 1 copper.
Block, ingot, fragment of aluminum brass.
- Alumite
is a durable alloy for cobalt and ardite mining. It is made in the proportion of 5 aluminum to 2 iron and 1 obsidian. (In new versions of Tinkers Construct, Alumite has been removed)
Block, ingot, fragment of alumite.
- Manullin
is the strongest alloy added by Tinkers construct. It is made in the proportion of 2 cobalt to 2 ardite. - Pig steel is
an alloy that has the appearance of a pig, but in the form of an ingot. It is made in the proportion of 144 mB iron, 40 mB blood and 72 mB clay. - Slithesteel
is an alloy whose pickaxe tip has a unique
Crusher
with which the pickaxe can break not only stone, but also wood, sand, and earth at the same speed. Made in the proportion of 72 mB iron, 125 mB Purple slime, 144 mB stone. Added around version 1.10.2.
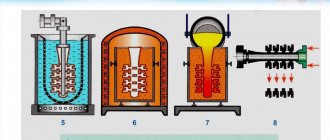
Basic structural elements and materials for assembly
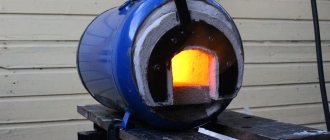
The main element is, of course, the heater. It is best to choose an electric one. Its greatest advantage is that it is very easy to operate. In addition, there are such details as a heating chamber and a special heat accumulator. In order to successfully melt aluminum, heat control must be in place. This will help make the process continuous.
If you have to melt several different materials, then the aluminum itself should be subjected to the process not just once, but several times. In this mode of operation, it is necessary to ensure that the heat accumulator also functions as a regulator. This is necessary in order to maintain the desired temperature of the aluminum after melting.
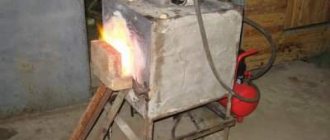
In order to make a stove for melting aluminum, you need to prepare the following materials:
- grinder, wire and metal bucket;
- seven bricks;
- construction-type safety glasses, a few unnecessary pieces of metal;
- hammer and other standard tools.
Accessories:
Here is a list of supplies we used:
- Insulating fire bricks;
- Furnace cement;
- Crucible tongs;
- Ceramic terminal blocks;
- High temperature wire;
- Baking dish;
- Graphite crucible;
- Type K thermocouple;
- Heating element coil wire;
- PID controller;
- Corner iron 1”;
- Toggle switch 125/250 V;
- 14 gauge power cable.
Review of the SmartMelt compact crucible furnace: mini-melting for home or workshop
Surely many have encountered the need to cast metals at home. But really, is it possible to prepare a mold and cast non-ferrous or precious metals on your own and at minimal cost for hobby, mini-production or educational purposes? So, I found an interesting, inexpensive and compact version of a crucible furnace that can be installed in a home workshop or garage.
Crucible mini melting furnace SmartMelt
Mini muffle furnace SmartKiln
As you know, for melting and casting metals you can select equipment of various classes: from budget gas forges to induction installations and jewelry equipment. Today we will talk about a convenient budget option - the SmartMelt mini crucible furnace for melting non-ferrous and precious metals. There is a larger option - the SmartKiln mini muffle furnace. Both options operate from a household network of 220 V/50 Hz (1 phase), do not consume excessive electricity (no more than 1.8 kW, like a household electric kettle or iron), do not require a special room, and are also equipped with a controller to maintain the set temperature.
The SmartMelt crucible mini-furnace is designed for use in domestic conditions. It is a fairly compact device in a stainless steel case and well-thought-out thermal insulation. A special PID controller is used to control the temperature.
Characteristics: Brand: Plavka.pro Model: SmartMelt Type: Crucible furnace Power: 1800 W. Maximum temperature 1150 degrees Time to reach maximum temperature: 6 minutes Dimensions: 170 x 170 x 400 mm Weight: 7.5 kg.
A special thermocouple is installed inside for temperature feedback and control of heating elements in temperature maintenance mode. The oven is connected to a 220 V/50 Hz household network with a 2 kW (16A) Euro socket.
The work area is covered with a special lid. A snap lock is used for fixation; there are loops on the reverse side. The mechanism is simple, it is quite possible to repair it yourself in case of long-term use.
My delivery package included a graphite crucible - a simple and effective way to heat metals. Conducts heat well and heats up well.
There is a flange for installation, and a ring with a groove for pliers for gripping. Crucibles differ in volume (1 or 2 kg crucibles, which corresponds to 100 and 200 ml of melt), as well as in body material (ceramics or graphite). It makes sense to purchase spare crucibles, or ceramic ones (they wear out less).
A groove is provided in the crucible for careful draining of the melt. The crucible body is installed in a special hole in the furnace.
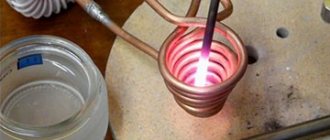
The spirals of the heating elements and the thermocouple located nearby are clearly visible through the hole. The internal space is filled with a high-temperature thermal insulator - the outside of the stove practically does not heat up, retains heat perfectly when closed, and heat leaks are minimal.
Above I mentioned tongs: simple tongs from the kit, which are convenient for removing the crucible and pouring the melt into the mold. The length of the tongs is just over half a meter, which makes it possible to comfortably work with hot metals.
Ceramic or graphite crucibles are tightly grasped with tongs, making it possible to carefully install or remove the crucible for working with molten metals.
Operating the controller is quite simple: there is a target temperature setting (SET) function in degrees Celsius, as well as a display of the current temperature in degrees Celsius. Press SET, use the up or down arrows to select the target temperature, and the left arrow moves the cursor through the digits. After installation, the heating elements begin to warm up smoothly. After reaching the set point, heating and holding the temperature value. The melting point of the selected metal can be found in available sources.
A single-stage PID algorithm is used to control and maintain the temperature. The oven can not only maintain the temperature, but also provide smooth cooling. Examples of stove consumption: - at rest (only the controller works); -temperature maintenance (PWM, partial power); — warming up (managed to capture 1.6 kW, consumption pulses reach 1.8....2 kW, which is quite normal).
If you purchased a furnace for a hobby, you can start by casting metals and alloys with low melting points: tin, lead, copper, brass, bronze, silver, etc. Scraps and scraps of non-ferrous/precious metals and their alloys are quite suitable.
Heat-resistant materials can be used as a casting mold: special gypsum, silicones, etc. The more convenient the material is to process, the better the quality of the casting. For example, gypsum. Knead, let it dry a little, and form the model. Can be made from two halves and then fastened together.
We install the crucible with the material for melting and close the lid. Preheat the oven to the desired temperature. Heat it up and wait for it to melt completely.
Be careful, it is very hot in the stove - 1000...1100 degrees, depending on how much you set (for lead or tin it can be lower - 400...450). If you are experimenting at home, it is better to cover all accessible surfaces from melt splashes. It will be a little simpler in a garage or workshop.
Depending on the volume of material in the crucible, it may take 5...15 minutes. The heating time to a maximum of 1150 degrees is 6 minutes. Again it depends on the type of metal or alloy. I usually look at the temperature readings as soon as they stop jumping (the temperature has leveled off, the crucible and the entire volume of metal have warmed up), I wait a minute and check.
The result of casting in plaster. There is some roughness that can be removed by sanding with a wheel or sheet of sandpaper.
Photo: original and casting. What can I say - without a vacuum machine, jewelry quality cannot be achieved. Simple parts turn out decently, taking into account further processing (grinding, etc.). This is a topic for further trial and error.
Quite a good entry-level option that does not require a specially equipped room, powerful electrical wiring, etc. The compact SmartMelt mini crucible furnace or SmartKiln mini muffle furnace are well suited for small volume melting of non-ferrous and precious metals. I will continue to experiment, especially since casting wax, wax for CNC processing, wax for 3D printing (SLA or FDM), as well as ready-made waxes are now available.
You can find other reviews and tests of smartphones, tools and gadgets in my profile and on the links below.
How to use[edit | ]
First add lava to the tank, then right
On the controller and in the interface that opens, you will need to place the item you need for melting. If everything is done correctly, then a readiness indicator will appear next to the item icon, and a block symbolizing the item will appear in the game world, inside the smelter.
If you click on molten metal in the controller menu, this metal will go down and pour out first.
In order to pour out the molten metal, you will need a casting tap or pouring channel installed close to the melting outlet. Under the casting tap or pouring channel there must be a reservoir for filling the molten metal, for example a casting table or a casting tank.
It is imperative to prepare a cast on the casting table to obtain the mold.
Nothing is required to operate the casting tank, but the amount of resources spent on filling the tank increases dramatically.
- Bake
If you place a funnel under the tanks, things will automatically move into the block to which the funnel is connected. Also, if you place the funnel directly into the controller, things loaded from above will be placed in the smelter.
(100% more profitable than a furnace) - one block of metal (smelted in a smelter) = 4.5 ore.