In our age of technology, a screwdriver is no longer something special and is probably found in every home. Typically, this device is equipped with rechargeable batteries for remote use.
Over time, the batteries lose their strength and can no longer be charged, buying new ones is impractical and expensive, and the device begins to gather dust in the closet. What to do with a screwdriver that has become unusable? Today we will try to talk about several ideas for reusing the device for household purposes!
What you can make with your own hands from a screwdriver
These design features, as well as technical characteristics, are important. It depends on them what kind of homemade products you can assemble from a screwdriver. All household appliances and power tools run on electricity. In this case, the work is performed by electric motors of different designs and power. They are powered by alternating or direct current.
And then it is quite possible to assemble the following technical devices using a screwdriver or from some of its parts with your own hands:
IMPORTANT! If the impact model is powerful, then you can use it to make tampers for concrete using a special attachment. It will take you time to implement each option. It will be different. You also need to be prepared for additional costs. By the way, they are insignificant. In some cases there will be no cost at all.
Design of a charger from a screwdriver
Replaceable battery.
The GB1 replacement battery is a unit in which 12 nickel-cadmium (Ni-Cd) cells, each 1.2 volts, are connected in series.
In the schematic diagram, the elements of a replaceable battery are outlined with a dotted line.
The total voltage of such a composite battery is 14.4 volts.
There is also a temperature sensor built into the battery pack. In the diagram it is designated as SA1. Its operating principle is similar to the KSD series thermal switches. Marking of thermal switch JJD-45 2A. Structurally, it is fixed to one of the Ni-Cd elements and fits tightly to it.
One of the terminals of the temperature sensor is connected to the negative terminal of the battery. The second pin is connected to a separate, third connector.
Possible problems with the charger.
Over time, due to wear and humidity, the SK1 “Start” button begins to work poorly, and sometimes even fails. It is clear that if the SK1 button malfunctions, we will not be able to supply power to the U1 chip and start the timer.
Failure of the zener diode VD6 (1N4742A) and microcircuit U1 (HCF4060BE) may also occur. In this case, when you press the button, charging does not turn on and there is no indication.
In my practice, there was a case when the zener diode struck, with a multimeter it “ringed” like a piece of wire. After replacing it, charging began to work properly. Any zener diode with a stabilization voltage of 12V and a power of 1 Watt is suitable for replacement. You can check the zener diode for breakdown in the same way as a regular diode. I have already talked about checking diodes.
After repair, you need to check the operation of the device. By pressing the button we start charging the battery. After about an hour, the charger should turn off (the “Network” indicator (green) will light up). We remove the battery and make a “control” measurement of the voltage at its terminals. The battery should be charged.
If the elements of the printed circuit board are in good working order and do not raise suspicions, and the charging mode does not turn on, then you should check the thermal switch SA1 (JDD-45 2A) in the battery pack.
The circuit is quite primitive and does not cause problems when diagnosing faults and repairing even for novice radio amateurs.
Making an angle grinder from a screwdriver
There are many options for how to remake an instrument. The easiest way is to use ready-made or homemade attachments or adapters. We fix one end of it in the cartridge. You need to attach a disk to the second end.
You can also convert a drill-driver into an angle grinder using a special type of attachment, which is equipped with a gearbox. To do this, we disassemble the power tool, dismantle its gearbox and install an attachment instead. And you have in your hands a tool that is very reminiscent of an angle grinder.
Purchasing such a special attachment will not be cheap. And modification will take a lot of time. To make homemade attachments, use studs of suitable diameter, nuts, and washers. They can even be used with cordless electric screwdrivers.
IMPORTANT! Of course, homemade ones are less effective compared to factory-made grinders. The difference in rotation speeds of the nozzles is large. Approximately 3000 rpm in a screwdriver versus 11000 rpm in an angle grinder. Low power coupled with low speed significantly limits the functionality of a DIY device.
DIY devices are recommended for use only in emergency cases. Since reversal is possible on the tool being remade, in order to avoid injury it is necessary to control the direction of rotation of the disk.
Children's vehicles
Creating children's vehicles that move without applying physical effort to them has always been and remains a fascinating task for men who love to tinker with tools in their own garage or workshop. Of course, it is worth noting that some of these cars require adult supervision in order to avoid collisions, injuries and various troubles “on the roads.”
More useful homemade products:
Security alarm from a push-button telephone
Broken screwdriver? Don't rush to throw it away. If you have golden hands and you are a professional design engineer or you just like to make something exclusive, if you have a son who is a young technician, or on weekends you get together with friends and share fresh design ideas, then a faulty screwdriver is just a godsend for you.
Try using basic tool parts to make screwdriver crafts . What might be useful? First of all, this is, of course, the engine. Although, you can use almost everything, from the case to the battery, depending on which parts are working. In order to figure out what exactly to make from a screwdriver, it’s best to use your imagination. But if you are still new to construction, we can offer you several ready-made options to make homemade products from a screwdriver useful and, most importantly, working.
So, here is a short list of what can come out of an old screwdriver in the hands of a creative craftsman:
– lawn mower screwdriver. You will need a screwdriver, 2 strong knife blades or a hacksaw blade, as well as a bolt and nuts. The knives are attached crosswise to the drill, turn on the screwdriver, and we get moving knives.
– screwdriver-blender or mixer. And even an ice screw. The principle is the same, the only difference is in the working nozzle.
– an electric spit for frying meat or a fan for blowing coals in the grill.
– many options that are more complex, but also more interesting. These are all kinds of electric cars. There is a lot of scope for the designer's imagination. The screwdriver body can be used in the construction of the frame, the motor for its direct functional purpose. Some craftsmen even make cars using a remote control. Even design engineers use screwdrivers for unusual purposes. For example, such a conceptual vehicle has already appeared in Europe, where the engines are Bosch screwdrivers.
– wind generator. You will need a motor and a chuck. The blades can be made from PVC pipes. Of course, some more parts will be needed, tubes, nuts, bearings, but the main parts are those that can be obtained from a screwdriver with a dead battery.
READ Pneumatic jackhammer device and operation
– there are even more non-standard options, for example, using a motor to design a device that rocks a baby stroller. In this case, you will need a platform with limiters on which to install the stroller, the engine, a pair of levers and gears.
This is not an exhaustive list of homemade screwdrivers. For a craftsman who has an understanding of the principles of operation of a power tool, creating one of the listed items will not be difficult. And if you also show your imagination, then homemade products from a screwdriver can become real works of art of design thought. In any case, regardless of the result, you will have fun and enjoyment.
The presence of a screwdriver inspires many craftsmen to create additional devices and tools based on it. The imagination of the “Kulibins” is limitless. Equipment for the carpentry workshop - lathe, drilling, milling machines, drill and grinder, mechanical saw and impact wrench.
Even children's transport - electric cars and snowmobiles - are not left out. What can we say about the necessary household appliances - trimmers and lawn mowers, and even a boat engine. The most amazing thing is that all of the listed “homemade” items, made with your own hands, work on the basis of an ordinary old screwdriver and talented design solutions of home craftsmen.
Assembling a camping electric generator or wind generator
To make a dynamo, it is necessary to radically modify the product. After all, everything you need to make a camping generator is already included in the design of the device. Only minor modifications will be needed.
With do-it-yourself equipment, you can charge 6 or 12 V batteries. An electric tool with an operating voltage of 18 V or higher will be suitable for reworking.
The modification is done like this. First, disassemble the electric screwdriver. Then the electronic board is soldered. Instead of batteries, you need to place a diode bridge suitable in size and technical characteristics inside the battery case. Also make a handle with a handle that is comfortable for you. The end without a handle must be secured in the chuck.
IMPORTANT! A diode bridge is needed so that the electric generator handle rotates in any direction. To get a simple wind generator, you can insert an attachment with blades instead of a handle.
We remove the cartridge with the gearbox, that is, the rotor part. We insert the electric motor shaft into the chuck. We attach a round metal plate, approximately 1 mm thick, to the gearbox gear with bolts. It will become the basis for fixing the blades, which can be made, say, from plastic pipes. Then we put a clamp with a clamp on the shaft, which is located between the cartridge and the gear.
We cut out the base in the shape of a rectangle from plywood. You can also use thin metal for this. the engine to it . To do this, you need to drill holes for fastening in the right places in advance.
READ How to Make a Handheld Circular Saw
In order to protect the wind generator, for example, from dust and precipitation, make a casing from under a hard coffee can. We insert the base with the motor and cartridge inside. Take glue and secure the elements. To secure the cover you need a sealant.
We attach the made blades to the round plate of the unit. We make a weather vane, on one of the ends of which we mount the assembled generator. We connect the wires to the motor outputs. And now all that remains is to check the output voltage. Do this Using a multimeter while rotating the blades.
IMPORTANT! There are many options for wind turbines. Even the entire screwdriver, equipped with an attachment with blades, is attached to the support.
Replacement for various household appliances
A screwdriver in the household can replace a large number of different devices:
- If you attach the mixer attachment to the chuck, you can beat the desired products (eggs, dough) at low speeds.
- There are special brushes made of metal or plastic on sale, which, when installed, can quickly clean surfaces from rust or old dirt.
- If you purchase a round Velcro attachment, you can glue an ordinary kitchen sponge onto it, which you can use to polish a bathroom or tile.
Velcro attachment with a set of sponges
- A special attachment will help you sharpen pencils quickly and on an industrial scale.
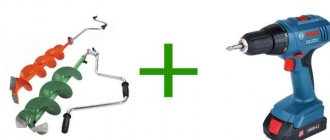
- When installing a small drill using a screwdriver or drill, you can make holes in the soil for garden plants.
- There are attachments on sale that make a construction mixer out of a regular drill. The power of this device will be noticeably less, but it is suitable for small jobs.
Mixer attachment for drill
Ideas for homemade techniques using a screwdriver
What are the functionality of this or that model? They are determined by the amount of power, torque, and whether there is a shock function.
An interesting nuance is that with your own hands at home you can make a screwdriver , which will then be suitable for use in everyday life. If you have set yourself such a task, then prepare not only a power tool, but also additional materials and parts. Without them, you will not be able to remake the screwdriver.
what can be made from a motor with a screwdriver. Motor from screwdriver 550
There is a reason for such work. In the sense that each homemade device will cost you less than its factory-made counterparts. And then your manual labor will be more effective. Automation will take over the entire load.
boat motor
How nice it is to take a boat ride in warm summer weather. The only problem is that I don’t want to pick up the oars. Ingenuity comes to the rescue.
What if you adapt a motor from a screwdriver to a boat using available tools?
It’s easier to use the following materials for this “idea”:
- Screw (rabbit):
- Long metal pin;
- Battery powered screwdriver.
The essence of the idea is as follows. A hole with a diameter equal to a metal pin is drilled in the propeller (in this situation, the propeller). The screw is installed on the stud and securely fastened. The long pin itself is inserted into a screwdriver, which turns the pin together with the screw. The boat engine is ready!
All that remains is to come up with some kind of metal structure that will allow you to securely attach the screwdriver to the boat itself. But this is too simple a task to discuss. And every amateur will be able to show his inventive abilities in this matter.
We lower the screw on the hairpin into the water and turn on the screwdriver. All that remains is to slowly swim and enjoy the beauties of nature that you see around. There is only one thing - realistically evaluate the capabilities of the batteries and “don’t swim behind the buoys.”
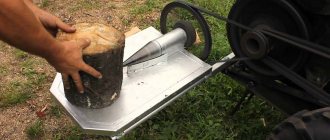
Making a trimmer or lawn mower out of a screwdriver
During work, you will also need a pipe and an angle for it with a diameter of 40 mm.
The remodeling process begins with disassembling the electric screwdriver and removing the motor. Then you need to attach it to the plug. The mounting holes are pre-drilled in it. Use two screws to secure the electric motor , soldering the leads to the motor. We install an electric motor. In this case, you need to advance its wiring in the pipe.
IMPORTANT! Using a marker on the tube, we make a mark in the place where the future switch will be located. Next, you need to attach contact clamps to the ends of the outgoing wires so that you can quickly connect to the battery.
We make a battery holder from the adapter, connect the drive, connect the adapter to the handset. The blades need to be made knives. Using a regular clamp for terminals, we connect the nozzle to the motor shaft. We make a protective casing from a plastic bucket. We glue the part to the pipe. You still need to check how efficient the design is.
IMPORTANT! This device makes it possible to mow only the grass cover that has soft stems.
There are many different options for lawn mowers, which are based on networked models of drills and screwdrivers.
The first step is to create a base from metal, plywood and other materials. Wheels and a control handle will then be attached to it. The electric screwdriver is fixed with clamps or to a stand. Insert the cutting attachment into the chuck. To protect your feet from flying grass, you need to attach a cover to the back of the base.
Feeding is done through a button. but you can do it directly from the network. If you need a fairly functional lawn mower, then take a drill-driver with a power of 0.5 kW or more.
Scheme, device, repair
Without a doubt, power tools greatly facilitate our work and also reduce the time of routine operations. All kinds of self-powered screwdrivers are now in use.
Let's look at the device, circuit diagram and repair of a battery charger from a screwdriver.
First, let's take a look at the circuit diagram. It is copied from a real charger circuit board.
Charger circuit board (CDQ-F06K1).
The power part of the charger consists of a GS-1415 power transformer. Its power is about 25-26 watts. I calculated using the simplified formula that I already discussed here.
A reduced alternating voltage of 18V from the secondary winding of the transformer is supplied to the diode bridge through fuse FU1. The diode bridge consists of 4 diodes VD1-VD4 type 1N5408. Each of the 1N5408 diodes can withstand a forward current of 3 amperes. Electrolytic capacitor C1 smoothes out voltage ripples after the diode bridge.
The basis of the control circuit is the HCF4060BE chip, which is a 14-bit counter with elements for the master oscillator. It controls the bipolar transistor of the pnp structure S9012. The transistor is loaded onto the electromagnetic relay S3-12A. The U1 chip implements a kind of timer that turns on the relay for a given charging time - about 60 minutes.
When the charger is plugged in and the battery is connected, the JDQK1 relay contacts are open.
The HCF4060BE chip is powered by a zener diode VD6 – 1N4742A (12V). The zener diode limits the voltage from the mains rectifier to 12 volts, since its output is about 24 volts.
If you look at the diagram, it is not difficult to notice that before pressing the “Start” button, the U1 HCF4060BE chip is de-energized - disconnected from the power source. When the "Start" button is pressed, the supply voltage from the rectifier is supplied to the 1N4742A zener diode through resistor R6.
Next, the reduced and stabilized voltage is supplied to pin 16 of the U1 microcircuit. The microcircuit starts to work, and the transistor S9012, which it controls, also opens.
The supply voltage through the open transistor S9012 is supplied to the winding of the electromagnetic relay JDQK1. The relay contacts close and power supply is supplied to the battery. The battery begins to charge. Diode VD8 (1N4007) bypasses the relay and protects transistor S9012 from a reverse voltage surge that is formed when the relay winding is de-energized.
The VD5 diode (1N5408) protects the battery from discharge if the mains power is suddenly turned off.
What happens after the contacts of the “Start” button open? The diagram shows that when the contacts of the electromagnetic relay are closed, the positive voltage through the diode VD7 (1N4007) is supplied to the zener diode VD6 through the quenching resistor R6. As a result, the U1 chip remains connected to the power source even after the button contacts are open.
The operating algorithm of the circuit is quite simple.
When plugged into a 220V network, the charger does not show its operation in any way. The indicators (green and red LEDs) do not light up. When a replacement battery is connected, the green LED lights up, indicating that the charger is ready for use.
When you press the “Start” button, the electromagnetic relay closes its contacts, and the battery is connected to the output of the mains rectifier, and the battery charging process begins. The red LED lights up and the green LED goes out. After 50 - 60 minutes, the relay opens the battery charging circuit. The green LED lights up and the red LED goes out. Charging is complete.
After charging, the voltage at the battery terminals can reach 16.8 volts.
This operating algorithm is primitive and over time leads to the so-called “memory effect” of the battery. That is, the battery capacity decreases.
If you follow the correct battery charging algorithm, first each of its elements must be discharged to 1 volt. Those. A block of 12 batteries needs to be discharged to 12 volts. This mode is not implemented in the screwdriver charger.
Here is the charging characteristic of one Ni-Cd battery cell at 1.2V.
The graph shows how the cell temperature (temperature), voltage at its terminals (voltage) and relative pressure (relative pressure) change during charging.
Specialized charge controllers for Ni-Cd and Ni-MH batteries usually operate using the so-called delta.ΔV method. The figure shows that at the end of charging the element, the voltage decreases by a small amount - about 10mV (for Ni-Cd) and 4mV (for Ni-MH). Based on this change in voltage, the controller determines whether the element is charged.
Also, during charging, the temperature of the element is monitored using a temperature sensor. The graph also shows that the temperature of the charged element is about 45 0 C.
READ Screwdriver attachment for paint removal
Let's return to the circuit diagram of the charger from the screwdriver. Now it is clear that the JDD-45 thermal switch monitors the temperature of the battery pack and breaks the charging circuit when the temperature reaches about 45 0 C. Sometimes this happens before the timer on the HCF4060BE chip works. This happens when the battery capacity has decreased due to the “memory effect”. At the same time, such a battery is fully charged a little faster than in 60 minutes.
As we can see from the circuit design, the charging algorithm is not the most optimal and over time leads to a loss of battery capacity. Therefore, to charge the battery, you can use a universal charger, such as the Turnigy Accucell 6.
Harnessing wind power with a screwdriver
Wind generators are built using this principle using a screwdriver, but the current generated is so small that the game is not worth the candle. Its installation is more effective in areas of high wind load, although even there the result does not justify itself.
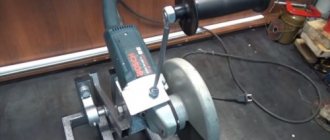
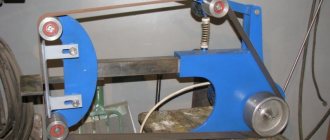
Wood lathe
When making wood products, it is difficult to do without a lathe. You can build it yourself. A flat wooden workbench is ideal for the bed. A screwdriver can be used as a headstock and rotation drive. You need to place the tool in a wooden bed made from a block shaped like a screwdriver and secure it with a clamp. The block can be secured with a clamp, and if the machine is constantly used, screwed with self-tapping screws. A tooth mandrel must be inserted into the chuck. The tailstock is made of two bars with an adjusting screw, which is sharpened to a cone. It is installed opposite the fixed screwdriver so that the tool coincides with the axis of the tailstock adjusting screw. The back support structure is secured with a clamp. If you plan to process large parts, then the fastening should be more reliable. The tool rest can also be made from a block, securing it to the workbench with a clamp. A primitive lathe for a home workshop is ready.
READ How to choose a circular saw for your home
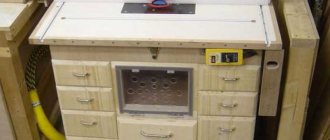
Manual router from a screwdriver: Step-by-step instructions
it can be converted into a hand router. To do this, you do not need to purchase expensive materials. Everything you need can be found in the workshop or garage, practically under your feet. To make a manual router from a screwdriver, you will need pieces of thick plywood or chipboard, a clamp for attaching the tool, fasteners in the form of bolts and self-tapping screws, plumbing tools and a feather drill for wood. In the latter case, you can use a drill bit.
Assembling a homemade cutter is quite easy. To do this you need:
- From pieces of the selected material, cut out a base, a vertical stand on which a screwdriver will be attached using a clamp, a stop and a gusset to impart rigidity to the structure. The dimensions of the parts are chosen arbitrarily, in relation to the dimensions of the power tool.
- In the base, using drill tips, drill a Ø 40 mm hole for free access of the cutting tool to the processing area.
- Make a clamp according to the diameter of the hand tool.
- Using a clamp, secure the screwdriver to a vertical stand so that its chuck is a few millimeters from the base.
- Install the stiffener.
- Secure the screwdriver with the stop on the vertical stand.
- Install the cutter into the tool chuck.
screwdriver cutter is ready for use. Such a machine will NOT be able to become a full-fledged replacement for a manual milling cutter due to its low power and low spindle speed, but it will solve the issue of milling small parts in a home workshop.
Epilogue
This is how you can assemble an electric bicycle without any expense. Of course, additional work is needed here, but the foundation is already there. It's quite fun to see people's reactions when they see such an interesting vehicle. Of course, it’s unclear what’s moving along the road. In fact, if you work on the bike for a couple more days, it will not be inferior to expensive factory products in almost any way. Considering that all the work is done “on the knee” in one day, without financial investments, we can say with confidence that the idea is very good.
We hope that the material presented today will be useful to the dear reader. If you still have questions about what you read, you can ask them in the discussions below. The HouseChief editors will be happy to answer each of them as quickly as possible. There you can comment on the article and express your opinion about the rework. Tips for improvement, as well as pointing out the wizard's mistakes, are welcome. And we have one request. Please don't forget to rate what you read.
Every opinion, both positive and negative, is very important to us. Happy cycling!
Screwdriver as a generator
A screwdriver can be used as a generator. It's very easy to do. You need to remove the battery, attach wires to the terminals using alligator clips and connect them to the consumer. Be sure to first check the polarity with a multimeter. You need to insert and clamp a hex key into the chuck to assemble the furniture. By rotating the spindle, a current will be generated that will be supplied to the consumer. However, it is worth noting that the voltage generated by this electric machine is only enough to charge a mobile phone or operate a small LED lamp.
WHAT CAN BE MADE FROM AN ENGINE WITH A SCREWDRIVER. WILL BE USEFUL in the garage!
electric snowmobile
With the help of a screwdriver you can make not only a vehicle on wheels, but also a real snowmobile. To use this, the electric vehicle will undergo a number of appropriate upgrades. It is necessary to improve the electric vehicle frame to install a drive wheel on it. Instead of driven wheels, you need to install skis, and replace the plastic steering wheel of the car with a metal bicycle handlebar. The drive wheel is driven through a chain transmission from a screwdriver.
Assembling such a miracle piece of equipment will NOT take a lot of time, and most importantly, money. All costs will be paid off by the joy of the child, for whom an electric vehicle will be a real gift.
Bench Drilling Machine
Another equally important piece of equipment is a drill. can also be made from a screwdriver. To do this you will need a used screwdriver. From it you need to take a motor with a gearbox and a cartridge. Now you need to make two clamps from textolite, which will perform the function of fixing the drilling head of the machine. To achieve maximum alignment of all holes on the clamps, it is better to process them together at one time. Then you will be able to avoid distortions.
Bushings with internal threads are used as limiting posts. they must be the same size, corresponding to the distance between the clamps. After this, another clamp is made from textolite and two bosses from caprolon. They are drilled off-center, resulting in two eccentric bushings. The clamp is installed on the rod and the backlash is selected using eccentrics. After this, install a wooden lever on a spring so that the drilling head returns to its original position. To supply power, you must use a transformer with a power of more than 150 watts and an output voltage similar to the screwdriver used. After this, you need to install a diode bridge and a capacitor, and install the drilling head on the frame.
Circular Saw
In addition, for your carpentry workshop you can make a circular saw from a screwdriver. To do this, you need to make a working surface using a sheet of chipboard or thick plywood. You need to make a cut in the tabletop to allow the circular saw to exit. The screwdriver must be securely fastened to the underside of the work surface using metal or wooden clamps. In the same way it is necessary to mount the shaft. It is important that the saw blade extends above the working surface of the table by no more than a third of its diameter.
READ How much oil to pour into a walk-behind tractor engine
Flashlight
From an old broken cordless screwdriver you can make a powerful flashlight that runs on battery power. To create this homemade product you need:
- disassemble the drill body and remove the motor, gearbox and chuck from it;
- instead, an LED lamp of the appropriate size with a power of 5-12 W must be installed in the groove. For this you may need a G 5.3 cartridge.
Due to the battery capacity, such a flashlight can work for a long time and is well suited for those who experience frequent power outages.
a circular saw
make from a used impact wrench . To fasten future equipment, a plywood sheet is used, in the central part of which a hole is cut to the size of a screwdriver . The tool is secured at the top and bottom of the base with self-tapping screws or clamps.
The cutting element of the saw can be using an M10X 50 bolt, onto which a washer and a rubber gasket are placed. The cutting part is tightened in the upper and lower parts of the bed.
To create the sides of a circular saw, a plywood sheet measuring 11.5x15 cm is used. They are assembled using self-tapping screws. A cut (27x40 cm) is made in the central part of the frame to install the disk. It is important to firmly secure the saws to the frame in order to prevent it from playing during operation.
Bracket for attaching an electric motor to a bicycle
To make this part you will need a metal plate and a section of channel. It is not difficult to find such parts in a garage or at any metal receiving site.
PHOTO: YouTube.com These are the steel parts needed to make the bracket
These parts need to be welded together, and then a slot is made in the plate using a grinder. It will serve to secure the electric motor with a bolt. A regular hole will not work here; the mount must be movable so that the alignment of the drive and driven sprockets can be adjusted. If you don’t set it, the chain will fly off without allowing you to travel even a meter.
PHOTO: YouTube.com The parts are welded, the groove is cut, a couple of little things remain
Pressure foot, and what is it for?
Making a bracket support tab is a purely individual process for each model and brand of bicycle. A photographic example will show a similar detail so that the reader can understand what it looks like. And it will serve to adjust the chain tension. The thrust tab is attached to the bolt and nut, the connection remains movable until fully tightened.
PHOTO: YouTube.com A curved steel strip serves as a stop tab for adjusting chain tension
wind generator
An old cordless screwdriver is suitable for creating a simple model of a wind generator, which will look like a weather vane. It is necessary to disassemble the tool and disconnect its contacts, dismantle the mechanical elements.
Insert the electric motor shaft into the chuck and clamp it securely. Attach a metal plate with a thickness of NOT more than 1 mm to the gearbox with bolts, which will subsequently serve as the basis for mounting the wind generator blades.
A plastic pipe cut lengthwise into 2 parts is ideal for making blades. Place a clamp on the shaft located between the gear and the chuck. The motor and cartridge are securely attached to the base made of plywood.
You can protect the wind generator from precipitation by placing the working elements of the device in an empty aluminum container.
After making the weather vane, attach the generator to its end and connect the wiring to the engine. To check the power of a wind generator, use a multimeter by rotating the blades.
electric snowmobile
To create a simple and reliable snowmobile, a cordless screwdriver is suitable. The snowmobile frame can be made from a sled with steering type control. Attach a screwdriver to the iron frame. For this, a wheel welded to the rear of the frame is used.
The chain and 2 sprockets create a rotational motion that turns the snowmobile wheel, causing the sled to move. The snowmobile control consists of a cable, the end of which is connected to the screwdriver . The other end of the cable is attached to the steering wheel. As a result of clamping and releasing the handle on the steering wheel, the screwdriver is turned on (off).
Children's vehicles
Creating children's vehicles that move without applying physical effort to them has always been and remains a fascinating task for men who love to tinker with tools in their own garage or workshop. Of course, it is worth noting that some of these cars require adult supervision in order to avoid collisions, injuries and various troubles “on the roads.”
Electric scooter and electric bicycle
It's hard to deny a child the pleasure of riding a scooter. But what a surprise and happiness it will be when he sees this scooter in an improved, or rather “self-propelled” form. No physical effort is required to ride. Just a smooth road and balanced movements.
So how can you make an electric scooter with your own hands while spending a little money? Options may vary. The only thing they have in common is that the source of movement, the engine, is a screwdriver.
The structural part can be made individually, from an old overcooked bicycle with an extended handlebar or from a scooter. But the most important thing in an electric scooter is the motor part.
Let us summarize the principle of its operation. There is a drive sprocket with a rod driven inside it. This rod is installed in the screwdriver chuck.
The screwdriver turns the drive sprocket, which transmits rotation through the chain to the second sprocket mounted on the wheel. What could be simpler? Each master decides differently how to attach a screwdriver to a bicycle. It all depends on possibilities and imagination.
The on-off system is displayed on the steering wheel. Many different solutions have been invented for this: cable systems, hydraulics from a hose and two syringes. All you need to do is turn the screwdriver on or off using a handle or button on the steering wheel. It makes no sense to list them and delve into their technical features; let this remain the prerogative of motorists.
What can be made from an old screwdriver: 19 cool ideas
At home, you can make household electrical appliances or equipment for various purposes from an old screwdriver . This will require a little imagination and additional tools. Homemade devices and tools will cost much less than their factory-made counterparts, and their service life will be several orders of magnitude longer.
Sources:
https://pro-instrument.com/ruchnoj/chto-mozhno-sdelat-iz-shurupovyorta.html https://tehnopanorama.ru/instrumenty/chto-mozhno-sdelat-iz-starogo-shurupoverta.html