Choosing and purchasing a manicure tool is only half the battle, since it requires constant and high-quality maintenance and sharpening. New scissors or forceps can become dull after just a few uses, and some need to be brought into good working condition immediately after purchase. It all depends on the quality of the metal and the initial characteristics of the tool. What does a manicurist need to know about sharpening manicure tools? Is it possible and how to sharpen nail scissors, tongs and cutters at home? How to evaluate and accept a job in the service? Let's look at all the questions in order.
Rules of care
For manicure accessories to last a long time, they need to be well cared for. It is very important to store your tools correctly. Most often, they become unusable precisely because of improper storage.
Regular and timely care of manicure accessories will ensure their comfortable use and long service life.
- Scissors, wire cutters and tweezers must be stored in special cases , otherwise notches and unevenness may form on their surface. If you don't have a special case, you can wrap them in soft cloth.
- Do not store manicure accessories next to each other , avoid sudden temperature changes and high humidity.
- Place all cutting tools with the blade facing up or on its side .
- Scissors and wire cutters should be oiled .
Rules for working at home
Regardless of what tool is used, you need to know how to sharpen metal scissors at home correctly to get a good result
It is important to know 4 rules:
- It is necessary to take into account the factory sharpening angle. Self-sharpening of manicure or other scissors is carried out only at the established angle. If you break the rule, you can permanently damage the tool for manicure and cuticle trimming.
- The tool sharpens towards itself. Movements must be constantly controlled; you cannot sharpen the side cutter using back and forth movements. Tools can be sharpened from the nose to the rings.
- Fighting burrs. If there are burrs after sharpening, they are removed with a fine-grained abrasive. The only exception is hairdressing equipment; it cannot be made too sharp.
- Checking the work. It is made according to the material for which the tool is intended. For example, if tailor scissors have been sharpened, they need to be checked on the fabric. A thin piece of fabric is taken, hung and cut. If the cut is smooth and pieces of fabric are not caught, it means the job was done correctly.
If the design of the scissors allows, then it is better to disassemble them to simplify the task of how to sharpen nail clippers at home. The blades are sharpened separately, so it is more comfortable to work, and the result is better.
Signs of a dull instrument
Typically, a blunt tool has jagged edges; sometimes of scissors and wire cutters differ The tips and cutting edges become so thick that it is almost impossible to grip the skin or remove an ingrown toenail.
The frequency of sharpening depends on how often you use the manicure set. Usually the need for it occurs once every 2-6 months .
This video will tell you how to sharpen nail clippers:
Proper care of scissors in the future
Your scissors will not require sharpening or repair for a long time if you follow the basic conditions of proper storage and use. The special tool should only be used for its intended purpose. Cutting blades should be cleaned regularly with cleaning agents and disinfectants.
At least twice a year, the fastening and connecting mechanism should be lubricated with machine oil. After each use, be sure to wipe the blades with a dry, clean cloth. Professional tools should be stored in a protective case and should not be exposed to moisture, dust or contamination.
Sources
- https://sdelai-lestnicu.ru/obustrojstvo/kak-natocit-noznicy-v-domasnih-usloviah-7-effektivnyh-sposobov
- https://WikiMetall.ru/metalloobrabotka/kak-natochit-nozhnitsyi-v-domashnih-usloviyah.html
- https://instrument16.ru/zatochka/kak-potochit-manikyurnye-nozhnitsy-v-domashnih-usloviyah.html
- https://ubirai.ru/raznoe/kak-natocit-noznicy-v-domasnih-usloviah-manikurnye-i-parikmaherskie.html
- https://baltija.eu/2021/05/08/kak-natochit-nojnicy-vozmojnye-sposoby-borby-s-typostu-instrymentov/
- https://heaclub.ru/kak-i-chem-natochit-nozhnicy-domashnie-manikyurnye-parikmaherskie-filirovochnye-portnovskie-sadovye-po-metallu-ovechi-prosto-bystro-i-dostupno-v-domashnih-usloviyah- kak-natochit-nozhnicy-igol
- https://hoznauka.ru/poleznye-sovety/kak-natochit-nozhnicy.html
- https://1000sovetov.ru/article_krasota-v-vashikh-rukakh-kak-zatochit-manikyurnye-nozhnicy
- https://math-nttt.ru/stanki/kak-zatochit-shchipchiki-dlya-nogtej.html
- https://janet.ru/404972a-kak-zatochit-manikyurnyie-nojnitsyi-v-domashnih-usloviyah-zatochka-manikyurnyih-instrumentov
- https://heaclub.ru/prichiny-pochemu-nozhnicy-mogut-ploho-rezat-kak-natochit-nozhnicy-samostoyatelno-osnovnye-pravila-kak-zatochit-nozhnicy-v-domashnih-usloviyah-oselkom-bruskom-tochilnym- kamnem-nazhdachnoj-bumag
- https://DomZastroika.ru/byt/kak-zatochit-nozhnitsy-v-domashnih-usloviyah.html
Signs of a well-sharpened tool
- Cuts the nail plate, rough skin and cuticle smoothly, with the entire blade, but especially well at the tips.
- Cuts in a thin layer.
- Causes deep deformations.
- Does not tear or pull the skin.
- It runs smoothly and cuts well without pressure.
Appearance of a well-sharpened tool
- The working blades are free from nicks, scratches and stains;
- the tips of the scissors and nippers are thin and equal in length and width;
- the cutting blade is uniform and has no sharp breaks;
- when closed, the cutting blades do not intersect.
How to sharpen nail clippers and scissors without a machine
Nippers, tweezers, and scissors are among those tools in the manicure set, without which it is difficult to imagine performing a perfect trimmed manicure or pedicure at home. The blades of each tool must be sharp, smooth, without gaps in order to efficiently and safely remove the keratinized layer of the cuticle and give the free edge of the nail plate the desired shape. Even professional manicure tools from well-known brands after a while begin to tear off pieces instead of cutting the nails/cuticles evenly. And cutting tools from regular manicure/pedicure kits must be sharpened immediately after purchase.
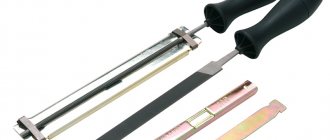
There are three options to solve this problem. Firstly , you can use the services of an individual sharpener who comes to the client’s home and polishes the cutting parts of nippers, tweezers and scissors manually. As a rule, the master works with a diamond monolayer (with a continuous diamond layer) whetstone. Secondly , you can go to a workshop where a certified specialist will professionally sharpen manicure tools using a diamond wheel or in a special machine. In this case, the services will cost more, but the company provides a guarantee for its work (service life of at least 6-7 months, even with frequent use). Thirdly , you can turn to the “strong half” of your family for help and sharpening manicure tools at home will save your family budget. You will learn how to properly sharpen scissors and clippers for manicure/pedicure from the photo and video materials in this article. ♦ SHARPENING NAIL CLIPPERS AT HOME You can sharpen the blades of the clippers using a regular carbon steel file. Choose a file with a uniform grain and close-fitting, fine cuts. We recommend 'experimenting' with old nail clippers, and if you have an expensive professional tool, it is best to seek help from an experienced specialist.
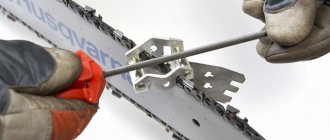
— in the photo: 'cheek', 'heel' and joint (hinge) of the pliers ❶ Backlash. Open the pliers, grab one handle and swing from side to side. If there is play, then place the tool on the workbench, place the rod on the rivet of the hinge joint and tap with a hammer (not too hard), constantly checking the result;
❷ Cleaning the hinge joint. We open the nippers completely and, using a folded piece of sandpaper, clean the joint joints, first on one side of the tool, then on the other;
❸ Sharpening the entire plane of the blade. We place the open cutter with its cheek on the table and with smooth unidirectional movements of the file we grind the inner cutting edge;
❹ Sharpening the corners of the blade. We place the nippers on the cheek parallel to the line of the table edge and with smooth unidirectional movements of the file we grind the corner of the cutting edge;
❺ Sharpening of outer cutting edges. Now you need to close the nippers and place them on the table so that the connected cutting edges are at the top. We grind the outer cutting edges along the connection line using a reciprocating file motion;
❻ Grinding of 'cheeks'. Alternately grind the “cheeks” with unidirectional movements of the file;
❼ Polishing and lubrication. To finish the job, we'll go over the cutting edges of each blade with a polishing stone (8000 grit) to make them smooth and even. After this, you can lubricate the hinge joint with oil. ♦ SHARPENING NAIL SCISSORS AT HOME For work, prepare two sharpening stones with an abrasiveness of 600 grit and 1500 grit.
— in the photo: joint, cutting edge, side and top plane of the scissors blade. ❶ Backlash. We place the scissors with the sharp edges up, place a small cue ball on the rivet and hit the cue ball with a hammer. We eliminate the play gradually so as not to flatten the rivet too much with one blow;
❷ Lubrication. After eliminating the play, you can lubricate the joint of the tool on both sides so that the blades move freely and smoothly;
❸ Sharpening of blades with 600 grit stone. We fix the open scissors on a stable surface and sharpen the cutting edge from the side of the upper plane of the blade, moving with a 600 grit sharpening stone in one direction (towards you). First we work with one blade, then move on to the second;
❹ Polishing blades with 1500 grit stone. Using a 1500 grit stone, we move in one direction (towards ourselves), eliminating scratches after sharpening and making the cutting edge of each blade smooth;
❺ Blade tips. After sharpening, one tip of the blade may move slightly away from the other. In order for the ends to fit tightly to each other, you need to bend one of them a little with pliers;
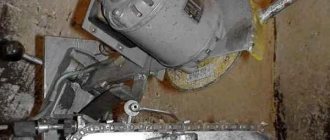
❻ Check. Stretch a sheet of printer paper between your fingers and try cutting it down the middle with sharpened scissors. The cut should be smooth, without “chewed” edges. ♦ SHARPENING A MANICURE INSTRUMENT USING A GRINDING WHEEL You can sharpen a tool quickly and efficiently on a sharpening machine. Of course, you should have experience working with such equipment, since you can easily injure your hands while rotating the circle. It is best to sharpen the blades of manicure tools on a fine-grained diamond grinding wheel.
❶ We eliminate backlash at the very beginning of work. To do this, take a strong rod, place one end at the point where the blades join, and tap the other end with a hammer (not too hard), checking the working stroke of the tool from time to time; ❷ First, sharpen the blades from the inside, and then from the outside (taking into account the cutting angle). Set the minimum speed of the diamond wheel in the machine. We move the edge of the blade along a rotating circle in one direction (from beginning to end, contact patch - no more than 0.3 mm); ❸ Turn off the machine, wipe the tool and, using a polishing block with an abrasiveness of 8000 grit, level the edges of the blade, ground in the machine. ♦ HOW TO CHECK THE QUALITY OF SHARPENING? ► Scissors. The cutting surface of the tool after sharpening should be smooth, and the edge of each blade should be even. Be sure to check the movement of the blades and make sure that there is absolutely no play, but the blades close/open smoothly, simultaneously, without unnecessary effort. Test: Take a sheet of printer paper (or a piece of electrical tape) and stretch it between your fingers. Using sharpened scissor blades, cut the stretched fabric in the middle. If a clear cut remains on the paper without torn or chewed edges, then the tool is ready for use. ► Nippers and cuticle tweezers. Make sure that the edges of the blades on both sides are even and smooth, and that there is no gap between the cutting edges. Take the tool by the handles and move it up/down slightly. If you find any play in the joint of the pliers, be sure to ask the specialist to eliminate it, since during a trimming manicure you can injure the periungual ridges with sharp blades. Test: Take a piece of thick plastic bag, pull it between your fingers and make a cut with sharpened wire cutters. The edges of the cut should be clear and even. ♦ VIDEO MATERIALS
Your recommendations will be very useful to all site visitors! Please leave comments on the article, share with each other the secrets of home care for manicure tools. If you want to post your photos and video materials on the topic on the site, please write a message to us by email: This e-mail address is being protected from spambots. You need JavaScript enabled to view it. To the main page
ALSO FIND OUT...
| Comments | Add new | Search |
Children's Portal: Home Page
3.26 Copyright (C) 2008 Compojoom.com / Copyright (C) 2007 Alain Georgette / Copyright (C) 2006 Frantisek Hliva. All rights reserved."
Related materials:
- It's no secret that with the help of a haircut you can visually increase the volume of your hair and make the appearance of your hairstyle noticeably more impressive and fresh. By the way...
">Thermal haircut for sealing the ends of split ends
- A variety of foot care methods allows us to choose the best option for procedures and often eliminates the need for regular visits to the…
">Pedicure machine for removing dead skin on heels
- Classic (trimmed) manicure is a traditional way of caring for natural nails using manicure tools. Unlike the procedure e...
“>How to do edged manicure at home (photo, video)
- Hygienic manicure is not only the ability to cut your fingernails correctly, but also regularly maintaining the impeccable appearance of your fingers using…
“>How to do a hygienic manicure. Video lessons and photo instructions
- What is a nail clipper and is it worth adding this tool to your manicure set, the popularity of which has noticeably increased recently?…
">Large and miniature nail clippers for newborns
The following materials:
- Why are professional cuticle files in high demand and is it worth expanding the arsenal of your manicure set with this sufficient...
">Laser and ceramic files with diamond coating for cuticles
- Bafik is a convenient manicure tool for polishing natural nails to a pearlescent shine, made in the form of a rectangular bar with a...
">How to use polishing buff for natural nails
- Fingers with an overgrown film of pterygium on the nail plates and keratinized layers of cuticle with hangnails do not look very neat, to put it mildly...
">Professional tweezers for home manicure and pedicure
- Nippers are rightfully one of the most important tools for high-quality home manicure and pedicure. It's hard to imagine leveling...
">Nippers for manicure/pedicure. Correction of cuticles and ingrown nails
- To perform a hygienic manicure, it is useful to have a set of special scissors on hand to maintain the well-groomed appearance of your nails without…
">Good scissors for manicure and pedicure
Previous materials:
- In order for our fingers to always look well-groomed and beautiful, it is enough to devote 30-40 minutes a week to a hygienic manicure. And classic...
">Professional tools for manicure and pedicure
- To perform modern modeling and fashionable nail design, we use special equipment, reliable manicure tools and materials...
">Vacuum hood for manicure table
- To enjoy the look of beautiful nails, you need to constantly care for them and adjust their shape using manicure and pedicure tools. ...
">UV and glasperlene sterilizers, dry heat cabinets for manicure
- Nails painted with gel polish look incomparable and the damage-resistant coating allows you to maintain a fashionable manicure for several…
">LED or UV lamp 36 W for drying gel polish and nail extensions
- If you like to do your own manicure at home, if you constantly follow the latest nail designs and implement interesting ideas...
“>Choosing a manicure table. Photo options and tips
- Manicure files for correcting the length of nails and the shape of the free edge differ in appearance, degree of hardness (abrasiveness), material made...
">Manicure files for polishing and grinding nails
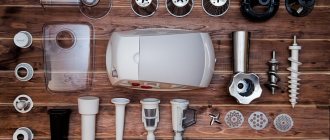
Sharpening accessories
Diamond sharpening wheel
You can sharpen manicure accessories in a special workshop or yourself. To do this, you can use a regular fine-grained whetstone or machine . It is advisable to use a diamond-coated grinding wheel . You can buy it at any hardware store or rent it.
You can also use sandpaper . This option will provide a softer and faster sharpening, and it is much simpler than the others. However, such sharpening is short-lived and requires more frequent repetition.
If scissors have curved blades, it is almost impossible to sharpen them yourself. You can only tighten the connecting bolt, and it is better to entrust sharpening to professionals.
To sharpen efficiently, you can take special courses or master classes. It is also advisable to undergo training if you often use manicure tools and they require constant care and sharpening.
How not to sharpen
The most important condition when sharpening is that you cannot change the factory angle of inclination. All beginners make this mistake. Such manipulation will affect the quality of sharpening and the ability of the tool to continue working. Often they try to sharpen the inner plane of the blade with a file. The effect in this case will be the opposite. File only the cutting edges of the tool.
- For garden shears, sharpening using foil, a needle, or sandpaper will not work. A grinding wheel or whetstone should be used;
- It is not recommended to use a gypsy needle for tailor's scissors. But, in addition to foil and sandpaper, you can use plastic bottles, which are also cut into small pieces;
- Nail scissors and stationery scissors are easily sharpened with a needle, and a sharpening wheel can quickly put them out of use, so it is not suitable.
Another common mistake is when scissors are taken apart. This cannot be done for all types of products; for example, if the blades are connected by a spring or rivet, then they should not be separated. Any inaccurate movement will cause the cutting surface to become distorted. The result of such work is that the tool will be unsuitable for use.
Types of sharpening
There are different types of sharpening: mechanical and diamond, manual and professional.
Diamond
During factory diamond sharpening, parameters such as sharpness, ideal angles, and convergence of cutting edges are taken into account. This technology allows you to sharpen products that have denser metal in the cutting part, making them more durable and sharp. This sharpening can last for more than a year in home use.
Mechanical
Mechanical sharpening is carried out using mechanical machines. In this case, the master processes each tool manually, giving the necessary sharpening angles, controlling the entire process exclusively by hand. This type of sharpening is simpler and less durable.
Get acquainted with the author's sharpening technology:
The main mistakes when sharpening scissors
The main conditions for proper operation of household scissors are a tight fit of the knife parts, the correct slope and sharpness of the cutting edge. According to GOST R 51268-99, the sharpening angle of hairdressing scissors should be 60° with a deviation in accuracy from +5 to -15°, and for household, tailoring, etc. scissors - 70° with a possible deviation of ±10°. The surface finish of the internal part and the chamfer of the blade must correspond to the pre-grinding roughness class.
Sharpening scissors at home does not require strict compliance with all these requirements, although this should be strived for. The main mistakes made during home sharpening are:
- linear and angular unevenness of the cutting edge;
- non-compliance with the standard sharpening angle;
- Using too coarse abrasive.
As a rule, the cause of the first two errors is unreliable fixation of the blade in a given position or incorrect operation of the sharpening tool. If the first is quite difficult to achieve at home, then with the second everything is simple: working movements of the blade along the abrasive should be performed only in one direction.
How to prepare manicure tools for repair
Before you sharpen a manicure tool, you need to make sure that the problem is in the sharpening and prepare it properly.
Carefully inspect the tool for the presence of center play in the scissors; the axle mount may have become loose. Typically, the axle is a screw or rivet. If a bolt is used, tighten it.
If the screw is already tightened and the blades are still hanging loose, do not bend the blades under any circumstances. This can be corrected by sharpening the limiter, this will allow the blades to be brought closer to each other. Even new cutters sometimes have some play initially. If it is not removed, there will be no correct pressure on the cutting edges, as a result of which the nippers will leave burrs and make poor cuts.
Useful tips
Recommendations:
- Inexpensive tools do not need to be taken apart. Poor quality fasteners may not withstand being disconnected and reconnected.
- When working with a sharpening machine, it is necessary to set low speed. High rotation speed will damage the cutting edge.
- After purchasing a tool, you need to remember its angle. It must be adhered to during sharpening.
- If you need to sharpen professional manicure tools, it is advisable to use the services of professionals. Carrying out the procedure yourself requires practical experience. To do this, you can practice on old instruments.
- Wear safety glasses when operating the sharpening machine.
- Bars less than 8000 grit are used to smooth out serious damage and chips. If there are no such problems, you should not choose stones less than 8000 grit.
- Do not forget about regular lubrication of moving elements with oil (machine oil, vegetable oil).
- Store tools in a dry case without access to moisture. Constant moisture will cause rust to form.
- After work, clean tweezers, scissors, files, tweezers from dirt and debris.
- A simple option to restore the sharpness of nail scissors is to cut the foil. The sharper the blades are needed, the more cuts required.
It is strictly forbidden to change the angle of the cutting edges, which was made by the manufacturer.
Sharpening manicure instruments is a responsible procedure that will help restore sharpness and perform work more efficiently. However, in order not to permanently spoil the cutting edges, it is necessary to take into account a number of nuances and recommendations of professionals. If it is not possible to spend enough time for sharpening, you need to contact a specialized workshop.
Sharpening at home
Having everything you need, you can sharpen your tools yourself. To do this you need a sharpening stone, sandpaper, and lint-free wipes .
Place the sharpening stone on a flat surface, open the nail scissors or tongs wide and begin sharpening. Movements should be smooth, even, and there is no need to sharpen for a long time. After completing the procedure, the instrument should be wiped with a soft cloth.
The sharpness is checked on a piece of polyethylene: if the tool is well sharpened, the polyethylene should not wrinkle when cut.
It is best to have a sharpening machine with a diamond wheel, which will make your task much easier and keep the tool sharp much longer than sharpening on paper or a whetstone. But such an expensive purchase is only advisable if you do manicure professionally.
Technology for sharpening nail clippers.
Today's lesson is very important for novice sharpeners, since correct sharpening of nail clippers is an accurate and responsible task. We can say that nail clippers are one of the most difficult tools to sharpen. I know from my practice that beginners quickly master sharpening scissors than nail clippers, since the operating principle and geometry of the clippers are different from scissors and getting the right angles is sometimes difficult even for experienced craftsmen.
The step-by-step sharpening technology is as follows.
Step 1. Check the joint of the pliers for play, which is present in 90% of tweezers received for sharpening. Backlash is detected by wobbling of the blades of the pliers in the joint, and without eliminating it, sharp cutting edges have no meaning. When we are sure that the play has been eliminated in both cases, we lubricate the joint of the pliers with machine oil and clamp and unclench several times. If the joint is dirty, let the dirt (or rust) soak in the oil for several minutes.
Step 2. Now let's work on the blades of the nippers, which are the main critical area when sharpening. We sharpen the blades from the inside. According to A. Sharp’s method, this operation can be performed efficiently on the ShM-36 Supermaster or ZAT-36U machines:
Step 3. We sharpen the blades from the outside, correct the tips and visually verify the sharpness of the cutting edge.
Step4. After this, we take a piece of leather and, holding the blade with a piece of leather on both sides, we pinch it and pull it towards us. Then we clean the blade from unnecessary particles with cotton wool. We perform this procedure with both blades. We clamp the pliers and look at the gap against a light background. Next, we hold the pliers with our left hand and turn the blades upward.
Step 5. Place the pliers with the blades up, as they should lie correctly, with your right hand, use a fine-grained diamond stone to carefully file and trim the contact area. This operation must be performed carefully so as not to spoil the geometry of the blade. We file until the mirror line on the edge of the blade is barely visible. Let's unclench and see what both blades have covered in this operation. Now we clean the blades from microparticles, first with a piece of leather, then with cotton wool. If, when viewed through the light, we see tight contact between the cutting edges... then you can check the sharpness of the blades. This is done on a thin and soft polyethylene film. If the nippers leave an even cut, then the nippers are sharp. And if they pull the film, then repeat the listed procedures until the desired result is obtained.
Here I have outlined the sharpening technology, and you will learn more about this in my book “Secrets of Professional Sharpening.”
Now let’s talk about the tool base and what to use for sharpening. There are different methods of sharpening, from manual sharpening on a diamond stone to performing this procedure on a precision machine. Although they are performed in different ways. But still, they are all called manual sharpening.
The difference between the traditional method (on the left) and the new technology (A. Sharp’s method on the right) of sharpening manicure and hairdressing instruments.
1. This method requires skill and long-term experience, and achieving high-quality sharpening is a difficult task, especially for a beginner.
2. The circle runout is large. The larger the circle, the more radial or planar runout occurs. It is difficult to escape from this law, so sharpening on small wheels turns out to be more accurate and of higher quality.
3. There is no rigid fixation of the workpiece (all metalworking machines operate on this principle) and with one awkward movement of the hands, the tool can be easily rejected. Therefore, not only beginners, but also experienced craftsmen have a fear of ruining the client’s instrument.
4. As a consequence of the above points, with this method it is difficult to achieve a clear closure of the cutting edges, and therefore high-quality sharpness, as in A. Sharp’s method. Below in the video, see a fragment of work using this method
I have been sharpening this way for a long time and my clients know about the quality of my sharpening. This method is effective not only for standard sharpening, but also for restoring the geometry of deformed blades of wire cutters.
And if you have a need for urgent repair of power tools, sharpening or sharpening training, you can call +7-920-216-14-57 (free Whats Up, Viber).