The modern dowel-nail replaced wooden dowels, which often split into pieces, dried out and did not adhere well to the load-bearing surface. Composite fasteners with a spacer sleeve significantly speed up most installation work, providing the most reliable fastening of furniture and other products.
What are dowels for?
On the market you can find dozens of types of fasteners, which differ in size, materials, and scope of application. The most popular dowels are: universal dowels, expansion dowels, spiral dowels, frame dowels, insulating dowels, heavy-duty dowels, nail dowels and others. Each of them is designed for specific purposes and has its own advantages and disadvantages. Let's look at the key differences and come to a conclusion in what situations certain types of fasteners are used.
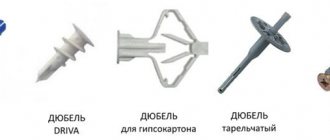
Traditionally, all dowels are divided into three categories: standard, for hollow walls and special. Each of them has subgroups of hardware.
Standard dowels include:
- Expansion anchor. This is the most popular type of standard expansion dowel. Despite the fact that it is classified as standard, an expansion anchor is used extremely rarely. Its design is too light, so it is difficult for the fasteners to stay in the wall. As for loads, it is not able to withstand large and heavy objects. The name of the expansion anchor is related to the technology used to screw in the dowels: the raised part of the dowels is extended in the shape of an umbrella, providing a reliable fixation. Thanks to this principle, expansion anchors are suitable for permanent fastening in concrete and solid stone.
- General purpose dowel nails. These are universal dowel-nails that have replaced less convenient expansion fasteners. Universal dowels are one of the most popular types on the market. Thanks to the variety of shapes, they are suitable for all installations without heavy loads. They can easily be used to secure household items, such as hooks, light shelves, and decorative items. They are found in almost all types of bases, including concrete, brick - solid or hollow, wood, chipboard, light finishes. Do not use universal dowel-nails for foam concrete and insulating materials. This is the best option for solving small household problems.
Dowels for hollow bases:
- Dowels for metal cavity. This is an alternative to universal dowels. Their main value is that they can withstand heavy loads. If you need to install a TV, cabinet or any other items, use a metal cavity dowel. These dowels are suitable for all plasterboard or chipboard surfaces on walls and ceilings.
- Hinged spring dowel-nail. Its design includes a hook for securing heavy objects or for assembling complex structures. Despite the specific use of fasteners, they are quite in demand.
Special dowels:
- Insulating dowels. Most often used for mounting on facades.
- Foam concrete dowels. Special purpose for working with foam concrete. You will not be able to select other fasteners for this material, guaranteeing a reliable connection.
- Frame dowels. Thanks to the long shaft, frame dowels provide reliable fixation of heavy structures even on thick walls. They are an ideal choice for through-hole installation.
- Spiral dowels. They are a combination of two types of anchors - for hollow walls and anchors for insulating material. The name comes from the characteristic spiral threads that provide a secure hold in drywall and insulation material.
- Dowel-nails. These dowels are suitable for particularly fast mounting of parts or building frames on a wall, ceiling or floor. Mainly used when assembling light walls.
- High strength dowels. Designed to solve complex problems, for example, assembling stairs and railings.
Features of fasteners for concrete walls
A dowel for concrete is different from a brick one. Therefore, in order to avoid mistakes when installing it, you need to become familiar with its features.
In practice, it is not very rational to use concrete dowels on brickwork, especially if the wall is made of hollow material. In this case, fasteners of a special design and installation specifications are used.
The differences between the dowel for concrete and the option for brick are presented in the table:
| For brick | For concrete |
| Bushing for brick dowel This is a metal or plastic bushing, the design of which has a double thrust mechanism. This guarantees the strength of the fastening - in any case, one of the spacers hits and is fixed on a solid base. The rod that plays the role of a spacer element is a threaded stud of the appropriate diameter and other anchor fasteners, which depends on the load on them. |
Such a dowel will never create a reliable fastening in a hollow material, no matter how long it is. During installation, the fasteners are driven into the hole, which speeds up the work. When using this technology in loose materials, the mounting hole is destroyed and high-quality fastening is not created. |
How to install a dowel-nail in a brick or concrete base?
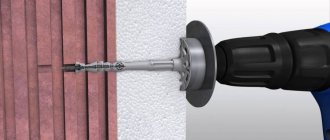
The dowel-nail is used for installation in brick and concrete surfaces. To do this, you need to prepare a hole of a suitable diameter in advance. To install the dowel, use the following instructions:
- Use a drill to drill a hole. The tool must be kept perpendicular to the surface, avoiding violation of the angle of inclination. The work is performed at low speeds for the first time. Once 15mm has been drilled, you can increase the speed;
- the drill is installed in the center of the designated hole;
- the resulting hole is cleaned of dust and particles of material;
- the dowel is driven in with gentle hammer blows;
- The hammer can be replaced with a screwdriver or screwdriver.
For a concrete base, follow the following instructions:
- We mark the hole using a center punch, which we hammer in;
- drill a hole. It should be longer than the dowel itself;
- we remove garbage;
- hammer in the dowel;
- We do not hammer the nail itself completely, leaving up to 4 mm for hanging.
Step-by-step instructions for attaching joists to concrete with your own hands
Attaching wooden joists to a concrete floor is easy, even on your own. There are several mounting options, and below are the steps of one of the standard methods.
- Lay waterproofing (roofing felt or simple PVC film) on the concrete base. The joints between the pieces must be secured with special tape.
- Next, you need to lay out the logs along the floor in a certain step. This step will depend on the material from which the finishing flooring will be made: when using a 25x100 mm tongue and groove board, the logs can be laid with an indent of 70-80 cm, but for other materials the step will need to be reduced to 40 cm.
- If the length of the material is not enough to cover the entire room, then the elements can be joined using an iron angle or by making cuts that form a connection into a root tenon.
- Before installing the joists on the concrete floor, you need to take care of the outermost joists that will be located near the walls. They must be laid level, clearly leveling their height by placing wooden planks or pieces of plywood under the beams. It is most convenient to use a laser level. When the outermost logs are fixed, a nylon thread is stretched between them, which will serve as a guide when installing the remaining logs.
- To attach timber to a concrete floor, you need to make holes in both. You need to drive a dowel or steel anchor spacer into the hole in the concrete. Each joist must be fixed with at least four anchors, and the screws must be placed 40-60 cm from each other.
- You need to prepare levelers for the joists in advance - cut chipboard or plywood into even strips. With the help of these elements, the joist structure is fixed in a level position (pieces of plywood are simply placed under the joists if you need to raise them) so that the finishing coating on it does not creak or move.
- If, on the contrary, there are bulges in the concrete base, then you will have to level the lag not by placing plywood, but by selecting part of the material from below using a plane.
- When all the logs are installed in their places, thermal insulation should be laid between them, for example, expanded clay.
How to install dowel nails in drywall and ceramics: photo instructions
When working with a plasterboard base, you must avoid attaching heavy objects. Oversized products should not be fixed, since the drywall itself is loose in texture and cannot withstand heavy loads. Such experiments will result in the resolution of the foundation.
For installation in drywall, the algorithm is practically no different from the standard sequence. The hole must be made without impact force. A drill is best for this. At the end we screw in the hardware itself with a screwdriver or screwdriver.
If you need to make a fastening joint in tile, follow the tips when working with concrete or brick. Be sure to consider the fragility of the tiles. The material is prone to splitting. To mark the location of the hole, it is better to use a center punch or a metal screw. Do everything carefully until you create a small indentation of 0.5 mm. Drill the first 15 mm at low speeds, then you can move to higher speeds. The depth of the hole is 1 cm more than the dowel itself.
What does a dowel-nail look like?
By design, this is a fairly simple fastener. Visually, the dowel-nail resembles a cylindrical rod. When installing a dowel, the hole expands. Due to this, it is possible to achieve the most tight connection.
The dowel-nails are provided with cuffs. This part of the fastener plays the role of a supporting part, which prevents the dowels from sinking. There are dowels on sale with many cuff options.
In simple words, this fastener consists of a nail and a dowel into which it is screwed. The hardware itself is often steel, the dowel is polyethylene, polypropylene or polyamide. To protect against corrosion, hardware is galvanized. There are models without zinc coating, but they are used only for internal purposes.
Design features
The dowel-nail is intended for carrying out some fastening work. The design is made of two simple elements - a nail and a dowel. With its help, various objects are securely fixed to concrete, brick, stone and other bases that are dense solid materials. Products for chipboards and plasterboard are also provided.
Read also: Types of predicates and how to distinguish them
The rod has a cylindrical shape and a small spacer part is provided. The element expands during installation and firmly secures the structure. There are dowel-nails supplemented with a special cuff (limiter). In this case, the shape of the element differs - cylindrical and secret.
There are also products with a thread located on the nail and a slot on the head. This allows you to install the dowel-nail using a screwdriver and makes the work much easier.
For the production of dowels, polyethylene, polyamide or polypropylene is used. The dowel-nail requires increased strength, so steel alloys are used. Additionally, the structure is processed by galvanic galvanizing. Standard product diameters are 5, 6, 8 and 10 mm, length varies from 30 to 160 mm.
Dowel-nail: how to work with fasteners?
We have already figured out that the dowel-nail consists of two parts, which play their role in creating a strong connection. The dowel-nail is suitable for fixing in concrete, brick, stone. Special dowels are made for plasterboard or wood.
If the models have a cuff, the fasteners cannot turn or get stuck in the hole. The configuration of the cuffs also varies. For use in the industrial industry, you can find special designs of dowel-nails that have a thread and a slot. They are located on the head of the product. This is convenient for screwing in with a screwdriver.
There are two ways to work with a dowel-nail:
- Manual. Hand tools are used to create the hole. This could be a screwdriver or a hammer.
- Auto. In this case, automatic tools are used. This option takes less time, but requires certain equipment.
Technical features of the dowel-nail
Technical features of dowel fasteners are determined by GOST standards. These are general requirements for the technical parameters of fasteners. GOST specifies not only technical standards, but also permissible deviations. All manufacturers who intend to sell products and enter the market must comply with these requirements and have quality certificates after assessing the fasteners.
Otherwise, the reliability of the connection cannot be guaranteed and large-scale projects requiring high quality fastening connections cannot be implemented. GOST indicates permissible changes in configuration, length, weight, diameter and other indicators. Taking into account these deviations, uniform standards must be observed for each hardware manufacturer. Let's consider the basic requirements for the production of dowel-nails:
- Fasteners are made of steel. This material can withstand heavy loads. The hardness of the metal is determined according to the Rockwell scale and must be at least 54 HRC.
- The rod may not be perfectly straight, as slight curvature is allowed. Its value is determined depending on the diameter of the hardware. If the diameter is less than 50 mm, then a deviation of up to 0.1 mm is acceptable. For a dowel-nail measuring more than 5 cm, the curvature does not exceed 0.15 mm.
- The dowel-nail design has a pointed tip. Slight dullness is expected. It can be within 0.8 mm, but not exceed this value. The tip of the dowel should be smooth, without defects, with a smooth transition into the rod. There should be no gaps or other deformations on the surface.
- The nail itself may have traces of clamps on the work surface. This is acceptable when processing hardware.
- In models with grooved edges, the pitch between them is no more than 0.8 mm. The maximum permissible depth between faces is set.
- If you disassemble the structure of dowels with washers, the shear force is at least 0.3 kN.
- If you are using a galvanized product, the coating of which protects the hardware from corrosion, determine the minimum thickness of the coating. The zinc layer must be at least 6 microns. Otherwise, there will be practically no benefit from such coverage. To finish fasteners, the cathodic method is used.
There are other quality criteria that apply to specific dowel-nail models.
Specifications
Enterprises in the metallurgical industry produce hardware of the type in question with standardized technical characteristics indicated in the table below. The designation of the parameters corresponds to the letters shown on the design drawings. Dimensions are presented in millimeters.
| Rod diameter (parameter d) | Weight of 1000 pieces of washers, 1.5 mm thick (kg) | Weight 1000 pcs. dowels, (kg) | Dowel size: diameter×length (d×L) | h | D1 | L | D |
| 4,5 | 1,15 | 9,15 | 4,5×60,0 | 1,0-1,5 | 12,0 | 60,0 | 10,0 |
| 7,95 | 4,5×50,0 | 50,0 | |||||
| 6,75 | 4,5×40,0 | 40,0 | |||||
| 5,55 | 4,5×30,0 | 30,0 | |||||
| 3,7 | 1,2 | 5,2 | 3,7×40,0 | 40,0 | 8,0 | ||
| 4,3 | 3,7×30 | 30,0 |
Methods for installing dowel-nails: photo
Another popular classification of fasteners is by installation method. The following options are available:
- by hammering. This method is suitable for fasteners with smooth threads. If the hardware does not have edges for a screwdriver, then you will have to carefully drive it into the surface. A dowel-nail with a thread is more convenient because the risk of damage to the surface is reduced, and if necessary, it can be easily dismantled. Without threads, getting fasteners is problematic and sometimes impossible;
- mounting gun. If the configuration of the hardware provides for the presence of a cuff, it can be mounted with a construction and assembly gun. This method is quite common, since it provides that the fasteners can withstand heavy loads.
There are dozens of dowel nails for certain types of surfaces. Let's look at their features:
- For porous concrete. Such fasteners are made with grooved ribs that fit easily and tightly to the dowel when driven in. For installation, be sure to make a pilot hole.
- For surfaces with voids. Such fasteners are made elongated so that they can be tightly fixed to the base. Strong adhesion is ensured by the presence of special jumpers.
- For lathing. If the sheathing is located a short distance from the wall, it can also be fixed. A distance of up to 30 mm is acceptable. One part of the dowel secures the structure of the slats, the second - the wall. The dowels are mounted with a screw.
- Universal mount. Such hardware adapts to the characteristics of the surface. For example, when working with hard and homogeneous material, the body expands when driven in. For hollow structures, the dowel-nail behaves differently - it is as close to the base as possible.
- For thin walls. Metal fasteners are most suitable. When fixed, the hardware firmly adheres to the bases with a small thickness, preventing deformation.
- For suspended ceilings. In this case, special fasteners are used. You can find them on sale under the name “butterfly”. This fastener is designed for materials with voids. The dowel-nails have a spring mechanism that opens when the hardware is driven in. Structurally, this fastener has hooks and threads for quick and reliable connection.
- For massive and large hanging products. Due to their heavy weight, such dowel-nails are used for mounting into concrete or brick surfaces. For example, you need to secure a gate or door. Multi-ton loads with fasteners of this type are acceptable.
- For gas or foam concrete. Manufacturers produce metal and plastic fasteners. The tip in such models has the shape of a drill, and there is a thread on the rod. The main advantage of such products is that you do not have to make a hole for them. Using special models, you spend less time creating fastening joints.
- For thermal insulation. The fastener locks into place without a nail or pre-pilot hole.
- For bricks with voids. Installed using adhesive. This is a rather labor-intensive process that must be justified.
How to choose a dowel-nail: valuable tips
Experts highlight several useful tips that will help you choose the right dowel-nail for solving specific problems. Consider the following tips:
- determine the loads that the fastener must withstand. This is the first criterion from which you need to proceed when searching for suitable hardware;
- to fasten furniture, which itself weighs quite a lot and must also withstand additional loads, you will need hardware with a diameter of at least 85 mm;
- for insulation work, fastening skirting boards, and other horizontal fixations, the dowel must be at least 3 cm long and its diameter at least 6 mm;
- When working with suspended ceilings or other products in which the load is determined from the bottom, dowels with spacer notches should be used. Due to the corrugated surface on the working surface, the necessary fixation is ensured;
- if you need to find hardware for an existing hole, correctly determine its diameter. It should be equal to the hole. Otherwise, you will not be able to ensure a secure fastening. This may cause the dowel to become loose;
- When working with foam concrete, be sure to ensure the reliability of the fastening connection. The load should be evenly distributed.
To choose the right dowel-nail, it is important to determine what type of surface you will be working with. Universal types of dowels are suitable for old concrete walls. If the service life is too long, there is a possibility of formation of seals and irregularities. In this case, universal hardware will do. Key rule: the dimensions and length of the dowel are selected according to the loads on it. If you plan to fasten large and massive objects, it is better to choose long and durable hardware of sufficient thickness.
Application area
Wall shelves are attached to the wall using dowels.
The use of this type of fastener is advisable in various fields. It is an important part that is difficult to find a replacement for. When renovating an apartment, many household appliances and interior items - hoods, wall cabinets, kitchen furniture - must be hung and mounted on the wall. They are held in place thanks to the use of dowels - reliable mounting elements.
Return to contents