Silver casting
The noble metal silver is one of the oldest metals mastered by mankind. Being in nature in its native form, as well as its low melting point - 962 °C, gave our distant ancestors the opportunity to use this metal in the 4th - 3rd millennium BC.
Silver is a soft, ductile metal, excellent for the production of jewelry, ritual objects, mirrors and for minting coins.
Silver has the best electrical conductivity among metals and is used in the most critical electrical appliances and components. Excellent thermal conductivity makes it possible to use it in heating engineering.
Noble metal was widely used in photography in the 19th and 20th centuries.
Another important property has long been noticed - bactericidal properties. Silver vessels and filters are used to disinfect water. In Christianity and some other religions, the so-called is prepared in silver vessels. “holy water”, which helps with appropriate prayer against all ailments.
Expert advice
- Potato crucible is a budget and safe option. First you need to give the root crop stability - cut off the convex parts at the top and bottom of the potato and make a depression for melting. It is convenient to do this with a teaspoon. We prepare the surface of the potato crucible by burning it until charred. The resulting carbon serves as a good container for molten metal: high heat resistance and low thermal conductivity make such a crucible so convenient that you can pick it up with your hands - no tongs are needed. The disadvantage of this option is that it is only suitable for small volumes of gold - up to 15 g, and only for melting using a gas or gasoline burner.
- Pure gold is a very soft metal. To increase its strength, it is melted with various alloys: copper, nickel, palladium.
- Before you start working with precious metals at home, you should practice using cupronickel.
Jewelry making is a fascinating and creative process. However, to start it, I recommend consulting with specialists. When working with gold, mistakes are costly.
Stay safe and be careful when working with molten metal, especially at home. Share this article with your friends, and we will delight you with new interesting topics!
Silver casting technology
Silver casting in a factory environment is carried out using industrial technologies that require expensive equipment, significant energy consumption and the use of rare and dangerous components. Traditional technologies, proven over thousands of years, are more suitable for casting silver at home or in a workshop.
The most common of these is lost wax casting. The use of special modeling wax as a model material is also popular. The material used to create the mold is gypsum or clay-sand mixtures.
Silver ingots for casting
Silver for casting can be purchased at a savings bank or jewelry store in the form of ingots. In this case, its composition is precisely known and is stamped as a sample. If you decide to use grandma's spoons or scrap silverware, be prepared for the fact that you will have to carry out an operation to clean the scrap from impurities. For example, silver is purified from impurities of base metals such as lead, copper and others by melting it in a crucible with the addition of saltpeter, borax and soda. Nitrate binds base metals, oxidizing them. Soda and borax transfer these oxides into solution, forming liquid slag. The silver remains at the bottom of the crucible in the form of an ingot.
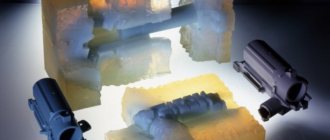
Lost wax casting. This silver casting technology is most accessible for beginners to master. The model is made of a material whose melting point is lower than that of the melt being poured. A mold of plaster or sand-clay mixture is poured or molded around the model.
Lost wax casting
The most common materials for lost wax models are wax and paraffin. When the melt is poured into the mold, the model material melts and is forced out of the mold through a specially provided hole. The place of the model is gradually taken by silver. There is a variation of this method in which the wax model is burned out by heating the mold to a high temperature, and casting silver is poured into the now empty mold.
At what temperature does gold melt?
The melting point of the 79th element of the periodic table in its pure form is 1064.18 °C. Different ligatures can change this indicator. So, silver and nickel will significantly lower the melting point, palladium will increase it. But with a copper alloy, the melting point will not change.
585 and the old Soviet 583 standard (an alloy of gold with silver and copper) melts at a temperature of 840 °C. This additive makes it possible to increase the strength of gold while maintaining its ductility and aesthetic appearance. That is why this particular sample is so popular among jewelers and ordinary people. Jewelry alloy of 375 gold melts at 770 °C. It should be remembered that molten gold evaporates quickly.
Forming tools and casting fixtures by model
To cast precious metal products at home you will need
- Crucible for melting or cleaning metal.
- Muffle furnace or gas burner.
- Steel tongs.
- Fireproof stand.
- Scales
- Modeling wax. Candle wax will not work.
- Molding sands
- Container for diluting the mixture
- Scalpel, knives and files for processing the model and for finishing the finished product.
- Casting mold
- Hammer for breaking the flask.
- Protective gloves, glasses and apron.
- Fire extinguisher.
- Dremel (mini drill)
- Vices, Crossbars and Mandrels
It’s worth going into a little more detail on making a mold for casting silver. First, a model of the future product is created from wax by sculpting and cutting out small parts with a scalpel, completely repeating its shape, but having a thin protrusion in the form of a round rod.
Wax model for silver casting
This is the sprue that will carry the molten metal into the mold. Next, the model is placed in the flask and the molding mixture is poured.
If dry molding mixture is used, then the vibration compaction method is used for molding. Next, the model wax is burned out, and the mold is ready for pouring the melt.
Melting methods
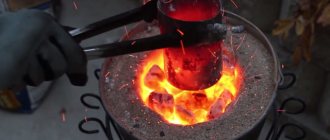
Folk craftsmen have invented many devices for artisanal melting of precious metals. Modern Kulibins can make an electric furnace at home, melt gold in a microwave, barbecue, gas welding, deposit gold by electrolysis, make a gasoline, propane or oxy-acetylene burner for melting, or even decide to use a gas stove for melting.
I strongly do not recommend the last option, unless you want to start a fire in your own home. In addition, gold melted on a gas stove heats up for a long time, unevenly and mixes with atmospheric air. Such an alloy will be very brittle.
Among several popular methods of melting at home, I have chosen for you three that, in my opinion, are the most reliable.
Burner
The most affordable and fastest way to melt small volumes of solar metal. You will need a gas canister with tourist gas (a mixture of butane and propane) or acetylene, and the burner itself, which is easy to buy at any hardware store or order online. The main thing is that the unit has a sufficiently high efficiency. The device data sheet indicates the maximum temperature - compare it with the melting point of gold.
This video shows that a 15g gold bar can be melted in about 5 minutes even at home.
You can melt gold using a gasoline torch. It is not inferior to gas, but is more often used for jewelry soldering of finished jewelry.
Using a homemade oven
For those who plan to engage in melting regularly, I recommend purchasing a jewelry muffle furnace. Or you can be patient and make such a stove with your own hands at home.
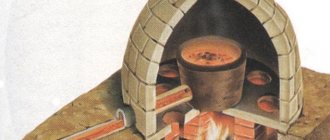
Melting furnaces are either electric or charcoal-fired. How to make such a stove is a separate topic, I will only say that a variety of materials are used for its manufacture: refractory bricks, cement slabs, steel cylinders of different diameters, stainless steel beer kegs and other materials resistant to high temperatures.
It should be remembered that for such furnaces it is better to use charcoal: its heat transfer when air is supplied is 1280 ⁰C. This is enough to melt gold, but coal can heat the metal above the melting point of steel.
Microwave
Yes, you can bake an original gold bracelet for yourself in your home microwave oven! But seriously, 1200 watts of power is enough to melt precious metals. The method is suitable for those who systematically engage in jewelry making: if you use your microwave to melt metals at least once, you will no longer be able to cook food in it.
A few important points:
- The magnetron in a microwave oven should be located at the back or side - this is the main condition.
- Clay crucibles are not suitable for microwave oven conditions. The optimal crucible is graphite.
- It will take about 8 minutes to melt a few grams of silver. It will take 12-15 minutes to melt 3 grams of gold.
To start melting precious metals at home, you will need to remove the rotating disk from the microwave oven and make a heat-resistant chamber from two refractory bricks.
Which way is better
Everyone can choose for themselves which method suits them best. It all depends on the melting objectives, profitability, availability of raw materials and budget. For one-time operations at home, a gas burner is ideal. Inexpensive and effective, does not require time to manufacture, melts quickly and well.
The furnaces are well suited for those who do smelting regularly. The advantages are minimal losses and the ability to control the melting temperature. But it will require certain investments.
Model casting in earth molds
Casting in so-called earth molds is the oldest method, proven over thousands of years. Molding mixtures do not actually consist of black soil, but are a mixture of fine-grained quartz sand and plastic clay in certain proportions. For casting small products with thin relief and a large number of parts, mixtures containing 12-15% clay are used, for large castings - up to 25%. Gases generated during casting must escape freely through the walls of the mold.
Casting silver according to models in earthen molds
The model for casting into earthen molds is made absolutely exactly repeating the original, but a little larger in size. This is an allowance for shrinkage and subsequent processing of the product. Models were traditionally made from wood, wax and plaster. Today, plastic models are becoming increasingly popular. The plastic holds its shape well and is easy to process.
Silver jewelry making techniques
Making your own silver jewelry will allow you to save money, but will also allow you to show your creativity and create a truly unique product.
Silver is not only beautiful, but also a durable and versatile precious metal. Working with silver allows for several different techniques, some of which do not require any special equipment, while others require special training and tools. To make your own silver jewelry, choose the technique that suits you.
Silver casting at home
Important! Casting silver with your own hands is a complex and fire-hazardous process. Your workshop should have fireproof stands and fire extinguishers designed to extinguish live electrical equipment. Be sure to wear fire-resistant gloves, an apron and goggles.
For casting silver at home, beginning craftsmen usually choose the following technologies:
- wax modeling
- earth casting
- heating the crucible with a gas burner.
Of course, if you have a muffle furnace with adjustment and maintenance of a given temperature, a vibrating table and a centrifuge, your castings will only get better.
Casting silver at home is a complex process, but quite feasible with proper preparation and perseverance. Good luck in mastering this branch of metallurgy!
If you find an error, please select a piece of text and press Ctrl+Enter.
How much does it cost to melt gold
It is quite expensive to melt gold from a specialist, and the cost is in direct correlation with the purity. The higher the metal standard, the higher the price. The price range for such a service is from 500 to 1500 rubles per gram. The cost of melting a house is much lower. But you will need to study the features of the process in detail so as not to suffer yourself and avoid losses.
It is difficult to name the exact costs of melting at home - it all depends on what materials and tools for melting you have available and which you will need to purchase.
Jewelry casting at home for beginners
But how are we going to fuse paraffin onto a ring when it is incredibly fluid and unpredictable? It turned out that everything is much simpler. In the process, the master realized that paraffin remains plastic for a long time and can be deformed like plasticine. And so it happened. He simply molded the desired ring shape and continued. True, it wouldn’t hurt to go through a soldering iron in order to fuse the molded boundaries. But the master decided not to do this. Later on the castings this will appear as a defect, but not so bad that you can’t wear this ring. Now we need to process the molded model. The master decided to do it with sandpaper, but he doesn’t remember whether it was forty or sixty, but it was definitely very rough. And again for good reason. The fact is that a large grain of sandpaper leaves a deep mark on the paraffin and gives it texture. Therefore, carefully walking along the front part of the ring with coarse sandpaper, we will leave the resulting texture for casting. Since the paraffin could fail at any moment, the master decided to leave the finishing work to the brass casting.
We put the model aside and prepare the bases for fixing the model. The simplest thing is to make it from plasticine. We knead it and sculpt a hemisphere into which we will install sprues in the future, and subsequently this sphere will become a kind of pocket for melting metal before pouring. Therefore, you should not make the sphere too flat. It is necessary that all the molten metal fits in it. By the time of casting you will understand everything and see for yourself what it looks like.
As a flask (a metal mandrel for pouring the molding mixture), you can take a very ordinary metal pipe; for example, a plumbing store should have pieces of a suitable size.
We will make the sprues from 2 nails. We bite off the excess with pliers and install them in our plasticine sphere. After installing them, we somehow need to attach the wax model to the metal sprues. To do this, the author decided to take a burner and slightly heat the nails, and then lean the ring against them. Hot nails will easily melt the paraffin and go deep into the model.
And actually, it turned out quite well. When the plaster gets stronger, you can clean the mold from sagging and separate the plasticine from the sprues. Now comes the most crucial moment - the moment of calcination of the mold. In the instructions for the molding compound, there is a map that indicates the calcination cycle of 15 hours. But since this goes against knee technology, it would be fair to reduce this time to 40 minutes.
This is bad and wrong, but still possible. The main thing here is to provide gentle heating at first, so that the water from the plaster begins to evaporate, and the paraffin begins to smoothly melt and flow out. The master used a roofing torch for this, since he had one. You can get by with a household burner, or you can start with a very ordinary oven, it will be more correct. Just don’t forget to place the mold with the sprues down in some kind of tray so that there is somewhere for the paraffin to drain.
You can pour metal at home in several ways: using potatoes, clay, or any other dense, moisture-containing material. But the author has never mastered this method, so he will cast metal using a manual centrifuge.
It looks like a glass with four bolts (for more reliable fixation of the flask), a chain and a handle made of PVC pipe with bearings inside (for long-term unhindered torsion).
The author welded this thing himself, but you can get by with, for example, a metal mug.
We heat the mold until red and prepare to pour the brass. As a starting material, you can take brass plumbing fittings. They're great for this. Well, or if you are braver, you can immediately pour silver or even gold. There are no restrictions on metal in knee technologies.
Jewelry Making Lessons for Beginners: Free Self-Learning Videos
People have loved jewelry since ancient times.
Primitive people wore bracelets, rings and necklaces, earrings for self-expression, in order to emphasize status and wealth. Since then, almost nothing has changed. Only material processing technologies and design have become more diverse and professional. Becoming a jewelry maker is a feasible task for anyone who loves handicrafts. You can learn how to model jewelry and master casting and inlay techniques using free video lessons for beginning jewelers. You can study from scratch and at home.
Jewelry modeling
The work of a jeweler is varied and includes many skills. In recent years, with the advent of computer 3D modeling, there has been an added need to master the appropriate computer programs and design skills. Modeling is the path from sketch to model.
Burner overview
Jewelry burners - gasoline and gas. The first type is better for home use. The gas model assumes obligations to regularly change the cylinder. When choosing and purchasing, you should pay attention to the dimensions and weight. It is better to choose miniature and lightweight samples that can produce a powerful flame.
Tools and equipment
The jeweler's arsenal is quite wide. You can really do a lot of things with your own hands.
- Electronic balance.
- Container for melting and drying (crucible).
- House for holding heat.
- Boroshnitsa for diluting fluxes, bleaches, etc.
- Titanium stick for stirring alloys, solder set.
- Fireproof surface for annealing and soldering.
- Burner (gas, petrol, manual).
- Rollers for wire and plate blanks.
- Dies for creating tubes and wire.
- Crossbar - a rod for giving shape.
- Pliers and round nose pliers (flanges).
- Scribbler and core for markings.
- Collet grip handle.
- Jigsaw for cutting.
- Drilling bur.
- Presser and rooter (used when setting stones).
- Ironing and scraper (polishes).
- Stichel - hand cutting.
- Shperak is an anvil.
- Anka for creating bulges.
- Flaheisen is a small forging plate.
- Knurling for small ornaments.
- Needle file (file).
silver ring
It is recommended to gain your first experience in jewelry making by creating rings. Possible options are cocktail, trinity, engagement and wedding rings, rings, signets. For advanced craftsmen - open, with chains or pendants, for two or three fingers. The choice of materials includes white, rose, yellow and red gold, platinum, silver, titanium, tungsten, palladium, tin, copper.
Stone setting
Inlaying objects with stones is an ancient technique with an interesting history. You can inlay any product: pendants, earrings, bracelets, necklaces, watches.
Common ways to fix a stone:
- pronged - fixation with hook paws,
- rim (blind, nested) - the oldest type, when the stone is hidden under the rim,
- adhesive (for pearls and other round parts) - glued to a pin,
- channel (rail) - a row of decor is inserted into a channel-shaped groove,
- corner - immersion in metal,
- pavé - placement in drilled niches in bulk,
- carmesine - a combination of prongs.
Casting
There are several technologies for making jewelry: stamping, rolling, drawing, casting. The latter is most often used when working with gold. Casting of designer products consists of the following steps.
- Creating a sketch (monolith or assembly of several parts).
- Casting in wax or using ready-made wax.
- Forming a flask to obtain a casting mold.
- Metal casting.
- Assembly, fastening of inserts, processing and grinding.
Tubular earrings
Congo is a common name among jewelers for classic hoop earrings. Why classic? Today, the model is the most universal: suitable for any style (from hippie to r&b), age (from teenager to older lady), gender and occasion (office, city walk, business meeting, romantic date). A simple version involves molding from a hollow tubular blank. If desired, you can decorate with pebbles or additional elements, experiment with thickness, shape, diameter and textures.
Golden balls
Balls are used as parts for all types of products. Or as blanks for stud earrings. Can be cast from silver or gold. The technology is the same; the result should be hollow spherical elements. The manufactured plate will need to be cut through with a notch or a circle cut out, then formed into a hemisphere using an anchor and punches.
Earrings for earrings
Earrings are the part of the earring that is inserted into the ear. Usually they have the shape of a hook with or without a clasp (loop, English, French locks). Even if the product is made of wood, plastic, beads or wire, the hook is always made of metal. It is better to use silver, gold, medical steel, titanium, which do not cause irritation and inflammation at the puncture sites.
Arabian Bismarck weave
Bismarck is beautiful, complex and one of the strongest weaves that guarantees longevity. It is no coincidence that the name is immediately associated with the iron nature of the famous German Chancellor Otto von Bismarck. Although the name of the jeweler who created the weave remains unknown. There are several varieties: abinata, Moscow, glamorous, single. Bismarck chains and bracelets look solid and are ideal for formal business suits and casual sets. They look less harmonious with elegant evening dresses, but are also acceptable.
Today, jewelry craftsmanship has turned from a craft into an art. The lesson gives scope for artistic and creative self-expression and design ideas. Also develops the concept of fashion, history, culture and modern trends
Casting aluminum into sand and clay molds.
Good day, pikabushniks and pikabushnitsy. In this post I would like to talk about one of the methods for making metal castings. Specifically, address signs. These are the ones.
Furnace and crucible for melting metal. Since we use low-melting aluminum, we need a temperature of at least 660 degrees. We did all this in a cleared warehouse on a homemade stove and “by eye.” So, there was no specific temperature regime.
I didn’t photograph the stove itself, but its design was simple: an outer layer of refractory brick, inside a layer of kaolin wool. A gas burner is directed underneath the crucible. The crucible is roughly welded from a piece of metal pipe. They burned out often and cheerfully, regularly creating beautiful silvery puddles on the floor around the stove.
The aluminum itself. I bought it in the form of various scrap materials, from scraps of aluminum profiles for compartment doors to twisted cables (the coolest raw materials, by the way).
Model of our product. We made it from MDF on a milling machine and covered it with two layers of foam-filling primer.
Form. It consists of two metal frames into which the molding mixture is tightly compacted (consists of clay and sand in certain proportions, lightly moistened with water until the Easter cake is molded).
The flask is the same metal frame. It consists of two parts, the horizontal line in the figure along the upper edge of the “model” is the connector plane.
The vent is a channel for air outlet, the sprue is a channel for pouring metal. The black and gray in the molding mixture are voids, I painted it for clarity.
That is, we have such an Easter cake in a frame with a void in the shape of our product.
Here you can see a model of a sign about an angry dog, a metal frame of the first half of the form (the bottom one in the diagram). It all lies on the most even, flat thing we could find.
We coated the model with talcum powder to increase the chances that it would later be pulled out of our “little cake” without loss. They sprinkled the mixture on top through a sieve - this is done only for the first face layer, so that later the surface of the casting would be of better quality, since the molding mixture was mixed in a box with a drill, and there were a lot of lumps left in it from previous uses.
Then more molding mixture is poured on top in handfuls and buckets, and it is trampled down for a long time and carefully with a mallet, such and such a mother and other improvised objects.
Here I didn’t experience a sudden metamorphosis of one sign into another, I just didn’t photograph the Angry Dog at that stage. Here we see the same bottom part of the mold, but flipped over and ready for the top part to be molded. That is, with the surface that we see here, in the first and second photographs the half-form lay down.
Sprinkle generously with talcum powder, place a second metal frame on top, and insert pipe scraps. The latter is done so that in the upper half of the mold there are channels for the sprue and vents (air vents, remember?). And again we pour in the molding mixture, this time without sifting - this will be the back surface of the plate, here you can improve the quality of the surface.
When both halves are ready, the tubes are pulled out, the upper half of the mold is removed, and the product model is pulled out. A very important stage, at which it may turn out that a couple of hours of work are wasted: the upper half of the mold may crumble during transfer, the model will be pulled out along with a piece of the mixture, or something like that. So, all actions must be done slowly and sadly.
I didn’t take a photo of the assembled form, because there’s nothing interesting there - an Easter cake in a frame and that’s it. But in the photo below you can see a mold ready for casting, from which the model and tubes have already been pulled out.
How to make a homemade melting torch
It is not difficult to purchase a gas or gasoline device. A jewelry gasoline unit is safe and costs between 1000-2000 rubles. However, if you have the time and desire, you can make a melting torch yourself. It’s easier to make gasoline at home.
- Any compressor - from a refrigerator, an aquarium, a nebulizer or a foot compressor - to supply air.
- Plastic container - for example, a milk bottle.
- Hoses.
- Sealant.
- And, the most difficult thing, nozzles for supplying a directed flame. It is better to make several of them to order in order to get a powerful stream of flame for melting or a flame-needle for repairing jewelry or solder. But you can also use an air injector, make several injectors from gas jets - you can buy them in the gas industry and drill larger holes, from 1 to 3 mm.
- We weigh down a plastic container for gasoline by gluing it to a ceramic tile or sheet of metal. This must be done for fire safety purposes, so as not to overturn the bottle of gasoline during operation.
- We make two holes in the container - one in the lid of the bottle to supply air from the compressor to the bottle, the second to supply gasoline-air vapors to the burner.
- We connect the hoses: the first - from the compressor to the bottle (it should reach the bottom), the second - from the container with gasoline to the burner itself.
- We seal the joints.
- The simplest version of the burner is a steel tube with a gas jet screwed into it. But for the sake of simplicity and safety, I recommend purchasing a ready-made one - its cost will not exceed 200 rubles.
The assembly process of the entire structure is described in the video:
Details
Lost wax casting
This casting method is the most accessible for beginners. For this, it is necessary to create a model from a material whose temperature is significantly lower than that of molten silver. A mold made of clay-sand mixture or plaster is poured around the selected model of the product. The simplest and most common materials for making models are paraffin or wax. Molten metal is poured into the mold, the modeling material melts, which displaces excess metal, which flows through specially prepared holes. Another option is to burn out a wax model of the product by heating the mold to a high temperature, and molten silver is poured into an empty mold.
Tools and devices for molding and pouring silver according to the model.
casting fixtures by model:
- Crucible for cleaning and melting metal,
- Gas burner or muffle furnace,
- Steel pliers,
- Stand made of fireproof material,
- Scales,
- Special wax for modeling,
- Mixtures for molding and containers for their dilution,
- Knives, scalpels, needle files for processing and finishing the finished product,
- Casting molds,
- The hammer that breaks the flask,
- Protective equipment – mittens, apron, glasses,
- Fire extinguisher,
- Dremel is a miniature version of a drill,
- Crossbars, vices and mandrels.
