Purpose
To prepare parts for applying solder, it is necessary to clean them of particles of foreign materials - dust, sand, water. In addition, it is necessary to remove the oxide film from the surface, which is present on almost all metals.
And if the first condition is easy to cope with mechanically, using a file, needle file, or sandpaper, then the second condition is difficult to fulfill without the use of chemical compounds - an oxide film very quickly appears on the surface of the metal.
Substances that remove film and prevent the formation of a new one are called fluxes, and the most effective of them is soldering acid. It is an active flux, that is, during soldering it chemically affects the composition of the metal surface.
Professionals never question why soldering acid is needed; they know very well that very often it is impossible to complete the assigned tasks without it.
Soldering acid is used for the following metals:
- copper and its alloys;
- nickel;
- iron;
- structural steel;
- alloys of non-ferrous metals.
If copper or brass parts are successfully soldered with borax, then it is often possible to solder aluminum or steel workpieces to each other only using soldering acid. Upon completion of work, the active flux must be washed off with water containing a small amount of alkali.
You can buy acid in stores, or make it yourself using chemical reagents. Although purchasing raw materials can be more expensive than ready-to-use flux.
Soldering wires
In order to correctly solder copper wires using rosin, you must follow a certain sequence of actions.
- First prepare the wires. To do this, the ends of the wires that need to be soldered must be thoroughly stripped of insulation. All wires spliced together are usually insulated using a special heat-shrinkable tube. If such a tube is present, then it must be cut using a sharp knife so that the length extends 2-7 mm beyond all seams. The insulating coating should be about two centimeters on each side of the wires being connected. The exposed ends of the wires must be burned to completely remove the insulation.
- Then the connected ends of the wires need to be provided with a high-quality mechanical connection. To do this, the two ends of the wire are twisted together so that their centers intersect tightly with each other. After this, the end of one wire should be twisted along the length of the cable. The same manipulation should be done with the second end of the other wire.
- Then you need to heat up the soldering iron to first tin the wires and then warm them up. To do this, a heated soldering iron is lowered into rosin and a little solder is taken, after which the device is passed a couple of times along the ends of the wire. During tinning, the wire should be rotated and heated, which will help ensure an even coating of rosin.
- At the end of the work, the finished wire should be insulated. To do this, you need to put the heat shrink back on the already soldered wires. This will not only help cover the connection, but also heat it, making the soldered wire strong and flexible.
As you can see, there are no particular difficulties with soldering wires using rosin. The main thing is not to forget to tin the wire and check the quality of the soldering. If necessary, tinning should be repeated several times until the wires are firmly connected with solder.
What does it consist of?
In general, soldering acid is called zinc chloride, but the composition of the substances used in practice is somewhat different. Most often, soldering is done using preparations based on hydrochloric or phosphoric acid with the addition of solvents.
Concentrated hydrochloric acid is not applicable because it corrodes the metal. For electronic circuits, acidic substances are not used, soldering using rosin or choosing another inactive flux.
One of the universal types of liquid flux can be considered soldering acid FCA, produced by chemical industry enterprises.
This drug contains:
- zinc chlorides;
- ammonia (ammonium chloride);
- hydrochloric acid;
- water purified from impurities.
At home, soldering acid is made by dissolving zinc in hydrochloric acid. To obtain satisfactory results, you need to know how to solder metals and alloys with soldering acid, and also strictly follow safety rules when working.
Rules for soldering work
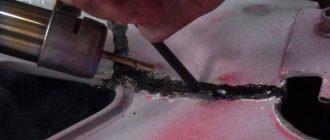
Before knowing how to use a soldering iron correctly, it is necessary to carry out all work in a ventilated room, and if ventilation is not possible, then equip a place with strong ventilation hood. Next, the working preparation of the soldering iron involves cleaning the metal surface using sandpaper. We process dirt and defective areas with a file or reinforced sandpaper. After this, take a small brush and carefully spread acid on the damaged areas. After this, we apply solder to the surface, which should have a liquid-like form.
Acid soldering process
In general, liquid solder provides protection to the part of the surface being processed; when boiling, the finished acid flux comes out onto the working surface. When the solder hardens, the treatment areas are securely and completely sealed. Working with a soldering iron involves using a powerful device or fixing it using an open flame. If necessary, other heat sources can be used that can be adapted to other metal surface materials.
Features of soldering
Before starting work, you need to prepare the place and tools that you will use for soldering. Below we provide you with information on what you need for soldering with a soldering iron, a list where the main points of the upcoming work are indicated:
- Use soldering irons with low voltage, preferably 24V or 12V, and even 6V.
- All soldering irons must be grounded, even if it is a low-voltage device.
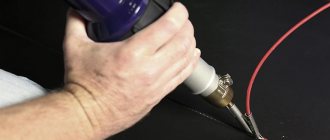
- Before the soldering process, be sure to warm up the boards with a special hairdryer, and large objects over a heat source.
- The specialist’s body must also be grounded. To do this, use special grounding bracelets.
- For miniature circuit boards, do not use acid, use rosin.
- Carry out all work wearing a special protective mask or binocular glasses for small work.
- If necessary, allow the material to cool before continuing the soldering process.
- In some cases, use alcohol to clean the surface.
- When finished, dry the surface of the workpiece.
- Use only proven components so that you can effectively solve the problem of how to properly solder brass, copper, tin or other metal with an acid soldering iron.
The room must be ventilated; use ventilation devices and other technological devices. All acidic substances must be stored in special containers. For utensils, use only the following basics:
- Glass.
- Ceramics.
- Porcelain.
- Fluoroplastic.
Such utensil material does not come into contact with acid and there will be no damage during the working process or as a result of acid storage in the future.
Tools and materials for work
To properly prepare for soldering work, you need to prepare tools and materials in advance, which include a sample list:
- Soldering iron.
- Acid.
- Soldering iron stand.
- Pliers.
- Technical tweezers.
- A knife with a thin blade (can be a stationery knife).
- A desalination pump or a special copper whip.
The soldering process also has a number of sequences that the master must follow, in particular:
- We clean the place where the soldering is carried out.
- Using a brush, we treat the area of future solder, carefully lubricate the area, preventing acid from getting on your hands.
- We tightly compress the parts to be processed.
- We process the soldering area using a soldering iron, using an additional heat source if necessary.
- Let the material cool.
- Clean the surface from excess.
You can work with a soldering iron yourself, as well as prepare acid. During work, we must comply with safety standards and requirements when working with chemical components, and also comply with fire and electrical safety requirements. Despite this, soldering acid remains popular among specialists. Considering the chemical nature of the substance, after finishing work, be sure to ventilate the room and wash your hands thoroughly with soap. The special properties of the acid make it possible to efficiently and effectively eliminate defects on various metals that are present in our everyday life.
General rules of application
For soldering, tin-lead solder (PLS) is usually used. Its main component is always tin, and lead is added in proportions, depending on which the solder acquires the properties necessary for soldering.
Lead makes the material softer and more fluid, while tin provides strength to the hardened joint.
Despite the presence of lead, the fluidity is often not enough to overcome the surface tension forces in a drop of solder, and with little adhesion to the metal surface, the solder remains in the form of a drop that does not want to stick to the parts.
If the surfaces are first cleaned of oxides, the adhesion force will exceed the forces of surface tension and the solder will spread over the surface, ensuring good adhesion, that is, sticking.
To clean the surface, it is mechanically cleaned using a file or sandpaper and soldering acid is applied. It can be applied with a small brush made of natural materials or with a small spatula.
Often the composition is contained in plastic bottles with dispensers that are convenient to use. The flux must cover the entire surface to be soldered, otherwise the solder will not stick well to it.
During contact of the heated solder with the surface, the soldering acid evaporates, but its presence is no longer required. After the solder is applied, it itself performs a protective function, preventing oxidation. This process is called tinning.
Both soldered workpieces are subject to tinning. After tinning, you can easily connect them by applying additional solder to the joint.
Of course, when soldering with a soldering iron, the tool must also be clean and the tip, made of copper, must not contain oxide films. To do this, the tip must also be tinned first by dipping it while heated in soldering acid and applying solder to it.
An even more affordable recovery option
By soldering you can remove a layer of carbon deposits. We make a small bath of solder. You will need a solder rod and flux. Preferably activated (for example, LTI - 120). You can even use regular alcohol rosin. This is in the case of “light” soot, of small size.
Now we divide the solder bar into small pieces and pour a little rosin or flux (even if you have solder containing rosin, this is not enough for this case).
And we begin to bathe the tip in solder. If the solder does not melt, then you need to increase the temperature.
We coat the tip in solder from side to side, without pulling it out, so that the tip is completely enveloped. In a couple of minutes, a small amount of carbon deposits will evaporate, and it will be possible to take a little more fresh solder onto the tip after “bathing”. We leave the soldering iron heated with a drop of water for 10 - 15 minutes.
Soldering without a soldering iron
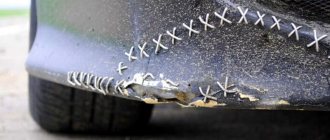
Sometimes when soldering using soldering acid, you can do without a soldering iron. One of these methods is used, for example, when soldering twisted wires during electrical installation work on electrical wiring.
In this case, flux is applied to the twist with a brush, and for a better effect, the twist is dipped in a small container with acid. After this, the twist is immersed in a container with molten solder and held for about 1 minute so that the wires warm up well and the solder penetrates to all points of their surface. This soldering provides excellent electrical conductivity when connecting wires.
After soldering, it is necessary to remove the remaining soldering acid from the joint in order to avoid metal corrosion and destruction of the joint in the future.
It must be remembered that when installing printed circuit boards of electronic circuits, when soldering electronic components of radio devices, it is not recommended to use soldering acid, since very thin conductive traces of the boards can be damaged. When applying flux, soldering acid can dissolve them.
PCB soldering paste
The composition is not much different from the paste that is used to solder without a soldering iron; the powder includes the following components:
- tin – 14.8 g;
- rosin – 4 g;
- zinc dust – 738 g;
- lead powder – 7.4 g.
For a paste-like consistency, add diethyl ether - 10 ml, it can be replaced, use glycerin - 14 ml.
Soldering sequence:
- the legs and tracks of the printed circuit board are cleaned;
- in order to solder, the legs of the parts are inserted into the holes of the board;
- places where it is necessary to solder on the board are lubricated with paste;
- the paste is heated with a soldering iron until it melts;
- The solder spreads and hardens, providing reliable electrical contact between the parts and the traces of the printed circuit boards.
Safety regulations
In the production of soldering acid, hydrochloric and phosphoric acids are used. They are very active (although phosphorus is weaker) and easily react with many chemicals. When such substances come into contact with the skin, they cause a chemical burn.
Read also: Mat cable what is it
Even when diluted, their vapors can damage the mucous membrane of the sensory organs.
Taking into account the above facts, safety rules when handling soldering acid include secure storage of the drug, the use of protective clothing and gloves, and good ventilation of the work area.
[Acid for soldering is necessary] if the use of rosin does not allow the necessary elements to be properly soldered together.
The use of soldering acid for soldering helps remove the oxide film layer from the surfaces being soldered and makes it possible to properly prepare them for joining.
As a rule, rosin is used to prepare copper parts for soldering with your own hands. But soldering acid is used for tinning not only copper, but also its alloys - bronze and brass.
And also for stainless steel, precious and ferrous metals, aluminum and nickel, even for soldering cast iron.
The need to use acid fluxes
Any soldering acid - hydrochloric or phosphoric acid - is designed to create an ideal environment for the interaction of solder with elements.
Their use makes it possible to remove contaminants and oxides from the working area, prevent the resumption of the oxidation process and reduce the tension of the solder, in order for it to spread more freely.
As a result, reliable soldering of parts is ensured.
Depending on the type of metal, the flux for soldering is selected. It is worth noting here that soldering acid is not used when assembling boards.
Acid belongs to the category of aggressive media and contributes to the destruction of components standing in its path.
In addition, it is an ideal electrical conductor and has the property of creating additional conductive channels.
Therefore, you should not even count on neutralizing the acidic environment after soldering.
Preheating and temperature selection
It is difficult for beginners to determine at what temperature the tool can start working. The degree of heating should be selected depending on the type of material:
- soldering microcircuits requires heating no higher than +250°C, otherwise the parts may be damaged;
- large individual radio components can withstand heating up to +300°C;
- Tinning and joining of copper wire can occur at +400°C or slightly lower;
- massive parts can be heated at the maximum power of the soldering iron (about +400°C).
Many models of instruments have a thermostat, and it is easy to determine the degree of heating. But in the absence of a sensor, it is worth keeping in mind that a household soldering iron can be heated to a maximum of +350... +400°C. You can start working with the tool if the rosin and solder melt within 1-2 seconds. Most POS grade solders have a melting point of about +250°C.
Even an experienced craftsman will not be able to solder correctly with a soldering iron that is not heated enough. With low heat, the solder structure becomes spongy or granular after solidification. Soldering does not have sufficient strength and does not ensure good contact between the parts, and such work is considered a defect.
DIY hydrochloric acid flux
Often, to process the parts being soldered, a flux is purchased, which is commercially available and is simply called soldering acid.
The manufacturer supplements the product with instructions on the conditions of its use, which makes it easy to navigate its purpose.
Usually this is tinning and soldering of stainless steel, silver, copper, aluminum and various alloys.
In the production of flux, hydrochloric acid is used, in which zinc is dissolved, resulting in a base - a zinc chloride compound. It is quite easy to make such a composition at home with your own hands.
To prepare the composition you need to take:
- 1 liter of HCL (concentrated hydrochloric acid);
- 412 g Zn (zinc).
Next you will need a container made of glass, ceramic or porcelain. First, zinc is placed in the dishes, then hydrochloric acid is poured.
It is very important to prepare the composition with care; fill ¾ of the container with acid.
Zinc and hydrochloric acid can be bought in special chemical stores, but if you have old AA batteries at home, Zn can be easily obtained from them.
After the reaction of dissolving zinc in hydrochloric acid occurs, the evolution of hydrogen will stop.
That is, bubbles will no longer form in the liquid, it will become transparent. The prepared soldering acid composition is carefully poured into a tightly sealed glass container.
Precautionary measures: when making flux, it is recommended to be near running water; if the composition suddenly gets on the skin or, even worse, in the eyes, it is necessary to rinse them with plenty of water.
By the way, hydrochloric acid in its pure form can be used as a flux, provided that iron parts are processed.
Preparing the soldering iron for use
In everyday life, “ordinary” electric soldering irons are used. There are those that operate from 220 V, there are from 380 V, there are from 12 V. The latter are characterized by low power. They are used mainly in enterprises in areas with increased danger. They can also be used for domestic purposes, but they heat up slowly, and the power is not enough...
You need to choose the one that fits comfortably in your hand
Power selection
The power of the soldering iron is selected depending on the nature of the work:
- For working with electronic elements - 40-60 W.
- With a thickness of soldered parts up to 1 mm - 80-100 W.
- Thick-walled elements - with a wall of 2 mm - require power of 100 W and above.
Soldering irons come in different capacities and operate on different voltages.
In a household, it is enough to have two soldering irons - one low-power one - 40-60 W, and one “medium” one - about 100 W. With their help, it will be possible to cover about 85-95% of needs. But it is still better to entrust the soldering of thick-walled parts to a professional - this requires specific experience.
Preparing for work
When the soldering iron is plugged in for the first time, it often starts to smoke. This burns out the lubricants that were used in the production process. When the smoke stops coming out, turn off the soldering iron and wait until it cools down. Next you need to sharpen the tip.
First you need to burn off the grease
Sharpening the tip
Next, you need to prepare the tip for work. It is a cylindrical rod made of copper alloy. It is fixed using a clamping screw, which is located at the very end of the heat chamber. In more expensive models, the tip may be slightly sharpened, but basically there is no sharpening.
How to prepare a soldering iron for use
We will change the very tip of the sting. You can use a hammer (flatten the copper as you need), a file or emery (just grind off the unnecessary). The shape of the tip is chosen depending on the intended type of work. It can be:
- Flatten it into a spatula (like a screwdriver) or make it flat on one side (angled sharpening). This type of sharpening is needed if massive parts will be soldered. This sharpening increases the contact surface and improves heat transfer.
- You can grind the edge of the tip into a sharp cone (pyramid) if you plan to work with small parts (thin wires, electrical parts). This makes it easier to control the degree of heating.
- The same cone, but not so sharp, is suitable for working with conductors of larger diameter.
Sharpening with a “spatula” is considered more universal. If it is formed with a hammer, the copper will be compacted and the tip will need to be adjusted less often. The width of the “shovel” can be made larger or smaller by trimming it on the sides with a file or emery. With this type of sharpening you can work with thin and medium-sized parts to be soldered (rotate the tip to the desired position).
Soldering iron tinning
If the soldering iron tip does not have a protective coating, it must be tinned - covered with a thin layer of tin. This will protect it from corrosion and rapid wear. This is done the first time you turn on the instrument, when the smoke has ceased to be emitted.
The first method of tinning a soldering iron tip:
- bring to operating temperature;
- touch the rosin;
- melt the solder and rub it along the entire tip (you can use a wooden sliver).
Second way. Moisten a rag with a solution of zinc chloride and rub the heated tip on the rag. Melt the solder and rub it with a piece of table rock salt over the entire surface of the tip. In any case, the copper should be covered with a thin layer of tin.
Phosphoric acid for flux production
The second common type of soldering acid is phosphoric acid - H3PO4. It also ideally removes oxide film from metal surfaces and prevents its renewal.
Reference: H3PO4 (orthophosphoric acid) is a component of many anti-corrosion compounds for metal processing.
To carry out high-quality soldering of elements made of nickel or chromium, such acid is used undiluted. Moreover, the composition prepared using it includes 1/3 of ethanol or ethyl alcohol.
The share of orthophosphoric acid is 32%, and 6% is rosin.
In other acid compositions used for tinning and soldering, the proportion of acid can reach 100%.
Very often, H3PO4 is combined with zinc chloride, and its mass in the finished flux can reach 50%.
The use of phosphoric acid is not limited to soldering nickel alloys; it is used to connect elements made of stainless steel, copper, aluminum and low-alloy steel.
Orthophosphoric acid is a component of the classic active flux "F-38 N", the use of which makes it possible to solder copper alloys and pure copper, various steels and chromium-nickel alloys.
“F-38 N” is an excellent option for carrying out the work process in hard-to-reach places; it has the ability to protect welded elements from corrosion.
The components of “F-38 N” are: diethylamine hydrochloride and 25% phosphoric acid.
Orthophosphorus soldering composition is characterized as fire and explosion-proof. It is recommended to store and use the product with all precautions.
In case of contact with skin, rinse for at least 10 minutes under running water.
Use of tin for soldering
Different materials can be used for soldering metals, but connecting elements with tin is much easier and more convenient.
Tin can be used to connect parts made of stainless steel, aluminum, copper, and its alloys.
Tin is melted at a temperature of 2500; for this purpose, various heating devices can be used:
A soldering iron is a device with a metal working part and a plastic handle, and can have a variety of tips.
Heats up with a gas burner.
Electric soldering iron - the set includes replaceable tips of various sizes and shapes. The structure is assembled from a soldering rod and a heating coil, which can have different heating power.
Gas burner - a portable design is a container with a handle and a nozzle for creating a fire of varying intensity.
How to properly solder tin on stainless steel?
For soldering stainless steel elements, it is recommended to use active soldering acid, for example, zinc chloride or phosphoric acid.
Flux is applied to the surface of the stainless steel right before soldering begins. The tip of the soldering iron is tinned with molten tin and the surface of the stainless steel begins to warm up well.
Read also: Dimensions of roofing screws for metal table
The procedure is repeated until the coating becomes uniform. During the soldering process, you can use rosin, which will make the surface smooth by removing oxide from the solder.
After soldering the stainless steel is completed, the product is washed from acid residues with soapy water. Excess rosin is easily removed in cold water.
It is worth noting here that high-quality soldering will have a uniform and smooth surface.
How to properly solder aluminum with tin?
Before soldering aluminum, the surface is cleaned using emery cloth, then the work area is degreased with an organic solvent.
To solder aluminum you will need a soldering iron with a power of 100 W, as well as solder made of tin - 95% and bismuth - 5%. Stearic acid can be used as a flux.
Since aluminum products are difficult to solder due to the rapid formation of an oxide layer after stripping, it is necessary to fill the surface to be joined with hot rosin.
Then, use a soldering iron tip to take the solder and transfer it to the working part treated with rosin.
After tinning the aluminum in this way, it will become easier to solder the surface; if necessary, even copper wires can be soldered to it.
Every person who has had to work with radio electronics has repeatedly used a soldering iron to solve their problems, so he knows what the operating principle of such equipment is. But due to the unpleasant odor emitted when processing a structure using classic solder, as well as significant difficulties at different stages of operation, this technology is not in great demand and has a number of simpler analogues.
Soldering wires to LED step by step
Organize a workplace that is bright and always ventilated. Rosin smoke is harmful to health. Prepare a soldering can, for example, from a candy can, lay paper on the bottom so that the tin rolls into balls.
Soldered the LED to the wire
In the future, this solder is very convenient to use for soldering small components. Be sure to get tweezers, they will come in handy when working with small objects.
I recommend working with safety glasses, as a flying leg from any part can launch a drop of molten solder directly into your eye.
Step one, preparatory
- Prepare your soldering iron for soldering. Turn it on and wait for it to heat up.
- Remove the insulation from the wire; it can be easily removed with wire cutters in one movement. It is convenient to use an insulation stripper.
- The insulation in a fabric braid, like a headphone wire, must first be burned, and then be sure to run sandpaper or a knife along the wire to clean the burnt ends. Otherwise, the solder will not stick to the wires.
- If the wire or leg of the radio component looks dark, oxidized, or has traces of burnt enamel, then they need to be cleaned with sandpaper or a file. You can clean it with a knife, many use a scalpel, until a metallic shine appears, this is the key to successful soldering.
Step two: flux and tinning
Rosin comes in three types: solid, liquid and gel. We use solid rosin like this: melt it with a soldering iron, and immediately apply it to the wire, hold the soldering iron tip on the wire until the rosin burns out completely.
Solid rosin, alcohol-based and gel
We continue tinning with tin until the wire is tinned. If there is such an opportunity, then you can dip the wire into melted rosin together with a soldering iron, and then tin it.
Tinning LED contacts
Liquid rosin is a solution of solid rosin in alcohol. You can do it yourself, everything is much simpler and more convenient with it.
Popular: Do-it-yourself oscillator – why pay manufacturers?
We apply liquid rosin directly to the wire using a brush or any convenient object, and then begin tinning with a soldering iron with a drop of solder.
Gel-like rosin is sold in a syringe and is very convenient to use; you can work with it in the same way as with liquid.
Step three - soldering
We collect a little solder on the soldering iron, directly from the wire or by picking up a ball. Dip the tip into the rosin from time to time to improve the flow of solder.
We connect both conductors that need to be soldered. Carefully heat the contact points until the solder melts on both ends and immediately remove the soldering iron so as not to overheat the parts.
Solder the wire to the LED
We try not to move the wires with our fingers until the solder has completely hardened. This can be determined by appearance. At the moment of hardening, the surface of the solder becomes dull and the bright shine disappears.
This is what proper soldering looks like
If the surface of the seam is dark and has many irregularities, then this is incorrect soldering.
Incorrect soldering
Solder the seam and achieve the desired result.
How to achieve better results
- Heat the soldering area not with the tip of the soldering iron, but slightly with the side surface of the tip, so that the contact area is maximum.
- The wire and the LED leg can be twisted before soldering, this will give the connection increased strength.
- Use a device called a third hand to help you hold the piece.
- If your parts are new, straight out of the box, shiny and sparkling with tinned legs, then you can solder right away. We apply flux and immediately apply solder without prior tinning.
- If you use thin solder with rosin inside, you can solder immediately, without degreasing.
Purpose of soldering acid
To make the upcoming soldering more productive, many welders use special substances - fluxes, with the help of which the solder spreads evenly over the soldering site. Among the main fluxes, rosin and soldering acid are distinguished. The first option is indispensable when soldering copper and silver, and acid is used in particularly difficult cases. How soldering acid works, the composition and other features of such a substance are the main questions that concern many inexperienced beginners.
If we highlight the main recommendations for successful soldering with acid, they will look like this:
- When choosing a suitable solution, you need to understand the type of metal or alloy. When soldering iron, including galvanized iron, a unique type of soldering acid is used, represented by a solution of zinc chlorate. Soldering of stainless steel is carried out using phosphoric acid for soldering, as well as multi-component fluxes. A material such as aluminum cannot be soldered , which is due to the lack of suitable fluxes capable of dissolving the oxide film of the material. Acid cannot be used for soldering printed circuit boards, as this increases the risk of the formation of corrosive elements and short circuits between conductors.
- If you intend to use soldering acid for your own purposes, you can purchase it in the form of a paste at the appropriate store. Nevertheless, many welders make their own soldering acid, claiming that such an action does not require any special difficulties. You need to take about 100 ml of hydrochloric acid, put pieces of zinc in it, for example, removed from batteries, and wait for the chemical reaction to complete, during which hydrogen will be released. Given this feature, it is better to conduct the event in a ventilated environment away from sources of fire. If the hydrogen bubbles stop rising, let the solution sit until clear, and then carefully pour it into the bottle. That's it, the highly effective soldering acid is ready.
Instructions for use
- Immediately before soldering, it is necessary to clean the surface with a file or sandpaper, which will avoid all kinds of contamination.
- Acid should be applied to the adhesion site, for which you can use a brush. Next, you need to cover the structure to be soldered with solder based on tin or its alloy. If the substance does not apply evenly, you will have to repeat the acid treatment again.
- In the next step, carefully solder the surfaces. When working with a heated soldering iron, do not forget about safety rules and try not to clutter the work area with materials that ignite very quickly.
- After completing the procedure, the acid should be neutralized using an alkali, for example, a soda solution, and then rinse the adhesion site to get rid of any remaining acid. In rare cases, acetylsalicylic acid plays the role of a flux, although its use requires a more complex approach.
Features of metal soldering
Silver
If you have ever worked with a soldering iron, then you know that soldering is a unique type of permanent connection of metal products using low-melting metal. The technology itself is selected taking into account the type of metals that are to be soldered, as well as the environmental conditions where the action will be performed. For example, processing printed circuit boards from some electronics and repairing silver jewelry are significantly different from each other.
When soldering this way, you should use a soldering iron, solder, and also a flux, which is colophonium.
The step-by-step instructions look like this:
- It is no secret that for soldering elements with a high silver content, solder is used, which contains about 60% tin and 40% lead, which can melt at a temperature of 180 degrees Celsius. Try to prepare solder, which will be indispensable for soldering electronic circuits. This product consists of thin tubes that are filled with resin and act as a flux.
- The surface that will be solderable must first be cleaned of any defects and irregularities that may appear when exposed to the oxide film. In this case, the heated solder can create an effective connection with the silver.
- The part in the soldering zone is heated to such temperatures that natural melting of the solder begins. However, at this stage, some difficulties cannot be avoided, which may be associated with insufficient power reserve of the soldering iron for sufficiently high-quality heating. When soldering silver products, it is important to protect the area from possible exposure to atmospheric oxygen. In this case, colophonium is used, which can create a protective film over the soldering area.
- As for soldering jewelry, it is carried out using high-temperature solders that correspond to the metal standard, or using solders of a lower standard, but containing silver. Soldering jewelry with tin is necessary only in the most extreme cases, and only after prior agreement on all details with the owner of the ring, chain, bracelet or other item. If you do not know how to perform such an action correctly, this can cause damage to an expensive structure.
Read also: Requirements for hammers and sledgehammers
Boards
It's no secret that soldering radio components into boards is a simple process . It is much easier to do than connecting loose wires, since the holes in the boards are intended to fix the soldered parts. However, you need to understand that the final result is directly related to the experience and responsibility of the worker. The first circuit that is assembled on a breadboard cannot be called very successful. But don’t worry - after some time the quality of the connections will increase significantly.
Step-by-step instructions and features of such soldering consist of the following points:
- The main goal of the upcoming work is to effectively connect the chip to the board so that a uniformly good soldering is obtained. The event can be divided into several separate stages.
- First, you need to simultaneously bring the solder and the tip of an already heated tool to the area where the connection is required. It is important to follow the key rule, making sure that the soldering iron tip is in full contact with the pin being processed and the board itself.
- During processing, you cannot change the position of the soldering iron tip until the entire contact area is covered with an even layer of solder. In most cases, this takes from 0.5 to 1 second. This time period ensures sufficient heating of the soldering area.
- At the next stage, you need to circle the tip of the tool near the contact being processed in a semicircle, moving the solder in the opposite direction. In the same way, apply another millimeter of solder to the soldering area. During this period, the selected area will warm up quite well, so the solder melted under the influence of surface tension will be distributed evenly over the contact area.
- After successfully applying the required amount of solder to the selected location, you can move the wire away from the soldered area.
- And at the last stage, you should quickly remove the tip to the side. In a short period of time, the liquid substance, with a small layer of flux, will take its final shape and harden, creating a strong connection.
It is important to understand that if the sting is sufficiently warmed up, the action will not take more than 1 second. Try to hone your skills and follow the recommendations of professionals. This way you can achieve incredible success.
Every man can learn to solder, because this procedure does not require any special skills or secrets. In any case, the ability to solder can be very useful and useful in everyday life, where you need to connect wires and parts of electrical circuits, repair a car radiator, and also install copper pipeline elements.
It's no secret that copper is one of those materials that lends itself very well to soldering. In addition, the surface of products made of this metal can be easily cleaned from oxide film, dirt, unevenness and other defects without the use of expensive chemicals and aggressive agents. Most fusible metals have excellent adhesion to copper and do not require the use of expensive or complex fluxes. Copper practically does not interact with air when heated.
Due to such unique properties , metal can be soldered in a wide variety of environmental conditions, using various types of fluxes and solders.
To solder parts, you should use electric soldering irons or soldering stations with different power. It is known that the greater the mass and volume of the part, the higher the power indicators of the working tool should be. If you've never soldered before, a 25-50W device might be your best bet
Popular mistakes
Why is it easier to solder with soldering acid? During heating, the soldering area becomes covered with oxides faster, since the higher the temperature, the faster the chemical reactions proceed. Acid also begins to corrode these oxides faster. Here lies another problem. Acid also corrodes the soldering joint, in addition to oxides. This degrades the strength of the connection.
Poor soldering is preceded by many errors:
- Overheat. The flux evaporates and does not have time to take part in soldering. This happens when the temperature on the soldering iron is set above 300 degrees;
- Underheating This occurs due to the small heating area, lack of understanding of the principles of soldering work, or poor-quality equipment;
- Long touch of the soldering iron to the contact point. Soldering should not last more than a few seconds. Otherwise, most of the flux will evaporate, and the rest of the solder will form a lump and begin to oxidize.
- Amount of flux and solder. An excess or deficiency of components is also a critical factor. Too much flux - the solder will start to spread, too little - it will evaporate quickly and will not be enough for the entire area.
Other soldering features
At the learning stage, many beginners have a question: “what is solder and flux.” Solder is a common form of low-melting metal that is required for successful soldering of radio circuits, electronic components, and jewelry. Most often, solder is made from tin, but in its pure form such metal is not cheap, so it is used only for tin-plating and soldering of utensils, which are used for storing and preparing food. If it is necessary to solder wires and electrical circuits, the tin-lead solder option is used.
When performing soldering work, you may need the following tools and accessories:
- stand for soldering device;
- side cutters;
- pliers;
- tweezers;
- stationery knife;
- vice;
- desoldering pump or copper braid.
The soldering process itself includes several steps:
- Cleaning the selected area to a shine.
- Dipping the soldering iron tip into rosin for more effective cleaning.
- Firmly pressing the connected elements together.
- Then it requires applying a soldering iron with a small amount of solder at the end to the junction of such parts.
- Next, you need to run the soldering iron tip along the part or wire, doing this as quickly as possible to avoid burning out the rosin on the tip.
- The soldering area should be thoroughly heated so that the rosin, when melted, covers the entire surface of the part, and the solder fills the gap between the parts.
- Be sure to remove excess solder with a soldering iron or desoldering iron. It also wouldn't hurt to use braid.
If all operations are carried out exactly according to the established rules, the hardness of the solder will become maximum, and its distribution will be uniform.
If during the solder solidification stage the soldered parts move from place, most likely the soldering is not good enough. To avoid such a course of events, it is enough to learn how to avoid making many mistakes.
How to solder correctly with a soldering iron and rosin
Every novice radio amateur sooner or later has to acquire a minimum set of tools and learn the basics of soldering with a soldering iron. To get the job done quickly and with the highest quality, you need to master rosin soldering.
1
How to solder correctly with a soldering iron and rosin
In order to get started, you need to purchase the following minimal equipment:
- electric soldering iron;
- tin or solder;
- rosin.
Regarding the power of the soldering iron, a regular 40 W (voltage 220V) will do. For home use, such a soldering iron is quite sufficient. Now solder - you will need it in order to connect the components and parts. Solder can be different: rosin, an alloy of tin and lead. It is sold in the form of tubes (with flux inside) or in the form of wire. The last option is better.
As for the choice of solder, in terms of hardness and melting point, a flux labeled PIC (tin-lead solder) is suitable; 60 is the percentage of tin, and 40 (this figure is not indicated, we calculate it ourselves) is the amount of lead in this solder. It's good if you can find solder with a high lead content (it differs in color, it will be darker). The melting point of such solder is an order of magnitude higher, which means increased soldering strength.
And finally, about fluxes - this substance is intended to remove oxides from parts being soldered. This cannot be avoided, because the tip of the soldering iron is copper and will oxidize when heated, so you will have to periodically remove carbon deposits. If this is not done, the solder will not attach to the parts, but will simply spread. Soldering with such a contaminated tip will not work.
The simplest and most reliable flux is rosin. The material is natural, because rosin is made from pine resin. This is an amber-colored liquid with a pleasant pine aroma.
Sold in pieces in pure form, in the form of viscous or liquid flux.
For beginners, both pure rosin and alcohol-rosin flux are suitable; this is a universal material consisting of a solution of rosin and pure ethyl alcohol.
2
How to solder with rosin
Everything you need has been purchased and prepared; you need to clean the soldering iron tip (and if it is not flattened, do it yourself). The thinner the tip, the more delicate soldering work can be done. The angle of the tip should be dihedral 30-45 degrees.
How to solder with rosin:
- Open the window; you need to work in a well-ventilated area.
- Turn on the soldering iron, wait until the unpleasant smell and characteristic smoke go away - the tip is calcined and ready for use.
- You can turn off the soldering iron for now to clean the tip.
- Turn on the electrical appliance again and wait for the tip to heat up.
- You can lightly tin the part clamps (touch the rosin with a hot tip several times so that the tip is covered with solder) to ensure high-quality adhesion of the parts being soldered.
- Take the rosin, touch the tip of the tip to the rosin to pick up a little solder. Wait until it warms up. It will take literally a few minutes.
- Place the sting on the pine board for a few seconds, then repeat your actions again.
- After a few repetitions you will succeed.
- For a beginner, when mastering the basics of soldering, it is more convenient to work so that the tip is exposed; this is the most basic mistake when working. Due to the large exposed tip, the circuit often catches fire.
- When working with copper wire, one tinning is enough, that is, you need to warm up the tip, touch the rosin, apply the tip to the working surface, lift the wire, lower it into the rosin, apply the hot tip to the surface and lift the wire.
- As a result of these actions, the rosin will begin to smoke, and the wire will flow around the rosin mass. After this, you will need to cover the soldering with tin and transfer it to the wire.
- If, as a result of the actions taken, the wire changes color from yellow to silver, this means that everything was done correctly. To solder 2 wires, you need to tin both.