Not everyone can afford to finish surfaces with natural materials, due to the high price of products and work. The process involves not only laying marble on a specific surface, but also processing it, which is done with a specialized tool. Various quantities of polymer concrete fall into the subcategories of artificial marble.
Marble finishing in large quantities can be done with your own hands, through organized production at home. An obvious advantage is the production of artificial marble of the required shape and consistency, which is unique and cannot be found on the market. The general composition of accessories for making artificial marble at home does not change depending on the required shape of the product.
Properties of artificial marble
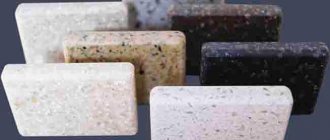
The main components of artificial marble are polyester resins, which are wear-resistant and durable. An alloy of mineral fillers, dyes, and various acrylic resins are used in production. The composition of artificial marble varies depending on the work and the type of product. More budget-friendly variations involve the use of crushed quartz crushed stone, pebbles, concrete-cement mixture, and tinted sand.
The homogeneous structure is an obvious advantage; the material does not delaminate and is not flammable. Artificial marble does not conduct electricity, does not burn, and is used in various fields. Products in the form of accessories for kitchen and bathroom utensils may have excellent anti-corrosion properties and resistance to cleaning chemicals.
Artificial marble in the interior
There are several varieties of material; it is divided into casting, casting, and liquid composition. There are many varieties that are used in production and industry. The main purpose of the material is finishing facades and offices, making countertops, fountains, and kitchen utensils.
Cast marble
The base of the material consists of a neutral mineral, quartz chips, crushed marble and others, combined with polyester resin. The added mineral allows you to turn liquid marble into a kind of granite, jasper or malachite stone. To make the composition, you will need to prepare the ingredients and preliminary solutions:
- Mixed polyester type resin, one to four ratio with mineral. This type of solution belongs to polymer concrete and is necessary for subsequent use in the manufacture of artificial marble.
- Butacrylic solution is made by mixing AST-T and butacryl in proportions of 1 to 1. Half the volume of crushed crushed stone is added to the resulting mixture.
Do-it-yourself cast marble is made using the following auxiliary substances: river sand, gelcoat, pigment and plasticizer. Compliance with the production stages will allow you to produce a high-quality product:
- The mold for the product is coated with gelcoat.
- The prepared solution is laid out in a mold, the excess is removed.
- The mold is covered with an airtight film and left for 12 hours in a dry place.
- The finished stone is removed from its shape and dried in a well-ventilated area or in the fresh air.
The hardened stone can be further polished to achieve shine. The manufacturing process does not take a lot of effort and time, but the components are not always freely available, and the price of the final product is high. Based on this, it is worth considering similar methods for making artificial marble from other components.
Oselkovy marble
The preparation of the composition from gypsum is made by mixing a mixture of water and glue, which is applied to the product and sanded to a shine. Gypsum marble is tinted to achieve the desired result; the basic appearance is similar to lapis lazuli, malachite and other types of materials. Production does not require expensive materials; it is necessary to properly prepare the solution, following several steps:
- Wood glue with dry plaster is mixed with water.
- Next you need to add the melted resin.
- After uniform stirring, the pigment is added.
- Mixing occurs until streaks and natural inclusions appear.
- The solution is poured into the prepared mold, and excess mixture is removed using dry gypsum.
- Hardening occurs within 8-12 hours, depending on ambient temperature and humidity.
- Waterproof properties are imparted by potassium silicate, which is applied on top of the product.
- Polishing is done using specialized abrasives; if you don’t have them, you can use soft felt.
It is important to know that for the finished product with a natural color, a special mixture is used. Artificial marble made from gypsum turns out more natural if you mix 200 grams of gumilax, a liter of alcohol, and 50 grams of gypsum.
Aniline dye will give the product a black tint, while orange humilax will appear as a lighter color. Do-it-yourself touchstone marble is the most accessible due to the low cost of the ingredients. The design is light and durable, and is successfully used in residential premises.
Artificial marble with concrete filler
The method available for production, easy production from available materials, and low costs make concrete filler one of the most popular marbles in use. It is quite simple to produce artificial marble; the production technology is similar to the casting method, but there are some nuances:
- The mold is coated from the inside with a moisture-resistant gelcoat and completely dries.
- A concrete mixture is prepared using clay or slaked lime.
- The filler is prepared from a 2 to 1 mixture of river sand and cement, and a small amount of pebbles. The composition is filled with water, approximately 80% of the container volume, pigment for natural color is added at a ratio of 1 percent of the total mass of the solution. Mixing takes place with a mixer, the duration of the operation is from 30 seconds to a minute.
- The resulting solution is poured into molds, completely filling the empty spaces; excess is removed with a spatula or other available tool.
- Drying occurs with a covered form for 24 hours, after which the material is processed with a grinding machine.
The finished product will allow you not to waste time on manufacturing, but will not be able to fully meet the necessary parameters.
Marble with concrete filler
The most affordable is ground artificial marble, which is durable and highly resistant to moisture. The liquid product is used for difficult-to-make forms; it can be cut with a knife and made into any product.
Instructions (step by step)
Let's look at how to make it yourself, at home. In order to make it you need to have the following materials:
Chips or cracks on the surface of the product, excluding defects in materials or workmanship. Minor imperfections, deformation and variations in shade or veining between the sample and the finished product. This warranty covers the replacement cost of this product only. The cost of removal, reinstallation or consequential damages is not guaranteed.
The cost of your marble shower wall depends on what type of cultured marble is chosen, the manufacturer and the thickness. Shower pans are priced differently because they are usually made to specific dimensions, while shower slabs are made larger and then cut to preference.
- cement and water;
- plasticizer and sand (preferably fine-grained);
- a form made of polyurethane or plastic;
- fine gravel and polyethylene;
- a pigment that does not dissolve in water (dye or oil paint);
- construction mixer or drill with a similar attachment.
In order to understand what the technology for making marble tiles from concrete is, consider a special guide offered by professionals:
As always, there are a few things to keep in mind that will change the cost of the project. Adding a soap holder will increase the value of your colored marble shower. To maintain the stylish appearance of cultured marble, you should not keep your plastic soap holder or install the plastic version in a cultured shower. Although it will cost more, cultured marble manufacturers know how to add cultured soap dishes.
Cost Comparison of Cultured Marble
While cultured marble is hard to beat, you have other options when it comes to shower walls. Design and durability play a key role, but cost should always be a top consideration. All shower wall materials come with their own set of pros and cons. Links above or continue reading. Cultured marble is a stone that contains a mixture of particles and resins. Once created, they create beautiful and durable slabs that can be used throughout the home.
- Pigment, gravel, sand (2 shares), cement (1 share) are placed in a washed container. In this case, there is no need to color the composition evenly, otherwise the finished mixture will not have the same spots and veins as the natural material. In order for the marble to have an unusual pattern and color, pigments of several colors are added.
- The bowl is placed on a special vibrating table and air (excess) is removed from the mixture. If this tool is not available, then simply shake the bowl with the composition (several times).
- 80% of the plasticizer is diluted in a small amount of heated water.
- Mix everything and get a homogeneous mixture.
- The remainder of the plasticizer along with water is added to the composition. Using a drill with an attachment or a construction mixer, stir the mixture.
- To paint a uniform color, the pigment is introduced into either the prepared or dry mixture, and the components are mixed for 7 - 8 minutes.
- The resulting composition is placed into already dry forms. In order to increase the strength of marble, it is reinforced, for which they use wire, which is heated in an already poured mixture. The forms are covered with polyethylene. Wait until the composition has completely hardened.
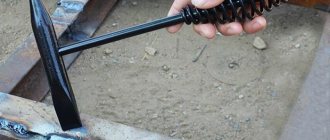
- Start sanding. Each cube is taken out of the mold and processed, and for these purposes it is better to use a special machine, although if you don’t have one, you can do this work manually. It is necessary to take into account that during this operation there will be a lot of dust. Therefore, prepare a hose, connect it to the tap and, if necessary, turn on the water under high pressure.
Before making marble from concrete, calculate the required amount of water, which depends on the proportion of cement included in the composition.
Cultured marble is created by placing the mixture into specific shapes resembling a bathtub, countertop or shower. The marble is then coated with a gel that binds the mixture. After polishing, the cultural marble is completed. Easy to Install: Cultured marble is easy to install, saving you money during installation. While it's not as affordable as tile, keeping installation costs down is vital when you're on a tight budget. It comes in a variety of colors to match any bathroom design. Additionally, the manufacturer can add veining or special patterns to incorporate your unique taste or add character and depth to your shower wall. Cost Vs. Marble: Cultured marble is cheaper than real marble. Cultured marble is made from a mixture of limestone and fiberglass resin, which can be continuously reproduced while maintaining cost. This way, you can achieve an elegant look without having to pay a hefty price. Easy to Maintain: Because the surface is smooth and shiny, you can wipe off almost anything with a wet sponge or rag. Luckily, it also resists staining. No grout: Other than not cleaning, no grout means you'll never have to pay. Flexibility: Cultured marble can be cut into any shape. Authentic marble, for example, can only be cut into simple shapes, which limits its placement. As you will see below, you can use cultured marble in various areas of the bathroom and home. Design: Cultured marble is beautiful. . Cultured marble shower walls may sound perfect, but like any material, it has a few drawbacks.
First, determine the value of the coefficient, which indicates the amount of liquid required for hydration (the process by which the grains of the composition are enveloped in water).
This value is expressed by the formula:
Coefficient = Water/Cement
Marble manufacturing technology
Not real marble: Cultured marble looks like real marble, but not completely. Upon closer inspection, cultured marble does not have the same quality as real marble. Disadvantages Show: The sealant that is used on cultured marble to give it a shine is quite weak and does not last as long as real marble or other shingle options. Over an extended period of time, cracks and tears may appear. Beware that cultured marble is also sensitive and can be damaged by extreme heat from curling irons and candles. Cleaning Limitations: While basic maintenance is easy, abrasive cleaners that are often used in the bathroom should not be used on cultured marble because they scratch easily; scratches can be sanded out, but this is another drawback to consider. Not everything is the same: different manufacturers have different qualities of cultured marble, which is why some cultured marble shower walls last longer than others. Thus, always research the manufacturer and ensure that you receive some kind of warranty before purchasing any cultured marble.
- From a distance, the untrained eye will not see the difference.
- Some people label it as fake plastic.
Any cultural product goes through an artificial or artificial process.
In order for the mixture to be mixed, the following indicators are used:
- if water and cement are taken in 1 share, then the coefficient is 0.2;
- when using 1 part liquid to 2 parts composition – 0.25;
- if there are 3 parts of cement and 1 part of water, then the coefficient is 0.3.
But at the same time take into account that the sand must be dry.
In addition to marble, you can purchase cultured granite or onyx. There are dozens of marble colors and types available from Carrara and Calachatta to Statue and Emperadora. Essentially, the second it is changed with a new vein, formation or color, it is cultivated.
Artificial marble can be used in the bathroom. In fact, just as common as cultured marble shower wall panels are cultured countertops surrounding bathtubs, tubs and shower inserts. Please note that some manufacturers charge based on inches rather than square feet. The above prices must be fair.
Let's look at a specific example.
- Using 15 kg of cement and 30 kg of dry sand, prepare a mixture.
- Calculate the required amount of water using the formula:
Water/cement = 0.25
From this it is concluded that to determine the required amount of liquid it is necessary:
Cement X 0.25 = Water;
Therefore, the amount of water is equal to:
15 X 0.25 = 3.75 kg, that is, 3.75 liters.
Other, less common uses include fireplace surrounds, bathroom floors and kitchen countertops. Beware, cultural marble is not intended for heavy foot traffic. Therefore, it is risky to use both bathroom flooring and kitchen counters.
Cultured and cultured marble comes in a wide range of colors. Since they are man-made, it makes sense that all homeowners have a variety of options to choose from. Popular cultural and faux marble colors include. Most homeowners believe that they cannot install cultured marble. Believe it or not, installing faux marble shower walls is as easy as installing drywall. Once you remove the existing shower, all you need is some silicone and a friend to help you out.
Manufacturing technology
The production of the finished product is not difficult and not expensive; you will need several available materials for making molds and a grinding machine. Do-it-yourself artificial marble is obtained by following the technological process; just follow a few simple steps. The production of artificial marble makes it possible to obtain a finished product of the desired type, give the structure uniqueness, and ensure the proper appearance.
Preparatory work
Before any work you will need the necessary materials. To obtain artificial marble you will need:
- Filler that is selected according to the budget. Ideally, marble chips are used; for a cheaper process, you should pay attention to crushed stone, quartz sand or a cement-sand mixture.
- Depending on the recipe and the desired result, a polyester resin is selected, preferably with an alcohol composition, as saturated as possible.
- Important parameters of high strength are achieved by using a hardener.
- Prepared dyes give the product color.
Read also: How to drill a load-bearing wall
Do-it-yourself fillers for making artificial marble
The materials necessary for the production of artificial marble with your own hands can be purchased in specialized stores in construction markets. Only after all the preparatory work is it possible to begin work on the production of a mixture of material.
Preparation of the solution
The solution is prepared in a special container. The prepared ingredients are mixed in accordance with the proportions and recipe; the main requirements for mixing are the absence of lumps and a homogeneous mass at the output. For small volumes, it is possible to use an electric drill with a special stirring attachment, similar to a butterfly. Large volumes are mixed with a construction mixer.
Preparing and filling out the form
Before making a mold, it is necessary to determine whether it is advisable to produce a collapsible mold, because there are designs that are made once. The main materials for making molds are gypsum, polyurethane, plastic and others. The strength of the form depends on the volume and mass of the solution. Flow production involves division into sectors; this method is used when several products are made from a homogeneous composition.
The forms must be pre-polished and material applied to prevent adhesion. The gelcoat is sprayed onto the surface with a special cup device, then allowed to settle until completely cured. After pouring the material, it is necessary to remove air bubbles. This procedure is performed manually by piercing the mass over the entire area; for a faster, automated process you will need a vibrating table.
Hardening depends on the volume of the product and the ambient temperature. Filling is done in small layers to completely fill the form. The appearance of cracks on the surface of artificial marble is avoided by sealing with polyethylene or other available material.
Processing of the finished slab and subsequent care
The finished slab is processed with a grinding machine until shiny. Final polishing is done with felt; for a more pronounced shine, a polish is used, the color of which depends on the product.
Subsequent care requires special care; aggressive detergents can scratch the surface and remove shine. Removal of dirt is done with a soft cloth or a special sponge. To maintain shine, dilute a solution of detergent with water. The shine is maintained by rubbing with a towel after washing.
Usage
The manufacturing process differs depending on the materials and purpose of the structure. Products made from artificial marble are widely used in the decoration of residential premises and administrative buildings. Artificial marble tiles are used for the manufacture of stairs, building facades, and other areas.
Artificial marble tiles
The cheap material, compared to natural stones, is used everywhere due to its waste-free production and ease of maintenance. Marble is being replaced by artificial stone and is used in various fields of construction; some forms and types are used by certain types of industry. It is possible to make artificial granite with your own hands using the casting method as an example, but the process will require a lot of effort as a consequence of the changed technological process.
If you find an error, please select a piece of text and press Ctrl+Enter.
Making liquid stone with your own hands is quite simple. It is a modern finishing material, which is manufactured using technology that makes it possible to achieve an imitation of the resulting products with the appearance of natural stone. This name is explained by the fact that the finished product is the result of polymerization of a multicomponent liquid composition based on polyester resins. The resulting materials are used in various fields, such as finishing work, facade cladding, and the manufacture of plumbing fixtures. As a result, it is possible to obtain the following products:
- sculptures;
- decorative fountains;
- steps;
- countertops;
- baths.
Liquid stone is used, which you can make with your own hands, and for finishing rooms for various purposes. The products are cheap, but very durable and flexible, which is sometimes necessary. This is true when covering surfaces with an irregular configuration. Manufacturing can be turned into a profitable business.
Definitions
Liquid granite is an artificial liquid stone.
Its advantages are due to the fact that, unlike the composition of granite, liquid granite contains purified marble chips (80%) and polyester resin (20%). It hardens when an accelerator and hardener are added to it. During the process of chemical reactions, all harmful substances are released, and the finished product will be environmentally friendly.
Liquid granite can be used in any premises: apartments, offices, schools and so on. The surfaces for spraying are: wood, stone, metal, porcelain, fiberglass, ceramics, chipboard and fiberboard. Products made from liquid granite resemble products made from natural stone, because it contains marble chips, and you no longer need to use large pieces of stone. The color range of the material is varied thanks to hundreds of color dyes that allow liquid granite to fit into any room.
Making countertops from liquid stone
Before you start making liquid stone for the countertop, you need to complete the mold. The surface should ultimately be as smooth as possible, so the base should be made strong. This is due to the fact that the solution should not push through the material with its weight. To do this, you can use chipboard sheets that are installed on racks or trestles.
The surface of the base needs to be covered with something in order to separate the tabletop from the chipboard after hardening. An excellent solution would be to use polymer film. A single sheet is installed on several trestles, only then can we begin making the mold. It can be done for several tabletops.
The next step is to prepare liquid stone for the countertop. To do this, you can use a cement-sand base, to which additional ingredients are added. These can be fillers in the form of sand, as well as resin and marble chips. The penultimate component acts as a binder.
Review of additional properties of liquid stone
Polyester resin is usually included in liquid stone, which is a polymer composition. She is the quintessence of plastic. Various fillers and components give this material special properties. Standard colors number about 120 units. If necessary, the material can be given almost any color, which will remain unchanged for a long time.
If you add polyester resin to the ingredients, then the surface after polymerization will require virtually no maintenance; it will be enough to wipe it with a soft cloth soaked in a soap solution. In most cases, such cladding is used when decorating interiors, as well as in the manufacture of furniture.
The coating is polymer, it imitates the color and texture of natural material, which, unlike natural material, is more plastic and warm. It makes excellent countertops and window sills, which can be made to imitate a concrete or brick wall.
The stone does not fade in the sun and has increased wear resistance. They are used to decorate walls near sinks, that is, they are simply used instead of regular tiles. Despite the fact that this finish resembles granite, it is more affordable and lighter in weight. The products are environmentally friendly, they are resistant to mechanical stress and temperature changes, do not corrode and do not become scratched during intensive use. The structure does not create environments that would be suitable for the emergence of pathogenic microorganisms. Wood, metal and glass components are often added to the layer before the mixture completely hardens. One of the fundamental properties of this material is its low cost.
Advantages and disadvantages of the material
Liquid granite allows you to achieve a complete imitation of products made from natural stone, and working with it is much easier. The composite has many other advantages:
- Resistance to aggressive factors. The material does not delaminate, does not soften and is not destroyed under the influence of alkalis and acids, household chemicals. This allows it to be actively used in the design of bathrooms and kitchens. It is not afraid of ultraviolet rays or changes in air temperature.
- Pore-free and hygienic. Unlike natural stone, liquid granite is not porous, so it does not absorb grease and dirt, does not create an environment for the growth of bacteria, and is easy to wash and wipe.
- Strength. Granite can even be used to make stairs and flooring. It can easily withstand the most severe mechanical loads and does not crack from impacts.
- Moisture resistance. The material is quite suitable for creating bathtubs, sinks, sinks, because it is absolutely not afraid of moisture.
- Maintainability. If, during long-term use, a chip or crack does appear on the granite, it can be repaired without much difficulty using the same mixture. After drying, the “patch” will be completely invisible.
- Large range and versatility. The areas of application of the composite are diverse; it has a spectacular appearance and extensive decorative capabilities. You can add different pigments to the stone to give its texture interesting effects (from slight roughness to a mirror-like shine).
- Environmental friendliness and fire safety. The material is suitable for any room, including children's rooms. It does not emit toxins, is not flammable, does not support smoke and is suitable for finishing fireplaces and stoves.
- Durability. On average, the service life of liquid granite products exceeds 25 years.
The disadvantages of liquid granite include its high cost, although it will be an order of magnitude lower than the production of products from solid stone. However, products made from plastic, wood, MDF, and porcelain stoneware may be cheaper.
Important! When using the spraying technique, the thickness of the products will be small (up to 4 mm), and this increases the risk of peeling off the coating if used incorrectly.
Methods for making liquid granite
Liquid granite can be made using one of two technologies. The first involves the use of casting methods, while the second involves the spraying method. When casting, the finished mixture is poured into molds and left until completely dry, and then the products are removed, and at the next stage they are processed.
Liquid granite can also be made using the spraying method. In this case, the technology of spraying liquid stone onto the surface is used; the layer thickness does not exceed a few millimeters. In turn, the pollination method is divided into two more types:
- direct spraying;
- reverse spraying.
Read also: Soldering workstation
The first method is as follows: primer is applied to the workpiece, and then left until it dries. Then, using a spraying method, a layer of liquid stone is applied to the base, and it is ground and polished, but only after drying. The production of liquid stone can be expressed in the reverse spray method. It is used if the workpiece is not part of a piece of furniture.
The products are placed on a molding surface made of glass or chipboard, the contours are outlined, and then a side made of plastic or chipboard is installed. A layer of release agent is applied to the surface, and then liquid stone is sprayed. After it has partially hardened, the soil is sprayed so that the stone layer does not show through. As a result, it is possible to obtain a mold into which polyester resin is poured. After polymerization, the products are removed.
Use in everyday life using the example of a kitchen sink
One of the most striking examples when a product made from such granite will be no worse than products made from natural granite is a sink.
Almost any person with taste would like to acquire such splendor instead of classic stainless steel. In addition to practicality, this solution will turn the process of washing dishes into a holiday, since a stone sink looks very nice and expensive.
Sinks made from artificial stone are perfect for any interior. Before the washing process, the customer can formulate absolutely any task. Due to the fact that artificial material is used as a basis, the sink can be of any shape, depth, texture and color.
Methods of spraying liquid granite
Before hardening, the artificial stone is a liquid mixture. Therefore, an artificial granite sink can be made in two ways:
- Sheet stone is a material ready for construction. Often these are slab-shaped chipboards or MDF sheets. The surface of the sheet is covered with liquid stone. This type of production is very expensive and impossible at home.
- Liquid stone is a material for lining the surface of a workpiece. As usual, the phrase “liquid stone” does not mean the material, but the process of lining the workpiece with the mixture.
The thickness of the layer at the end of this procedure should not exceed 15 mm. Often, a sink made of such granite has a thickness from 3 to 15 mm, depending on the wishes of the customer.
Technology for the production of sinks made of artificial granite material
Let's take a clear example of how sinks are made from artificial stone, and take a step-by-step look at the process of making them. To prepare the mixture, you do not need a large room - only up to 50 m2.
However, the apartment must consist of at least two rooms, one of which will produce artificial stone. In addition, the air in the rooms must be heated to at least 20C. All procedures can only be performed with good ventilation.
Production of liquid granite
The technology for manufacturing liquid granite requires compliance with certain rules. The first of them says that the production premises should consist of two rooms. The first is required for casting, while the second is required for polishing the resulting product. The temperature is maintained at 24 °C, ventilation is required.
The production of liquid stone begins with degreasing the surface, removing dust and dirt. Before coating, the base is washed with water and dried well. All damage and cracks must be repaired. At the next stage, a mixture of transparent gelcoat with granules is prepared. You need to use a ratio of 2 to 1. The first ingredient is a polymer resin. Hardener is added before spraying. The resulting composition is applied to the base. To do this, you can use one of the two methods described above. The surface of a new product must be ground and polished.
Peculiarities
- The color of the soil does not affect the color of the liquid stone;
- Pleasant to the touch;
- The material is non-toxic, odorless;
- Moisture resistance is achieved by adding a hardener;
- Does not lose its appearance over time, is durable - the service life of the products is more than 25 years;
- It is easy to remove dirt from the surface;
- When temperature changes, a product made of liquid stone does not lose its shape and properties.
Components for liquid stone:
- Plasticine;
- Fiberglass;
- Chemical resin;
- Filler;
- Hardener;
- Acetone;
- Calcinitis;
- Gelcoat;
- Hot melt adhesive;
- Chipboard, fibreboard.
Making liquid marble
If you want to make liquid stone with your own hands, you can try making marble. It is very popular, especially for its lithium variety. It is a composite material based on polyester resin. An additional ingredient is a mineral filler. However, it can be quartz sand or marble chips.
Depending on what fillers are chosen, marble can be obtained in imitation of the following types of stones:
- onyx;
- malachite;
- granite;
- jasper;
- natural marble.
When making liquid stone with your own hands, you should know some features about it. Among others, it should be highlighted that the material can be used for finishing, and it is a lightweight, environmentally friendly and flexible material with acrylic polymers and marble chips. Such products can even be cut with scissors or a knife, and also glued to walls instead of wallpaper.
Advantages of artificial stone
Products made from artificial stone have many advantages:
- Price. The cost of artificial stone is much lower than natural stone
- Large scope of application. Artificial granite or marble can replace natural varieties of stone in any field of human activity.
- Appearance. Artificial stone can have any color and different texture.
- Easy to use. Artificial stone is easy to process and is not difficult to install.
- Service life: this material can last about 30 years in an aggressive environment.
- Resistant to damage. The material is not scratched and does not support corrosion processes.
- Similarity to natural material. It is impossible to distinguish factory granite from the real thing by eye.
There is a simple test that allows you to determine whether the stone is natural or manufactured at a factory. You need to take a metal object (for example, a coin) and knock on the surface of the stone. Natural rocks will sound loud, while artificial ones will sound muffled.
Form information
Filling molds are also called matrices, but a sprayer is needed for gelcoat. To stir the composition, you need to stock up on a mixer, while you have to lubricate the molds with brushes. Molds for marble are made on the basis of polyurethane rubber. The matrix is durable and not prone to deformation, so it is expensive, but its price pays off, because production is highly profitable.
Production of polymer granite
Now you will be presented with the technology of manufacturing artificial stone using the example of a table.
Table size 1100 mm x 630 mm. First of all, two types of materials are used - 16 mm chipboard and 12 mm plywood. The blanks are cut 1 cm smaller, i.e. 1090 mm x 620 mm. This is explained by the fact that in the process of pouring the edges of the RS blank we will increase it to the required size (the thickness of the artificial stone around the perimeter is 0.5 cm). When making countertops and window sills we use only chipboard. Plywood is used to prevent the legs from becoming loose during use of the table. First stage: gluing the workpiece.
Now the gluing is happening.
Both materials can be glued with different types of adhesives. In our case, we use PVA. After the glue is applied, we glue the two sheets together. If the plywood has a bend, then we use self-tapping screws, which act as a load (tie). There is no need to press the table hard. In order for the table top (hereinafter referred to as the workpiece) to be smooth, everything depends on the surface of the work table. The surface of the work table must be perfectly flat, otherwise during the process of pressure the table top (workpiece) may take on the unevenness of the work table. The load should be approximately 20 kg. per 1 sq. m., no more. Next stage: chipboard milling.
After the gluing process, the edge of the workpiece will be milled.
In our case, we use a manual milling machine with a cutter with a radius of 25 mm. (or other cutter at the request of the client). Next stage: production of sheet
(plastic sheet). Wax mastic is applied to a soft cloth and rubbed over the surface of the glass in a thin layer, after 15 minutes it is reapplied and polished. The quality of your sheet depends on the quality of the applied wax coating. If dust or other solid inclusions get on the sheet, it is advisable to remove them. If you do not do this, then pits will be visible on the front surface of the sheet. On the glass, as you can see, there is adhesive tape pasted on the back side, which shows the boundaries of our sheet. During production, you can use a template, as in this case, that is, lay down the template and glue the side according to the template. We use textolite strips and masking tape. The thickness of the ebonite strip is 4-6 mm. or you can use glass strips, etc. Next, the dimensions of our edge are checked. The surface is ready. The frame is made 1 cm larger than the dimensions of our table, because during the polymerization process linear shrinkage occurs up to 1%. ROYAL STONE stone is cast into a separate bucket, after mixing well, at the rate of 3-2.7 kg per 1 sq.m. In our case, the table area is 0.710 sq.m. multiply 3 kg. and we get 2.1 kg. RS 1-1.5 percent of catalyst per 1 kg is added to RS; cobalt can also be added if the room temperature is not very high (less than 20 degrees C). Measure with a syringe and pour into a separate mug. Separately pour in cobalt (at the rate of 0.2-1 cube per 1 kg. RS) and mix with a hand drill with an attachment, and then the catalyst. The mixing process takes on average 1-3 minutes.
Read also: DIY solder for silver
The mixing proceeds in this order: 1. Add hardener to the resin and mix for 5 seconds. 2. Pour the stone (crumbs) into the resin and mix. As soon as we see a homogeneous mass in the bucket, we immediately proceed to forming a sheet. 3. To avoid the formation of air bubbles in the stone, do not mix for a long time and do not lift the mixer from the liquid.
DO NOT MIX COBALT AND CATALYST TOGETHER TO AVOID AN EXPLOSION.
Film 1. Wax – a separating layer for polymer granite.
The mixture is poured onto prepared glass, lubricated with paraffin, and leveled with a spatula or other flat material. The thickness of the material applied to the glass is visually measured. You can use a vibrator, but after the sheet has been formed. The vibrator should operate for no more than two minutes. It is advisable to prime our chipboard + plywood blank with cheap polyester resin
based on 200-300 gr.
per sq.m. (0.5-1% cobalt and 1-2% resin weight plus 20% talc). The surface is primed. We give it the opportunity to saturate the wood and polymerize, but not completely until it becomes tack-free. After our sheet has begun to polymerize, and this is checked using the tack test method, when a finger leaves a fingerprint on it, but does not stick. Next, we disassemble the mold, and while the sheet has not yet completely polymerized, we undermine it. This must be done very carefully, because... the sheet is thin. If you apply very little release paste, the sheet may stick to the glass and tear. Pay attention to this! When the sheet is completely torn off, we cover it with glass so that the polymerization process is completely completed and the sheet does not warp. One slightly larger sheet of glass is enough. If you have any doubts, you can put additional weight on top and as a result the sheet will turn out even. Leave the sheet for a day. Next step: gluing the sheet.
Prepare 650 gr.
cheap polyester resin with 20% talc (with cobalt and a catalyst), which was used for gluing and priming, and the amount of resin poured onto the sheet should be 3 times more than on the workpiece. The resin can be tinted with pigment pastes to match the tone of the RS stone. Color: it is advisable to match the light RS coating with light colors and vice versa. Resin consumption for gluing the RS sheet to the workpiece is 1-0.9 kg. per sq. m. When gluing a sheet, be sure to visually check the correctness of the sticker, so that there is an equal weight on each side, so that our sheet extends beyond the dimensions of the table by approximately 0.5 cm. Next operation: closing the back side of the workpiece.
On the back side, cheap resin with a dye in the color RS is applied to the plywood at the rate of 1.4 kg of resin. In this case, it is advisable to use a light green color.
Filling the back side occurs in several stages: – pasting the edge with masking tape – filling the back side. – Sprinkling RS granules on top of the resin
This operation can be combined with gluing the sheet onto the workpiece. Next operation: filling the edge.
Painting tape is applied to the plywood side.
The free edge of the tape should extend 1 cm. A tape with a width of 25 mm is used. Pay special attention to the corners. The corners should be well sealed to prevent leakage of tar and stone. It is advisable for our table to be horizontal. This is checked using a level. 280 g per side. RS for 1.1 linear meter of workpiece. Cobalt accelerates the polymerization process. It is not recommended to add a lot of cobalt so that the air can escape on its own. The resulting mixture slowly spreads over the entire surface. When the first batch of RS is poured over the end of the workpiece, we then manually reshape the edge. Once the gelation is complete, we move on to the next side and so on in a circle. We give it a day for polymerization. Next stage: milling.
Since all sides of the table are poured, we need to make the end of the table even, so we again use a hand router with a finger router.
We adjust the cutter so that approximately 1 mm is removed. Also, milling the edge of the workpiece allows the stone to be revealed. If there are any irregularities left somewhere, then we move it another 0.5 mm and go through it again with a milling machine. All four sides are milled. Next point. We use a manual milling machine to make a 25 mm oval. along the perimeter. You can use cutters with different semicircles. It all depends on the wishes of the customer. Next stage: grinding and polishing.
For this process, skins are used, ranging from large sizes to zero. It is advisable to start at 120 and work your way down. The latest sandpaper is 320. The product is matte. If the customer wants the product to have a shiny surface, then we use polishing. Periodically, dust should be removed from the table surface with a dry cloth. The grinding process takes on average 1 sq.m. at one o'clock.
Technical data: 1. RS resins - 50-60% ( gelcoat
transparent under brush 50% +50% general purpose resin). 2. RS crumbs 40-50%, depending on the fraction. 3. Catalyst 1-2% by weight of resin.
Now you can make artificial granite with your own hands.
Calculation of materials for the manufacture of countertops “SNOWFALL” from artificial stone 2.31 m by 0.6 m with a thickness of 40 mm. large granule.
| Type of work | RS resin, kg | Granule RS, kg | Cheap resin, kg | Talc, kg | Hardener, cm. | Total, kg |
| Sheet production | 3.56 | 3.50 | 71.0 | 7.060 | ||
| Primer of the workpiece (chipboard) | 0.330 | 0.083 | 6.6 | 0.413 | ||
| Gluing the sheet | 1.386 | 0.416 | 27.0 | 1.800 | ||
| Filling the reverse side | 2.770 | 0.550 | 55.0 | 3.320 | ||
| Filling the visible edge – 2.31 m | 0.37 | 0.37 | 7.50 | 0.740 | ||
| Filling the visible edge – 2x0.6 m | 0.19 | 0.19 | 4.0 | 0.380 | ||
| TOTAL | 4.12 | 4.06 | 4.486 | 1.049 | 171.0 | |
| Consumption 1 sq.m. | 2.97 | 2.93 | 3.237 | 0.760 | 123.0 |
Calculation formulas.
When making artificial granite, first make and write down the calculation of the material consumption for your product. This will help you avoid mistakes.
| Granule size | Resin | Granule |
| Small | 60-58% | 40-42% |
| Large | 50% | 50% |
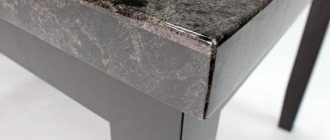
Ready-made countertops
Kitchen countertop made of artificial stone.
Film 2. Selection of stone colors for polymer granite.
Mixes of stone colors for polymer granite (%)
| No. | White | Grey | Black | Chocolate | Body | Children's | Ruby | Holy green |
| 1 | 50 | 50 | ||||||
| 2 | 80 | 0.5 | 19.5 | |||||
| 3 | 65 | 1 | 34 | |||||
| 4 | 80 | 20 | ||||||
| 5 | 65 | 1 | 34 | |||||
| 6 | 16 | 84 | ||||||
| 7 | 57 | 15 | 14 | 14 | ||||
| 8 | 80 | 20 | ||||||
| 9 | 31-small 56-large | 3 | 10 | |||||
| 10 | 10 | 45 | 45 | |||||
| 11 | 50 | 50 | ||||||
| 12 | 80 | 20 | ||||||
| Tinted resin | 100-large |