A high-quality knife is an indispensable attribute of equipment for any hunter, fisherman or outdoor enthusiast. There is such a wide range of hunting knives on the modern market that choosing the right model is not difficult. However, many people prefer to make blades themselves. The handle for the knife requires special attention, because it must be comfortable, durable and resistant to aggressive environmental factors.
Our article is intended specifically for those who prefer to make the tools necessary for hunting on their own. Today we decided to dwell in more detail on the manufacture of a handle for a hunting knife and consider the main stages of this process, as well as pay attention to the materials that can be used for production.
What is it and why is it needed
The drawing provides a complete description of the product, indicating dimensions, shape, and recommended material. The information is reflected in a frame in the lower right corner of the image or in a separate description. You should not ignore the recommendations. Behind them stands many years, and sometimes centuries, of experience of the craftsmen. For example, the design of a switchblade is quite complex, and its implementation will require skills in working with metal and a special set of tools.
An important factor in manufacturing is compliance with the proportions and dimensions of the product - and without a drawing it is almost impossible to achieve accuracy. A photo provides only a visual image of a knife, and making a copy from a photo is not easy, because it is necessary to take into account the features of individual elements, the pairing of straight lines with ovals and curves. You can make your own life-size sketches of knives. The image must be drawn to scale. In this case, during manufacturing it is enough to transfer the lines to the blanks for the blade and handle elements. The tool and processing method are chosen by the home craftsman himself at his discretion, taking into account the available capabilities.
The finished drawing can be downloaded. The file found on the Internet is opened in a graphics editor, the dimensions are checked and printed at a scale of 1:1. Most of the drawings are made in accordance with all the rules of the Unified System of Design Documentation (ESKD). But it is difficult to use some amateur drawings or a sketch of a knife in artistic form without indicating the dimensions. If you don’t have the ability to accurately convey the design features and make a drawing, you need to ask those who do this professionally to make templates for knives.
You can realize your ideas by sketching life-size knives, without relying on a ready-made model. In this case, it is necessary to follow the general rules for drawing up a drawing. For example, design the shape of the blade, handle, based on personal ideas and preferences. You can use your favorite models as a prototype for your own product. By combining individual elements, an original drawing is created.
Transformable models are popular today. But having found, for example, drawings of folding knives, you should be aware of the difficulties of their manufacture, since the desire to independently assemble a complex mechanism will require serious metalworking skills. Appropriate tools and materials are required.
Polishing
Polishing is not only about giving the blade an aesthetic appearance, but also protecting it from corrosion. The smooth surface prevents water from accumulating in the recesses, which leads to the appearance of characteristic rusty spots on the knife.
Polishing can be roughly divided into 3 stages:
- Processing with coarse abrasive with large grain size.
- Processing with thinner stone.
- Finish polishing with fine grain.
As a result, we will get a shiny blade, but it will not yet have a mirror image. To achieve a mirror-like result, you will need to change a few more abrasives, gradually reducing their grain size, and eventually switch to a piece of leather with goya paste.
The whole process is quite simple - apply three abrasives along the blade until the entire surface becomes homogeneous, then reduce the grain size. This stage is one of the longest in the entire production, but at the same time the most exciting.
Drilling holes for attaching the handle
To form a handle from two wooden plates, you will need to drill 2 holes in the shank for rivets. This procedure must be carried out before heat treatment. It is even advisable to assemble the entire structure for a kind of test to make sure there are no defects.
We select the diameter of the drill based on the size of the purchased rivets. To speed up the process of drilling hard or thick metal, the location of future holes can be marked with a center punch. You can use any available drill.
Making a forge
Heat treatment is not an easy and very traumatic stage of knife manufacturing, during which all previous efforts can be ruined if done incorrectly. To heat treat a blade, it must be heated to a temperature that leads to structural changes in the metal; usually 750 degrees is enough.
Forge for hardening.
Of course, you can use a special burner that will produce the required temperature. But it is not recommended to do this, since the steel heats up unevenly, which can lead to defects in the future.
Therefore, to perform heat treatment at home, you will need a forge. They are also on sale - this is not our method. Making a forge with your own hands is not difficult; a large number of instructions, articles, training videos, and diagrams can be found freely available on the Internet. The main materials used for manufacturing are sand and gypsum.
How to determine the temperature in such an oven without a special thermometer? There is an old proven method: we place ordinary kitchen salt in a steel container in a forge; if it begins to melt, then the temperature is quite suitable for hardening the blade.
When using complex alloys and grades of steel that are difficult to heat treat, it is better to seek the help of specialists.
Drawings of popular knife models
The knife is used for hunting, fishing, protection from attacks by wild animals, and cooking. It must have special qualities, which are reflected in the choice of shape, size, and material of manufacture. During the search, you can find both a drawing of a butcher knife, designed for concealed carry and equipped with a T-shaped handle, and an image of a regular model for housekeeping.
When choosing a model, you need to know the restrictions associated with the ban on carrying and producing edged weapons.
A knife is considered dangerous if:
- the blade is more than 90 mm in length;
- the thickness of the butt exceeds 2.5 mm;
- hardness has a Rockwell value of 42 or more;
- there is handle protection;
- the blade has a sharpening.
Products that meet all 5 requirements are prohibited. If at least one of them is not met, there is no need to issue a permit. In practice, this means that you can make a very high-quality sample, even a copy of a military weapon, which is not subject to legal restrictions. It is enough, for example, to reduce the thickness of the blade, making it equal to 2.4 mm.
When choosing a drawing, you need to know what qualities a knife must have in order to use it for the desired purpose. It is customary to divide products into categories according to intended use. The most popular types include:
- kitchen;
- tourist;
- hunting;
- fishing;
- propelling.
These models are most often made by hand. For each type, there are manufacturing rules and processing features. Therefore, it is important, having selected or created a drawing yourself, to familiarize yourself with the recommendations for the choice of material and production technology.
A drawing of a switchblade with your own hands may be interesting, but in order to implement it in reality, you need not just desire, but serious skills.
Kitchen
There are not many requirements for the product. However, several rules must be followed during manufacturing. If you are making a drawing of a kitchen knife with your own hands, you must remember that you will have to work with the tool on a cutting board. Therefore, the blade is designed straight to ensure that it adheres to the substrate for quality cutting. The rounding and point of the blade are needed to perform certain operations, so they are done only at the end of the blade. You can check how convenient the product will be by making drawings of the knives on plywood and then cutting out the blank. It only takes a few minutes, but you can try how well the instrument fits in your hand.
When choosing a drawing, you should also pay attention to the shape of the handle. Sharp edges will be uncomfortable when working. An ergonomic model that takes into account the structural features of the hand is considered optimal. It is very difficult to calculate the configuration yourself, so it is better to select ready-made drawings of a knife handle of the shape you like and copy them. The result of the labor will be a source of pride for the master and a good gift for a woman, and work in the kitchen will be less tiring.
Tourist
A camping knife is designed for use in extreme conditions, which means it must be versatile, durable, reliable and easy to use. During manufacturing, special attention is paid to the choice of material for the blade and handle. The very shape of the knife according to the drawing may be different. The choice of a specific option is usually associated with the confidence that the product will withstand the expected loads and will meet the aesthetic requirements of the owner. Dimensions and proportions are calculated in such a way as to guarantee the safety of the user and successfully perform the following operations:
- Cook;
- cut ropes, ropes, cords, fishing line;
- sharpen tent pegs;
- provide protection from attack.
Touring models are often called survival knives. Extreme tourists prefer samples that are similar in properties to military weapons.
An excellent choice would be a drawing of a Bowie knife, named after the famous explorer. A characteristic feature is the sharpened bevel at the end of the blade, often called a “pike”. The tip of the knife is on the middle line if you draw it along the entire product, starting from the handle. This is an important feature that should not be ignored: upon impact, energy is transferred as much as possible, and the knife does not move to the side.
Experienced tourists prefer to take with them several different knives for all occasions. Universal models with dozens of switchblades and devices are used as auxiliary ones, since they do not withstand extreme loads well. It is better to look through several product options, which indicate the dimensions of the knife drawing, selecting a sample of the required dimensions from them, and start looking for materials to make it yourself.
Hunting
Hunting is a risky activity and requires high demands on ammunition. Therefore, drawings of handmade knives for hunting are among the most sought after. In addition, it is a source of pride for the owner. Prices for products from leading manufacturers are high, so it makes sense to choose the model you like, make an effort and realize your dream yourself. For hunting, you can choose not the traditional option, but, for example, a samurai combat blade. You need to find a drawing and dimensions of a tanto knife, the blade of which has a unique penetrating power. With such a weapon you can cope with a dangerous predator and cut up any game.
When choosing a model, pay attention to the materials and dimensions indicated in the drawing. Manufacturing requires that all requirements be met, so often a template is first made to make the knife from easily machined materials. Then the shape is copied onto the workpieces. Industrial samples are made as thick as possible so that they can withstand any load. Some models require permission to purchase. The types and shapes of knife handles become a subject of special pride. Here you can fully express your creative abilities, for example, decorate it with engraving or come up with a typesetting design of an original shape from various materials.
Fishing
The main function of this product is cutting the catch. But that's not all a good fishing knife can do. With its help, they repair gear, cut fishing line, set up a tent, and prepare food. Versatility is the quality of a good outdoor assistant. They use it actively, so you need to make it convenient. To do this, it is wise to design a wooden model of the knife and try how the tool fits in your hand. You may have to make adjustments, taking into account the individual characteristics and structure of the brush.
The blueprint for a fishing knife often includes a list of recommended materials. Preference is given to those that are not afraid of moisture. The optimal solution would be to use stainless steel for the blade. And for the handle, you can take impact-resistant plastic or hardwood treated with protective compounds. If fishing is just a hobby on a nearby body of water, you can opt for a small product that will easily fit in your pocket, so a drawing of a small knife will come in handy. It is perfect for basic operations. Drawings of folding knives are also in demand among fishermen, since this compact design is brought into working order in one movement, is completely safe when assembled and does not take up much space.
Propelling
This type of knife belongs to combat knives, but if you comply with the requirements of the law, you can make a product with your own hands that does not fall into the category of prohibited ones. It is better to look for a drawing of a knife for making it yourself on thematic websites. Every little detail is important in a product. During the throwing process, the knife performs from half to several revolutions, depending on the throwing technique. The flight path should not critically depend on air resistance, therefore the shape of the product is designed taking into account aerodynamic loads. It is very difficult to do the calculation yourself. It is better to use ready-made knife drawings and follow the recommendations of specialists.
The necessary balancing can be achieved if you strictly follow all the steps described by the expert. Often throwing knives are made from one material, without using linings on the handle. You can learn how to make a knife from wood according to a drawing, and then construct a trial version from easily processed materials, find the balance point and check the correctness of the calculations on a prototype. If necessary, the drawing is adjusted.
Regardless of the knife model, the main criterion for successful work will be the presence of a good drawing. Successful tools and implements are the result of many years of experience or the implementation of a design idea based on scientific data and numerous tests. By following the recommendations of specialists and accurately copying the dimensions of the drawing, the desired characteristics of the knife are achieved. A handmade instrument will be a reliable assistant and proof of a man’s worth for many years.
Handle mounting type
According to the method of attachment to the blade, all handles are divided into two types: overhead and mounted (or riveted). Each has its own advantages and disadvantages, so when choosing, you should again rely on the scope of use of the tool.
Invoice
Overhead fastening method.
The overhead method involves attaching plates to the shank of the knife using screws or rivets (hence another name for this type - riveted). To do this, the extension of the blade intended for the handle must be wide and match the shape of the handle.
These pens are relatively simple to manufacture (the overlays can be made using a stencil), so the described method is suitable primarily for beginners. However, it has a number of disadvantages.
Firstly, the choice of handle shape will be greatly limited. Secondly, overhead handles have a high thermal conductivity coefficient, which means you won’t be able to use the knife for a long time in the cold. Thirdly, compared to mounted ones, handles with pads are heavier.
Horseback
The mounting technology implies that a hollow handle made of a single piece of material is mounted on a narrow shank and secured in any available way (for example, with glue). A stacked version is also possible: when plates with holes in the center are strung onto a rod.
This type of handle looks more attractive; it can be made into any shape, unlike an overhead handle. But there are downsides here too. The main one is the low reliability of attaching the handle to the shank.
Photo
Horse handle
Treat the pre-selected tree with an antiseptic.
Mark and drill a hole of the required diameter and length slightly larger than the blade shank. Dilute epoxy resin in a ratio of 100:13, mix with sawdust and pour the resulting mixture into the hole. Insert the shank of the blade, previously wrapped with tape to protect it from contamination. Now press the semi-finished knife into a press and wait 1 day for the resin to dry.
If the handle has grooves for the fingers, then a deeper recess should be made for the index finger. Using plasticine, you can make a visual shape so as not to make a mistake on the tree. Next, use a cutter, rasp and sandpaper to bring the workpiece to the desired appearance.
Then perform impregnation, for which the oil or drying oil is heated in a water bath and the knife handle is immersed in the heated raw material for 1 day. When ready, there will be no air bubbles on the surface of the oil. This is followed by drying, preferably in the sun.
Carry out the final finishing treatment with a “zero” finish.
Mix rosin, turpentine and wax in a water bath and cover the handle with the resulting mixture. Finally, polish the handle and remove the tape from the blade.
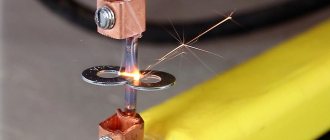
Power connection: electrolysis etching principle
Power is supplied to the elements as follows. A wire with a bolt at the end is lowered into salt water and connected to the negative output of the charger. A positive charge is applied to the blade itself. The principle of electrolysis is as follows. The varnish coating does not transmit electricity, but the area of the metal where it is absent reacts with salt water under the influence of voltage. As a result, the metal is corroded exactly where there is no varnish.
The bolt is wound to the wire and lowered into the water
Many will be interested to know that in this way you can even apply a pattern with copper. To do this, a similar preparation of the blade is performed. The difference is that the polarity of the connection will be reversed - plus on the bolt, and minus on the knife. Instead of salt, you need to dissolve copper sulfate in water. In a similar way, you can either apply an image or completely cover the part with copper.
Everything is ready, you can apply voltage by plugging in the adapter
Etching: some nuances to consider
When power is applied to the wires, it will become clearly visible how electrolysis occurs. Gas bubbles will begin to emerge from areas of the blade unprotected by varnish. It is this process that “gnaws out” metal particles. It is necessary to carefully monitor the temperature of the charger - it can rise sharply. To avoid failure of the adapter, do not keep it turned on for more than 15-20 seconds, giving a break of at least 10 minutes. This way, the work will be extended, but at the same time you will maintain the functionality of the charger. In total, etching a small design takes about a minute of constant work. It turns out that in 3 passes the image will be ready.
The photo example shows how the inscription appears on the metal under the influence of the electrolysis reaction. After the work is completed, all that remains is to clean the unnecessary varnish coating and polish the blade.
The process has begun - it can be observed with the naked eye
During operation, a dirty-brown oxide layer will form on the surface of the jar. This should not scare you; the process involves such deposits.
What will happen in the end: how high quality will the drawing be?
If everything was done correctly, the drawing will be no different from the one on paper. At the same time, the quality of the image does not depend on its complexity and the number of small details. If etching is not important, then you can leave the drawing as it turned out. Of course, such an image is not very resistant to aggressive cleaning agents and high temperatures, but in the absence of such factors it can last up to six months. I decided to leave this image of a tiger as a simple drawing.
The principle of etching using electrolysis
For metal products, two methods are used: acid (liquid) and electrochemical. They are used to remove scale and oxide films. Compliance with the etching rules: holding time and solution concentration are the key to a successful process.
It is important to thoroughly degrease the part. A small greasy stain will render all the work of the master unusable. When working with varnishes, you must be careful; they are highly flammable. This also applies to the process itself. In any form, it is unsafe. It must be treated with caution and care.
Solutions used for pickling steel
The process for different alloys requires different etchants. Based on the atomic structure of the metal lattice, a specific solution is selected:
- alkaline solutions etch aluminum and its alloys well;
- nitric, sulfuric, hydrochloric and phosphoric acids are used in the etching of copper and its alloys. To increase the reaction rate, chromium and nitrogen are added;
- For durable titanium, a double etching method is used. Initially processed in alkaline solutions, then in high concentration acidic solutions;
- an aqueous solution of hydrogen peroxide and formic acid is ideal for nickel and tungsten;
- for other solid metal compounds, mixtures of nitric and acetic acids are used;
- A mild sulfuric acid solution works well on cast iron.
The essence of the method
The key factor is the effect of acidic environments on the metal. Due to the interaction of the aggressive environment and the product, a chemical process called etching occurs. To apply a pattern to the blade, areas of the surface not intended for etching are covered with a protective layer.
It must be resistant to the etching substance. The depth of metal dissolution depends on the time of exposure to it. Since the 16th century, several effective methods for etching knives have been identified. They will be discussed below.
Drawing methods
A pattern made from various materials serves as a protective layer; the metal not covered with it will be etched. There is a similarity to a film negative when a photograph is developed. There are plenty of options for protection: electrical tape, stickers, nail polish, vinyl, metal marker and many other polymers.
Nail polish
A popular material among amateurs. But professionals don’t disdain them either. Good resistance to aggressive environments makes it a leader in use. After applying it to the product and letting it dry, it is possible to correct the design with sharp cutting objects. Achieving a clear pattern and smooth lines.
Primer or bitumen varnish
The product is completely covered, then the contours of the design are transferred over the layer with a marker or brush. Having sharpened a thin wire, you need to scratch the sketch down to the metal. The primer is used GF 021 or XB 062. When scratching a sketch, there is a risk of chipping off the dried primer or bitumen varnish. This is a disadvantage of this method.
Glossy paper
It is a good method that is gaining momentum among masters and has many positive aspects. The required sketch is printed in real size on glossy paper using a laser printer. Applying the side with the pattern to the surface of the blade, you need to iron the paper.
After the product has cooled, it is placed in water. Having brought the paper to a soft state, it peels off, and the toner from the printer remains on the product. You just need to treat the surface around the design with nail polish. The method allows you to transfer the smallest details of the image.
Preparing metal for drawing
It is necessary to prepare the blade for drawing and for the etching process itself. If the knife is collapsible, be sure to disassemble it. Freeing the blade will make it easier to work. In a one-piece product, the handle must be insulated.
It doesn’t matter what material it is made of, an acidic environment will harm anyone. Electrical tape as an insulator will work perfectly. The surface of the blade to be treated must be thoroughly wiped with acetone. The intended design will fit well on a degreased surface. We try not to touch the workpiece with our fingers.
Criterias of choice
Skinning knives must meet the following requirements:
- Ease of cutting the skin.
- Sufficient blade hardness. The optimal metal hardness is 55 HRC or more.
- Blade wear resistance.
- Ability to resist corrosion. The process of skinning prey involves a moist, viscous environment.
- No need for frequent sharpening.
- Ergonomic handle. The ideal skinner handle should be straight and have no bends or grooves. The best material for the handle is wood. The types of wood used are Karelian birch, walnut, wenge and some others. When making handles for good knives, plexiglass is not used, since it is a slippery and uncomfortable material.
- There should be no engravings or patterns on the handle or blade. Decorations are suitable for collectible knives, but they only get in the way when doing work.
GOST requirements allow the use of the following metals for the production of skinning blades:
- steel and its alloys (low-carbon, alloy or Damascus steel, damask steel);
- composite compositions (for example, steel with the addition of titanium nitride);
- other materials (including zirconium).
Some types of steel undergo additional processing, including grinding, heat treatment or burnishing. This gives the material additional performance characteristics.
From the point of view of working features, Damascus steel is best suited for making a skinner. However, this metal is not resistant to moisture and must be thoroughly wiped dry after use.
Preparing metal for applying a relief pattern
First, the entire blade must be varnished. It doesn’t have to be nail polish; a composition for coating wood is quite suitable. But here it is worth remembering that feminine chemicals dry out almost instantly. Considering that the metal will need to be coated in 2 layers, this is a serious reason to use a quick-drying composition.
The design, if it is not too complex, can be applied after the varnish has dried. But, if it is necessary to etch an image similar to what I applied to the previous knife, it is better to use the transfer method using an iron and alcohol, and then coat the steel with colorless varnish.
For etching on one of the kitchen knives, I chose not too complex Arabic script. It was applied after the varnish had dried, after which the coating along the lines was removed. In other words, I just scratched it with a needle. I note that the edges of the strips need to be carefully trimmed - during etching, electrolysis will eat away unprotected areas, which means that all irregularities will remain on the metal without the possibility of subsequent correction.
The Arabic script has been applied, the varnish coating has been scratched across it with a needle, you can start etching