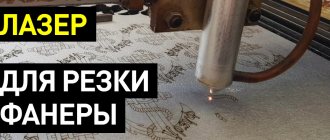
When producing various finishing works or making furniture, the use of plywood is a common practice. At the same time, home craftsmen are faced with a choice: how to cut plywood and how to achieve a perfect cut without chips. When cutting such material, some difficulties arise: the sheet is large in size, and the structure of its base creates difficulties when sawing. Knowing some features, you can achieve excellent results when working with an electric jigsaw, hand saw or circular saw. The main condition is to ensure reliable fixation of the plywood.
Plywood is a material that is practical to use and easy to process.
Sawing purposes and suitable tools
Depending on the purposes of sawing, we select what can be used to cut plywood most effectively. Among the tools used for work are the following:
- electric circular saw;
- hand saw;
- electric jigsaw.
Let's consider the features of using various tools for cutting plywood and in what cases it is more advisable to use one or another device.
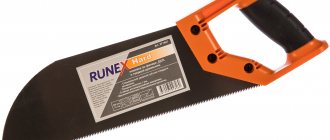
Hand saw
When cutting plywood with a hand saw, physical effort is required due to the significant density of the material. This tool is used when it is necessary to cut a sheet of plywood into identical fragments.
A hand jigsaw is the best assistant in processing plywood sheets
A hand jigsaw is considered the best tool and allows you to decide in advance how to cut plywood without chipping, eliminating the need to purchase electric tools. It can be used to produce a small number of elements of complex shapes. Having certain skills in working with a jigsaw, you can make a neat cut, however, due to high labor costs and low productivity, this method cannot be called optimal.
Hand saw for plywood
If you don’t have electric tools or a simple jigsaw at hand, you should resort to using a simple hand saw. To make cutting a sheet convenient and to avoid chipping, the tool blade must have a large number of small and well-sharpened teeth. The angle of the saw to the plywood sheet should be sharp. It is recommended to avoid jerking and make even movements with strong pressure.
Tip: The cut of a regular saw is rough, so it is recommended to sand the end parts after finishing the sawing.
Circular Saw
Sheets of plywood can be created into various shapes using a circular saw or circular saw, but the main purpose of these tools is to create square cuts. When cutting material, it is very difficult to get a neat cut because the rotation speed of the discs is very high. In this regard, preference should be given to those cutting wheels that have small teeth and are used for working with wood. When processing plywood, it is good to use cutting wheels designed for sawing chipboard.
A cutting wheel with fine teeth will prevent the formation of large chips
Tip: when cutting a plywood sheet, make sure that the pressure on the sheet is insignificant and the rotation speed of the disk is low.
Circular Saw
When making furniture or repairing it, you often have to choose what to cut laminated plywood with. To get a clean cut, you need to select discs or blades that have frequent and fine teeth. The angle of their sharpening, as well as the shape, is of great importance. It is advisable to select discs with a positive sharpening angle and different tooth shapes (alternating trapezoidal and straight teeth are observed). If the disk has negative sharpening angles, then it is necessary to reduce the speed, otherwise the wood will burn.
Important: the larger the diameter of the disk, the wider the cut will be and, accordingly, the number of chips will increase. It is completely impossible to avoid the formation of chips, but it is possible to reduce their number and size to such an extent that subsequent processing can completely eliminate all roughness.
A relationship has been established between the size of the chip and the saw teeth: small ones leave less damage than large ones. The amount of tooth set affects the cleanliness of cutting plywood. The best result is achieved with minimal wiring. You can check this parameter using a regular ruler. You should not saw a thick sheet using a disc with minimal tooth spacing, since increased friction will cause it to burn and the disc will become pinched.
Electric jigsaw
An electric jigsaw is best for cutting any plywood. When working with this tool, you should use small files, cut the blade, pressing the jigsaw and avoiding jerky movements. Upon completion of the process, the ends of the material are processed using sandpaper.
A jigsaw will make sawing easier and make a high-quality cut of the sheet
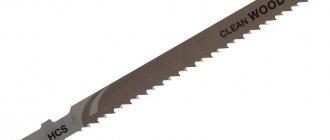
Advice: when choosing saws for an electric jigsaw, you should give preference to those models that are marked “clean cut”. Most manufacturers of cutting tools have saws in their assortment for these purposes; for example, BOSCH has a product line called CleanWood. A distinctive feature of the teeth is their regular triangular shape and the ability to cut in opposite directions.
You should not purchase low-quality tools, since after a cut 5 meters long, the cutting edge becomes severely dull, which causes chips to appear. The absence of setting and the opposite sharpening of teeth located next to each other and the small width make it possible to make complex figured cuts. But these qualities of files for finishing cutting cause the fragility of the blades.
Plywood saws are the key to successful sawing of the material
Finish cutting of plywood can be done using blades for working with metal parts. The size of the teeth of such saws is minimal, which greatly slows down the cutting speed, but allows you to achieve the highest quality. Since the width of the metal files is large, it is possible to carry out a figured cut only with a large bending radius (0.6-0.8 m).
Why do you need to cut plywood?
Standard sized plywood sheets are rarely used and usually need to be sawed
Plywood is used in many construction and renovation projects. In addition, it is the safest and easiest to handle option for making home furniture, especially children's furniture. Sheets have to be sawed, cut, bent and cut.
The complexity of such work lies in the structure of the material. In regular wood, the wood grains are oriented in one direction, which makes work easier by allowing you to choose the right tool for each direction. In the chip material the fiber has no orientation at all; the user has to deal with a relatively homogeneous composition.
Plywood is a multilayer wood-laminated board in which the wood fibers in each layer are oriented perpendicular to each other. When sawing, the tool simultaneously works with several planes . This makes it very difficult to work, especially manually. You have to put in more effort. The cut often turns out uneven, with chips . This property is especially pronounced during complex cutting, when it is necessary to perform a rounding.
Features of cutting tools
Each plywood cutting tool has its own characteristics when used. Let's look at the rules for working with plywood with various cutting tools.
Sawing with a circular saw
Using a guide when cutting with a circular saw will help avoid unevenness.
To effectively cut a sheet using a circular saw, you should adhere to the following rules:
- Place the plywood sheet on a stable support and make the first cut closer to the middle of the sheet.
- Adjust the cut depth. To do this, lower the disk and start cutting, while the depth of immersion of the disk should be 0.5 cm greater than the thickness of the blade.
- To avoid injury due to the high risk of kickback, position yourself to the side of the saw's line of action.
- Prepare the saw to make the required cut. To do this, you should attach the saw shoe (its part in front) to the blade and install the blade on the cutting line, having previously bent the casing.
- Make sure there are no obstructions at the bottom of the sheet.
- Turn on the saw and slowly plunge its blade into the material. To prevent kickback, hold the saw firmly. After immersing the disk in the slot and installing its shoe on the surface of the sheet, the protective casing should be returned.
- Run the tool along the line to the end of the canvas.
- Turn off the saw and only after it has stopped completely, remove it from the slot.
Cutting with an electric jigsaw
A jigsaw allows you to make high-quality curly cuts
To obtain an even cut, the sequence of actions should be as follows:
- Securely fix the material.
- If possible, cut perpendicular to the grain of the wood, otherwise it will be very difficult to obtain a straight edge.
- Under no circumstances should you put pressure on the tool; this will not increase the cutting speed, but the tool is guaranteed to break.
- The surface of the teeth should be lubricated with oil to facilitate work (subject to working with high-strength wood).
- It is undesirable to use the tool for a long time due to its heating and damage to the engine.
- After use, you need to clean the jigsaw and lubricate it.
Working with a hand saw
Metal saw is good for working with plywood
Working with a hand saw involves a lot more labor compared to a circular saw. To properly cut a sheet of plywood, you need to consider the following rules:
- Make a vertical notch along the cut line. To do this, you need to place a saw blade and pull the blade through to form a groove.
- Tilt the saw blade until an acute angle is formed with the plane of the sheet (from 30 to 400) and begin to make smooth movements.
- To maintain an even cut, the forearm and shoulder should be located in the same plane. If you deviate from the specified direction, you need to slightly bend the saw in the desired direction and continue working.
- To avoid the formation of a fracture, you need to hold the part being sawn off with your unoccupied hand.
- When you finish cutting, you need to return the blade to a vertical position and finish the work by making several movements perpendicular to the sheet of plywood.
This is interesting: the hard coating of laminated plywood imparts heterogeneity to the material, which causes chipping during processing. Another reason for the appearance of such defects is determined by the speed of movement of the cutting edge, the shape of its teeth and the applied forces. Often the jigsaw blade breaks out large pieces of plywood, which is due to the use of saws with large teeth or pushing through the top of the sheet.
Cut plywood with your own hands
- All procedures are carried out according to drawings that are drawn up in advance. This will avoid mistakes.
- The marked slab is laid in the prepared place. It is important to ensure free passage of the disk or saw and rigid, stable placement of the resulting fragments.
- The exposed stop is fixed with clamps.
- Based on the most comfortable position, the largest possible cut is made. It is important to ensure that the parts - especially the part being processed - do not sag or jam the tool. Whenever possible, cutting is carried out without stopping.
- Figure cutting is performed in a single section or fragments, the excess is removed gradually.
Masking tape glued to the cutting line can prevent the appearance of small chips along the edge, but if the disc is selected correctly, then you can do without such manipulations
. For complete safety, it is recommended to work with safety glasses, a mask and a respirator. All processes are carried out carefully; upon completion, the device is disconnected from power.
Source
How to get the perfect cut
A high-quality cut simplifies further work with the material
In order to get a perfect cut from the end side, you can use either a hand saw or a power tool. There are several techniques to help achieve high-quality plywood cutting. Here are some of them.
Zero clearance
The principle of this technique is to reduce the distance between the saw blade and the pressure pad to the minimum possible. This avoids breaking off the top layer of plywood. This effect can be achieved by attaching an overlay plate to the sole of the tool. The pad has a slot to maintain the ability to saw along the intended line. Thanks to this, the teeth are guaranteed to cut small chips and not break out the material.
It is important to prevent mechanical damage to the sheet surface by the overlay. The pad should be changed every 5 meters of cut. The use of linings made of more durable materials (metal, plastic or fiberglass) eliminates the need to frequently change the linings, the surface of which must be pre-polished.
Adhesive tapes
To protect the back side of the plywood, tape is applied along the cut line. This method helps prevent large pieces from breaking off, which is especially effective if you decide to use a manual or electric jigsaw. However, not every adhesive tape is suitable for these purposes. For example, masking tape in this case will be completely useless due to its small safety margin.
Adhesive tapes are the best protection against chipping
Before you start sawing, tape with fiberglass or aluminum reinforcement is glued to the surface. The requirements for its width are as follows: there should be a margin of 1.5-2.0 cm on both sides of the cutting line. It is better to paste by pressing the tape with a dry cloth, preventing the formation of wrinkles and gluing.
After the saw blade or electric jigsaw has stopped working, you should remove the tool, first unplugging it from the power supply. Then start peeling off the tape. In this case, great care should be taken so that sudden movements do not cause the tearing of small fragments of the laminated surface that inevitably form during cutting. Therefore, it is necessary to abandon the use of materials with a strong adhesive base. When choosing such a tape, you should take into account its adhesive ability and ease of cleaning from rough surfaces.
Fastening material
In order for the cutting line to be smooth, the working surface must be as stable, rigid and durable as possible. When working at home, this can be an ordinary table with reliable legs and a flat tabletop.
The board is fixed to the surface using clamps secured on both sides with moderate force. The sheet to be processed must be positioned in such a way that the tool does not rest against the surface during operation. To prevent pressure from being applied to the saw during the cutting process, you can weigh down the protruding edge hanging from the surface using an attached weight.
Adviсe
To cut a plywood sheet correctly, you must use the right tool and follow some rules:
- Before cutting, you need to take all measurements and check yourself to avoid annoying mistakes;
- During operation, you must monitor the power cord;
- before using the tool, you need to adjust the cutting depth to an unnecessary amount;
- the saw blade must be suitable for cutting plywood;
- the use of a saw must be accompanied by the use of protective gloves and goggles;
- dull saw blades are more dangerous than sharpened ones;
- When sawing plywood, you must be careful not to bring your hands close to the blade;
- Do not start work without skills in using power tools.
Cutting technology
They begin sawing after securing the workpiece and applying markings. To do this, you need to turn on the jigsaw, set the maximum speed level and adjust the pendulum stroke by setting it to number 1.
You need to bring the file to the marking line, press the side of the platform against the guide and start working. When moving the jigsaw forward, you need to monitor the location of the platform. Do not deviate from the guide. When there are a few centimeters left to the end of the canvas, you need to carefully hold the free edge, avoiding breaking. At this point the process can be considered complete. To prevent the cut from turning out crooked, it is worth remembering a number of nuances:
- During operation, do not press too hard on the electric jigsaw, otherwise the file will break;
- when cutting a steel sheet, you need to choose a tool with maximum power and work at high speed - when heated, the steel softens and becomes more pliable;
- When processing plastic, laminate, organic glass or stainless steel, it is necessary to provide additional cooling for the file and periodically take breaks so that the tool has time to cool down;
- to prevent the plastic from melting during processing, it is necessary to set the minimum speed with a frequency of 1000 rpm;
- the figured cut will be smooth if you choose a narrow file with small teeth;
- After finishing the work, the electrical device should be cleaned of sawdust and placed in a special case.
Professional builders advise adhering to certain rules to help avoid mistakes that will not be easy to correct.
When choosing a file, you need to start from the material you are working with: plastic, thin or thick metal, plywood, solid wood. You should prepare in advance all additional items that may be needed during the cutting, marking and fastening process. Particular attention should be paid to fixing the material to the surface.
Note! To avoid defects, the canvas should be positioned face down.
It is best to try the sawing technique in advance and practice cutting with a jigsaw on unnecessary workpieces, because a crooked line will be difficult to correct. Safety precautions should not be neglected; you should use safety glasses and wear gloves when sawing.
If these recommendations are followed, the process of cutting parts should not be accompanied by unforeseen difficulties.
Multifunctional power tool
The renovator is now supplied by many leading manufacturers as the optimal tool for household use. With it, you can do all the household chores with one piece of equipment. This is a convenient, not heavy device with manual drive and access to the electrical network. There are battery-powered models, but they break down faster.
The essence of the device is a large number of attachments, one of which is designed for sawing metal parts. It can indeed help cut wire or thin sheets, but you should not expect high quality from a device for home use. Usually the golden rule applies here - is better than quantity of features.
Inserting a sink according to a template
The sink is one of the most important elements of kitchen equipment. If you decide to cut your sink into your kitchen worktop yourself, the first thing you need to do is prepare an exact template.
First, transfer the outer outline of the shell onto a thick sheet of paper. Next, measure the width of its sides, which will rest on the tabletop. Usually this is 2-3 cm. Now step back from the outline drawn on the paper, inward by the width of the side and draw a parallel line. This will be the cutting line.
When applying markings, make sure that the position of the template itself on the plate is correct. Of course, if all the corners of the sink are symmetrical, then nothing bad will happen if, according to the markings, it appears to be in a mirror image. But if the sink has the shape of a trapezoid and the roundings at the front corners differ from the roundings at the back, then under no circumstances confuse the front and back parts.
Use a similar pattern to make templates and cut holes for wall lights or loudspeakers mounted on wood panels.
The line drawn around the sink is auxiliary. The second, drawn parallel closer to the center, is the sawing line.
Pendulum stroke of jigsaw
The pendulum stroke, or otherwise called “pumping,” is needed to increase the speed of cutting wood, to be able to work with soft materials and to produce complex cuts. The pendulum stroke of the jigsaw is carried out according to the principle of swinging. It significantly worsens the quality of the cut and because of this, chips appear on the surface.
We recommend turning off the pendulum stroke to reduce chipping. For example, on a Makita jigsaw they showed where it turns off. Find out if your jigsaw has such a function and how to disable it. When the function is turned off, the jigsaw makes standard movements, due to which uniform sawing is achieved and the quality of the cut is improved.
What else do you need to know?
When you plan to saw off everything without chipping on one side, it is permissible to use files with both upper and lower teeth. Most craftsmen prefer small files with straight teeth. Such devices chip less material, but still work quite well. After cutting, it is best to process the ends with emery stretched over even bars. If you don’t have a ready-made crayon of a suitable color, you can mix different crayons, like paints in an artist’s palette, and get a new color.
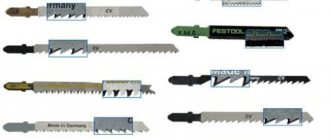
To cut without errors and quickly, you must always take into account the brand markings. There is no generally binding designation standard yet, but almost all companies strictly follow the classification developed by Bosch specialists. Or at least they list it along with their own abbreviations and terms. CV saws (sometimes referred to as HCS) are well suited for cutting wood and wood-based products.
Some inscriptions indicate in which mode the tool works optimally:
Installation
Fastening plywood sheets can be done using nails, staples, glue, screws, bolts or rivets. When starting installation with your own hands, you need to prepare the slab, that is, you should decide how to treat the plywood from moisture in order to prevent possible expansion and contraction of the material (this will be discussed below).
Experts recommend leaving a gap of 2 mm at joints (for example, between a steel frame and a plywood sheet), for which elastic filler is used.
Types of connections
The most important elements of plywood structures are joints and joints. Today, there are many types of fastening of plywood sheets: tongue-and-groove, tenon, bolt, etc.
We nail the sheet.
The most sensitive part of such structures are the ends, and therefore they should be processed, especially if the material is planned to be used outdoors.
Let's look at the most popular types of connections:
- We use nails.
- For wall, ceiling and floor panels, it is advisable to use threaded nails or special screws. In this case, it is desirable that the cap be depressed or hidden.
- For hidden nailing, wire nails are an excellent choice.
- Acid-resistant nails are recommended for exterior cladding as they offer better rust resistance.
- Nails should be selected so that their length is 2.5-3 times the thickness of the panel.
- Nails can be driven close to the edge (beyond 12-15 mm).
- Screw connections.
The screw type of connection is the most common. In some cases, plywood panels are fastened using screws.
Instructions for using screw connections include the following recommendations:
- The head of the screw screwed into the panel should not cut into the front veneer.
- When using domed nails, washers should be used.
- When attaching sheathing sheets to metal structural elements, you can use special screws to secure the plywood on the back side so as not to damage the front side.
- If the panels are used as floor coverings for trailers and containers, they should be secured to the metal chassis using self-tapping threaded screws. For example, to securely fasten a 27 mm thick plate, M6x40 mm screws should be used. The screw must first penetrate the body of the plate and then cut a thread in the metal.
- Using threaded bolts, it is very easy to fasten thin plywood panels to metal structures, which is actively used in transport engineering. The bolt hole should be 2 mm larger than its diameter. To protect the plywood, nuts and washers are placed under the bolt heads.
- Gluing.
Application of adhesive composition. Unfaced plywood sheets are easily glued together using any wood glue. The choice of adhesive depends on the method of work, the moisture content in the environment of use and the required strength.
The most common adhesives for such work are: PVA, epoxy resin, phenol, polyurethane, etc. PVA is excellent for indoor use, as it does not have a strong odor and is characterized by excellent gluing properties that can withstand various adverse conditions.
For gluing plywood to metal coatings, it is recommended to use epoxy-type adhesives.
Causes of chipping
Often chips appear because a jigsaw blade that is not suitable for these tasks is used. If you take a saw blade with teeth pointing upward, then such a saw will tear off the top layer of veneer. This happens because there is space between the jigsaw blade and the file. The fracture of the top veneer occurs precisely in this place.
What to do to get rid of chips:
- Disable the pendulum stroke on the jigsaw
- Use a suitable quality file
- Always cut plywood from the rough side
- Buy a splinter guard (or make one yourself)
- Additionally, choose a method that is convenient for you from the “clean cut” experiment
Let's look at all the points in more detail in this article.
Using masking tape
Before sawing, you can glue masking tape to the plywood, then the cut will be cleaner. It is better to use masking tape rather than regular tape. It does not leave sticky residue on the plywood and is easy to remove. Make sure the tape is well attached before cutting.
This method isn't that bad. But personally I don't like this method.
Firstly, the tape often comes off when sawing and chips appear in these places.
Secondly, if you want to saw off plywood on which a picture made on a Pyroprinter has already been burned, there is a risk that small details of the image will remain on the masking tape.
Types of impregnation
In construction retail outlets you can find excellent modern compounds used to impregnate plywood in order to acquire water-resistant characteristics. These include a number of products.
- Drying oil. It has an oily composition that penetrates deeply into the surface of the plywood and forms a water-repellent film.
- Polyvinyl acetate composition. PVA may be present in glue, paints or putty. Impregnation is suitable as a protective layer for preparing plywood sheets under laminate or linoleum. Polyvinyl acetate is not suitable for external protection, since it cannot cope with moisture for a long time.
- Wax. If the plywood area is small, it can be treated with wax. After polishing, it acquires an attractive, immaculately smooth appearance.
Polyvinyl acetate composition (PVA)
Polyvinyl acetate is used in the creation of PVA glue, acrylic and water-based paints, the composition of which is the so-called oil in water. Painting products are purchased in retail chains in the form of 2 components - paint with a paste-like structure and a plasticizer. Both products are mixed immediately before starting work. PVA glue is purchased with a homogeneous structure, without additives. All types of polyvinyl acetate compounds are suitable for coating plywood.
We cut plywood without chips
PVA impregnation guarantees protection of sheets from delamination and rotting. In this way, the material for flooring is prepared. The surface is coated on each side, achieving complete absorption. The ends are also carefully processed.
Self-drying is required between each layer. The entire work process is quite lengthy and can take a whole week.
A putty based on polyvinyl acetate is also used, with a structure reminiscent of thick sour cream. Plywood is processed as follows:
- the sheet is covered layer by layer with putty until spots appear on the surface on the back side;
- then prime the other side of the plywood well;
- dry the sheet in a vertical position for 3 days;
- then the material is treated with an antiseptic;
- then several layers of acrylic varnish are applied.
Nitrolac
Over time, the paint begins to crack and become unusable, so the plywood is treated with varnish. This happens through a series of steps.
- The surface is sanded and painted with drying oil in several stages.
- After drying, they begin to work with varnish. For better impregnation, it is diluted to a liquid consistency and applied in 5-6 thin layers to the surface. Each coating is given the opportunity to dry. The process will not take much time, since the varnish dries quickly. You can work with a roller or spray gun.
Nitropaint
Nitroglyphthalic and nitro-enamel paints perfectly protect plywood from contact with water. But, as we have already mentioned, coloring compounds are applied to a pre-treated surface. The coating process consists of several steps.
- After leveling the surface with sandpaper, it is covered with drying oil on all sides, including the ends. The product must dry thoroughly before painting.
- The paint is diluted, turning it into a liquid primer, and the dried sheet is treated with it again. After drying, the plywood will be ready for painting.
- Next, apply 2-3 layers of paint as thinly as possible with intermediate drying. You can work with a brush, or a roller will also work, but a more uniform coating is obtained using a spray bottle.
For more thorough protection, you can glue the surface with gauze soaked in nitro solvents.
To do this, the fabric is laid, applying an initial layer of paint, the rest of the painting work is carried out not only to protect the coating, but also to improve its appearance. The finished plywood sheet can also be coated with varnish.
Drying oil
This is the most affordable type of impregnation, and is also a good antiseptic. Processing a sheet of plywood with drying oil occurs in a certain sequence.
- For work, prepare containers for drying oil and brushes, or a roller.
- The drying oil is stirred well and sent into a container, then heated in a water bath to a temperature of 50-60 degrees Celsius.
- All surfaces are thoroughly treated with the composition. The leaf ends require special care.
- Next, forced drying is carried out using a hair dryer or other convenient method.
- Only after the coating has dried can you begin to apply the next layer. There should be as many of them as the plywood (until completely absorbed). After each treatment, another drying follows.
Sheets treated with drying oil will subsequently be protected from fungus and mold.
They can become the basis for the following decorative coatings - varnishes and paints containing drying oil.
Getting ready for Easter
Woodworking is a very difficult task that produces works of art. This is only said about handmade wood carving, because no machine in the world can compare with handmade work. Why? A person, working and creating his masterpiece with his hands, puts a lot of effort, time, and, of course, the most important thing - his soul into his work. Sometimes it’s enough to look at a craft and you understand in what mood the master created it, what was in his soul at that moment. After all, the mood and emotions are completely transferred to the created product.
Today we invite you to consider step-by-step instructions for decorating wooden eggs. The main tool, of course, will be the engraver.
So, for work you will need the following tools and materials:
- Engraver;
- Grinding attachment;
- Prepared wooden products;
- A simple black pencil;
- Sandpaper;
- Stain;
- Varnish;
- Application brushes;
- An eraser.
Step-by-step instructions for work.
Wooden products need to be lightly sanded with sandpaper. The surface must be flat. Then we select the drawing and transfer it to the workpiece. This must be done carefully.
We install a grinding attachment in the engraver and begin to make notches, as shown in the photo.
After working with the engraver, you need to remove all pencil lines with an eraser. It should look like in the picture:
Read also: DIY embroidery hoop made of wood
All that remains is a small matter. Now we need to color our egg souvenirs. In this case, you can use stain, and in different shades. Apply it to the finished product with a brush and put it aside until it dries completely. After which we go through a little sandpaper, thereby creating an unusual effect. Now you need to coat it with varnish, wait for it to dry completely. This is just an example. How much your imagination is enough depends only on you. Try, experiment, then you will become a real master in wood carving as an engraver.
That's all, the master class has come to an end, our Easter souvenirs are completely ready. In addition to all of the above, we invite you to watch the video tutorials in order to fully understand this craft.
Anti-splinter liner
This is a special pad for a specific brand of jigsaw. It is simply inserted between the jaws of the jigsaw and is not secured in any way. The insert is adjacent to the file, so it does not allow the pile of the top layer to rise (which is what causes chips), so the saw is smooth. Craftsmen advise using files from the same manufacturer as the jigsaw - the quality of the cut will be better with the use of an insert.
The inserts are sold in sets of 3-5 pieces. They are not eternal - they have to be changed periodically.
For example, an insert for a Bosch jigsaw costs about 400 rubles.
If you haven’t found an insert for your jigsaw or don’t want to buy one, then there is a small life hack from the craftsmen - stick ordinary tape in the place where you will be sawing . After this, you need to iron the tape well with your fingernail. Then saw directly on top of the tape. After that you delete it. The result will be similar to the liner.
You can also make such a sole yourself. Here is an example of how our client made a jigsaw pad from a thin sheet of tin.
But it is more convenient to make such a platform from a sheet of plexiglass. And stick it to the bottom of the jigsaw using double sided tape.
With a homemade insert you will also get a clean cut.
Cutting
We use a regular hacksaw, but it is necessary to secure the product well in a vice, otherwise it will slide along with the movements. Sometimes this method is not used for complete sawing, but as a preliminary step before bending. A file may work in this case.
Pipe cutters are what you use to cut metal
Structurally reminiscent of a handsaw, but much more practical. The cutting part looks like a small disk located inside a vice - the pipe itself is clamped in it. The movements are fast, the result is of high quality. The maximum diameter is 4 inches, the minimum is ? Typically the design consists of three rollers, two of which are movable and the third is static.
READ How to Cut OSB Plate