What the article is about:
How and from what to make a welding table for welding
Agree that cooking on the garage floor or on the ground is extremely inconvenient and unsafe. When constantly carrying out welding work, a specially equipped place with a welding table is required.
A welding table can be simple or professional. Here it is already necessary to determine the requirements for the table and workplace for welding.
From this fascinating article you can find out exactly what requirements apply to a welding table. What types of welding tables are there? How and from what you can make a welding table with your own hands.
Requirements for a welding table
Before you start designing and manufacturing a welding table, you need to determine the requirements for it:
- Structural rigidity. It should not “walk” under the weight of massive or bulky welded structures.
- Reliability of workpiece fastening.
- Ease of operation for the welder.
- Shelves for welding equipment, welding materials.
- Box for rarely used tools.
In addition to the basic requirements, additional options can be provided:
- exhaust ventilation to remove welding gases;
- work area lighting - 36 volts or LED.
Welding table with lamp
In addition, it is important that flammable materials are not used.
Dimensions
Before starting work, you need to immediately decide on the dimensions of the future welding table. In this case, you cannot be guided by ready-made industrial drawings, because creating products of this size at home is almost impossible.
The optimal total height will be 1.3-1.5 m (including fencing for protection). The dimensions of the immediate working area can vary significantly, but not exceed 1x0.8 m. Separately, the height of the tabletop can range from 0.7 to 0.85 m.
Required tools and materials
In a home workshop, they often try to make do with improvised materials. However, in order to meet the strength and stability requirements stated above, the following should be used for racks:
- profile with a cross-section of at least 60×60mm and a wall thickness of 4 mm;
- I-beam or angle 60×60, but already 4 mm thick.
The shelf and drawers can be made from a lighter profile.
Welding table drawing
The tabletop is assembled from rolled profiles. The gaps between them will be used to secure the parts to be welded with clamps or pliers.
For the protective screen use:
- base frame - light profile;
- the screen itself is a metal sheet 0.4-1.0 mm.
The protective screen also has side edges.
A welding table with a fastening system should be equipped with additional devices to help secure workpieces to the table and to each other:
- clamps;
- clamps;
- magnetic plate base for fastening small parts.
Welding table with clamping system
It is not possible to make this equipment for a welding table with your own hands; you will have to buy it.
Security measures
In the process of creating this table yourself, you should follow some important safety rules. It must be remembered that there is a danger of electric shock, so all work must be performed with the utmost caution.
And we should also not forget that there are risks of adverse effects of the electric arc on the organs of vision, contact of hot metal particles with exposed skin and eyes.
Before starting work, there are several important steps to take. Check in advance the quality of the electrical circuit and the insulation condition of all supply wiring, carefully consider the grounding (auxiliary electrical tools must be grounded). After making the table, make sure that it is as stable as possible.
After installation, turn on and check the operation of the ventilation system. It must function properly, removing harmful impurities from the air.
If you place the welding table in a garage or workshop, do not forget that it must be at least 5 m away from flammable and other flammable substances. Long products are best made for spacious rooms. During welding work when installing the table, be sure to use a protective mask, respiratory protection and gloves.
To learn how to make a welding table with your own hands, see below.
Welding table design
There are several types of designs. The most common:
- amateur, for occasional welding work, small structures by a home craftsman;
- semi-professional assembly and welding, for performing complex operations
For a table made from a profile pipe, made by yourself, the following dimensions are recommended:
- height of the working surface from the floor 70-85 cm;
- working surface dimensions of at least 80×100 cm;
- The height of the protective box is at least 140 cm from the floor.
Simple table for welding work
This design is durable, easy to manufacture, and convenient to use for small amounts of welding. It consists of a rigidly welded metal frame made of 60*60 profile. Four racks are attached to it. 20 cm from the floor they are connected by 20*20 corners. Tabletop elements are installed on top of the frame, forming a reliable support for the workpieces to be connected and equipped with grooves for their fastening.
Example of a mobile table
Hooks for wires from the welding machine are welded to the frame, and a shallow tray for scale and dust is placed under the working surface.
On one side of the welding table, a cabinet made of thin metal sheet is installed for storing small tools. Here I weld a stand for the water tank.
Semi-professional welding table
It is a welding and assembly station designed to improve the convenience of welding work. Allows you not only to cook, but also to carry out related mechanical processing.
This table includes:
- rotary working platforms;
- installation of drilling or milling equipment;
- quick-release bench vice;
- rotary attachments for attaching the welding machine;
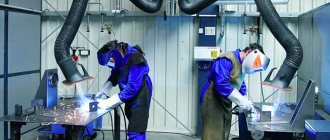
- exhaust ventilation;
- flexible illumination of the working area;
- anchorage to concrete floor.
The purpose of all these improvements is to enable the welder to work from a comfortable, non-tiring position and to save time on the operation of removing and installing the product. Pays off for large volumes of work
Bent frame
To bend pipes, you will need a pipe bender and a template (plaz), the outline of the part that should be drawn on a sheet of plywood. The bent pipe must be periodically applied to this template and compared with it, so that several identical elements can be made. Here are a few secrets that will help you bend a profile pipe:
- a homemade pipe bender can be made from an old car brake disc, attaching a pin made of steel rod to the side, which will serve as a stop;
- the pipe must be filled with fine river sand and plugged at the ends;
- It is advisable to heat it red-hot with a blowtorch at the bend.
Making a welding table
Let's take a closer look at the process of producing a simple welding table with your own hands. It is made of a rectangular metal profile and a corner. Dimensions can be changed depending on the needs of a particular home craftsman.
Let's decide on the size of the table
For free placement of workpieces, convenience and safety during work, we select the following sizes:
- height of the floor table top – 75 cm;
- tabletop dimensions – 80×100 cm;
- the height of the protective screen is 140 cm from the floor.
Preparation and cutting of material
To make the design you will need:
- corner 25×25, length 46 cm, ends cut at 45° – 4 pcs.;
- corner 25×225, length 76 cm, ends cut at 45° – 4 pcs.;
- profile 30×230×21.5, length 76 cm – 4 pcs. (for legs);
- steel sheet 3 mm 44.5×75 cm – 2 pcs. (for shelves);
- profile 60×240×22 mm – length 100 cm – 2 pcs.;
- profile 60×240×22 mm – length 72 cm – 2 pcs.;
- profile 40×230×21.5 length 72 cm – 8 pcs. ;
- swivel wheel support with stopper – 2 pcs.;
- wheel support – 2 pcs.
Welding table frame
The rolled product is cut with a grinder or a cutting saw and thoroughly cleaned of burrs.
Making a countertop
Along the contour, the tabletop is made from a 60×240 profile. When assembling, you should ensure that the angles and diagonals of the contour are equal.
The internal grille is assembled from sections of 30×230 profile and welded to the contour at equal distances from each other. All welds should be thoroughly cleaned with an angle grinder.
Welding table top
On the sides of the short sides, handles made of 8-12 mm rod can be welded to the bottom of the tabletop. This will allow you to move the table from place to place.
Table legs
The legs are welded at the corners of the tabletop frame. First, you should spot weld the legs and carefully check the angles of the legs with a charcoal and a metal ruler. They must be strictly perpendicular to the plane of the frame. If a skew is detected, it should be corrected. Otherwise the table will be unstable. Wheel mounts can be welded on the bottom of the legs. This is convenient if you plan to frequently move the table from place to place. If the place is permanent, then it is better to abandon the wheels that add instability and weld small squares of metal to increase stability and protect the floor from damage.
Table legs
After aligning the legs, they must be permanently welded and secured with additional strapping from light corners 20 cm from the ends. They are welded with the flat side down, and an OSB shelf is placed in the resulting recess. Welding equipment and materials, a mask, etc. are placed on it.
You can also weld several brackets and hooks to the legs for hanging cables, holders and other equipment. They are made from a steel bar of large nails. They should be thoroughly cleaned to remove any sharp edges.
Protective box
The protective box serves to prevent the scattering of splashes of molten metal during welding and solid waste during stripping. The frame is made from a lightweight corner, and the box itself is made from thin sheet metal. It is attached to the tabletop with pins. When working with parts that protrude beyond the dimensions of the table, the box is removed.
You can weld a tray with low sides under the tabletop to collect scale when cleaning seams. The tray is installed with a slight inclination so that debris gradually accumulates towards its lower edge.
Making a protective box
Tools are stored in a wooden or metal box. Instead, you can weld a cabinet with shelves.
Assembly
To carry out assembly work you will need:
- welding machine;
- electrodes;
- grinder with cutting disc and cleaning disc;
- a set of hand tools;
- ruler 1 m, corner, tape measure.
Assembly is carried out in the following order:
- cutting blanks, checking dimensions and angles according to the sketch drawing;
- tabletop assembly: first the outline, then the ribs;
- attaching legs;
- welding the bottom trim;
- fastening wheels or support platforms;
- assembly of the protective box;
- tray installation;
- final cleaning of seams, burrs and irregularities;
- applying primer and paint;
- installation of OSB sheet.
Additionally, you can weld handles for moving and hooks for wires.
Assembly
The individual elements of the welding table should be assembled in a strictly defined order. First, the legs are welded to the tabletop and the bottom trim is mounted. Then they begin to create amplifiers for the racks, welding the supports and installing the rollers.
Later they move on to forming a protective box for the table and installing a niche for tools. At the final stages, the welds are cleaned and the structure is coated with primer and paint.
Before applying paint, it is better to coat the table with an anti-corrosion substance, which will allow the product to last longer. Most often, painting is carried out using spray cans or a spray gun. If you made a table with wheels, you need to immediately wrap them in plastic so that paint does not get on them. Otherwise they may get stuck in one position.
For finishing such tables, the best option would be heat-resistant enamels, which can be purchased at almost any hardware store. After application and drying, the surface can be lightly annealed with a torch, which will help form a durable coating that is resistant to low temperatures.
To make future work more comfortable, the finished table can be equipped with various auxiliary equipment.
Final finishing
The assembled table with your own hands must be treated with protective agents. Antiseptics are used to prevent the negative effects of moisture. As for finishing materials, safe water-based acrylic varnishes are most widely used today. The tabletop is made from a variety of materials: wood, metal, plastic, glass. By themselves, these options look quite attractive, but require special processing. Wooden countertops are carefully sanded and at least 3 layers of paint or varnish are applied to obtain a mirror-smooth surface. Glass and plastic usually do not require additional processing; metal products look great in tandem with forged elements.
A table made of metal with a tabletop decorated with mosaics, paintings, and glazing looks attractive. Increasingly, furniture is decorated using decoupage techniques. To apply a neat design to the surface, all kinds of stencils are used.
A table made of metal and wood is characterized by strength, reliability, and durability. The stylish design will decorate residential premises or summer cottages. The models are successfully used for plumbing work, friendly gatherings, and family dinners.
OKOF, depreciation group
The welding table wears out during operation
In production conditions, as opposed to personal use, it is important to know the standard useful life of equipment. This will allow you to correctly write off or repair a worn-out object and replace it with a new one.
Welding and assembly table 1200x1200 VTM. Photo VseInstruments.ru
OKOF (all-Russian classifier of fixed assets) serves as the basis for determining depreciation groups. For welder's tables and welder's platform, code OKOF 14 2922726. This code is used to determine depreciation group - fifth (property with a useful life of more than 7 years up to 10 years inclusive).
What to look for when choosing ready-made tables
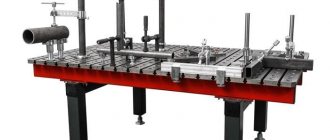
When choosing a table for a home workshop, it is best to give preference to a more versatile design. These types of welding and assembly workbenches are suitable both for working with equipment and for other functions: grinding, drilling, sharpening, riveting and others.
In appearance, it is a steel surface, which is assembled from strips of metal, has holes and slots for attaching clamps and vices.
When choosing such a table, you need to be guided by the following requirements:
- The working area is made of non-flammable and refractory material.
- Reliability and stability of the structure, which is ensured by a weight of 180-200 kg.
- Possibility to rotate the work surface in the required direction.
- To install drilling or milling equipment, such workbenches must have grooves in the surface, and the design must ensure reliability under various loads.
Ventilation
When using gas in the welding process, it is necessary to ensure good ventilation of the room.
Ventilation is needed for several reasons:
- To reduce the concentration of toxic substances that may be released from the metals being welded. When carrying out welding work, various harmful impurities can be released into the air: carbon monoxide, nitrogen monoxide and fluoride inclusions.
- In order to remove gas contamination from the room, which can lead to detonation.
- To ensure cooling of working tools and equipment that overheats during operation.
Ventilation can be natural, which is carried out using air flow from the street, as well as artificial. For artificial ventilation, special hoods, fans and other means of air circulation are used.
The best option for a welder's workbench is one that is equipped with dust extraction directed downward or to the side. The effectiveness of the suction of harmful substances from the inhalation zone is ensured by the close location of the exhaust intakes to the arc site.


