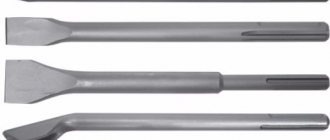
“Pusher” - what is it and what is it for? It is a stick, the main task of which is to remove the cuticle and clean the skin around the nails. Getting your hands in order without such a simple but useful tool is simply impossible. The item is present in all manicure sets. The best manufacturers have launched the production of popular pusher models that differ in shape, type, and material of manufacture. The appearance resembles a spatula. Designed for gentle cuticle removal. Belongs to the category of double-sided instruments.
Scraper VS pusher - what's the difference?
Pusher and scraper: two in one
Manicure blades are called pushers and scrapers, but these concepts serve to designate different devices. Let's look at the main differences between them:
- The pusher is used to push the cuticle away from the nail plane. In its classic form, the tool does not have a cutting surface (special knife) - there is only a blade.
- Using a scraper (hatchet or knife), remove burrs, dirt from under the nails, and trim overgrown cuticles.
Why are the concepts confused? The fact is that a traditional spatula (pusher) is often combined with a knife (scraper) - and the result is a universal tool. On one side of such a device (2 in 1) there is a scraper, and on the other there is a pusher, so it is impossible to put an equal sign between these concepts.
A pusher and a scraper are completely different tools. In this case, one tool can serve as both a pusher and a scraper.
Classification by functionality
All pushers are classified depending on functionality. There are single-sided tools (they are the simplest) and double-sided ones. The scraper, which has a curved blade configuration, is very convenient and does not slip during operation. Pushers are produced with a tip in the form of a large spatula and lance. They are used for manicure and pedicure.
One of the most common is a manicure scraper in the form of a hatchet. One of its sides is presented in the form of a spatula, with the help of which unedged and trimmed manicures are performed, and on the other - a hatchet. They use it to clean the surface of the nail from pterygium and various coatings that could not be removed with special means. You can also clean out any dirt that has accumulated around the edges of your nails.
There is a scraper specifically designed for working with ingrown toenails. The tip is a spatula or knife. You can easily treat such nails.
There are varieties that eliminate calluses and also help prepare the surface of the nails for gel or acrylic extensions. These tools must be used extremely carefully and require special skills.
A separate type of pusher is a magnetic paddle. This special tool is used to make patterns on magnetic varnish. The result is an amazing manicure.
Types of pushers for manicure
The following types of pushers are on sale:
- Double-sided for cuticles and single-sided for removing gel polishes.
- With a scraper for trimming cuticles, hangnails, removing dirt from under the nails and without a scraper .
- Plastic (“hooves”), silicone , rubber or metal , iron , titanium - the first group has a more gentle effect.
- With a round or flat handle - the choice of one solution or another is a matter of taste, but notches must be present (they prevent the tool from slipping).
- Straight (for moving the cuticle) and beveled (for cleaning the subungual bed).
Types of pushers
Instead of a pusher, you can use an orange stick 9-18 cm long and 3-5 mm wide with flat ends, soft but dense texture. It does not damage nails and absorbs moisture well. The tool is intended for one-time use.
It is much more difficult to damage the nail plate or cuticle with an orange stick or plastic pusher than with a metal spatula. Therefore, tools made of plastic and wood are recommended for beginners.
What is it used for?
Before we talk about the types of scrapers and the rules for their use, it is worth finding out what they are? The main purpose of a manicure scraper is to push back the cuticle and remove pterygia (the so-called thin skin that grows on the bottom of the nail). Thus, this tool is necessary for caring for fingers and toes (there are also pedicure scrapers).
Removing pterygia is a mandatory hygienic procedure that prevents the appearance of hangnails. Therefore, the pusher is used for almost all preparatory procedures when performing a manicure, including for preparing nail plates for the extension procedure.
Technique for using a pusher and scraper for manicure
Using a pusher
- Disinfect the instrument using a special composition, alcohol or chlorhexidine.
- Prepare your nails : the cuticle should be soft, then you can remove it without any problems and without damaging the skin (you can make a bath, apply a softening agent to your nails).
- Push the skin toward the bottom of the well using a spatula.
- Model the cuticle using the other end of the pusher or a beveled spatula.
- Use a hatchet to properly cut off the burrs (if any): as close to the base as possible.
And don’t rush – movements should be performed carefully and slowly.
We invite you to see how a manicurist works as a pusher and scraper:
How to remove cuticles with an orange stick
Safety and low probability of injury does not eliminate the need to know the basic stages of nail treatment.
- Before using a wood pusher, you should soften the cuticle. Special products or a simple warm hand bath will help in this matter;
- After softening the cuticle, use a blunt end to carefully pry the skin and move it to the base of the nail;
- At the end of the procedure, the cuticle is treated with oil to give a healthy appearance and additional hydration.
After using a wooden tool, it must be disposed of. A wooden stick cannot be sterilized and is a place for possible accumulation of bacteria.
Rules for choosing a pusher
The first criterion you should focus on is the shape and width of your nails . For a square plate, a wide rectangular blade is suitable, and for an elongated almond-shaped one, an oval blade is suitable.
The safest spatula is oval; a beveled one is more difficult to use, but it allows you to more accurately model the oval of the nail hole.
The second criterion is the material . The optimal solution is high-alloy steel, although some girls prefer plastic.
Silicone pushers
The third point is the handle . In a good pusher, it is covered with threaded notches or grooves (a smooth handle will slip out of your hands, which is inconvenient and unsafe).
Before purchasing, be sure to hold the instrument - it is important that it fits well in your hand . Run (without much pressure) the working part along your hand - the spatula should not scratch the skin or slide over it .
The most famous brands are Berkeley, Orly, Tweezerman, SILVER STAR, Runail . By choosing a well-known name, you get guaranteed quality.
The video review will help you decide on the choice of pusher:
How to use?
There are many photos of manicure pushers with step-by-step instructions for using them. Sequencing:
First, if necessary, remove the base from the nail. Next, treat the tools and hands with an antiseptic.
Giving the nail the desired shape - first adjust the length, and then give it a shape, which should be the same on all nails. When using a glass file, your nails will not peel.
Pushing back the cuticle is done after a warm bath in soapy water or herbs.
If there are cuticle residues, it is necessary to apply a special remover for 10 minutes, after which the hands are rinsed with water and the oil is applied with massage movements to the cuticle.
Using the wide part at an angle of 40-45 degrees, the cuticle is moved towards the nail bed, thus freeing the plate. Then do the same in the direction from the middle to the sides. The remaining cuticle is cleaned with a scraper.
To soften the cuticle, apply any oil with massage movements.
Trimmer as an alternative to a scraper
Manicure trimmer
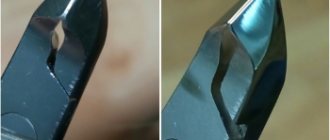
A scraper is a functional, convenient and effective tool for removing cuticles, but you need to know how to use it. An easier option or choice for beginners is a trimmer. It is a tool with a sharply sharpened working surface, which has the shape of the letter V.
You should handle it with extreme caution - otherwise you risk damaging the periungual area and epidermis. The trimmer handle is usually made of rubber or plastic.
Tool Features
A special feature of the tool is that it has two working surfaces. Each of them has a special shape, and therefore they perform different functions. One of the surfaces is shaped like a small spatula. It is used to treat the cuticle, removing its thin layer that grows directly to the skin that is located around the nail plate.
The other side of the scraper may have a regular handle or a different tip. The appearance of a double-sided manicure scraper depends on the functional features of this side. Basically, the second end is used to clean the edge of the nails from dust and various contaminants. It has special notches for this purpose. A tool with 2 tips is used to treat sensitive skin, as it causes almost no injury to the cuticle and dermis located around the nail.
Manicure trimmer: handling rules
Before you start removing cuticles and hangnails with a trimmer, thoroughly disinfect it, make sure the working part is well sharpened and sharpen it if necessary.
Removing cuticles with a trimmer
- The blade should be moved strictly along the nail bed smoothly and carefully , only after treating the hole with a pusher. The trimmer should only capture dead tissue.
- The procedure can be carried out no more than once a week . If the skin is inflamed, you should wait to remove the cuticles.
- , oil or cream is applied to the cut site .
Under no circumstances should the trimmer get under the living tissue around the nail.
Processing and storage of metal tools
- After each use, the device is sterilized. The metal scraper is subject to deep processing in an oven, solution or under ultraviolet light. Wooden is used once, after which it is disposed of, plastic is treated with an alcohol solution or hydrogen peroxide;
- Even if the device is used at home, it is important to clean it after the procedure. The surface can become a breeding ground for bacteria;
- After processing, the scraper should be in a separate case or together with other accessories undergoing sterilization. The most important thing is that the permanent storage location must be dry.
- The device needs to be sharpened once a year, but you shouldn’t do it yourself. An attempt to sharpen the pusher may cause its irreversible damage.
How and with what to disinfect, sterilize and clean manicure instruments
How to choose a manicure trimmer
How to hold the trimmer correctly
The safety of the trim manicure procedure largely depends on the quality of the tool used.
Good trimmer
- has a comfortable work surface ,
- made from quality material ,
- Doesn't bend when pressed hard .
As in the case of a pusher, preference should be given to products from well-known brands whose name speaks for itself. They are more expensive than tools from nameless manufacturers, but they are more durable and safe.
A quality tool is always worth the money - by buying a cheap trimmer, you save on your health.
How to work with a plastic pusher
When using a plastic pusher, you should adhere to the following rules:
- Like the orange one, the plastic tool is used after preliminary softening of the cuticle;
- Regardless of the tip material, the cuticle is gently lifted and moved to the base. When dry, the tips can act as an abrasive and file away minor skin tags.
Precautions when using a pusher, scraper and trimmer
Your nails will always be in order, and you will not encounter unpleasant consequences as a result of incorrect use of the tool if you follow simple rules.
- Forget about the rush . One careless movement and a scraper or trimmer can damage the skin.
- You will only work on a hard, flat surface , and not on weight.
- Buy a special cuticle oil or cream - they are needed to soften the delicate skin.
- You will try to cut off any burrs as close to the base as possible .
- Don’t skimp on your beauty and health: a quality tool is already half the success.
Practice working as a pusher and scraper with an experienced manicurist:
How to sharpen at home
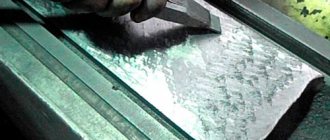
Almost all tools can be sharpened. Of course, now we are not taking into account wooden, silicone and other objects used by craftsmen. We are talking only about metal scrapers that are made with a sharpened edge. You can treat your nails at home, but do not forget that the tool must be sharpened and disinfected.
To sharpen the tool, it is taken to the workshop. If you have an emery wheel at home, you can perform the steps yourself. The most important thing is not to go above the intended line, the contour that already exists. On the blade, only one edge is sharpened, but the hatchet needs to be sharpened on both sides.
Rules for use at home
To use a manicure tool safely, it is important to know how to use a cuticle pusher at home. Here are some tips from the professionals:
- When cleaning the nail plate and removing the cuticle, do not make sudden movements to avoid injury;
- It is recommended to perform the procedure after preliminary softening the cuticle in a bath with warm water, sea salt or essential oils;
- you need to work with the tool at an acute angle relative to the nail plate;
- the sharp part of the device is directed to the cuticle in the corners of the nails and at the base of the plate;
- After cleaning the nail, you should use a manicure trimmer;
- at the end of the procedure, the hands are treated with an antiseptic, then a special caring oil or moisturizer is applied to the nails;
- all instruments used are treated with alcohol or sterilized;
- It is recommended to store the pusher in a dry place, separate from other devices.
- At least once a year, the manicure device is sent for sharpening.
If you follow these recommendations at home, you can do a high-quality manicure yourself.
Learning to use a cuticle pusher correctly
Having understood the purpose and purpose, as well as choosing a scraper option suitable for yourself for performing a pedicure or manicure, you can begin to figure out exactly how to work with it, what should be taken into account and what nuances should not be overlooked. However, first you should properly prepare your hands in general, and your nails in particular, for the upcoming procedures.
Preparing nails for treatment with a scraper
In order not to injure the delicate skin around the cuticle, in order to avoid the appearance of cracks, scratches and hangnails, you should properly approach the issue of preparing and softening the cuticle before moving it and/or removing it. If you neglect this stage, the cuticle can tear unsightly, fall behind in layers and pieces, which can then not only look unesthetic, but also cause pain.
- Find special oils for softening the cuticle in a manicure shop or any cosmetics store; there are quite a lot of them, so you should focus on your skin type and the scent you like.
- Remove the old varnish coating from the nail plates, if any, wash your hands with soap and apply cream.
- Drop the oil into warm water in a small bowl and soak your fingers in it for a few minutes to soften the cuticles.
- After time, carefully, without injuring, wipe each finger with a clean cosmetic towel or napkin. Please note that these types of wipes must be either disposable or heated in a special oven at high temperatures in order to ensure that germs do not enter the sensitive area under the cuticle, which is fraught with very serious problems.
After you soak your nails in this solution and dry them, you can begin the actual process of working with the scraper.
Anyone can learn to use a pusher
All instruments, especially new ones, must be treated with special antiseptic solutions that will prevent germs and bacteria from entering the body through the nail bed, which is unacceptable.
- When starting to work with a scraper, keep in mind that your finger must rest on a strong and fairly hard surface to avoid the risk of slipping.
- Using the spade-shaped side of the pusher, gently push the cuticle towards the bed, moving it around the perimeter. Do not press too hard, otherwise you can injure the nail plate, which can lead to its deformation in the future, and this is quite difficult to correct.
- If after this there are pieces of stuck pterygium left on the nail, then you definitely need to get rid of them, otherwise the manicure (varnish coating) will look untidy and ugly. Turn the scraper over with the pointed end and carefully scrape away any unsightly ridges until the plate is completely clean.
After all the nails have been treated in this way, you can proceed to further actions. However, you should never forget that the pusher should be cleaned immediately after use using antiseptic agents and solutions, which are offered in abundance by modern manufacturers. Important rules about disinfection and sterilization of manicure instruments are already available on our website; it would not hurt to familiarize yourself with the material in more detail, since your health may directly depend on it.
Removing gel polish
The manicure scraper can also be used to remove gel polish. There is an opinion that gel polish spoils the nail plate. In fact, if its composition does not contain harmful substances, the plate can be damaged by the procedure of improper removal of the color film. This can lead to thinning, delamination and structural damage.
In order to remove gel polish using a pusher, you must follow the recommendations:
- First, the nail is polished with a file, removing the finishing layer of gel. It is this that prevents the solution from penetrating inside, preventing the removal of the gel polish.
- Cut the cotton pad into four sectors. Moisten each sector in nail polish remover without acetone and apply it to the nail.
- Wrap each finger tightly with foil on top for better penetration of the solution. It is necessary to wrap with the glossy side of the foil inward, which is more capable of reflecting heat, directing it inward.
- It takes professional gel polish from 12 to 20 minutes to peel off from the nail. It is forbidden to lift the foil wrapper, since the ingress of oxygen has a depressing effect on the process of peeling off the varnish.
- After the film has come off, it is removed with a pusher, moving from the cuticle to the free edge. It is necessary to exfoliate without pressing the plate. If the varnish has peeled off well, it can be easily removed with a pusher.
Remains of gel polish can be removed by sanding the surface with a buff or an old file with a soft abrasive. This procedure may cause dry skin on your hands. After removing the gel polish, it is recommended to apply moisturizing cream or softening safflower oil with vitamin E to the skin, nail plate and cuticle, massaging each finger for better penetration of nutrients into the skin.