What is resistance welding
Resistance spot welding is a method of joining workpieces in the form of rolled metal sheets or welding various piece products to structures: bolts, washers, rivets and much more. This resistance welding technology is most widely used in industries such as automotive, aircraft and instrument making.
Owning a spot welding machine provides a number of advantages and additional capabilities, namely:
- the ability to weld products from sheet metal with small thickness;
- ability to weld low-melting metals;
- neat and durable weld seam.
The main advantage of resistance spot welding is that you can learn to work on it yourself, having only a basic level of knowledge. To do this, you need to practice a little and you will be able to achieve high performance when working on such a device, with a relatively low cost of consumables and electricity.
Transformer
The main component of any welding machine that uses electric current for the process of thermal joining of various metals is a power transformer, if you do not take into account modern electronic inverter welding equipment.
Moreover, the future welding transformer must have a high transformation ratio in order to be able to generate large welding currents.
The process of resistance spot welding is based on the Lenz-Joule law, which states that an electric current flowing through a conductor releases an amount of heat equal to the square of the electric current multiplied by the resistance of a section of this conductor per unit time:
Q = I**2 x R x t.
That is, with a current strength of, for example, 1000 amperes, a large amount of thermal energy will be released in a small area of contact. Depending on the length of time the electric current passes, at first the thermal energy will be enough to melt the contact area of low-melting aluminum sheets, and with prolonged contact, it will point-melt the steel sheet.
Hence, one of the best candidates for making a spot welding machine with your own hands will be a power transformer taken from an old broken microwave. As a rule, the power of such step-up transformers from a microwave oven ranges from 700 watts to 1.5 kilowatts, which is quite enough.
Keep in mind: that as a welding transformer you can take any suitable power transformer with a power of about 1 kW, but the most convenient, in our opinion, is a voltage converter from a microwave oven; it is easier to convert it.
Definition of pins of the same name
It is possible that the terminals of the windings of electromagnetic devices that must be combined are not marked. Therefore, it is necessary to determine the names of the same name. The primary and secondary windings must be connected in series. After this, voltage is applied to the input, and an alternating voltage measuring device must be connected to the output.
The meter can manifest itself from different sides, it depends on the direction of connection.
The measuring apparatus can record the following:
- Show voltage.
- Do not record voltages in the circuit.
If the measuring device gives readings, this means that there are opposite terminals in the circuit. This connection was not made correctly, so the following phenomena can be observed here:
- The voltage value supplied to the input of the primary windings becomes less than half.
- On the secondary side the indicator becomes higher
Therefore, the meter will show the total voltage, which is equal to twice the input value.
Transformer terminals
If the measuring apparatus registers a zero value, this indicates that the voltages that come out of the secondary windings are equal, but have different signs. They compensate for each other. One pair of windings is precisely connected by terminals of the same name.
Therefore, with the correct connection, you need to focus on the voltmeter and its indicators.
Step-by-step instruction
First of all, for this we will need a minimum of tools and devices that, perhaps, any household has at their disposal, namely:
- a small angle grinder with a cutting wheel for metal;
- electric drill or screwdriver with drills;
- hammer and chisel;
- a set of plumbing tools in the form of pliers, various screwdrivers, etc.
So let's get started:
- Let's take it
power transformer from a microwave oven and dismantle the secondary winding, it will be larger in volume, the main thing is not to mix it up. To do this, it is best to cut the steel core along the edges at the welding site and knock out the unnecessary winding with a hammer and chisel. But you can also try to carefully cut off the protruding edges of this winding with a grinder or a hacksaw, and simply knock out the remaining parts of it in the steel core with a chisel.
Important! Under no circumstances damage the primary winding; it is the main element of the future welding transformer. It can not be removed from the core.
- We are making the secondary winding of our future welding transformer. To do this, we need a piece of insulated copper wire with a cross-section of approximately 50 mm2 or about 8-10 mm in diameter (visually a finger thick) and a length of 70-100 centimeters. The main condition when choosing such a wire is that it must be new and undamaged.
We wind this copper conductor onto the central magnetic core of the steel core of our transformer so that we get two or three full turns. Moreover, this must be done in such a way that the turns on the magnetic core are the middle of the copper conductor, and the remaining ends are approximately equal in length.
- We assemble a welding transformer. To do this, we install the disassembled parts of the steel magnetic circuit in place exactly as they stood, having previously lubricated the contact points with epoxy resin or other glue suitable for these purposes. We clamp the entire structure in a vice and wait for the glue to completely harden.
Of course, if possible, these parts of the magnetic circuit can be welded, but it is necessary to reliably protect the transformer windings from possible damage from molten metal or sparks.
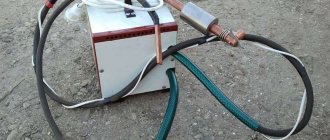
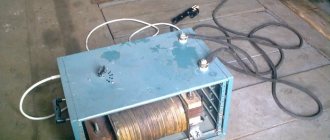
- We fix the manufactured welding transformer on the platform; it is best to take some insulated base in the form of a durable plastic plate, wooden board or thick plywood. Dimensions are approximately 150 mm in width and from 300 to 700 mm in length, which will further determine the depth of the workpiece to be welded.
The transformer itself should be covered with a protective box, in which it is necessary to make ventilation holes for natural cooling.
- Next, we make welding contacts. Moreover, one of them must be stationary and withstand heavy loads, so we make it from a durable bracket, which is rigidly fixed to the base of the transformer. Using a copper tip, we connect one of the ends of the secondary winding wire to this bracket.
Another
The contact must be made movable so that it can evenly close with the stationary one, but in a non-working state be normally open. To do this, we make the design of the second contact in the form of a lever, which we fix to the base and spring it with an elastic rubber band or a steel spring. We attach the welding contact bracket to the lever, to which we connect the second, remaining wire of the secondary winding of the welding transformer.
The easiest way to make welding contacts is from a copper rod 10-20 mm in diameter, making cone-shaped points at the ends. You can, of course, use rods specially designed for contact welding made of tungsten or based on beryllium bronze alloys with zirconium.
- Finally, we make the electrical part, that is, we connect the primary winding to a 220 V network. To do this, you can also use the power cord with a plug from our disassembled microwave oven, especially since it is no longer needed there.
To automate the welding process, it is necessary to make a switch.
The best option for these purposes is the so-called mic or push-type switch; it can also be taken from the microwave; it will be located in the door opening locking circuit. We place the microswitch on the break in the primary winding, that is, the 220 V network, and it is most convenient to position it by securing it to the movable contact lever.
Attention! All contacts and exposed parts of the 220 V electrical circuit of the welding machine manufactured by us must be carefully insulated using PVC electrical tape.
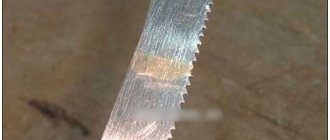
- That's it, spot welding from the microwave is ready. All you have to do first is practice to understand how the basic welding processes proceed for various metals, depending on the shape and thickness of the products. But after this, you can begin the practical use of your resistance welding machine for its intended purpose.
Electrodes
Installation of electrodes
When choosing electrodes, you need to pay attention to the diameter, which must correspond to the diameter of the wire, because the electrodes will be connected to this wire. To do this, you can use copper rods. If you are creating a low-power device, you can use soldering iron tips.
During operation, the electrodes wear out greatly. Therefore, they need to be sharpened regularly. Of course, over time they will need to be replaced.
So, the wire must be connected to the electrode; this is done using a copper tip. The tip is connected by soldering.
The combination of the tip and the electrode is carried out using a bolted connection. This connection must be reliable, because if the resistance in the area of unreliable contact increases, the device will lose its power. To avoid this problem, it is necessary to make a hole in the electrode and tip. These holes must have the same diameter.
It is better to choose copper bolts because they have minimal electrical resistance.
DIY spotter from the microwave
We described how to make one of the design options for resistance spot welding with your own hands.
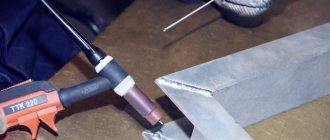
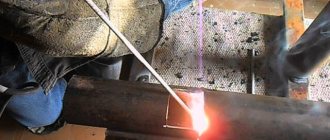
Although, with the same ease, other circuits can be made based on the same power transformer from a microwave, including a spotter for carrying out body welding work on a car. To do this, instead of stationary clamping contacts, we make elongated flexible contacts, using the same insulated copper wire with a cross-section of 50 mm in diameter, but no less than 2 meters long for each welding electrode. One of the contacts will be ground and is made in the form of a copper terminal with a large contact area. The second electrode will be directly welding and is made in the form of a metal rod with a strong stop, at the end of which a special pointed copper contact is made at the end for simple spot welding.
But to manufacture a real spotter that is not inferior to industrial designs, you will also need to carry out, at a minimum, an electrical control circuit and generate a welding pulse, and you will also have to spend a lot of money on various components and consumables for carrying out full-fledged body repair work.
If you have your own experience in the manufacture and use of homemade resistance spot welding machines, then share it in the comments block.
Housing mounting
Frame
The body can be made of wood. The back of the panel must be equipped with a switch and power cord. Holes must be made for these elements.
After this, sanding, priming and painting are carried out. After that - assembly. Then you will need 2 copper wires that need to be cut. The length of the wires should be two and a half centimeters. Copper wires are electrodes. Next, the switch is installed. Then the transformer is fixed to the tree. This fastening is made using ordinary self-tapping screws. To ensure safety and convenience, it is necessary to mount a microphone. This button is attached to the upper arm. Don't forget to insulate the connections.
It is quite easy to create a spot welding unit that includes a transformer from an old microwave oven. The main thing is to follow certain rules and nuances, and everything will work out.