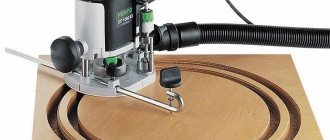
A hair dryer can be used for many different purposes, but one of its main purposes is to dry your hair. Hair dryers come in different designs and price ranges. It is clear that a good device cannot be cheap. And if it breaks, and even at the wrong time, this is a reason for disappointment. But don’t throw away your device and run to the store for a new device. Most problems can be fixed on your own. Any person can easily cope with this if he knows how to disassemble a hair dryer, its features, what breakdowns occur most often and how to fix them yourself.
Internal organization
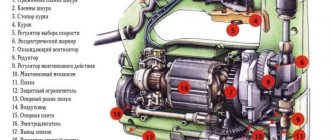
Before you start disassembling the device, it would be a good idea to find out what’s inside and what it generally consists of. In principle, this is a fairly simple device and there are not so many basic elements in it. Any hair dryer consists of:
- Electrical cord;
- Switch/mode switch;
- Motor;
- Impellers;
- Heating element;
Now you can clearly see that the device is designed quite simply. Self-repair is quite possible. Below we'll take a closer look at the main reasons why a hair dryer isn't working and what you can do to fix them.
For this simple job you need to prepare in advance:
- Multimeter;
- Screwdriver with replaceable bits;
- Electric soldering iron.
Manufacturers of hair styling devices
Rowenta
Popular ironing iron manufacturing company. The products are characterized by good value for money. Rowenta irons feature a safe ceramic coating and electronic control. Heating lasts 30 seconds and is controlled by 11 modes.
Philips
- The stylers are characterized by titanium coating and electronic control. Heating is very fast - within 10 seconds.
- Rectifiers stand out for their high power and ionization function. The temperature is controlled to the nearest degree. The package includes a special case in which you can place a hot device.
- Other models have a ceramic coating. They are cheaper, but heat up a little slower, in 30 seconds.
- The devices are equipped with an option to prevent excessive heating, which is activated at temperatures above 200°.
The brand also produces high-quality household appliances: washing vacuum cleaners, air purifiers and humidifiers, bread makers, multicookers, etc.
Vitek
The products have ceramic plates, but the control is mechanical, there are few temperature conditions, and they take a long time to warm up.
Braun
Ceramic coating, mechanical regulation at 5 temperature levels. Heats up within 40 seconds.
Irons have the additional ability to create waves. Among the nice features are floating plates, auto shutdown, and a long two-meter cable.
Babyliss
They separate consumer and professional product lines. Household appliances are manufactured with maximum power and minimum energy consumption.
- Hair dryers are distinguished by high performance, several temperature modes, and operating speed. The versatility of the devices is ensured by the presence of additional attachments.
- Most curling irons are equipped with a metal rod that contains a heating element. There is also a built-in strand attachment in the form of a clamp. The size and diameter affects the appearance of the curl.
- The professional line is equipped with ultra-modern engines that provide high performance. The weight is light and comfortable.
Bosch
- Travel hair dryers are characterized by their small size, quiet noise, and affordable price. The power is low and there are no attachments.
- The most popular hair dryers and stylers operate in two modes. They gently dry and style hair of all types. The maximum number of modes is 10.
- The ionization function will make the curls soft and smooth.
- Automatic rotation of the nozzles will bring ease of use.
Advertising from sponsors: // // //
How to disassemble a hair dryer
Now the tools are prepared, the desire to repair the device has not disappeared, but how to disassemble this device without damaging the fragile plastic?
But disassembling the case can be a problem, since the manufacturer is confident in the reliable operation of its device and is not at all concerned about quickly and safely disassembling its device.
The case can simply be held on by latches. And if you know where they are located, you can simply squeeze them out to open the patient.
The outer parts of the housing can also be connected using screws. But not ordinary ones, but non-standard ones, which can have several types of contact edges on the head:
- Plus.
- Star.
- Fork.
- Triangle.
There may be just one self-tapping screw, covered with a decorative sticker, and then both parts of the body are connected with latches.
You must be very careful and careful not to accidentally break off the latches. And it's very easy to do. It is enough not to notice the self-tapping screw or screw hidden under a sticker or decorative plug.
There are also hair dryers in which the handle rotates to several positions. This is where you need to be extremely careful and remember the order in which all elements are disassembled. Otherwise, reassembly may not be possible.
If all the screws are unscrewed and the latches are released, both halves of the device will be in your hands. Now you can begin to “treat the patient.”
Guarantee
What you need to know:
- You can get your money back for a low-quality product if you have your passport and receipt.
- Returns are limited to the warranty period.
- Most often, the guarantee is given from one to three years.
You have 14 days from the date of purchase to return a defective product that does not meet its specifications. An important condition is the absence of traces of use, the presence of factory seals, tags and labels. Exchange of goods occurs with the consent of the seller.
Electrical circuit of a hair dryer
The simplest model can simply dry your hair with hot air.
More complex specimens have three airflow options:
- warm;
- hot;
- cold.
There is also a “more/less” fan speed control.
The heating element in a simple version is a nichrome spiral thread.
If you look at the diagram:
It is clearly seen that after the current passes through the spiral, which has its own resistance, it loses its strength. Now he needs to get to the electric motor. But first it is straightened through a diode bridge and only then goes to the electric motor.
The motor is connected to the impeller. It is she who supplies outside air to the hair dryer body. Passing through a hot spiral, the supplied air warms up and exits this hair dryer through a nozzle.
The entire device is controlled by an external switch, which allows you to:
- Turn on/off the device.
- Adjust the air flow speed.
- Select heating or fan mode.
Modern models are equipped with protection that will not supply voltage to the heating element if the motor is not turned on.
There may also be a thermostat - it prevents the coil from overheating too much and will turn off the power supply in time.
If there is an electrical circuit for the device, we will repair your home hair dryer together, but in order to understand what is wrong, we will turn to possible malfunctions.
Final Tips
Repairing professional hair dryers is more complex. Design elements are often complemented by smooth controls and additional options such as the Care button. Spirals are made from special alloys that, when heated, create negative ions that have a beneficial effect on hair. The technique remains the same:
- cord;
- switches and buttons;
- dust removal;
- spirals;
- motor;
- visual inspection of capacitors and resistors.
Before repairing, it is advisable to get a schematic diagram.
Industrial models are not much different from household ones. But drying your hair is not recommended. Such products are distinguished by increased resistance to dust, shock, vibration, humidity, and other climatic factors. Home restoration of industrial hair dryers will not end well.
Electrical radio products used in household models are not suitable for use in harsh conditions. Requirements apply to wires, power cord, motor and coils.
Hairdryer
- an electrical device that produces a directed flow of heated air.
The most important feature of a hair dryer is the ability to deliver heat precisely to a given area. The origin of the word "hairdryer" is associated with the German brand Fön
, registered in 1908 by the electrical equipment manufacturer AEG, and referring to the warm Alpine wind föhn [1].
Possible faults
Despite its apparent simplicity, the hair dryer has some things to break:
- The power cord may have an internal break or short.
- The thermal fuse has failed.
- The resistor has burnt out.
- A breakdown of the diode bridge has occurred.
- The capacitor has burnt out.
- The mode switch itself is broken.
- The cold air switch is broken.
- The motor shaft is jammed due to hair being wrapped around it.
- The motor shaft bearing is jammed.
- The engine itself burned out.
- Broken nichrome spiral.
- Closing the heating coil.
- Carbon deposits on a spiral.
- The fan blade broke off.
This is the entire list of possible faults.
We will focus only on typical breakdowns that we can fix ourselves.
Characteristic signs of a faulty device:
- The device does not turn on;
- The device turns on, but the fan does not spin or gain speed;
- When running, the engine sparks and smells burnt;
- The hairdryer only blows cold air.
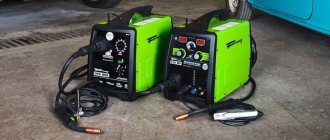
Electrode sticking (arc interruption)
The cause of electrode sticking and arc interruption may be a decrease in voltage due to a short circuit in the transformer windings, faulty diodes or loose connecting contacts. A breakdown of the capacitor filter or short circuit of individual parts to the body of the welding machine is also possible.
Organizational reasons due to which the machine does not weld as it should include the excessive length of welding wires (more than 30 meters).
If sticking is accompanied by a strong hum from the transformer, this also indicates an overload in the load circuits of the device or a short circuit in the welding wires.
One of the repair options to eliminate these effects could be restoring the insulation of connecting cables, as well as tightening loose contacts and terminal blocks.
We begin inspection and repairs
As we have already said, it is quite possible to disassemble the device yourself if you are extremely careful and follow the procedure.
Device repair is also subject to its own logic, which we will discuss below.
Cord
If the hair dryer does not turn on, the most logical first step is to check if there is current in this outlet?
If everything is in order with the outlet, proceed to checking the power cord. Kinks and twists are common causes of power cord failure. When the hair dryer is disassembled, the contact points of the wire to the mode switches are also carefully inspected. To carry out this procedure you will need a tester.
If the wire is damaged, there is no point in repairing it. It is necessary to replace the entire wire and plug.
Attention! The most common place for a wire to break is at the entrance to the hair dryer body.
After such a technical inspection, we connect the device to the network and check the result of the work performed.
Switch and switch
We also check the power button itself. It should turn on smoothly and without jamming. There should be no traces of carbon deposits or melting on the switch contacts.
The three-position switch will be checked by turning on each mode separately. Before checking the switch, it is worth marking all the wires so as not to confuse the reverse connection locations.
Clean damaged areas with fine sandpaper and resolder with a soldering iron.
If the switch itself fails, the best option is to replace it with a new one. But if it is not possible to find a new switch, another option is to bypass it and connect the power wire bypassing the broken switch. Since there will no longer be a power button, the device will turn on immediately after connecting the device to the outlet.
Fan
The fan is responsible for generating air flow. On the back side of the case there are special openings for air intake. The fan impeller is made of lightweight but durable plastic and rotates on a metal rod. This metal axis, on one side, is a continuation of the electric motor, and on the other hand, it rests on a special hole in the device body, which acts as a support sleeve. It is the impeller that takes in outside air through the holes in the hair dryer body and drives this flow towards the nozzle.
The most likely cause of reduced fan performance:
- clogged holes in the housing;
- hair is wrapped around the impeller shaft;
- One of the impeller blades broke off.
There are two options for solving the problem of a clogged air duct:
- If the device is equipped with a replaceable filter, you need to remove it and try to clean it thoroughly.
- If dust and debris have accumulated in the air intake cracks, everything can be successfully removed with a toothbrush.
If hair is wound around the fan shaft, it is better to remove the impeller and carefully remove the obstacle so that it rotates freely.
Attention! When cleaning the fan shaft, do not use excessive force to avoid damaging the shaft or impeller.
Spirals
Let us repeat once again, the material from which this heating element is made is nichrome. As soon as current is supplied to the nichrome spiral, it begins to heat up and makes the air passing through it hot. In normal mode, the hot air temperature is between 50–60 °C.
More advanced models have several such spirals that provide different air heating modes.
Typical manifestations of heating element failure:
- There may be a burning smell when the device is running;
- The air coming out of the nozzle is either too hot or completely cold.
These signs indicate that the heating element is faulty. All these breakdowns can be eliminated if the hair dryer is carefully disassembled, inspected and tried to detect the source of the malfunction.
If, after the device has been disassembled, you need to carefully inspect the heating element for integrity.
If burnt areas of the thread are found, it can either be soldered or two opposite ends twisted. Alternatively, crimp both ends of the spiral with a thin copper tube.
But we must warn you that, based on the experience of using nichrome spirals, such repairs can extend the life of the hair dryer, but not for long.
If possible, it is best to replace the burnt out spiral with a new one.
Important! You need to understand why the part failed in order to eliminate the cause of this problem in the future.
Engine
Electric motors on hair dryers can be in different versions - 12, 24, 36 volts.
A special additional electronic circuit reduces the voltage of 220 V. Thus, the level of danger of electric shock is reduced.
If the engine stops working, there are two main reasons for this malfunction:
- The supply wire is broken;
- The electric motor itself has failed.
We have already written above how to repair the supply cable with a plug, and the following symptoms indicate a malfunction of the electric motor:
- After turning on the engine, you can hear a slight crackling sound;
- The motor is unstable;
- There is a smell of burnt wiring;
- The fan does not rotate and a slight hum is heard.
If you suspect that the electric motor has burned out, the chances of repairing it yourself are zero. You can try to disassemble the motor, but where will you find the necessary part later?
Give it to a workshop? This is also not an option - repairing the device may turn out to be unprofitable. It’s easier and more profitable to buy a new hair dryer.
Chip
In professional hair dryers, operating modes are controlled using microcircuits. Everything is a little more complicated here. If you have skills in working with electrical circuits, you can try to find the cause of the problem yourself and fix it:
- The getinax substrate may crack and break the contact track. If a gap is found, it can be repaired using a soldering iron.
- A characteristic swelling can be seen on a faulty capacitor. When burned out, the resistor may darken. If a burnt part is detected, the fault is eliminated by replacing it with a new one.
Thermostat
This part protects the entire device from overheating.
If there is a thermal fuse, it can also cause poor operation of the coil. Its performance can also be checked with a multimeter. If it shows an open circuit, the fuse must be replaced - it cannot be repaired.
But there is an option to repair the device by excluding the temperature sensor from the general circuit, bypassing the wires past it. The device can be used for some time if it is not overloaded.
Types of hair styling devices
Hairdryer
Designed to dry hair and add volume. The hair dryer is equipped with attachments, combs, and brushes to create different effects. Styling is done with hot, warm or cold air.
The principle of operation is simple - the strand rises up and is blown with a hairdryer. Speed and temperature are controlled using mechanical or manual controls.
Types of hair dryers:
- tourist (small folding device);
- hair dryer brush;
- hair dryer
Curling iron
There are several types of curling irons:
- Hairdryer substitute. The package includes a special comb-brush that gives the hairstyle its shape. This product performs two additional tasks - styling and drying.
- Curling product. A traditional device for making curls.
- Rectifier. These curling irons are equipped with a corrugated plate to create beautiful patterns.
Styler
Professional and household hair straightening devices. In a good product, the temperature is controlled, and the coating consists of ceramics or tourmaline.
Thanks to this composition, the iron glides through the curls without harming them. Many devices are equipped with an ionization function.
Electric curlers
Electric curlers help you create beautiful curls in a short time. Their action is reminiscent of hot rollers, but much more convenient and simpler: you take them out of the box, twist the strands, and snap the curlers. An excellent option is ionic conditioning.
Additional functions
- Turbo mode. Guarantees the fastest possible drying of wet hair. The temperature does not increase; the effect is achieved by increasing the speed of air movement. But do not forget that turbo mode puts excessive load on the device.
Therefore, it is better to check the operating time for safe operation of the device.
- Automatic rotation of the brush. This option will ensure automatic rotation of the nozzle. Advantages of use: there is no need to unfold the device; you just need to turn the nozzle.
Be careful when drying long strands so they don't get tangled as you turn the nozzle.
- Cold air. Hair is dried without harmful high-temperature treatment, in an almost natural way. True, the process does not happen as quickly as with hot styling.
The combination of warm and cold air creates spectacular hairstyles.
- Steam humidifier. Some products are equipped with a special container with liquid - a hot steam supply device. Plain water or styling product is used as a filler.
Steam facilitates the hairstyle process, making hair manageable. But do not forget that high temperature has a negative effect on hair. Therefore, it is not recommended to use this function too often.
- Ionization. This function maintains shine, makes hair manageable and silky, and reduces electricity. The hairstyle remains attractive and neat for a long time.
Hair styling attachments
- Hub. A straightening attachment is included with every hair dryer. It looks like a cylinder, flattened towards the end. The inside is hollow. Using this nozzle, the air is directed in the desired direction.
- Diffuser. A nozzle with “fingers” that disperses the air flow. It is intended for sensitive hair as it limits damage.
Reduces damage from hot air, allows you to lift your hair while drying. Some diffusers are designed in such a way that they massage the head.
- Corrugated . Nozzle for creating zigzag curls. A small strand is placed in two plates, clamped, and held for some time. The effect is created due to the corrugated surface; the width of the plate can be any.
Corrugated attachments are selected according to hair types. This technique is used for thin, liquid curls.
Heating element coating
The outer coating of tongs, stylers, curling irons, and electric curlers is processed with various materials.
- Steel. Chrome plating is the most common due to its low cost. It heats up quickly and cools down for a long time, thanks to which the hairstyle is created in a short time. With constant use, the hair structure is damaged.
Use with caution; frequent use is not recommended.
- Aluminum. This material has good heat distribution and a long service life.
- Titanium. A metal heater has technical properties similar to aluminum, but differs in appearance. The coating heats up and cools down quickly. The device is safe.
The hairstyle is permanent. The material is expensive, so most often manufacturers combine it with ceramics.
- Ceramics. The advantage of this material is considered to be uniform thermal conductivity compared to metal. This is a natural substance, environmentally friendly. Heats up slowly without releasing harmful elements.
This coating is gentle on hair, causing minimal damage.
- Tourmaline. This type of plate is found in professional devices. The heating rate is the highest. The coating contains crystals. They produce negative ions that maintain the hair's moisture balance.
Power
There is an opinion that the more powerful the device, the better. But that's not true. The power is selected according to the purpose of the hair dryer. For domestic use, 1200 - 1600 Watts are sufficient, and for professionals, models with a power of 2100 Watts or more are suitable.
The power setting depends on the hair structure. A 1000 Watt device can easily handle short hair, but for long and thick hair, products from 1600 Watt are better suited.
For irons, curling irons, curling irons, the heating intensity of the clamps or plates is determined. The power of electric curlers starts from 35 Watts (household) and ends with 400 Watts (professional).
Little tricks
There are standard requirements for the safe operation of an electric hair dryer, which can push the boundaries of trouble-free operation of the device, without contacting service centers:
- There is no need to wrap the electrical wire around the handle of the device and generally try to avoid twists and loops on the wire;
- Use only those attachments that were supplied with the device;
- Do not use the device in rooms with high humidity to prevent water from entering the hair dryer body;
- If the distance to the outlet is too large, only factory extension cords can be used;
- It would be a good idea to protect the air intake area with a fine-mesh filter to prevent dust particles and hair from getting inside the device;
- Do not carry the hair dryer, holding it suspended by holding it with your hand by the cord;
- If even minor interruptions occur, further operation of the device is prohibited;
- Avoid excessive overheating of the product;
- After work, you need to let the device cool down and only then put it away for storage;
- The electric hair dryer must be stored in a dry and ventilated area;
- Follow basic safety rules when repairing electrical appliances;
- Repairing a hair dryer requires electrical skills. If they are not there, it is better to entrust the work to professionals in specialized workshops.
Let us repeat once again - independent repairs are possible if all work is carried out especially carefully. This is always true for electrical appliances.
Overheat protection system
The hair dryer circuit was created with the aim of organizing quick drying. To do this, some models can produce temperatures up to 60 degrees. The device is equipped with a switch. It helps regulate speed and heat. However, all internal parts must be reliably protected from overheating. If an emergency occurs, the power supply must be completely stopped. Thanks to this, it will be possible to avoid an emergency situation that could completely destroy the contents.
Important! The hair dryer was named after the warm mountain air, which with its gusts dried out all the adjacent lowland areas. However, among locals it is better known as föhn.
Additionally, you should find out what the device is made of and what is included in its composition to increase sensitivity:
- The thermostat allows you to organize contact between two plates that are made of metal. Each element must have a different degree of expansion. Thanks to this, it will be possible to fix the critical temperature and turn off the current supply. The engine stops working, and at this time the spare parts cool down and do not deteriorate further.
- The hair dryer also includes a special thermal fuse. With its help, it is possible to avoid overheating in all cases. It only takes a few seconds for the mechanism to operate. The element is fusible, so it quickly turns off the electricity supply. However, in some models, after a critical situation, further work becomes possible only after replacing the spare part.
The electric hair dryer has a simple system. There are only two main components that power the technology. If necessary, each person will be able to understand the operating features. Repairing a hair dryer with your own hands is carried out only if you have some experience in this field.
You should first read the instructions, which are guaranteed to be included in the kit. It contains complete information about the circuit used by the manufacturer. Each product has a number of features that should not be ignored.
Disassembly
Before starting repairs, you need to know how to disassemble a Parlux, Saturn, Moser or Jaguar hair dryer yourself. There is nothing complicated about this, you just need instructions and a screwdriver:
- There are two bolts on the back side of the body. They need to be unscrewed and carefully removed. In some cases, there are more of them, make sure that all fasteners are removed;
- At the same time, you can also remove the cover from the top panel - there is a fan under it. Most often it is simply pressed against the body, so it comes out without problems if you pry it off with a screwdriver;
- Under the top panel of the case there is a mode switch and a cold air button. There are several wires installed on the panel. Which are connected to the contacts of the circuit. For further disassembly they will need to be removed;
- Now you can remove the coil from the hair dryer head. You need to act carefully, otherwise it may break; remove it only after you are sure that all fasteners have been removed;
- Under the spiral, accordingly, there is a motor. Most often there is no need to take it out, since almost all faults will be noticeable immediately at the point where the motor is connected to the contacts of the heating element. The exception is the need to replace a part, then a major repair is carried out.
Principle of operation
All hair dryers, regardless of the brand and type of case, have the same operating principle - an electric motor drives a fan, which drives air through heating coils. Typically, hair dryers have a heating level switch, providing different thermal modes - the switch switches the sequential connection of the required number of coils - the fewer of them in the circuit - the greater the current flow - the greater the heating. Hair dryers are also equipped with thermal protection that turns off the device if the permissible temperature of the coil is exceeded. If such protection works, be sure to unplug the hair dryer from the network, because when the temperature drops, the thermostat will restore the electrical circuit and the hair dryer will work.