The meat grinder has become an integral part of our lives. You can use it to prepare minced meat or puree. First, manual ones appeared, then electric ones; both types are equally used for chopping meat, vegetables, fruits and crackers. There is only one function - to chop, but when preparing for work, sometimes the question arises: how to insert the knife correctly? Without this, the meat grinder will not work correctly.
In today's material we will take a detailed look at how to assemble and disassemble a manual and electric model. The main emphasis will be on how and where to install the knives in the meat grinder. Such instructions should help you master the equipment and use it without any problems to prepare minced meat, puree and other dishes.
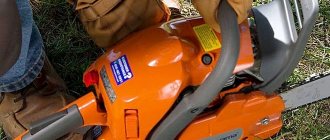
Typical manual meat grinder
How to insert a knife into a meat grinder correctly? Assembly procedure for the meat grinder
- February 11, 2020
- Tools and equipment
- Timofey Bogomolov
It is rare that a housewife or owner does not keep equipment in the kitchen that significantly reduces the time for the cooking process. Among the many devices, the most ancient is the meat grinder. During its existence, this utensil has undergone many improvements, but the principle of its operation has remained unchanged. However, you should know how to correctly insert a knife and other elements into the meat grinder so that it does not lose its functionality.
How to properly insert a knife into a manual meat grinder
Despite the different principles of operation of a meat grinder, it is necessary to carefully study the assembly instructions for any device, since the efficiency of its operation depends on the correct composition. It is especially important to know how the knife should stand in the meat grinder. This is the most important element of any type of device.
The mechanical importance of the assembly is no less than the electrical one. The quality of the prepared dish will depend on how you insert a knife into a manual meat grinder. And also the durability of the device. To sequentially assemble the parts of a manual meat grinder, you need to know what it consists of:
- The main body of the meat grinder into which all parts are attached. Often it is made of cast iron, but there are also examples made of aluminum.
- Spiral shaft for scrolling contents. It is also known by another name - auger.
- Cross knife.
- Grid plate - for adjusting the degree of grinding of meat and other products in the device.
- Fixer of all parts.
- The handle that sets the meat grinder in motion.
To assemble a manual meat grinder, you must first insert the auger into the device body. Then put a knife on top of it. Particular attention should be paid to which side to insert the knife into the meat grinder - this is very important. If the tip of the part is sharpened only on one side, then the sharp part is installed on the shaft side for a softer movement when grinding. If the knife is double-edged, then it doesn't matter which side you put it on.
After installing the cutting part according to the grooves, the grille is installed and the structure is secured with a union nut. It is very important to install the grid as tightly as possible to the cutting part.
The last thing to attach is the moving handle.
Step-by-step assembly algorithm
How to assemble a mechanical meat grinder? To do everything correctly, you need to follow the operating instructions that come with each product. If it is missing, then we will tell you a step-by-step assembly method.
- The main shaft or auger must be inserted into the housing, with the handle attachment point coming out from the opposite side, and the remaining parts are installed at the thinner end.
- Installing the knife is the most important task; one side of it is flat and polished to a shine, so this part must face the grate in order to slide along it while working. Many users are confused about which side the cutting tool should be placed on - as a result, the device is assembled incorrectly.
- When installing the disk version, the cutting edge also always faces the grille. It is this moment that is of great importance - it all depends on how to install the knife correctly so that the meat grinder chops the food and does not crush it.
- Now it’s time to install the grille correctly - it has a special groove that must be inserted into the protrusion on the main body. The grid should fit snugly against the cutting tool.
- The final step is to tighten the clamping device, which securely fixes all the parts inside the case.
- Now you can install and secure the handle to rotate the mechanism. The meat grinder is assembled - you can attach it to the edge of the table and prepare minced meat.
We described in detail how to correctly assemble a manual meat grinder yourself; the main task is to correctly install the knife and grid, otherwise the product will not work. How to properly position the product for work is shown in the photo below.
How to insert a knife into an electric meat grinder
Despite the striking difference between an electric meat grinder and its mechanical counterpart, careful assembly is also important for the correct operation of the device.
To start working with an electric meat grinder you need to:
- Insert the auger into the housing until it stops and make several rotational movements counterclockwise. The correctness of the actions will be confirmed by a characteristic click.
- As in the previous case, a knife is placed on the shaft, taking into account the same nuances.
- The grid is secured with a nut, and the mechanism is ready for operation.
Depending on the manufacturer, the assembly of each type of electric meat grinder may be complicated by some parts. Therefore, to find out how to correctly insert a knife into a specific type of meat grinder, you need to refer to the instructions for this equipment.
Connection to the network is possible only after the device has been completely assembled and all its parts have been securely fastened.
Electric meat grinder design
The body of electric meat grinders is most often made of plastic, in contrast to manual devices, which consist entirely of metal parts. In electrical appliances, only those parts that directly grind products (knives, grates) are made of metal, as well as other loaded elements that work to transmit force (auger, fixing and connecting elements). The main working part of the meat grinder is the engine built into the main body. When turned on, it rotates the auger, pushes the food towards the knives, and rotates the knife. In general, it does all the work.
The electric meat grinder does not have a handle through which the user drives the auger; it is not necessary. But the devices often have a removable tray for serving food, which can be removed when not in use to save space.
The electric meat grinder always comes with a food pusher. You should definitely use it to move the meat towards the auger, this will avoid injury. The auger itself ends in a plastic fastening element, thanks to which the rotating element is fixed inside the housing. In new models of electric meat grinders, the knife has a complex relief, thanks to which the minced meat is of higher quality.
Read more about the design of a meat grinder in this article.
Auxiliary spare parts for meat grinder
Modern models of meat grinders are equipped with additional elements that allow them to work not only with meat, but also with other products.
Now you can make juice using a meat grinder; for this you need to use a special auger.
The inventors did not stop there, and with the help of special grids it is now possible to regulate the saturation of freshly squeezed juices with pulp.
Salad in five minutes is no longer a fantasy: knives and shredding attachments will allow housewives to save time on cooking.
Using a meat grinder you can prepare homemade sausage or cookies.
What does a meat grinder consist of and what is the purpose of the parts?
What does a classic hand-held device consist of:
- Building: A. Meat receiving area; B. Fastening clamp;
- Lever;
- Auger with left-hand thread;
- Bearing bushing;
- Cutting knife with 4 blades;
- Lattice;
- Union nut;
- Eye bolt for attaching the handle
Meat grinder disassembled
The device can also be supplied with additional grates with different hole diameters, knives, attachments for making sausages, frankfurters and freshly squeezed juice.
The attachments must be sharpened regularly and should not be used for cutting too hard or stringy semi-finished meat products.
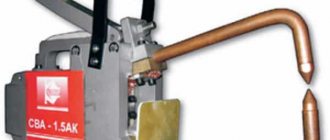
The screw shaft is an important and basic part. It has the appearance of a spiral, which during operation grinds excess meat, moving it towards the nozzles with knives. It is this mechanism that requires the use of durable metal.
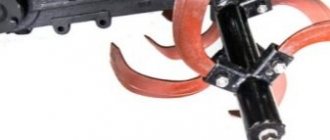
Screw shaft - conductor of products inside the device
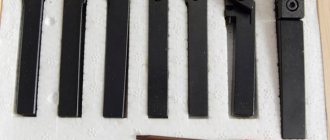
Knife and special cutting attachments. They do all the work of grinding, cutting and crushing meat or any other products. It is made mainly from stainless materials. It is necessary to sharpen knives for better and high-quality work, even though the steel is sharpened on the grate during rotation.
The knife must be installed correctly, otherwise the device may jam
The structure of the knife and its shape affect the grinding of the product. For example, if a knife has a curved blade, it means that it will easily chop the veins and fibers of meat, while preventing the auger shaft from clogging.
The grid has three types of hole diameters:
- Very large - 12 mm. Grille with three or four holes. Used for stuffing sausages. Not always included.
- Large holes - 8 mm. This rack is ideal for preparing sausage mince.
- The middle holes are 4-4.5 mm. Universal grid. Suitable for preparing minced meat for cutlets. Included.
- Small holes - 3 mm. Pate lattice. It is ideal for making pate or puree.
Using these grates you can get coarse or finely ground minced meat. It all depends on your preferences
The nut (fixing ring) clamps and secures the grid, knife and auger shaft. Sometimes it can be difficult to unscrew it after finishing work. But this problem can easily be solved with the help of ordinary cloth thrown over the nut. So, the hand does not slip, and the part can be easily unscrewed.
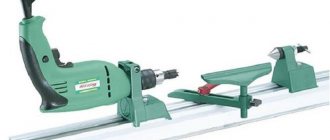
A manual cast iron or aluminum meat grinder, especially from Soviet times, is attached to the work surface using a threaded device (foot). And therefore, in order to prevent the device from moving on the table, you need to place something under the metal base. This can be a newspaper folded several times. In modern models, the mounting base is plastic or rubber, and therefore the device is attached to the table much more securely.
Installing the meat grinder on the surface
If there are no difficulties in terms of installation with an electric meat grinder, then its mechanical “brother” is more demanding in this matter. For fixation, this type has a special grip with a screw holder in the tail section. For a stable position, place the device on a paw at the edge of the table and tighten the holder until it stops.
If the surface is smooth and the meat grinder holder is not rubberized, then you should use a piece of textile or rubber as a gasket so that the device does not move during cooking.
Subtleties of work
A meat grinder is a fairly unpretentious household appliance, however, it must be handled correctly so that it lasts as long as possible.
If you follow a number of rules, a meat grinder in the kitchen will always be in order:
- You need to put cut-up products into the device. Especially meat: you need to cut portions and remove unnecessary parts (bones, cartilage and veins).
- Knife sharpening should be done in a timely manner.
- To facilitate the operation of the meat grinder, it is a good idea to lubricate its parts with sunflower oil.
- Do not leave the device unwashed for a long time. Metal parts may rust if grinding or moisture remains inside. Therefore, immediately after cooking, the device is disassembled, and each part is thoroughly washed and dried.
- The meat grinder is stored in strictly disassembled form.
Device Features
Today the market offers two options for devices for rolling meat:
- electric meat grinders;
- manual models.
The general design of such a device is quite simple, and its main function is the processing of meat products to a homogeneous soft mass.
Electrical and mechanical devices are found in every kitchen.
The principle of operation of a mechanical meat grinder and differences from the electric model
The diagram of a manually driven device is clear even to a child
Before you figure out the differences between an electric and manual meat grinder and how to properly assemble the meat grinder immediately before use, you should first pay attention to some points
It is important to understand the operating principle and have an idea of the appearance of the parts, and only then will it not be difficult to assemble an electric meat grinder or its manual equivalent
It is important to understand the operating principle and have an idea of the appearance of the parts, and only then will it not be difficult to assemble an electric meat grinder or its manual equivalent. What does a manual meat grinder consist of:
What does a manual meat grinder consist of:
| Image | Manual meat grinder parts |
| Metal body Usually this is a whole cast container with a meat receiver in the form of a wide tube extending upward. | |
| Spiral Shaft This screw shaft serves as a pushing device to feed the meat to the chopping knives. | |
| Knife Can be in the form of a cross-shaped or disk-shaped part with sharp edges and a hole in the middle. | |
| Disc-shaped grille with holes. Some meat grinders may have several such grates, and the diameter of the holes in them allows you to adjust the degree of minced meat grinding. | |
| Clamping cover in the form of a wide nut It allows you to tightly press the shaft, insert knife and grid, avoiding play. | |
| Pen It is put on the part of the auger shaft protruding from the housing and secured with a special clamp. It is the movement of the handle that ensures the rotation of the spiral inside the body and this is how the meat is minced. | |
| Clamp It allows you to secure the device to the work surface. |
The main difference between an electric device and a manual one is how the screw shaft is driven. Unlike its mechanical counterpart, an electric meat grinder has a special electric motor installed, which rotates the shaft. It is enough to turn on the device and press the button, placing meat in the receiver in a timely manner.
The manual unit is attached to the working surface using a special clamp
Step-by-step assembly of a hand-held device
Assembling a manual meat grinder may seem complicated, but after the first time this procedure will take a matter of seconds and seem elementary.
How to properly and quickly assemble a manual meat grinder? The table describes each action in detail, and the photos attached to each step will allow you to clearly navigate and perform all the steps correctly:
| Image | Instructions |
| Step 1 The spiral (screw shaft) is installed inside the housing so that it is completely inside. The shaft part for attaching the handle should easily fit into the special hole in the housing. | |
| Step 2 Now it's time to install the knife and grill. The blades should be installed on the shaft so that the flat surface of the knife faces the grate. This will be the answer to the question of how to properly place a knife in a meat grinder. | |
| Step 3 When the blade has taken its rightful place, the grate is placed nearby. All that remains is to secure the mechanism with a screw-on cap in the form of a large nut. | |
| Step 4 The handle is attached and screwed on the opposite side of the meat grinder. | |
| Step 5 There is nothing complicated about the question of how to install a meat grinder on a work surface. It is enough to secure the unit on a flat and durable table using a special screw. By making rotating movements of the screw, we set in motion the clamp, which firmly fixes the meat grinder. |
How to properly disassemble and clean a meat grinder
When handling this household appliance, it is important not only to know how to insert a knife into the meat grinder correctly, but also how to put it in order after use.
In order to clean it, you first need to disassemble it. It is strictly not recommended to wash the device when assembled, since residues in hard-to-reach places contribute to the development of fungus, mold and rust. The meat grinder is disassembled in the reverse order of assembly, that is:
- the union nut is removed;
- the grate and knife are removed;
- the rotating handle is disconnected and the auger is removed.
Each part is washed with running water. Fatty particles can be washed off using special detergents. Remains of minced meat stuck in the grill can be removed with a toothpick or a match.
In some sources you can find useful tips on how and with what you can clean a meat grinder. For example, some users clean the device with refined sugar, claiming that its crystals absorb previous products. However, in reality this method is ineffective and expensive.
All parts, after being washed, must be dried. They can be wiped with a kitchen towel and left disassembled for final drying.
Disassembly and cleaning
How to disassemble a meat grinder is a question of interest to those who managed to assemble it. Most people prefer to store it unassembled. It is convenient and does not require much space. But, in order to avoid metal corrosion and damage to parts, the unit must be disassembled and cleaned after use.
Correct step-by-step instructions for disassembling a meat grinder:
- if there is a removable meat receiver, it should be removed from the neck;
- then the clamping nut is unscrewed. This is done by rotating counterclockwise. If it slips, wipe it or cover it with a dry cloth;
- the knife and lattice attachment are removed from the shaft;
- The final step is to remove the shaft. This can be done by unscrewing the nut holding the handle. After removing the latter, the auger shaft can be removed without much difficulty.
All disassembled components of the mechanism are thoroughly wiped and cleaned of food residues. To remove them better, it is recommended to use a meat grinder. Washing is carried out using washing liquid or a solution of regular soda. Each part is dried on a towel or paper napkin, and then put away in its place of permanent storage.
The manual version of the kitchen aid is best kept disassembled. If necessary, it can be quickly assembled. For better sliding of all parts of the mechanism and better grinding, it is recommended to lubricate each component before work. This will allow the units to operate at full capacity and eliminate wear and tear on the device.
Electric or mechanical meat grinders have simplified the life of housewives at all times. It is impossible to replace all its functions using similar modes of other devices. If you follow all the instructions and rules described above, you will be able to increase the service life of your equipment and save on it. Any device requires careful handling, and a meat grinder even more so.
A manual meat grinder is a necessary tool in the kitchen, because, unlike an electric one, it will never stop working due to power outages
Most modern hand-held devices are made of high-quality and reliable material to last for centuries. There are also modern meat grinders made of durable plastic. Such a meat grinder, of course, is easier to break than a cast iron one. Therefore, you should handle it more carefully.
Manual cast iron meat grinder
A cast iron meat grinder is a faithful assistant in the kitchen. It will serve for a very long time. And to break it, you need to try very hard. This is her advantage. The disadvantage of a cast iron meat grinder is that it is very heavy compared to other devices.
The cast iron meat grinder is very heavy, but it works flawlessly
Meat grinders made of aluminum alloys and plastic models
A meat grinder made of aluminum alloys is much lighter than a cast iron one. And during operation it will serve faithfully for a very long time. There is only one drawback of such a device - sometimes your hands get very tired from grinding large amounts of meat or other products.
Plastic models of meat grinders are made from high-quality and very durable materials. But, nevertheless, this model is not as durable as a cast iron meat grinder, and its parts can quickly fail
Therefore, it is important to use the meat grinder carefully